
Abstract
Adenoviral vectors have proven to be valuable resources in the development of novel therapies aimed at targeting pathological conditions of the central nervous system, including Alzheimer’s disease and neoplastic brain lesions. Not only can some genetically engineered adenoviral vectors achieve remarkably efficient and specific gene delivery to target cells, but they also may act as anticancer agents by selectively replicating within cancer cells.
Due to the great interest in using adenoviral vectors for various purposes, the need for a comprehensive protocol for viral vector production is especially apparent. Here, we describe the process of generating an adenoviral vector in its entirety, including the more complex process of adenoviral fiber modification to restrict viral tropism in order to achieve more efficient and specific gene delivery.
Access provided by CONRICYT – Journals CONACYT. Download protocol PDF
Key words
- Adenovirus
- Viral vector production
- Adenoviral gene therapy
- Adenovirus fiber modification
- Adenovirus tropism
1 Introduction
Adenoviral vector production is the process by which replication-defective viral vectors or replication-competent viruses are generated and amplified for use in laboratory experimentation [1, 2]. In general, the incorporation of a specific gene of interest into the viral vector is made possible through means of homologous recombination [3]. The common generation of a recombinant adenoviral vector is done by introducing a gene of interest into the E1 region of an adenoviral vector backbone. With that as a model, we hereby provide a detailed protocol describing how to construct and use a shuttle vector carrying a gene of interest to generate desired adenoviral vectors, with or without viral fiber modification, through homologous recombination with BJ5183 cells. The processes of rescuing and up-scaling a virus including culturing of virus producing cells as well as viral purification are also described in detail.
2 Materials
Each solution must be prepared within a sterile hood except for the bacterial culture materials. Cell-involved materials must be stored in 4 °C and bacterial culture related materials can be stored at room temperature except for antibiotics, which should be stored at −20 °C.
2.1 Human Embryonic Kidney 293 Cell Line Culture
-
1.
Cell growth media: 5 mL of 100× stock of penicillin sodium (100 units/mL) and streptomycin (100 μg/mL), 5 mL of 100× stock of glutamine (200 mM, light sensitive), and 50 mL of fetal bovine serum (FBS) added to Dulbecco’s modified Eagle’s medium (DMEM, 500 mL).
-
2.
Virus infection media: 10 mL of FBS, 5 mL of penicillin/streptomycin stock, and 5 mL of glutamine added to 500 mL of DMEM.
-
3.
Cell-freezing media: 10 % Dimethyl sulfoxide (DMSO) in FBS.
-
4.
Cell-detaching reagent: 1.5 mL (T75 flask) or 4 mL (T175 flask) of 0.25 % Trypsin-EDTA solution.
2.2 Bacterial Culture and Cloning
-
1.
Luria-Bertani (LB) Broth.
-
2.
LB Agar.
-
3.
50 mg/mL (1000×) Kanamycin sulfate.
-
4.
50 mg/mL (1000×) Ampicillin, sodium salt.
2.3 Cell Transfection
-
1.
Attractine (Qiagen, Germantown, MD, USA).
-
2.
Opti-MEM® (Life Technologies, Grand Island, NY, USA).
2.4 Virus Purification
-
1.
5 mM HEPES buffer, pH 7.8: Dilute 2.5 mL of 1 M HEPES (see Note 1 ) buffer pH 7.8 in 497.5 mL of water.
-
2.
1.33 g/mL CsCl: 113.550 mg CsCl in 250 mL of 5 mM HEPES buffer.
-
3.
1.45 g/mL CsCl: 152.250 mg CsCl in 250 mL of 5 mM HEPES buffer.
-
4.
21.5-gauge needles.
-
5.
5 mL syringes.
-
6.
Beckman SW41 rotor with buckets, or equivalent.
-
7.
13.2 mL Beckman SW41 ultraclear tubes or equivalent.
2.5 Dialysis
-
1.
Slide-A-Lyzer 10 K dialysis cassette (Thermo Scientific, Waltham, MA, USA).
-
2.
Float buoys (Thermo Scientific, Waltham, MA, USA).
-
3.
Dialysis buffer: 10 % glycerol in 1× phosphate-buffered saline (PBS).
-
4.
1 L beaker.
-
5.
Magnetic stir bar.
-
6.
Stir plate.
2.6 Virus Titration
-
1.
Virus lysis buffer: 1 % SDS in 1× PBS.
3 Methods
3.1 Cell Culture of HEK 293 Cell Line
-
1.
In order to generate an adenoviral vector, a stable human embryonic kidney (HEK) 293 cell line culture is needed for transfection purposes. When passaging each serial HEK 293 cell line culture, a determined quantity of cells for a given flask size is needed as noted in Table 1.
Table 1 Approximate cell numbers and amount of media in different flasks -
2.
At confluency, the passaged cells should have the documented quantity as listed. The number of cells may be quantified through a trypan blue exclusion method using a hemocytometer.
3.2 Propagating the Initial Culture from a Frozen Stock
-
1.
A cryotube of stock HEK 293 cells is noted to contain approximately 2.0–3.0 × 10⁶ cells [4–6] (see Notes 2 and 3 ).
-
2.
Add 14 mL of growth media to a T75 flask.
-
3.
Thoroughly mix the growth media throughout the flask to ensure that it is evenly distributed.
-
4.
Thaw the frozen stock of HEK 293 cells in a water bath set to a temperature of 37 °C until it becomes completely thawed.
-
5.
Transfer the previously frozen, now thawed, cell line stock from the cryotube into the T75 flask containing the 14 mL of growth media.
-
6.
Incubate the HEK 293 cells with growth media in 37 °C, 5 % CO2, humidified incubator.
-
7.
After 20–24 h, aspirate and discard the growth media from the T75 flask. Immediately following, apply 14 mL of fresh and pre-warmed (in a water bath set to 37 °C) growth media. Please advise that it will take about 2–3 days for the HEK 293 cells to recover from the propagation and, thus, fully grow in a T75 flask.
3.3 Propagation (Subculture) of HEK 293 Cell Culture
-
1.
Aspirate and discard the existing growth media from the T75 flask and wash the attached cells with approximately 5 mL of PBS for the purpose of removing any excess of dead cells that were not removed through the initial growth media aspiration (see Note 4 ).
-
2.
Add 1.5 mL of 0.25 % trypsin-EDTA solution to the T75 flask containing the attached HEK 293 cells, thoroughly spreading it entirely across the flask, and incubate the flask until there is evident cell detachment present (placing the incubating flask into a 37 °C, 5 % CO2 incubator may accelerate cell detachment via trypsin activation).
-
3.
Add 5 mL of fresh 10 % FBS DMEM to the T75 flask, washing the cells on the flask’s side to the bottom of the flask.
-
4.
Homogenize the HEK 293 cell line culture in the growth media through repeated pipetting (the total volume of the T75 flask should be consistent with 6.5 mL).
-
5.
From one T75 flask, you can make 3× T75 flask (outlined in steps 6 and 7) or 1× T175 flask and 1× T75 flask (outlined in steps 8 and 9).
-
6.
From a single T75 flask, three separate T75 flasks can be processed. Aliquot the volume of the original T75 flask, which should be 6.5 mL in volume, to each of the three new flasks in an even manner.
-
7.
Add 12 mL of a fresh 10 % FBS, DMEM into each of the three T75 flask. The new, total volume should now be 14–15 mL.
-
8.
If using 1× T175 and 1× T75 add 5.5 mL from #4 into a T175 flask. Keep 1.5 mL in the existing T75 flask.
-
9.
Add 18 mL of growth media to T175 (total 24–25 mL) and 14 mL of media into T75 (total 14–15 mL) (of note, cells in the flask will grow a bit slower since the initial amount of cells will be lower).
-
10.
Spread the cells gently, yet thoroughly, over the bottom surface of the flask and return it to a 37 °C, 5 % CO2, incubator.
3.4 Generation of Frozen Stocks of HEK 293 Cells
-
1.
It is recommended to have at least 2.0–3.0 × 10⁶ cells per 1 mL of freezing medium in a cryotube [4, 7]. As described in the Table 1, T75 flask can contain approximately 1.0 × 10⁷ cells at confluency, ergo, three to four cryotubes of frozen HEK 293 cell stock can be processed. Please note that if the confluency is ill defined, it may be of particular interest to quantify the number of cells in order to achieve the desired 2.0–3.0 × 10⁶ cells/mL [5, 8] (see Note 5 ).
3.5 Generation of a Shuttle Vector (Fig. 1)

Shuttle vectors and adenoviral backbone. (a) pShuttle vector(s) can be used to replace the E1 gene with the chosen gene of interest, thereby modifying the virus in a way that it is now replication incompetent. (b) A fiber shuttle vector can be used to modify the wild-type fiber, thus changing the viral tropism. (c) Commercial AdEasy or wild-type adenovirus type 5 may be used as a backbone
-
1.
Insertion of a gene of interest into the E1 region of the plasmid (see Notes 6 – 8 ). There are commercially available shuttle vectors that insert the gene of interest into E1 region. Through the usage of a multi-cloning site (MCS), a gene of interest can be inserted per the instructions of a standard molecular cloning method [3, 9–12].
-
2.
Modification of viral fiber(s) to alter viral tropism: Using the primers shown in Table 2 with adenoviral DNA as a template, the region of E3 (left arm)-fiber-E4 (right arm) can be obtained and inserted into any preferable common vector [3, 10–13].
Table 2 Primer set to generate fiber shuttle vector
3.6 Generation of Adenoviral Vector with a Gene of Interest Through Homologous Recombination (Fig. 2)

Generation of plasmid DNAs of modified adenovirus by way of homologous recombination. Plasmid DNA of the adenoviral backbone and that of pShuttle (or pFiber shuttle) are co-transformed into BJ5183 cells. The resultants are selected by negative antibiotic resistance and the relative size of resultants’ DNAs (Fig. 3). Sequencing verified recombined DNA from BJ5183 cells should be retransformed into DH5α cells to achieve a large amount of stable DNAs
-
1.
Prepare the PmeI-digested shuttle vector generated in Table 2.
-
2.
Thaw 20 μl of electro-competent BJ 5813 cells [3, 9–12, 14–16] on ice.
-
3.
Add PmeI-digested shuttle vector and Ad5 backbone (such as AdEasy): the ratio of DNA concentration is 3:1 in a maximum of 3 μl in volume.
-
4.
Transfer the mixture to the bottom of a pre-chilled, 1 mm gap electroporation cuvette.
-
5.
Electro-pulse the cuvette containing the mixture at 1800 V for 5 s.
-
6.
Resuspend the pulsed mixture in 1 mL of LB medium and transfer the mixture into 14 mL bacterial culture tube.
-
7.
Incubate at 37 °C for 40–50 min.
-
8.
Plate on 3 LB/Kan plates with 500 μl, 300 μl and 100 μl of the transformed mixture and incubate overnight at 37 °C (see Note 9 ).
-
9.
Pick 10–15 of the smallest, single (isolated) colonies and grow each in 2 mL of LB/Kan broth overnight at 37 °C with vigorous shaking (see Note 10 ).
- 10.
-
11.
Transfer the bacteria grown LB into 1.5 mL tubes.
-
12.
Centrifuge at 14,000 rpm for 10 min.
-
13.
Aspirate all excess LB (a bacteria pellet should formed at the bottom).
-
14.
Add 300 μl of homogenizing buffer (commercially called P1 buffer) and homogenize well by thorough vortexing.
-
15.
Add 300 μl of alkaline buffer (commercially called P2 buffer) and mix through inverted shaking.
-
16.
Add 300 μl of acidic (neutralizing) buffer (commercially called P3 buffer) and mix through inverted shaking.
-
17.
Centrifuge at 14,000 rpm for 15 min.
-
18.
Transfer only the clear solution to a 1.5 mL tube (be cautious to remove any white debris). (However, if any white debris is collected, an additional centrifugation is necessary for its removal.)
-
19.
Add 560 μl of isopropanol and vortex.
-
20.
Centrifuge at 14,000 rpm for 15 min.
-
21.
Aspirate the supernatant (the DNA should be near the bottom of the tube).
-
22.
Add 400 μl of 70 % ethanol.
-
23.
Centrifuge at 14,000 rpm for 10 min.
-
24.
Aspirate out the supernatant (the DNA should be near the bottom of the tube).
-
25.
Dry completely.
-
26.
Add 20–30 μl of dH2O.
-
27.
Run on 1 % agarose gel (electrophoresis).
-
28.
Check the size of the plasmid DNAs (Fig. 3).
Fig. 3 
Verification of homologous recombinants per gel electrophoresis. M: DNA ladder. 1–8: Homologous recombinants. 9: Void. 10: pShuttle vector. 11: Viral DNA of wild-type Ad5. After the homologous recombination of replacing the E1 gene region with the pShuttle vector (kanamycin resistant), plasmid DNAs of the resulting colonies were purified and separated on a 1 % agarose gel. Since the BJ cells can contain either homologous recombinants or the pShuttle vector, alone, and may grow in kanamycin LB, lanes 3, 4, and 6 are the possibly correct homologous recombinants, although verification by sequencing is required
-
29.
Verify via sequencing.
-
30.
Re-transform sequence verified DNAs into electro-competent DH5α or DH10B cells to obtain a large amount of stable DNAs (see Note 12 ).

3.7 Transfection of Adenoviral Vector in HEK 293 Cells
-
1.
Plate HEK 293 cells (or 911 cells) in a 6-well plate approximately 12–20 h prior to transfection. The confluency should be approximately 50–70 % at the time of transfection. Transfection of one well may be sufficient for virus generation and for further amplification. However, it is highly recommended that multiple wells be used for transfection as they will yield higher initial titers and quicker amplifications [7, 12, 17].
-
2.
Digest 10 μg of recombinant adenoviral plasmids with PacI (see Note 13 ).
-
3.
Precipitate PacI digested plasmid DNA as described in steps 4–10.
-
4.
Add 400 μL of ethyl alcohol (ethanol, see Note 14 ).
-
5.
Centrifuge at maximum speed for approximately 10–15 min.
-
6.
Aspirate and discard the isopropyl alcohol (isopropanol) supernatant (a white precipitate of DNA should be visible at the bottom of the tube).
-
7.
Add 400 μL of isopropyl alcohol (isopropanol).
-
8.
Centrifuge at maximum speed for approximately 10–15 min.
-
9.
Aspirate and discard the isopropyl alcohol (isopropanol) supernatant and allow the DNA to dehydrate.
-
10.
Add 20 μL of dH2O (see Note 15 ).
-
11.
Perform a transfection with a lipid-based transfection reagent according to the manufacturer’s instructions (e.g., with Attractine from Qiagen as described in steps 12–17).
-
12.
Mix 5 μg of PacI-digested DNA and 15 μL of Attractine in 150 μL of Opti-MEM.
-
13.
Vortex thoroughly and incubate for 15 min at room temperature.
-
14.
Add 1 mL of Opti-MEM into each well.
-
15.
Add 1 mL of Opti-MEM into the mixture.
-
16.
After thorough pipetting, add the mixture to the HEK 293 cell plate in a dropwise manner.
-
17.
Remove the growth media containing transfection mixture approximately 4–6 h later, and add 2 mL of fresh 2 % FBS of DMEM (it is advisable to check the cell quality 2 h into the incubation period, changing growth media if necessary).
-
18.
After 72 h, aspirate and discard all media and add fresh 2 % FBS of DMEM growth media.
-
19.
Incubate the transfected HEK 293 cells in a 37 °C, 5 % CO2 incubator for 10–15 days. Typically, it takes at least 14–20 days to rescue a virus from transfected cells. During this period, the media should not be changed unless there is an observable change in growth media color from red to yellow. If observed, add 1 mL of fresh 2 % growth media.
-
20.
Harvest all the cells when 80 % of the cells in a well show cytopathic effect (CPE) (Fig. 4). Place the collected mixture in a 50 mL tube.
Fig. 4 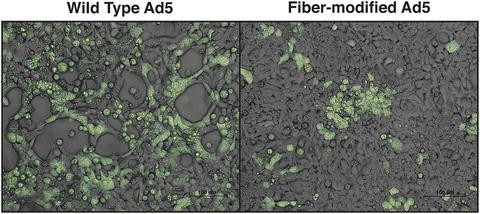
Cytopathic effect (CPE) of adenovirus on cells: (a) Observed CPE of plaque-forming wild-type virus. (b) No apparent CPE of fiber-modified adenovirus (plaque-less virus)
-
21.
Freeze the mixture completely at −80 °C and thaw it in a 37 °C water bath.
-
22.
Repeat step 7 three times in preparation for the following propagation procedures.

3.8 Propagation of Adenovirus
-
1.
The growth rate of a virus varies depending on its structural characteristics and the characteristics of the inserted gene of interest. Appropriated up-scaling steps are required to acquire maximum amount of adenovirus (~1012 vp/mL) in a stock [7, 12, 18] (see Note 16 ). Different up-scaling steps are depicted in Table 3.
Table 3 Different up-scaling steps
3.9 1st Up-Scaling of Virus
-
1.
Prepare HEK 293 cells in a T75 flask (the appropriated cellular density should be consistent with approximately 107 cells in T75 flask).
-
2.
Prepare virus containing media.
-
3.
Infection with purified virus stock. Calculate and make ten plaque-forming units (PFU) or 100 viral particles of multiple of infections (MOI) per cell in 10 mL of 2 % FBS infection media.
-
4.
Infection from a rescued virus in a 6-well. After three times of “freeze and thaw,” centrifuge the sample at 4000 rpm for 30 min, aspirate the supernatant, and add 2 % FBS infection media to make the final volume equivalent to 10 mL.
-
5.
Remove the growth media from the T75 flask and add the virus-containing media to the opposite side of the flask where cells are growing.
-
6.
Incubate in a 37 °C, 5 % CO2, incubator for approximately 2–5 days until there is an appreciable cytopathic effect (CPE) evidenced at a consistency of approximately 80–100 %.
-
7.
Harvest the mixture of virus-infected cells and infection media in a 50 mL tube.
-
8.
Centrifuge at 1200 rpm for 5 min.
-
9.
Aspirate and discard the infection media, retaining approximately 5 mL.
-
10.
Perform three cycles of “freeze and thaw.”
-
11.
Keep at −80 °C until the second up-scaling.
3.10 Second Up-Scaling of a Virus
-
1.
Thaw the tube containing the virus from step 11 in Subheading 3.9 and centrifuge at 4000 rpm for 30 min.
-
2.
Prepare cultures of HEK 293 cells in 3× T175 flasks.
-
3.
Aspirate the supernatant from step 1 and add 2 % FBS adenovirus infection media to allow for a total volume of 60 mL (each of the three T175 flasks requires 20 mL of infection media).
-
4.
Add 20 mL of the mixture of adenovirus in 2 % infection media to each T175 flask to the opposite side of the flask where cells are growing.
-
5.
Follow steps 6–11 described in first up-scaling.
3.11 Third Up-Scaling of Virus
-
1.
Over the course of serial passaging, prepare HEK 293 cell cultures in 20× T175 flasks.
-
2.
Thaw the tube containing the virus from the second up-scaling (step 5 in Subheading 3.10) and centrifuge at 4000 rpm for 30 min.
-
3.
Aspirate the supernatant from step 2 and add 2 % FBS adenovirus infection media to allow for a total volume of 400 mL (a T175 flask needs 20 mL: 20 × T175 = 400 mL).
-
4.
Add the mixture of adenovirus and infection media to each flask to the opposite side of the flask where cells are growing.
-
5.
Follow steps 6–11 described in 1st up-scaling.
-
6.
Aspirate and discard all infection media from the eight tubes.
-
7.
Combine all centrifuged cells in one 50 mL tube with a fresh 4 mL of 2 % FBS infection media.
-
8.
Freeze and thaw the tube three times and store at −80 °C until purification.
3.12 Cesium Chloride (CsCl) Purification and Dialysis
-
1.
This method of adenovirus purification involves separation of viral particles based on the known density of intact adenovirus particle (1.42). To maximize the purity of adenovirus, two rounds of CsCl gradient-based purification are recommended using a CsCl gradient of 1.33–1.45 g/mL [19].
3.13 Adenovirus Purification with CsCl
-
1.
Thaw the virus containing cell lysates from step 8, Subheading 3.11 and centrifuge at 4000 rpm for 30 min at 4 °C.
-
2.
Prepare the CsCl gradient as follows (first CsCl gradient centrifugation).
-
3.
Add 4 mL of 1.33 g/mL CsCl gradient in SW41 ultraclear tube.
-
4.
Add 4 mL of 1.45 g/mL CsCl gradient at the bottom of the tube.
-
5.
Add 4 mL of supernatant from the viral cell lysate (step 1) to the top of the tube.
-
6.
Fill up the tube with 2 % FBS infection media, forming a concave meniscus.
-
7.
Prepare a balance tube.
-
8.
Add 4 mL of 1.33 g/mL CsCl gradient in SW41 ultraclear tube.
-
9.
Add 4 mL of 1.45 g/mL CsCl gradient at the bottom of the tube.
-
10.
Fill up the tube with 2 % FBS infection media, forming a concave meniscus.
-
11.
Centrifuge at 18,000 rpm for 4 h at 4 °C.
-
12.
Collect the lowest observed band with a 21.5-gauge needle connected to a 5 mL syringe (Fig. 5a) (see Note 17 ).
Fig. 5 
CsCl gradient-based virus purification. (a) Gradient-based layers after initial 4 h of centrifugation. Among the layers, only the intact virus layer (gradient of 1.42 g/mL) should be collected with a 21.5-gauge needle connected to a 5 mL syringe, and used for the second centrifugation. (b) A single, pure viral band after overnight centrifugation
-
13.
Prepare the second concentration gradient for centrifugation.
-
14.
Add 4 mL of 1.33 g/mL CsCl gradient.
-
15.
Add 4 mL of 1.45 g/mL CsCl gradient.
-
16.
Add the collected viruses.
-
17.
Fill up the tube with HEPES buffer.
-
18.
Prepare a balance with the same composition as in the step 6 except for the incorporation of the virus.
-
19.
Centrifuge at 35,000 rpm at 4 °C for 12–16 h.
-
20.
After 12–16 h of centrifugation, there should be only one band observed. Collect the observed band with a 21.5-gauge needle connected to a 5 mL syringe (Fig. 5b). If there is an obvious second band observed, perform the third centrifugation with the collected low-appearing band.

3.14 Adenovirus Dialysis
-
1.
Dialysis is required to remove any remaining CsCl, which is known to be cytotoxic and to collect pure virus particles in 10 % Glycerol in 1× PBS.
-
2.
Prepare a standard dialysis buffer with a total volume of 4 L (stored at 4 °C).
-
3.
Thoroughly wet a dialysis cassette in the prepared dialysis buffer.
-
4.
Insert the purified viral lysate into the dialysis cassette (a total volume may not exceed 3 mL).
-
5.
In a 1 L beaker containing 1 L of dialysis buffer and a magnetic stir rod, place the dialysis cassette containing the viral lysate with the buoyant (injection site) side in the supine position (i.e., facing upward).
-
6.
Place the beaker on a magnetic stirring plate in a cold room (4 °C).
-
7.
Perform this dialysis treatment 3–4 times with 1 L of a fresh dialysis buffer on a time consistency of approximately 2–3 h for each treatment (keep 1 mL of the dialysis buffer from the last treatment for the virus titration).
-
8.
After 3–4 times of full dialysis treatments, remove the virus from the buffer with 21.5-gauge needle connected to a 5 mL syringe.
-
9.
These purified virus particles can be aliquoted in desirable amounts. Commonly, aliquots of 10 μL in 20–40 tubes are made. The remaining virus is then aliquoted into 1.5 mL tubes with 100 μL per tube.
-
10.
Store the aliquots of the purified virus at −80 °C.
3.15 Virus Titration: Virus Particle Analysis in O.D. 260 nm (VP/mL) (See Note 18 )
-
1.
Prepare blank solution: 100 μL of dialysis buffer and 10 μL of virus lysis buffer.
-
2.
Prepare virus sample solution: 100 μL of purified virus + 10 μL of virus lysis buffer (if preferred, serial diluted virus samples can be tested).
-
3.
Incubate samples for 30 min at 56 °C with vigorous shaking.
-
4.
Read your samples on O.D. 260 nm.
-
5.
Calculate the virus particle (VP titer using the formula below [20]):
4 Notes
-
1.
1 M HEPES buffer can be purchased or prepared in the laboratory. To prepare 1 L of 1 M HEPES buffer dissolve 238.3 g HEPES in 800 mL of water. Mix and adjust pH to 7.8 with NaOH. Adjust volume to 1 L with water. Filter sterilize with a 0.45 μm filter.
-
2.
Take extra protective care in culturing HEK 293 cells since it takes approximately 2–3 weeks for the virus to be rescued from the HEK 293 cells. During this period, cells will grow without any antibiotics. Any contaminants which are inert during normal cell culture will be detrimental to the following virus rescue period.
-
3.
Do not wipe out 70 % ethanol after spraying. Let it dry up. Sanitization is done by dehydration.
-
4.
It is not recommended to culture HEK 293 cells in excess of 20 passages for the cells will exhibit extremely slow and minimal proliferation. After 20 passages, it is of best interest to discard these cells and thaw fresh cells from frozen stock according to the aforementioned procedure.
-
5.
It is of utmost importance to process a frozen stock of HEK 293 cells in the early stages of culture.
-
6.
In generating the pShuttle vector, ensure that the gene of interest does not have PmeI and PacI recognition site(s), since these enzymes will be used in the process of homologous recombination and in the process of transfection, respectively.
-
7.
Unless there is no alternative choice(s), avoid use of the NotI recognition site on MCS. Creating a NotI recognition site for the gene of interest via PCR is not easily achievable since high GC-containing primers (NotI recognition sequence: GC/GGCCGC) tend to form a secondary structure especially when the template recognition site has high GC contents. When there is no alternative choice of action, add 0.5–1 % of DMSO to the PCR reaction which can prevent a formation of a secondary structure.
-
8.
If E1 and E3 deleted backbone (such as AdEasy) are used, the maximum size of the inserted gene of interest can be approximately 7.5 kb.
-
9.
It is not especially easy to make a large volume of LB media to be absorbed into a LB agar plate. You can transfer 500 μL and 300 μL of the transformed mixture into 1.5 mL tube(s), centrifuge at 14,000 rpm for 1 min, and remove most of the LB broth, leaving 100 μL of LB broth in volume. Then, homogenize the centrifuged, transformed bacteria with the remaining LB and plate on the LB agar plate.
-
10.
It is highly likely that either only small or isolated colonies that stand alone are the correctly homologous recombined DNA containing cells. pShuttle (~7 kb) containing cells can grow much faster than homologous recombined DNA (~40 kb) containing cells due to the size of plasmid DNAs they produce. Since the size of satellite colonies and homologous recombined DNA containing colonies are very similar, small colonies that are in the close proximity of others may be satellite colonies that do not contain any plasmid DNA.
-
11.
The use of a mini-prep kit is only suitable for less than the 10 kb size of plasmid DNAs. Therefore, use the previously mentioned protocol (Subheading 3.3) for isolation of any adenoviral backbone plasmid DNAs.
-
12.
Plasmid DNAs with too large a size that are isolated from BJ5813 cells are known to be unstable DNAs, and, thus, BJ5813 cells are not suitable to produce an appropriate amount of plasmid DNAs for cell transfections. Also, chemical-competent cells are not suitable to transform a large size of plasmid DNAs, so re-transformation of homologous recombined DNAs has to be done in electro-competent cells.
-
13.
Overnight digestion with 1× BSA is recommended when using PmeI and PacI. This overnight incubation with BSA can maximize enzyme digestion (12–18 h) and minimize nonspecific cutting (BSA).
-
14.
Adding 80 % volume of ethanol to your sample is enough to precipitate DNAs at the bottom of the microfuge tube. However, adding 400 μL makes the DNA precipitate more towards the side of the tube and facilitates aspiration of the supernatant.
-
15.
Use pre-warmed dH2O to dissolve DNA as opposed to any buffers. Most of plasmid DNAs produced through this protocol are byproducts for virus production rather than for DNA stocks. Some commercially provided buffers are not applicable for some steps during the adenoviral production processes (e.g., TE (Tris and EDTA) buffer: lower an efficiency of enzyme digestion and cell transfection when DNA is in TE buffer).
-
16.
In the case of generating a replication-competent adenovirus, the A549 (adenocarcinomic human alveolar basal epithelial cells) cell line can be used.
-
17.
There are other approaches, which may be found in other resources for isolating virus particles from the microfuge tube (e.g., collecting them from the bottom of the tube by puncturing the bottom or collecting them from the top of the tube by passing through the other layers). Find the best approach to suit your needs.
-
18.
SDS-treated virus particles obtained after titration can be used to isolate viral DNA using a Blood and Tissue Kit such as those available from Qiagen.
References
Majhen D, Ambriovic-Ristov A (2006) Adenoviral vectors—how to use them in cancer gene therapy? Virus Res 119:121–133
Green NK, Seymour LW (2002) Adenoviral vectors: systemic delivery and tumor targeting. Cancer Gene Ther 9:1036–1042
He TC et al (1998) A simplified system for generating recombinant adenoviruses. Proc Natl Acad Sci U S A 95:2509–2514
Graham FL (1987) Growth of 293 cells in suspension culture. J Gen Virol 68:937–940
Lavappa KS, Macy ML, Shannon JE (1976) Examination of ATCC stocks for HeLa marker chromosomes in human cell lines. Nature 259:211–213
Stulberg CS et al (1970) The animal cell culture collection. In Vitro 5:1–16
Graham FL et al (1977) Characteristics of a human cell line transformed by DNA from human adenovirus type 5. J Gen Virol 36:59–74
Coecke S et al (2005) Guidance on good cell culture practice. A report of the second ECVAM task force on good cell culture practice. Altern Lab Anim 33:261–287
Graham FL, Van der Eb AJ, Heijneker HL (1974) Size and location of the transforming region in human adenovirus type 5 DNA. Nature 251:687–691
Graham FL, Prevec L (1991) Manipulation of adenovirus vectors. Methods Mol Biol 7:109–128
Sambrook J (2001) Molecular cloning: a laboratory manual. In: Russell DW (ed) Cold Spring Harbor Laboratory Press, Cold Spring Harbor, NY
He TC (2004) Adenoviral vectors. Curr Protoc Hum Genet Chapter 12: Unit 12.4
Kim JW et al (2013) An adenovirus vector incorporating carbohydrate binding domains utilizes glycans for gene transfer. PLoS One 8:e55533
Hanahan D, Gluzman Y (1984) Rescue of functional replication origins from embedded configurations in a plasmid carrying the adenovirus genome. Mol Cell Biol 4:302–309
Imler JL et al (1995) An efficient procedure to select and recover recombinant adenovirus vectors. Gene Ther 2:263–268
Chartier C et al (1996) Efficient generation of recombinant adenovirus vectors by homologous recombination in Escherichia coli. J Virol 70:4805–4810
Krougliak V, Graham FL (1995) Development of cell lines capable of complementing E1, E4, and protein IX defective adenovirus type 5 mutants. Hum Gene Ther 6:1575–1586
Ng P, Graham FL (2002) Construction of first-generation adenoviral vectors. Methods Mol Med 69:389–414
Kanegae Y, Makimura M, Saito I (1994) A simple and efficient method for purification of infectious recombinant adenovirus. Jpn J Med Sci Biol 47:157–166
Maizel JV, White DO Jr, Scharff MD (1968) The polypeptides of adenovirus. I. Evidence for multiple protein components in the virion and a comparison of types 2, 7A, and 12. Virology 36:115–125
Author information
Authors and Affiliations
Corresponding author
Editor information
Editors and Affiliations
Rights and permissions
Copyright information
© 2016 Springer Science+Business Media New York
About this protocol
Cite this protocol
Kim, J.W., Morshed, R.A., Kane, J.R., Auffinger, B., Qiao, J., Lesniak, M.S. (2016). Viral Vector Production: Adenovirus. In: Manfredsson, F. (eds) Gene Therapy for Neurological Disorders. Methods in Molecular Biology, vol 1382. Humana Press, New York, NY. https://doi.org/10.1007/978-1-4939-3271-9_9
Download citation
DOI: https://doi.org/10.1007/978-1-4939-3271-9_9
Publisher Name: Humana Press, New York, NY
Print ISBN: 978-1-4939-3270-2
Online ISBN: 978-1-4939-3271-9
eBook Packages: Springer Protocols