
Abstract
Cilia and flagella are microtubule-based organelles that play important roles in human health by contributing to cellular motility as well as sensing and responding to environmental cues. Defects in cilia formation and function cause a broad class of human genetic diseases called ciliopathies. To carry out their specialized functions, cilia contain a unique complement of proteins that must be imported into the ciliary compartment. In this chapter, we describe methods to measure the permeability barrier of the ciliary gate by microinjection of fluorescent proteins and dextrans of different sizes into ciliated cells. We also describe a fluorescence recovery after photobleaching (FRAP) assay to measure the entry of ciliary proteins into the ciliary compartment. These assays can be used to determine the molecular mechanisms that regulate the formation and function of cilia in mammalian cells.
Access provided by CONRICYT – Journals CONACYT. Download protocol PDF
Key words
1 Introduction
Cilia (and flagella ) are microtubule-based organelles that project from the surface of cells and serve both motile and sensory functions. As organelles, cilia contain a unique complement of protein and lipid (reviews [1, 2]). Furthermore, the ciliary localization of signaling factors can be dynamic and change in response to ligand stimulation (e.g., in Hedgehog signaling [3, 4]). Thus, understanding the mechanisms that regulate selective entry into the ciliary compartment is important for both cell and developmental biology.
As an organelle, the cilium is not completely enclosed by a membrane barrier. Rather, the ciliary membrane is continuous with the plasma membrane, and the intraciliary space is continuous with the cytosol. Selective entry of both membrane and cytosolic proteins thus requires mechanisms that operate where the ciliary compartment meets these neighboring regions. Indeed, the base of the cilium contains several unique structures that can be observed by electron microscopy (transition fibers and Y-links ) and/or are the locale for some cilia-specific proteins (the transition zone) (reviewed in [5–7]).
Understanding the mechanisms that regulate entry of ciliary proteins requires assays that specifically measure the transit of proteins from an adjacent compartment (the plasma membrane or the cytosol) into the ciliary compartment. In systems that are both genetically and biochemically tractable, such as the unicellular alga Chlamydomonas reinhardtii , the effects of loss of transition zone protein function can be ascertained by analysis of the protein content of isolated flagella (e.g., [8, 9]). However, these assays are not optimal for measuring the dynamics of protein import/export; rather, fluorescence microscopy provides the temporal and spatial resolution for measuring protein import/export. This chapter provides detailed experimental approaches to study passive and active transport of molecules into the ciliary compartment using fluorescence microscopy in cultured mammalian cells.
A major detriment to imaging ciliary import in mammalian cells is their small size (~0.25 μm wide × 3–10 μm long) such that many details of ciliary structure and localization are at or below the resolution limit of the fluorescence microscope. Furthermore, most cilia are assembled on the top surface of cultured cells, and thus, the presence of probes within the ciliary compartment is difficult to spatially resolve from those in the cell body using epifluorescence microscopy . To date, researchers have used several approaches to get around these difficulties and directly measure the movement of fluorescent probes within the cilium or between the cilium and adjacent compartments, including (a) probes that accumulate to very high levels within cilia due to protein-protein interactions or chemical induction of such interactions [10, 11], (b) imaging of cilia that are spatially separated from the cell body due to natural variation in ciliary position and/or manipulation of cellular orientation (e.g., [12–17]), or (c) fluorescence recovery after photobleaching (FRAP) in which bleaching the fluorescent molecules in a select area gives rise to a strong signal that is readily distinguished from the background and can be monitored quantitatively in real time.
FRAP exploits the ability of laser scanning confocal microscopes to rapidly and irreversibly photobleach fluorescently tagged molecules within a specific region of the cell. Fluorescence recovers in the bleached region due to the movement of non-bleached fluorescent molecules from adjacent regions into the bleached area. Provided that the fluorescently tagged proteins are in equilibrium between the bleached and unbleached areas (see Note 1 ), the rate of influx of the non-bleached fluorescent proteins provides information about the dynamics and mobility of the protein population. In terms of ciliary localization, FRAP has been used to measure the dynamics of both membrane and cytosolic proteins (e.g., [15, 18–29]).
Imaging ciliary proteins in mammalian cells requires transfecting the cells with plasmids that drive the expression of fluorescently tagged protein(s) of interest. The transfection can result in transient expression (e.g., 1–2 days) of the protein from the plasmid or long-term expression if the plasmid is stably integrated into the genome. In either case, it is imperative to analyze cells with low to moderate levels of expression that, as much as possible, mimic the protein’s normal expression level and localization pattern (see Note 2 ). In addition, it is useful to image cells in populations where the majority of the cells have a primary cilium present on the cell surface. Many cultured cell lines generate primary cilia in the G0 or G1 phases of the cell cycle, and the percentage of ciliated cells in the population can often be increased by serum starvation. Widely utilized in the field are telomerase-immortalized human retinal pigment epithelial (hTERT-RPE1 ) cells, NIH 3T3 cells, mouse inner medullary collecting duct (IMCD3), and canine Madin-Darby kidney (MDCK) epithelial cells.
2 Materials
2.1 Cell Culture and Transfection
-
1.
hTERT-RPE and/or NIH 3T3 cells (ATCC).
-
2.
35 mm glass-bottom cell culture dishes (MatTek) (see Note 3 ).
-
3.
DMEM/F12 for RPE cells or DMEM for NIH 3T3 cells.
-
4.
DMEM/F12 phenol red-free or DMEM phenol red-free.
-
5.
l-Glutamine [or GlutaMax (Gibco 35050)].
-
6.
Fetal bovine serum (FBS) for RPE cells or bovine calf serum (CS) for NIH 3T3 cells (see Note 4 ).
-
7.
Penicillin-streptomycin (optional).
-
8.
Hygromycin B.
-
9.
Trypsin/EDTA solution: 0.25 % (w/v) Trypsin + 0.01 % EDTA.
-
10.
TransIT-LT1 (Mirus MIR2305).
-
11.
Opti-MEM (Gibco 31985).
-
12.
Plasmids for expression of fluorescently tagged ciliary markers as well as the ciliary protein(s) of interest (see Note 5 ).
-
13.
Leibovitz L-15 medium, phenol red-free (see Note 6 ).
2.2 Buffers
-
1.
Reconstitution Buffer: 25 mM Hepes/KOH pH 7.4, 115 mM KOAc, 5 mM NaOAc, 5 mM MgCl2, 0.5 mM EDTA, 1 mM GTP, and 1 mM ATP.
-
2.
Phosphate-buffered saline (PBS).
2.3 Microinjection
-
1.
Fluorescently labeled dextrans (Molecular Probes™). Reconstitute at 10 mg/ml in reconstitution buffer. Aliquot into 10 μl portions and store at −20 °C.
-
2.
Recombinant proteins of different sizes: nonfluorescent proteins [e.g., α-lactalbumin (Sigma L5385), BSA (Sigma A9647), protein A (Prospec PRO-774)] should be brought to 1 mg/ml with PBS and then labeled using the Alexa Fluor 488 Microscale Protein Labeling Kit following the manufacturer’s protocol. Recombinant GFP can be used at 1 mg/ml without labeling.
-
(a)
Bring recombinant proteins to 1 mg/ml in PBS if needed.
-
(b)
Incubate protein with Alexa Fluor 488 dye according to manufacturer’s directions. The labeling reaction will proceed spontaneously.
-
(c)
Separate the labeled protein from free dye using spin filters included in the kit.
-
(d)
Aliquot into 10 μl portions and store at −20 °C.
-
(a)
-
3.
Inverted wide-field microscope. Our system consists of a Nikon TE2000-E with DIC and fluorescence optics, 40 × 0.75 N.A. objective, 1.5× Optivar, and Photometrics CoolSNAP ES2 camera.
-
4.
Micromanipulator. Our system utilizes an Eppendorf InjectMan N1 2 micromanipulator, a motorized system containing a control board with joystick. Simple mechanical micromanipulators can also be used.
-
5.
Microinjector (see Note 7 ). The micromanipulator is connected to a semiautomated Eppendorf FemtoJet microinjector system, which provides control over the injection motion, time, and pressure and thus allows for consistency between different injections . To ensure that medium does not flow into the micropipette through capillary suction, a continuous compensation pressure is set to allow slight flow out of liquid from the tip. The injection pressure is the pressure applied by the microinjector during the injection. The volume injected into a cell depends on the injection pressure and time. Appropriate values for injection pressure, injection time, and compensation pressure vary with micropipettes and are determined by testing using a fluorescent dye.
-
6.
Micropipettes. We use pre-pulled micropipettes (Femtotips, Eppendorf 930000035). Micropipettes can also be fabricated from glass capillaries using a micropipette puller.
2.4 FRAP
-
1.
Confocal microscope. We use a Nikon A1 confocal system on a Nikon Eclipse Ti microscope equipped with a live-cell temperature-controlled chamber (Tokai Hit) with CO2 supply and a Perfect Focus System. A 60×/1.2 N.A. water immersion objective equipped with an objective heater is used for imaging. Image size is set at 512 × 512 pixels with a unidirectional scan speed of one frame per second. A fast imaging speed is important to minimize photobleaching of the sample while collecting pre- and post-bleach images. Imaging of mCitrine/EGFP and mCherry channels is performed sequentially to minimize channel-to-channel signal bleed-through. Laser power for imaging is typically held at 2 % for a 488 nm line (Spectra-Physics air-cooled argon ion laser, 40 mW run at 50 % power) and 30 % for a 543 nm line (Melles Griot HeNe laser, 5 mW). Photodetector voltage is adjusted on a cell-to-cell basis.
3 Methods
3.1 Analysis of Ciliary Import by Microinjection
-
1.
Plate hTERT-RPE cells on 35 mm glass-bottom cell culture dishes at 1.5 × 10⁵ cells/dish in DMEM/F12 supplemented with 10 % fetal bovine serum, 1 % Pen-Strep, and 0.01 mg/ml Hygromycin B. Return dish to incubator and incubate for 16 h.
-
2.
To express a fluorescently tagged ciliary marker, transfect cells with 1 μg of plasmid/dish using 3 μl of TransIT-LT1 and 100 μl Opti-MEM, following the manufacturer’s protocol.
-
3.
At 5 h post-transfection, wash cells two times with serum-free DMEM/F12 media then leave cells in serum-free media and return to the incubator for 48 h to allow cells to arrest in G1 and generate primary cilia .
-
4.
Thaw aliquots of fluorescent dextrans and/or proteins on ice. Spin in a microcentrifuge for 5 min at 10,000 × g at 4 °C to remove any aggregates. Keep thawed aliquot on ice while in use.
-
5.
Replace cell media with warmed (37 °C) phenol red-free Leibovitz L-15 medium plus l-glutamine (see Note 8 ), and place the dish on the stage of an inverted wide-field microscope.
-
6.
Load 2 μl of the desired fluorescent dextran or protein into a micropipette capillary. Flick the capillary to force solution down to the tip of the capillary.
-
7.
Check that the micromanipulator is at the middle position for all three axes and not positioned at the lowest or highest x-, y-, z-limit, thus allowing flexibility in the range of movement.
-
8.
Insert the micropipette into the micropipette holder, making sure that the micropipette tip does not touch anything and break.
-
9.
Position the micropipette at the center of the dish and slowly bring the tip down into the media.
-
10.
Focus on the cells using DIC optics at a low magnification, preferably using a 4× or 10× objective lens. Using the micromanipulator joystick, bring the micropipette tip to the center of field of view. At this point, the tip will be blurry and out of focus. Slowly adjust the position of the micropipette along the Z-axis, bringing the tip closer to the cells but still slightly out of focus. It is important to keep the focal plane in the same position throughout this step, as movement of the objective lens may inadvertently lift the plate of cells toward the micropipette and damage the injection tip.
-
11.
Change to the 40× objective and continue to slowly lower the micropipette tip using the micromanipulator, bringing the tip closer to the cell surface but keeping it centered in the field of view. Be sure that the micropipette tip remains in a Z position above the cells so that the dish can be moved in the x–y axes without scraping the cells with the tip.
-
12.
Switch to fluorescence imaging, and, using low-intensity excitation light, scan the dish for cells that are positive for the ciliary marker and have their cilium protruding off the side of the cell into empty dish space. Finding an appropriate cell for microinjection may be facilitated by capturing an image of the fluorescently tagged marker and a DIC image and overlaying these images.
-
13.
Once a target cell has been identified, switch back to DIC imaging mode for the microinjection. Slowly lower the micropipette tip toward the cell using the micromanipulator joystick. With the FemtoJet microinjector system, a Z limit has to be defined before the automated injection. To do this, manually lower the micropipette so that the tip lightly presses against the cell surface, then press the “limit” key to set the Z limit. Manually raise the tip above the cell, and then activate the injection function by pressing the joystick button. The micropipette will begin a predetermined injection sequence in which the injector tip will enter the cell, apply an injection pressure, and then return to its original position.
If using a nonautomated microinjector system, lower the micropipette tip close to the cell surface and move the joystick to penetrate the cell while simultaneously activating the injection by pressing the foot switch of the microinjector.
-
14.
Following injection, capture fluorescence images in two channels, the marker and the dextran/protein, at different time points (Fig. 1).
Fig. 1 
Microinjection to measure protein entry into the primary cilium. hTERT-RPE cells expressing the ciliary marker Arl13b -mCherry (red) were scanned to identify cells with their cilium protruding off the side of the cell. The selected cell was microinjected with a fluorescent protein of interest, recombinant GFP (rGFP), and images were taken at various time points post-injection. Shown are images of Arl13b-mCherry (red) and rGFP (green) at (a) 1 min and (b) 20 min after microinjection. Far right images are higher magnification images of the cilium in the yellow boxed areas. At 1 min after microinjection, the rGFP has not entered the nuclear or ciliary compartments, but by 20 min after microinjection, the rGFP has entered both compartments. N, nucleus. White dotted line, periphery of cell. Arrow, cilium. Scale bar, 5 μm
-
15.
Import images into ImageJ.
-
16.
Use the signal of the ciliary marker projecting off the cell body to define a ciliary region of interest (ROI). Switch to the dextran/protein channel and measure the average fluorescence in the ciliary ROI.
-
17.
In the dextran/protein channel, measure the average fluorescence intensity in the cytoplasmic region half the distance between the nuclear envelope and cell periphery by moving the ROI to this area.
-
18.
In the dextran/protein channel, measure the background fluorescence by moving the ROI to a region next to the cell and measuring the average fluorescence.
-
19.
Subtract the background fluorescence from that of the ciliary region and the cytoplasmic region.
-
20.
Repeat for as many cells as possible and then determine the average background-corrected fluorescence for the ciliary region and the average background-corrected fluorescence for the cytoplasmic region.
-
21.
Calculate the Diffusion Barrier Index as the ratio of mean fluorescence intensity in the ciliary region versus the cytoplasmic region.

3.2 Analysis of Ciliary Import by Fluorescence Recovery After Photobleaching (FRAP)
-
1.
Plate NIH 3T3 cells on 35 mm glass-bottom cell culture dishes at 1.5 × 10⁵ cells per dish in DMEM supplemented with 10 % FetalClone III, 1 % GlutaMax, and 1 % Pen-Strep.
-
2.
After 24 h (or after ~4 h when cells have adhered to the bottom of the dish), promote ciliogenesis by replacing growth media with serum-free DMEM plus 1 % GlutaMax.
-
3.
Immediately transfect cells with 1–1.5 μg of total expression plasmids (ciliary marker and ciliary protein of interest, see Note 5 ) using TransIT-LT1 in Opti-MEM media according to manufacturer’s instructions.
-
4.
After 24–48 h, turn on microscope system and set imaging chamber to 37 °C and 5 % CO2. Wash cells 2× and then leave in warmed phenol red-free and serum-free DMEM media (optional; to rid or minimize population of dead or floating cells). Transfer dish to the live-cell imaging chamber with minimal time at room temperature.
-
5.
Configure the microscope in epifluorescence mode and use low-intensity excitation light to search for cells with moderate levels of expression of the fluorescently tagged protein of interest as well as a ciliary position that facilitates photobleaching and imaging (Fig. 2a, d).
Fig. 2 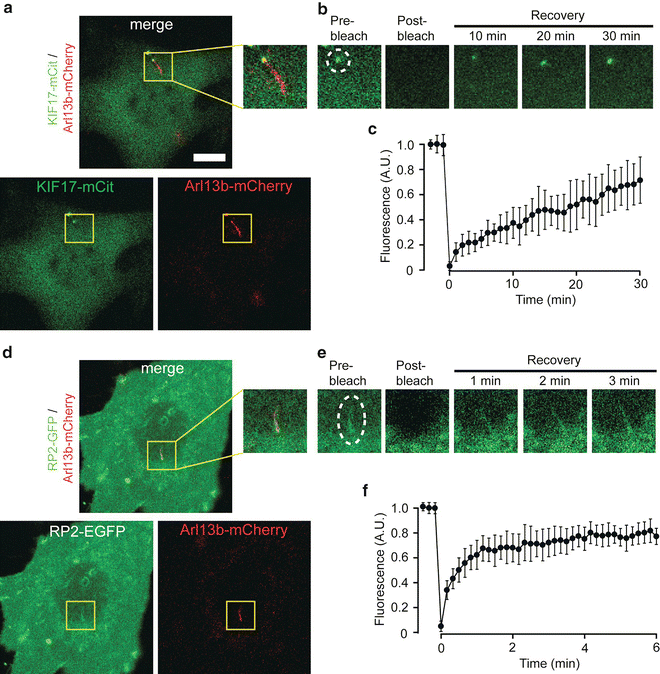
FRAP to measure protein entry into the primary cilium. (a–c) FRAP of an NIH 3T3 cell co-expressing the ciliary marker Arl13b-mCherry and the cytosolic kinesin-2 motor KIF17-mCit. (a) Whole cell images showing KIF17-mCit (lower left) and Arl13b-mCherry (lower right) expression and the merged channels (top). (b) KIF17-mCit fluorescence in the ciliary compartment was photobleached with high laser power, and fluorescence recovery was measured every minute for 30 min. Dashed white line, ROI for photobleaching . (c) Quantification of the fluorescence recovery of KIF17-mCit in the distal tips of cilia (mean ± standard deviation). N = 12 cells. As a cytosolic protein and kinesin motor, the accumulation of new fluorescent KIF17 molecules at the tip of the cilium reflects their entry into the compartment and their movement along the doublet microtubules to the tip. (d–f) FRAP of an NIH 3T3 cell co-expressing the ciliary marker Arl13b-mCherry and the peripheral membrane protein RP2-EGFP. (d) Whole cell images of RP2-EGFP (lower left) and Arl13b -mCherry (lower right) expression and the merged channels (top). (e) RP2-EGFP in the ciliary compartment was photobleached with high laser power, and fluorescence recovery was measured every 10 s for 3 min. Dashed white line, ROI for photobleaching . (e) Quantification of the fluorescence recovery of RP2-EGFP in cilia (mean ± standard deviation). N = 11 cells. Scale bar, 5 μm. As a peripheral membrane protein, the recovery of RP2-EGFP fluorescence in the cilium reflects the entry of new RP2-EGFP into the compartment
-
6.
Once a cell is chosen, configure the microscope in confocal imaging mode. Focus on the cilium and adjust the photodetector voltage and image offset to ensure that an appropriate dynamic range of fluorescence output is obtained.
-
7.
Due to the tendency of cilia to move (and thus the cilium tip to drift in and out of focus), we have developed two different photobleaching protocols to maintain the cilium within the analysis region .
-
(a)
One protocol involves opening the confocal pinhole to a relatively wide diameter (4–7 AU which corresponds to 2.2–5.4 μm) to increase the optical section thickness. This results in a higher level of background fluorescence but allows one to image the cilium tip within a larger z area.
-
(b)
The other protocol allows for a thinner optical section to be used by taking multiple z-stacks for pre- and post-bleach images. While this setup minimizes background signal from the cell body, it also decreases the temporal resolution of recovery analysis and increases photobleaching of the sample.
-
(a)
-
8.
Collect several pre-bleach images or z-stacks. Taking several pre-bleach images is needed to calculate an average pre-bleach intensity (Fig. 2b, e).
-
9.
Draw a region of interest (ROI) around the desired area to be photobleached (Fig. 2b, e). Expose this region to 50 % laser power (e.g., using the 488 nm line to photobleach EGFP- or mCit-tagged ciliary proteins) for a 2 s bleaching step (see Note 9 ).
-
10.
Collect a series of post-bleach images or z-stacks. The time interval between images and total duration of recording will depend on the fluorescence recovery rate which varies between proteins. For a ciliary protein like the kinesin-2 motor KIF17 with a relatively slow recovery rate [29], both methods described in step 7a, b can be used. When imaging using a wide diameter pinhole (step 7a), images are typically collected every 1 min for 30 min after photobleaching (Fig. 2b, c). When taking z-stacks (step 7b), images are typically collected less frequently, for example, every 5–10 min, which is still adequate for determining total levels of KIF17-mCit entering the primary cilium (data not shown). For a ciliary protein with a much faster fluorescence recovery rate, for example, the membrane-associated protein PalmPalm-mCit [29], the wide diameter pinhole imaging (step 7a) method should be used, and images are typically collected every 10 s for 5 min after photobleaching (Fig. 2e, f). In the following steps, we use KIF17-mCit and PalmPalm-mCit as example ciliary proteins of interest (see Note 5 ).
-
11.
During the recovery imaging, images of the ciliary marker are obtained at the same time to verify that the cilium remains within the imaging area in each time frame (see Note 10 ). The strong beam at 488 nm for photobleaching can also partially photobleach the fluorescence signal from the ciliary marker, but the signal can be observed in most cases (see Note 11 ).
-
12.
Import images into ImageJ (NIH) or MetaMorph (Molecular Devices). For analysis of data collected as z-stacks (step 7b above), either each stack can be flattened into a single image or measurements can be made from only the z-slice containing the greatest ciliary fluorescence.
-
13.
Determine the average KIF17-mCit or PalmPalm-EGFP fluorescence intensity for the pre-bleach images. Draw a region of interest (ROI) around the ciliary region in the first pre-bleach image and measure the mean pixel intensity. Determine the background fluorescence by moving the ROI to a region of the image in which there are no cells or debris, and again measure the mean pixel intensity. Subtract the background from the measured fluorescence. Repeat for the next two pre-bleach images and then determine the average fluorescence for the three pre-bleach images. The intensity values are copied and pasted into an Excel sheet for further calculations such as background subtraction and normalization.
-
14.
Repeat this process to obtain the mean pixel intensity measurements for the ciliary region post-bleach and throughout the recovery. For images where there is little or no KIF17-mCit or PalmPalm-EGFP fluorescence, the Arl13b -mCherry signal should be used to guide placement of the ROI at the cilium .
-
15.
Normalize the resulting intensities by dividing the post-bleach and recovery values by the pre-bleach value. The pre-bleach intensity will have a normalized value of 1.
-
16.
Average several datasets together to produce final recovery curves (Fig. 2c, f).

4 Notes
-
1.
A key consideration for FRAP is that there is a sufficient pool of fluorescent molecules available to move into the bleached region for fluorescence recovery. For example, if FRAP is performed with a protein enriched in cilia with little to no pool of cytoplasmic or plasma membrane molecules, an absence of fluorescence recovery may be incorrectly interpreted as immobility of the protein.
-
2.
A prerequisite for use of any epitope-tagged protein (FP or other) is that the tagged protein must be functional. In genetic organisms such as C. elegans, functionality can be tested by determining whether the tagged protein rescues a deletion or mutant phenotype. In mammalian cells, functionality is often tested by determining that the tagged protein displays the same subcellular localization, activity, and interactions as the native protein. Another concern is that overexpression of the protein of interest alters its subcellular trafficking, dynamics, or localization. Taking care to study cells expressing low to moderate levels of protein expression is often sufficient to alleviate such concerns.
-
3.
There are a variety of commercially available glass slides, culture dishes, and coverslips that are suitable for live-cell imaging as alternatives to the MatTek glass-bottom culture dishes (e.g., Nunc Lab-Tek). Generally, the glass component should be #1.5 or 0.17 mm in thickness for optimal resolution with high NA objectives.
-
4.
Some cell lines grow well with less-costly FBS alternatives. For example, we routinely culture NIH 3T3 cells in FetalClone III (HyClone SH30109).
-
5.
Both microinjection and FRAP experiments require expression of a marker of the primary cilium in live cells. Widely utilized probes in the field include the peripheral membrane protein Arl13b [30–32] and the transmembrane proteins somatostatin receptor Sstr3 and serotonin receptor Htr6 [33–35]. FRAP experiments also require expression of the ciliary protein of interest. The dynamics of both membrane and cytosolic proteins in the ciliary compartment have measured by FRAP. Membrane proteins include Arl13b [25], Sstr3 [21, 25–27], Htr6 [21, 26], a cyclic nucleotide-gated channel [18], Smoothened [19, 21], kidney injury molecule-1 (Kim-1 [19]), polycystin 2 [22], Crumbs3 [22], retinitis pigmentosa 2 (RP2 [29]), podocalyxin/gp135 [23], and membrane-targeted (myristoylated and/or palmitoylated) fluorescent protein mCitrine [29, 36]. Cytosolic proteins include end-binding protein 1 (EB1 [19]), kinesin KIF17 [15, 20, 29], intraflagellar transport proteins IFT88 and IFT20 [21, 25, 29], transcription factor Gli2 [29], Tsga14 [29], Gtl3 [29], tubulin [24], and Bardet-Biedl syndrome 1 (BBS1 [28]).
-
6.
Although the phenol red indicator dye is essential for routine cell culture, it should be avoided in live-cell imaging experiments as it can cause undesirable background fluorescence and its excitation can result in phototoxicity .
-
7.
There are different micromanipulators and microinjection systems available, and the specific methods for microinjection will need to be optimized for other systems.
-
8.
Virtually all culture media utilize sodium bicarbonate as a buffer system to regulate pH in atmosphere containing CO2 (usually 5–7 %). For live-cell imaging on the microscope, a stage-top or other microscope chamber system is optimal to maintain temperature and CO2 conditions for cell viability. However, such imaging chambers are not always available or may not be feasible with specific microscope accessories (e.g., the microinjection apparatus). In these cases, Leibovitz L-15 medium is favored for live-cell imaging. Leibovitz L-15 is buffered by phosphates and freebase amino acids and thus enables the culturing of cells in the absence of bicarbonate buffer (and CO2). Although not optimal, an alternative is to supplement the culture media with 10–25 mM HEPES buffer to control pH within the physiological range in the absence of CO2. HEPES does not eliminate the CO2 requirement; it only slows the rate of pH changes and may thus be sufficient for short-term imaging experiments.
-
9.
The photobleaching step will likely need to be optimized depending on the imaging system being used as well as the laser power and protein expression level. Insufficient photobleaching can result from suboptimal parameters for laser intensity and exposure timing or from too bright of a fluorescence signal (too many FP-tagged proteins). This will adversely affect the data analysis and result in an underestimation of the percent recovery and mobile fraction. On the other hand, excessive laser power and prolonged duration of photobleaching can result in phototoxicity to the cells, again causing an underestimation of the parameters revealed by quantitative analysis of the recovery phase.
-
10.
If the cilium starts to move away from the focal plane, the microscope can be refocused during an interval of the image acquisition. Do not refocus many times to avoid photobleaching. Typically, once or twice in 30 min observation period is sufficient, and it is typically not necessary in a 5 min observation period.
-
11.
Photobleaching can cause photodamage to other molecules and phototoxicity to the cell due to reaction of the excited fluorophore with dissolved oxygen and the release of reactive oxygen species (ROS). Although the use of oxygen scavenging systems can decrease such effects, it is best to minimize the amount of excitation light and maximize the light collection efficiency.
References
Emmer BT, Maric D, Engman DM (2010) Molecular mechanisms of protein and lipid targeting to ciliary membranes. J Cell Sci 123:529–536
Madhivanan K, Aguilar RC (2014) Ciliopathies: the trafficking connection. Traffic 15:1031–1056
Nozawa YI, Lin C, Chuang PT (2013) Hedgehog signaling from the primary cilium to the nucleus: an emerging picture of ciliary localization, trafficking and transduction. Curr Opin Genet Dev 23:429–437
Mukhopadhyay S, Rohatgi R (2014) G-Protein-coupled receptors, Hedgehog signaling and primary cilia. Semin Cell Dev Biol 33:63–72
Czarnecki PG, Shah JV (2012) The ciliary transition zone: from morphology and molecules to medicine. Trends Cell Biol 22:201–210
Garcia-Gonzalo FR, Reiter JF (2012) Scoring a backstage pass: mechanisms of ciliogenesis and ciliary access. J Cell Biol 197:697–709
Szymanska K, Johnson CA (2012) The transition zone: an essential functional compartment of cilia. Cilia 1:10
Craige B et al (2010) CEP290 tethers flagellar transition zone microtubules to the membrane and regulates flagellar protein content. J Cell Biol 190:927–940
Awata J et al (2014) Nephrocystin-4 controls ciliary trafficking of membrane and large soluble proteins at the transition zone. J Cell Sci 127(21):4714–4727
Breslow DK et al (2013) An in vitro assay for entry into cilia reveals unique properties of the soluble diffusion barrier. J Cell Biol 203:129–147
Lin YC et al (2013) Chemically inducible diffusion trap at cilia reveals molecular sieve-like barrier. Nat Chem Biol 9:437–443
Battle C et al (2015) Intracellular and extracellular forces drive primary cilia movement. Proc Natl Acad Sci U S A 112:1410–1415
Besschetnova TY, Roy B, Shah JV (2009) Imaging intraflagellar transport in mammalian primary cilia. Methods Cell Biol 93:331–346
Ishikawa H, Marshall WF (2015) Efficient live fluorescence imaging of intraflagellar transport in mammalian primary cilia. Methods Cell Biol 127:189–201
Kee HL et al (2012) A size-exclusion permeability barrier and nucleoporins characterize a ciliary pore complex that regulates transport into cilia. Nat Cell Biol 14:431–437
Mohieldin AM et al (2015) Protein composition and movements of membrane swellings associated with primary cilia. Cell Mol Life Sci 72:2415–2429
Williams CL et al (2014) Direct evidence for BBSome-associated intraflagellar transport reveals distinct properties of native mammalian cilia. Nat Commun 5:5813
Jenkins PM et al (2006) Ciliary targeting of olfactory CNG channels requires the CNGB1b subunit and the kinesin-2 motor protein, KIF17. Curr Biol 16:1211–1216
Boehlke C et al (2010) Differential role of Rab proteins in ciliary trafficking: Rab23 regulates smoothened levels. J Cell Sci 123:1460–1467
Dishinger JF et al (2010) Ciliary entry of the kinesin-2 motor KIF17 is regulated by importin-beta2 and RanGTP. Nat Cell Biol 12:703–710
Hu Q et al (2010) A septin diffusion barrier at the base of the primary cilium maintains ciliary membrane protein distribution. Science 329:436–439
Hurd TW et al (2010) The retinitis pigmentosa protein RP2 interacts with polycystin 2 and regulates cilia-mediated vertebrate development. Hum Mol Genet 19:4330–4344
Francis SS et al (2011) A hierarchy of signals regulates entry of membrane proteins into the ciliary membrane domain in epithelial cells. J Cell Biol 193:219–233
Hao L et al (2011) Intraflagellar transport delivers tubulin isotypes to sensory cilium middle and distal segments. Nat Cell Biol 13:790–798
Larkins CE et al (2011) Arl13b regulates ciliogenesis and the dynamic localization of Shh signaling proteins. Mol Biol Cell 22:4694–4703
Chih B et al (2012) A ciliopathy complex at the transition zone protects the cilia as a privileged membrane domain. Nat Cell Biol 14:61–72
Ye F et al (2013) Single molecule imaging reveals a major role for diffusion in the exploration of ciliary space by signaling receptors. Elife 2, e00654
Liew GM et al (2014) The intraflagellar transport protein IFT27 promotes BBSome exit from cilia through the GTPase ARL6/BBS3. Dev Cell 31:265–278
Takao D et al (2014) An assay for clogging the ciliary pore complex distinguishes mechanisms of cytosolic and membrane protein entry. Curr Biol 24:2288–2294
Caspary T, Larkins CE, Anderson KV (2007) The graded response to Sonic Hedgehog depends on cilia architecture. Dev Cell 12:767–778
Cevik S et al (2010) Joubert syndrome Arl13b functions at ciliary membranes and stabilizes protein transport in Caenorhabditis elegans. J Cell Biol 188:953–969
Hori Y et al (2008) Domain architecture of the atypical Arf-family GTPase Arl13b involved in cilia formation. Biochem Biophys Res Commun 373:119–124
Berbari NF et al (2008) Bardet-Biedl syndrome proteins are required for the localization of G protein-coupled receptors to primary cilia. Proc Natl Acad Sci U S A 105:4242–4246
Brailov I et al (2000) Localization of 5-HT(6) receptors at the plasma membrane of neuronal cilia in the rat brain. Brain Res 872:271–275
Handel M et al (1999) Selective targeting of somatostatin receptor 3 to neuronal cilia. Neuroscience 89:909–926
Kee HL, Verhey KJ (2013) Molecular connections between nuclear and ciliary import processes. Cilia 2:11
Acknowledgments
We thank members of the Verhey Lab for advice and discussions. We are grateful to Steve Lentz and the Morphology and Image Analysis Core of the Michigan Diabetes Research and Training Center (funded by NIDDK under NIH5P60 DK20572) for help with confocal imaging. Work in K.J. Verhey Lab is supported by NIGMS of the NIH under award numbers R01GM070862 and R01GM116204.
Author information
Authors and Affiliations
Corresponding author
Editor information
Editors and Affiliations
Rights and permissions
Copyright information
© 2016 Springer Science+Business Media New York
About this protocol
Cite this protocol
Takao, D., Verhey, K.J. (2016). Methods for Studying Ciliary Import Mechanisms. In: Satir, P., Christensen, S. (eds) Cilia. Methods in Molecular Biology, vol 1454. Humana Press, New York, NY. https://doi.org/10.1007/978-1-4939-3789-9_1
Download citation
DOI: https://doi.org/10.1007/978-1-4939-3789-9_1
Published:
Publisher Name: Humana Press, New York, NY
Print ISBN: 978-1-4939-3787-5
Online ISBN: 978-1-4939-3789-9
eBook Packages: Springer Protocols