
Abstract
West Nile virus (WNV) causes neurological diseases by penetrating the central nervous system (CNS)—an immune-privileged system. Although the CNS residential cells can produce antiviral immune responses, the blood leukocytes are required to contain virus spread. However, infiltrating leukocytes may also contribute to immunopathology if they overreact. Thus analyses of WNV infectivity and leukocyte numbers in the CNS are critical for understanding of WNV pathogenesis in experimental mouse models. Here I describe two basic assays for quantification of viral titers and infiltrating leukocytes in the mouse brain after WNV infection.
Access provided by CONRICYT – Journals CONACYT. Download protocol PDF
Key words
1 Introduction
West Nile virus (WNV) is the most significant cause of viral encephalitis in the United States of America, responsible for 1753 lethal human meningoencephalitis cases since 1999. Addressing the fundamental questions regarding host –WNV interactions is an integrated and indispensable part of the effort towards development of vaccines and therapeutics . The murine model of WNV infection reproduces all the essential elements of human infection and allows for investigation of infection in genetically altered animals. There is a large body of literature showing that WNV infection in mice is an effective in vivo model to investigate viral pathogenesis and host immune responses to infection [1–4]. We have successfully used several different backgrounds of mice including C57BL/6, C3H/He, FVB/N, and BALBc for WNV studies, and these strains show differential susceptibility [5–10]. WNV is a neurotropic virus that disseminates from the blood circulation to the central nervous system and causes severe conditions such as meningitis , meningoencephalitis, or poliomyelitis. The brain is an immune-privileged organ that excludes blood leukocytes under healthy conditions, but becomes permissive to leukocytes after WNV infiltration . The influx of leukocytes is essential for control of WNV dissemination in the brain, but elevated immune responses elicited by leukocytes may contribute to pathogenesis of encephalitis [11]. Here we describe the methods for quantification of viral loads and immune responses in the brain of C57BL/6 mice.
2 Materials
Prepare all reagents with deionized water (18 MΩ cm at 25 °C), and store at room temperature unless indicated otherwise.
2.1 Viral Quantification
-
1.
Sterile phosphate buffered saline (PBS): 10 mM Na2HPO4, 1.8 mM KH2PO4, 137 mM NaCl, 2.7 mM KCl, adjust pH 7.4 with 6 N HCl and NaOH, autoclaved at 121 °C for 15 min.
-
2.
Virus suspension buffer : 1 % gelatin prepared in PBS, autoclaved at 115 °C for 15 min.
-
3.
Vero cells : kidney epithelial cells originated from an African green monkey, deficient in type I interferon expression and thus suitable for virus production and titration .
-
4.
Complete Dulbecco’s Modified Eagle’s Medium (DMEM) (DMEM medium, 10 % fetal bovine serum , 100 units/mL of penicillin, 100 μg/mL of streptomycin, and 0.25 μg/mL of amphotericin B, filter-sterilized through a 0.2 μM filter bottle) (see Table 1).
Table 1 Components of base DMEM/RPMI1640 medium -
5.
Neutral red (3.3 g/L in PBS, filter-sterilized through a 0.2 μM filter syringe).
-
6.
Bradford protein assay kit: a coomassie blue-based protein quantification assay commercially available.
-
7.
Inhalational anesthetics : 30 % isoflurane diluted in propylene glycol, valid for 3 months.
-
8.
Injectable anesthetics: ketamine/xylazine mixture (up to 80 mg/kg body weight ketamine and 10 mg/kg body weight xylazine).
-
9.
5 % agarose : 5 g low-melting (melting temperature 65 ± 1.5 °C) agarose in 100 mL PBS, autoclaved at 121 °C for 15 min.
-
10.
0.4 % (w/v) Trypan Blue solution.
2.2 Immunoassays
-
1.
Prepare 70, 37 and 30 % (v/v) Percoll by diluting sterile isotonic Percoll into RPMI complete media (RPMI 1640 with 10 % fetal bovine serum , 100 units/mL of penicillin, 100 μg/mL of streptomycin, and 0.25 μg/mL of amphotericin B, filter-sterilized through a 0.2 μM filter bottle (see Table 1). Store at 4 °C.
-
2.
Flow cytometry (FACS) staining buffer : make 1 % bovine serum albumin, 0.1 % w/v NaN3 in PBS, store at 4 °C.
-
3.
Fixation solution: 8 % paraformaldehyde (PFA) prepared in PBS.
-
4.
Cell storage buffer: 10 % Dimethyl sulfoxide (DMSO) and 40 % FBS in PBS.
-
5.
Red blood cell lysis buffer: 0.2 % (w/v) NaCl, autoclaved at 121 °C for 15 min.
-
6.
Neutralizing buffer: 1.6 % (w/v) NaCl, autoclaved at 121 °C for 15 min.
2.3 General Equipment and Materials
CO2 incubator , 42 °C water bath, microwave oven, white light transilluminator, Eppendorf 5810 centrifuge with a swing bucket rotor and sealed buckets (for 1.5, 15 and 50 mL tubes), light microscope, inverted light microscope, tube stands (1.5, 15, 50 mL), balance, water-proof tapes, syringes (5, 10 and 60 mL), needles (20, 25 G), 1.5 mL microfuge tubes (autoclaved at 121 °C for 15 min), 20-G olive-tipped perfusion needle, absorbance microplate reader, 1.8 mL sterile Cryotube vials (Nunc product), surgical scissors/forceps, pipettes and sterile tips (10, 20, 200, 1000 μL), electronic pipette and sterile serological pipettes (10, 25 mL), sterile 40 μM cell strainers, crushed ice and box, a stainless still tray, Petri dishes (60 mm in diameter), hemocytometer, sterile conical tubes (15, 50 mL), 70 % ethanol pads, 24-well culture plates, 75 mL culture flasks, 0.2 μM syringe and bottle filters, a glass jar.
3 Methods
Perform all procedures in certified biosafety level 3 facilities when working with live WNV and follow institutional BSL3 biosafety and animal care regulations.
3.1 Mouse Infection and Tissue Collection
-
1.
Infection. Prepare 200 plaque forming units (p.f.u.) of WNV NY99 strain in 50 μL of virus suspension buffer for each mouse (see Note 1 ). Add 1 mL of inhalational anesthetics to a wide mouth glass jar; place an 8–12 week old C57BL/6 mouse. Wait until the mouse falls in deep sleep (see Note 2 ), disinfect one hind foot with 70 % ethanol, use forceps to hold the foot, inject virus with an 25-G or smaller needle (we usually use a 0.5 mL insulin syringe) to its ventral aspect. Wipe the footpad with a 70 % ethanol pad after injection.
-
2.
Perfusion. On day 6 (or the time points appropriate for your study), anesthetize and perfuse mice as the followings [12]. Before surgery, anesthetics will be injected to the intra-peritonea using a 25-G needle. Additional administration of anesthetic may be needed during the course of each perfusion in order to maintain a surgical plane of anesthesia. Once the animal is in a surgical plane of anesthesia (see Note 1 ); place the mouse with its face-up on a tray on crushed ice, spread out the mouse and tape its four feet firmly to the tray. Open the diaphragm to expose the heart. Make a small incision to the posterior end of the left ventricle. Insert a 15-G olive-tipped perfusion needle through the incision into the ascending aorta. Finally, make a large incision to the animal's right atrium without damaging the descending aorta. Fill a 60 mL of syringe with ice-cold PBS, push through the perfusion needle. Try twice until the flow-through is colorless. Now flip the mouse with its face down; cut along the coronal suture and sagittal suture then pull off both sides of parietal bone and interparietal bone; carefully remove the whole brain using a pair of blunt tip forceps. Figure 1 shows that a well-perfused brain should be free of blood.
Fig. 1 
A thoroughly perfused mouse brain

3.2 Plaque Forming Assay
-
1.
Prepare Vero cell monolayer a day before processing the brain. In a 24-well culture plate, seed 2 × 10⁵ viable cells (see Note 3 ) in 0.5 mL of DMEM complete medium, and grow it in an incubator at 37 °C, 5 % CO2.
-
2.
Take a half well-perfused brain from Subheading 3.1 step 2 and pipet up-down with a P1000 pipette several times gently to homogenize the brain on ice.
-
3.
Add 1 mL of ice-cold PBS; re-suspend the brain homogenate. Centrifuge at 6000 × g, 4 °C for 10 min; transfer the supernatant to a sterile 1.5 mL microfuge tube. When transfer, try to avoid the white fats on the top. Keep samples on ice.
-
4.
Determine the protein concentrations of the brain lysates using a Bradford protein assay (see Note 4 ).
-
5.
Remove 300 μg of protein-equivalent brain lysate to a sterile microfuge tube, and add ice-cold sterile PBS to a final volume of 300 μL.
-
6.
Change step 1 Vero culture medium of the 24-well plate with 0.5 mL of pre-warmed fresh one and then add 100 μL of brain lysate from step 5 to the cells (duplicate each brain sample). Swirl the plate gently to spread the brain lysate evenly. Incubate the 24-well plate at 37 °C, 5 % CO2 for 2 h, allowing virions to sediment and enter Vero cells.
-
7.
During the incubation, melt 5 % agarose (0.15 mL per well) in a microwave oven and cool it in a 42 °C water bath. Also warm the complete DMEM medium (0.6 mL per well) in the water bath. When the agarose and DMEM medium temperature equilibrates to 42 °C, transfer the medium to agarose (4:1 ratio) and mix well. Keep the mixture in the water bath at 42 °C.
-
8.
When 2 h-incubation (step 6) is over, carefully remove the culture medium from each well, and then add 0.75 mL of agarose-medium mixture (step 7) along the wall of the culture well. Leave the plate in the biosafety cabinet for 15 min, allowing the agarose to solidify.
-
9.
Incubate the plate at 37 °C, 5 % CO2 for 72 h. Mix 1 mL of neutral red with 4 mL of DMEM complete medium, add 100 μL to each well. Incubate the plate at 37 °C, 5 % CO2 for 2 h. Remove the unabsorbed neutral red from each well and then count plaques with a white light transilluminator. Viable cells can take up neutral red, while dead cells will exclude it and thus forms a white spot (Fig. 2). Based on our experience, the number of plaques per 100 μg of proteins may be between 0 and 100. Reduce the amount of brain lysates if the plaque numbers are too large.
Fig. 2 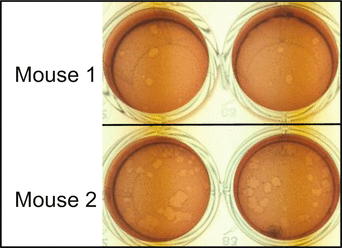
Representative results of two mice

3.3 Isolation of Brain Immune Cells
-
1.
Place two individual perfused brains from Subheading 3.1 in a 40 μM cell strainer (Corning product #354320, other comparable products are acceptable) which is sitting in a 60 mm Petri dish containing 10 mL of complete DMEM media on ice.
-
2.
Use the rubber stopper of a 10 mL syringe to crush gently the brains in the cell strainer. Make sure that just the single-cell suspensions, not the large clumps pass through the cell strainer.
-
3.
Transfer the cell suspension to a 15 mL conical tube and centrifuge the cell suspensions at 500 × g for 10 min at 4 °C. Discard the supernatants .
-
4.
Add 4.5 mL of 70 % Percoll to the cell pellet; resuspend the pellet by pipetting up and down gently; and then transfer the suspension to a 15 mL conical tube on ice.
-
5.
Use a 5 mL syringe with 20-G needle to transfer very gently 4.5 mL of 37 % Percoll to the top of the 70 % Percoll solution on ice. Be very careful not to disturb the 70 % Percoll phase. Next gently overlay 4.5 mL of 30 % Percoll (see Note 5 ).
-
6.
Set the brake to 0 on an Eppendorf 5810 centrifuge (with a swing bucket rotor and a basket for 15 mL tubes). Centrifuge the discontinuous Percoll gradient at 500 × g for 20 min at room temperature.
-
7.
After centrifuge, you will notice a small ring of cells at the 37:70 % Percoll Interface (Fig. 3). Using a P1000 pipette, carefully remove the ring (in between 4 and 5 mL marks of a 15 mL Falcon tube) and place it in another tube (~2–2.5 mL). Add 10 mL complete RPMI 1640 medium to dilute the Percoll solution (see Note 6 ), and spin-down cells at 1000 × g for 10 min. Remove most medium and leave ~1 mL, resuspend cells and transfer to a 1.5 mL microfuge tube. Spin again at 1000 × g for 5 min at 4 °C, and resuspend in 200 μL of ice-cold FACS staining buffer . Now these cells are ready for cell surface antibody labeling and FACS.
Fig. 3 
Illustration of Percoll gradient
-
8.
Count cells. Because WNV-positive cells must be inactivated before being counted using a microscope outside the biosafety cabinet , manual counting of viable cells is very challenging. We have to fix cells first with 4 % PFA (final concentration) for 15 min, and then count the intact cells using a hemocytometer. But generally we will have enough viable cells from two brains to perform two “cocktails” of markers.
-
9.
Divide the cells equally into two tubes-100 μL each (<1 million cells). First block Fc receptors by incubating the cells with 100 μg/mL of rat anti-mouse CD16/CD32 Ig (2.4G2 clone ) for 30 min at 4 °C. Add fluorochrome-conjugated antibody (see Note 7 ) cocktails of interest and incubate at 4 °C in dark for 30 min. Add 120 μL of 8 % PFA and fix cells for 15 min at room temperature. Spin down cells at 1000 × g for 5 min, and wash cells with 0.5 mL of FACS buffer twice. Resuspend cells in 200 μL of cell storage buffer. Use the cells from one brain for unstained and isotope IgG controls. Include immune cells from one spleen for single color positive controls.
-
10.
Isolate splenocytes for positive staining controls. Splenocytes consist of a variety of cell populations such as T and B lymphocytes, dendritic cells and macrophages. These cells are positive for the surface markers of brain leukocytes . Place a spleen of uninfected mouse in a Petri dish on ice, hold a razor blade with forceps and mince the spleen. Suspend cells in 2 mL of ice-cold RPMI complete medium, and pass the cell suspension through a 40 μM strainer to a 50 mL conical tube. Add 20 mL of ice-cold PBS and centrifuge it at 1000 × g at 4 °C for 5 min. Resuspend the cell pellet in 1 mL of ice-cold red blood cell lysis buffer for 1 min, and add 1 mL of ice-cold neutralizing buffer followed by 20 mL of PBS. Spin down cells at 1000 × g at 4 °C for 5 min. Resuspend cells in 5 mL of ice-cold FACS staining buffer.
-
11.
The most informative FACS is done by gating on intact cells and then CD45+ cells (CD45hi cells are infiltrating leukocytes ; CD45int cells are brain resident microglia), and combining this with other markers such as F4/80 Ag, Ly6G/C, CD11b, CD11c, CD4, CD8, and B220 or CD19.
-
12.
The discontinuous Percoll gradient centrifugation is an easy and fast method for isolation of brain immune cells, particularly in the tedious BSL3 environment (see Note 8 ). This method when coupled with a well-defined FACS protocol may quantify different immune cell types, distinguish residential microglia from infiltrating leukocytes , and help us define their roles in antiviral immune responses and pathogenesis of WNV encephalitis [13].

4 Notes
-
1.
The titer of WNV stock is generally high, ~ 106–107 plaque forming units/mL. Viral stock is made with C6/36 cell , a mosquito cell line. To make virus suspension for ten mice, dilute the stock to 1 × 10⁵ p.f.u./mL with sterile PBS, take 30 μL to a sterile 1.8 mL cryotube, add 720 μL of virus suspension buffer and mix well by pipetting ten times gently.
-
2.
After administration of anesthetics , the mouse heart beats from normal, fast to slow. Pinch the toes and make sure that animals are unresponsive before continuing.
-
3.
Vero cells should be maintained in complete DMEM medium in a 75 mL-cell culture flask (tissue culture treated) with a cell density of ~70–90 % confluence. Dislodge the cells with 0.05 % trypsin and count the viable cells using a hemocytometer. We use trypan blue to stain dead cells. Healthy cells are crucial for the success of plaque forming assays.
-
4.
To measure a protein concentration with Bradford Assay Kit, first prepare bovine serum albumin standards: 100, 200, 400, 800, 1600 μg/mL. Second, pipette 10 μL of each standard (BSA), known sample or three blank controls (which is PBS in this case) into microplate wells (we use Nunc Apogent MaxiSorp 96-Well Clear Polystyrene Non-Sterile Micro Plates). Third, add 300 μL of Pierce Detergent Compatible Bradford Assay Reagent to each well, preferably with a multi-channel pipettor, and pipette up and down 4–5 times to mix sample with reagent. Fourth, incubate plate for 10 min at room temperature. Fifth, measure the absorbance at 595 nm (O.D595) with a plate reader (make sure the reading is between 0.2 and 0.8. Sample dilution is needed if its O.D595 is above 0.8). Sixth, subtract the average readings of blank controls from those of each standard/sample. Use the blank-adjusted standards to plot a linear curve vs. their concentrations in μg/mL. An ideal curve would be y = Ax + B, where y is the concentration in μg/mL; x stands for OD595; A is the slope of the standard curve; B is y-intercept (ideally B = 0). Calculate each sample concentration using the standard curve.
-
5.
We use a 5 mL syringe with a 20-G needle to overlay 37 or 30 % Percoll. Push out the solution slowly against the conical tube wall. Handle the Percoll gradient carefully at all steps.
-
6.
This dilution step is critical; otherwise cells are not easily pelleted down in the following step.
-
7.
Choose the fluorochromes that are compatible with your FACS machine.
-
8.
BSL3 practice is much more time-consuming than BSL1/2 work. In order to get as many viable cells as possible, efficient work-flow is essential. Get all materials, reagents, tools, and equipment ready before starting work. Work on no more than four mice at a time.
References
Lazear HM, Diamond MS (2014) New insights into innate immune restriction of West Nile virus infection. Curr Opin Virol 11C:1–6
Colpitts TM, Conway MJ, Montgomery RR et al (2012) West Nile virus: biology, transmission, and human infection. Clin Microbiol Rev 25:635–648
Suthar MS, Diamond MS, Gale M Jr (2013) West Nile virus infection and immunity. Nat Rev Microbiol 11:115–128
Arjona A, Wang P, Montgomery RR et al (2011) Innate immune control of West Nile virus infection. Cell Microbiol 13:1648–1658
Wang P, Dai J, Bai F et al (2008) Matrix metalloproteinase 9 facilitates West Nile virus entry into the brain. J Virol 82:8978–8985
Dai J, Wang P, Bai F et al (2008) Icam-1 participates in the entry of west nile virus into the central nervous system. J Virol 82:4164–4168
Wang P, Arjona A, Zhang Y et al (2010) Caspase-12 controls West Nile virus infection via the viral RNA receptor RIG-I. Nat Immunol 11:912–919
Wang P, Bai F, Zenewicz LA et al (2012) IL-22 signaling contributes to West Nile encephalitis pathogenesis. PLoS One 7, e44153
You F, Wang P, Yang L et al (2013) ELF4 is critical for induction of type I interferon and the host antiviral response. Nat Immunol 14:1237–1246
Bai F, Kong KF, Dai J et al (2010) A paradoxical role for neutrophils in the pathogenesis of West Nile virus. J Infect Dis 202:1804–1812
Daep CA, Munoz-Jordan JL, Eugenin EA (2014) Flaviviruses, an expanding threat in public health: focus on dengue, West Nile, and Japanese encephalitis virus. J Neurovirol 20:539–560
Gage GJ, Kipke DR, Shain W (2012) Whole animal perfusion fixation for rodents. J Vis Exp 65, e3564
Brehin AC, Mouries J, Frenkiel MP et al (2008) Dynamics of immune cell recruitment during West Nile encephalitis and identification of a new CD19 + B220-BST-2+ leukocyte population. J Immunol 180:6760–6767
Author information
Authors and Affiliations
Corresponding author
Editor information
Editors and Affiliations
Rights and permissions
Copyright information
© 2016 Springer Science+Business Media New York
About this protocol
Cite this protocol
Wang, P. (2016). Exploration of West Nile Virus Infection in Mouse Models. In: Colpitts, T. (eds) West Nile Virus. Methods in Molecular Biology, vol 1435. Humana Press, New York, NY. https://doi.org/10.1007/978-1-4939-3670-0_7
Download citation
DOI: https://doi.org/10.1007/978-1-4939-3670-0_7
Published:
Publisher Name: Humana Press, New York, NY
Print ISBN: 978-1-4939-3668-7
Online ISBN: 978-1-4939-3670-0
eBook Packages: Springer Protocols