
Abstract
The moss Physcomitrella patens possesses highly efficient homologous recombination allowing targeted gene manipulations and displays many features of the early land plants including high tolerance to abiotic stresses. It is therefore an invaluable model organism for studies of gene functions and comparative studies of evolution of stress responses in plants. Here, we describe a method for generating targeted gene knockout lines in P. patens using a polyethylene glycol-mediated transformation of protoplasts including basic in vitro growth, propagation, and maintenance techniques.
Access provided by CONRICYT – Journals CONACYT. Download protocol PDF
Key words
1 Introduction
Living organisms have to cope with various stresses, both of biotic and abiotic nature. Studies of stress response not only are essential for a better understanding of life and its diversity but also have significant medical and economic implications. Different species respond and adapt very differently from one another. Fight-or-flight strategy used by animals as the first stage of the response to a harmful event is not applicable for plants that are sessile organisms. Plants have their own panoply of stress responses that was shaped by migration of plant ancestors from water habitats to land. At the terrestrial surroundings, they had to develop strategies to respond to much more substantial fluctuations in temperature, light intensity, and quality, including a stronger exposure to the DNA-damaging ultraviolet compound of the light, and now to water availability ranging from drought to flooding. Bryophytes are considered to be the closest to the common ancestor of plants. Among them, the moss Physcomitrella patens provides us with powerful tools to study functions of genes and together with other model plants allows comparative analyses of evolution of molecular mechanisms of stress response and adaptation [1]. Physcomitrella displays many features characteristic to the early land plants including a high tolerance to drought , salinity, osmotic, and other abiotic stresses [2–5].
Physcomitrella is haploid through almost all life cycle. The diploid stage, sporophyte, is short and results in haploid spores. Spores germinate and produce filamentous structures, protonemata. The protonemal filaments, the juvenile stage of gametophyte, can initiate buds that further develop into gametophores, the adult stage of gametophyte. The gametophores have more complex organization, with leaflike structures, rhizoids, female and male sex organs producing gametes, and subsequently diploid zygote that develops into sporophyte.
Physcomitrella is a remarkable model organism. Minimalist anatomy and simple developmental stages of Physcomitrella can be easily monitored. This is further facilitated by efficient methods of in vitro growth and propagation [6, 7] that also provide ample source of material for biochemical and molecular analyses. Moreover, Physcomitrella is highly amenable to genetic manipulations [8]. Dominant haploid generation of Physcomitrella allows fast and simpler recognition of mutant phenotypes [9, 10]. Development of approaches for genetic transformation of Physcomitrella yielded not only routine and efficient procedures, such as polyethylene glycol (PEG)-mediated DNA delivery into protoplasts [11], but also led to the realization that it undergoes high frequency of homologous recombination , comparable to that in yeast [12]. Gene targeting through homologous recombination is one of the most efficient means to study gene functions. This technology is far less efficient when applied in plants that have low rates of homologous recombination . Gene targeting is not limited to generation of knockout mutants by gene disruption. It allows also knock-in manipulations, such as introduction of various reporters and tags for visualization of expression of endogenous genes and isolation of molecular complexes. Moreover, endogenous genes or their portions can be replaced by their modified versions, thus providing means for site-directed mutagenesis. Importantly, the Physcomitrella genome is sequenced and fully assembled, therefore enabling reverse genetic approaches [1].
Here, we provide a protocol for generating targeted gene knockout lines in P. patens using a PEG-mediated transformation of protoplasts including basic techniques for in vitro growth, propagation, and maintenance of P. patens. This protocol is routinely used in our lab and is based on the protocols developed earlier [6, 11, 13]. Rich information resources providing further Physcomitrella protocols and techniques are currently available online (http://moss.nibb.ac.jp/ and http://biology4.wustl.edu/moss/methods.html).
2 Materials
2.1 Materials and Equipment
-
1.
Physcomitrella patens, the “Gransden” strain, freshly grown protonemal tissue.
-
2.
Gene targeting linear DNA vector (Fig. 1), 10–15 μg of purified DNA dissolved in a maximum of 30 μL dH2O.
Fig. 1 
Strategy of targeted gene disruption by homologous recombination in Physcomitrella patens protoplasts. To create the DNA targeting construct, a sufficiently long region of the target gene is amplified by PCR using primers p1 and p2 (outer primers) and integrated into the plasmid vector. The antibiotic resistance selection cassette (in this case neomycin phosphotransferase gene, NPT II) is then ligated into convenient restriction sites within the cloned target gene to replace the coding sequence (upper left scheme). The DNA targeting construct is used as a template in a subsequent PCR with primers p3 and p4 (inner primers) to obtain a linear targeting vector. The selection cassette is flanked by about 1 kb regions of homology to the target gene (lower left scheme). The linear DNA targeting vector is used for PEG-mediated transformation of Physcomitrella protoplasts, where it homologously recombines with the genomic DNA (upper right scheme). As a result, the endogenous gene is disrupted by the selection cassette. Stable transformants after the selection process are verified by two PCRs using outer primers in combination with primers to the selection cassette (lower right scheme; primer combinations: p1 and p5, p6 and p2). White rectangles represent the endogenous gene or the homology regions of the construct and the vector; gray rectangles represent the selection cassette
-
3.
Laminar airflow hood.
-
4.
Blender suitable for sterilization (see Note 1 ).
-
5.
Water bath 45 and 25 °C (room temperature).
-
6.
Hemocytometer.
-
7.
Lighttight box (see Note 2 ).
-
8.
Petri dishes, 9 cm in diameter with one vent.
-
9.
Glass Petri dish.
-
10.
Filter paper discs, 5–8 cm in diameter.
-
11.
Sterile cellophane discs, 8 cm in diameter (see Note 3 ). To sterilize the cellophane discs separate each other by a disc of filter paper. Assemble ca. 30 cellophane discs in this sandwich way into a glass Petri dish, wrap into an aluminum foil, and autoclave.
-
12.
Sterile wide-bored (or cut tip) blue micropipette tips.
-
13.
Sterile 70 μm nylon mesh attached to sterile 50 mL centrifuge tube.
-
14.
Centrifuge 10–15 mL tubes with round bottom and a cap.
-
15.
Surgical tape.

2.2 Media and Solutions
-
1.
Stock solution B (100×): 101 mM MgSO4. Add 25 g of MgSO4·7H2O (or 12 g of anhydrous MgSO4) to 500 mL of water in a beaker. Dissolve using a magnetic stirrer, transfer to the 1 L graded cylinder, and make up to 1 L with water. Autoclave or filter sterilize. Store at 4 °C.
-
2.
Stock solution C (100×): 184 mM KH2PO4, pH 6.5. Weigh 25 g of KH2PO4 and dissolve in 500 mL of water as in previous step. Adjust pH to 6.5 with 4 M KOH. Make up to 1 L. Autoclave or filter sterilize. Store at 4 °C.
-
3.
Stock solution D (100×): 1 M KNO3, 4.5 mM FeSO4. Weigh 101 g of KNO3 and dissolve in 200 mL of water. Weigh 1.25 g of FeSO4·7H2O and dissolve separately in 200 mL of water. Adding of H2SO4 may help dissolve FeSO4·7H2O. Mix both solutions and make up to 1 L. Autoclave. Store at 4 °C for 2–3 month and discard when iron precipitate forms.
-
4.
Trace element solution (TES, 1000×): 614 mg H3BO3, 110 mg AlK(SO4)2·12H2O, 55 mg CuSO4·5H2O, 28 mg KBr, 28 mg LiCl, 25 mg Na2MoO4·2H2O, 389 mg MnCl2·4H2O, 55 mg CoCl2·6H2O, 55 mg ZnSO4·7H2O, 28 mg of KI, 28 mg SnCl2·2H2O, 59 mg NiCl2·6H2O. Weigh and separately dissolve all the components in ca. 50 mL of water. Combine the solutions and make up to 1 L. Store at 4 °C.
-
5.
Ammonium tartrate (AT) stock solution (100×): 0.5 M Diammonium (+) tartrate. Weigh 9.21 g of diammonium (+) tartrate and dissolve in 80 mL of water as in previous steps. Make up to 100 mL. Autoclave or filter sterilize. Store at 4 °C.
-
6.
CaCl2 stock solution: 1 M CaCl2. Weigh 11.1 g of CaCl2, dissolve in 80 mL of water, and make up to 100 mL as in previous steps. Autoclave or filter sterilize. Store at room temperature (see Note 4 ).
-
7.
Plant agar (see Note 5 ).
-
8.
BCD medium (see Table 1): Basal minimum medium. Pour ca. 20–25 mL of a medium per a 9 cm Petri dish. Store plates at 4–10 °C.
Table 1 Physcomitrella patens media -
9.
BCD-AT medium (see Table 1): BCD medium supplemented with NH4 as a nitrogen source. Pour ca. 20–25 mL of a medium per a 9 cm Petri dish. Store plates at 4–10 °C.
-
10.
LB broth.
-
11.
Mannitol 8 % (w/v): Weigh 8 g of mannitol and dissolve in 100 mL of water. If sterile solution is needed, autoclave or filter sterilize and store at room temperature.
-
12.
Driselase solution: 1 % (w/v) Driselase (see Note 6 ) in 8 % (w/v) mannitol. Add 50 mg Driselase into 5 mL of 8 % (w/v) mannitol solution (not sterile). Dissolve the powder in the centrifuge tube by inverting the tube occasionally and gently for 15 min. Centrifuge at 2500 rpm for 5 min. Filter sterilize the supernatant through a 0.22 μm filter. Prepare Driselase solution in amount of 5 mL per one Physcomitrella protonemal homogenate plate.
-
13.
MaMg solution: 0.15 M MgCl2, 8 % (w/v) mannitol, 0.1 % (w/v) MES. Weigh 3.05 g of MgCl2·6H2O, 8 g of mannitol, and 0.1 g of MES. Dissolve all ingredients consecutively in 90 mL of dH2O. Adjust the pH to 5.6 with 1 M KOH. Make up to 100 mL. Autoclave. Aliquot the solution in 10 mL plastic tubes and store at −20 °C (see Note 7 ). Before use thaw by placing the tube in a warm water and vortex until no precipitate is visible. Spin down.
-
14.
PEG-CMS: 0.1 M Ca(NO3)2, 20 mM HEPES, 7.28 % (w/v) mannitol, 40 % PEG 6000. Weigh 0.236 g of Ca(NO3)2.4H2O, 0.0476 g HEPES, and 0.728 g of mannitol and consecutively dissolve in 5 mL of water. Make up to the volume of 6 mL. Measure the pH. A pH between 7 and 8 is acceptable (ideally pH 7.5). To adjust the pH, use 1 M KOH (usually 30–40 μL). Add PEG, dissolve the solution by incubation at 37 °C in water bath, and shake occasionally. Make up to 10 mL and mix the viscous solution thoroughly (see Note 8 ). Leave it for several hours to stabilize the pH. Filter sterilize and dispense in 1 mL aliquots in 1.5 mL microtubes. Store at −20 °C. Before use thaw PEG-CMS by placing tubes in warm water, vortex, and pulse spin (see Note 9 ). Dispense 300 μL aliquots into 10 mL centrifuge tubes and centrifuge the tubes briefly. Prepare one tube per transformation .
-
15.
PRM-L (liquid) (see Table 1 and Note 10 ): Prepare 2 mL per transformation on the day of transformation.
-
16.
PRM-B (bottom layer) (see Table 1 and Note 10 ): Plates with solid medium overlaid with cellophane, prepared 1–2 days before transformation , three plates per transformation. Pour maximum 20 mL of PRM-B into 9 cm Petri dish.
-
17.
PRM-T (top layer) (see Table 1 and Note 10 ): Low agarose medium, prepare 10 mL per transformation on the day of embedding the protoplasts.
-
18.
Antibiotics (see Note 11 ).
3 Methods
The tissue culture and transformation procedures require sterile conditions and are carried out in the laminar airflow hood.
3.1 Physcomitrella patens Protonemal Tissue Growth, Propagation, and Collection
-
1.
Prepare BCD-AT growth plates and overlay them with sterile cellophane discs (see Note 12 ).
-
2.
Take a well-grown (5–7 days old) protonemal homogenate BCD-AT plate (Fig. 2a). Using a sterile spatula, scrape the protonemal tissue off of the cellophane and transfer it to the sterile glass tube of a blender assembly filled with 10 mL of sterile water.
Fig. 2 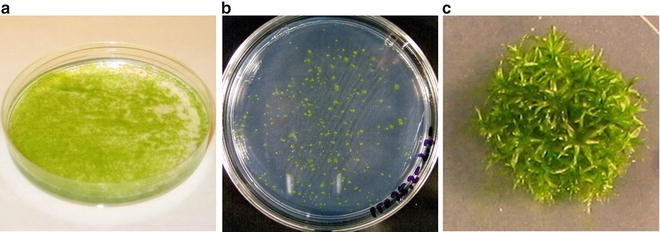
The moss Physcomitrella patens grown in vitro. (a) Protonemal homogenate plate, 6 days after incubation on BCD-AT plate. (b) Regenerating protoplasts after transformation , 5 days after incubation on PRM. (c) Colony with gametophores, incubated for 3 weeks on BCD-AT plate
-
3.
Blend the tissue in water until it is cut completely into ca. 0.5 mm small pieces.
-
4.
Using a sterile pipette, inoculate cut tissue suspension onto five cellophane overlaid BCD-AT plates 2 mL each. Make quick circular moves with the plate to evenly distribute the inoculum.
-
5.
To check for a bacterial contamination, add a few drops of the protonemal suspension to the 10 mL tube with 2 mL LB broth. Let it stay at the room temperature for 1–2 days and shake once a day (see Note 13 ).
-
6.
Cultivate the plates for 5–7 days (see Note 14 ) at 25 ± 2 °C, discontinuous white light (16-h light/8-h dark, 120 μmol/m2/s).

3.2 Physcomitrella patens Protoplast Isolation, PEG-Mediated Transformation, and Regeneration
-
1.
Collect the tissue from two 5–7 day old, well-grown BCD-AT cellophane overlaid plates (see Note 15 ) with a sterile spatula into a sterile container (e.g., Petri dish) containing 10 mL Driselase solution.
-
2.
Let the tissue digest at room temperature with occasional gentle stirring until the tissue loses its filamentous character (45–90 min) (see Note 16 ).
-
3.
Using a sterile pipette transfer the digested protoplast suspension onto a 70 μm filter placed in the corresponding container (see Note 17 ). Transfer the collected filtered suspension into the centrifuge tube.
-
4.
Centrifuge at 800 rpm for 4 min, no brakes (see Note 18 ).
-
5.
Carefully aspirate the supernatant at once using the pipette and leave ca. 0.1 mL of the liquid over the pellet. Resuspend the protoplasts in residuum very gently by rocking, tilting, and turning the tube. Slowly add 10 mL of 8 % mannitol (pour liquid slowly over the tube wall) and gently mix by rocking the tube. The cells should be evenly resuspended. Repeat steps 4 and 5.
-
6.
Set aside 0.2–0.3 mL of protoplast suspension to measure the protoplast density using the counting chamber (hemocytometer).
-
7.
Recover the remaining protoplasts by centrifugation at 800 rpm for 4 min, no brakes (see Note 18 ). Meanwhile calculate the protoplast density.
-
8.
To calculate the protoplast density pipette small amount of protoplast suspension to both chambers of the hemocytometer. Count protoplasts in eight 1 mm2 large squares and calculate the mean value n. This gives the density of the protoplasts in 0.1 μL and n × 105 corresponds to the total amount of protoplasts in 10 mL of 8 % mannitol. Calculate the amount of MaMg solution to be added to give a final protoplast density of 1.6 × 10⁶/mL.
-
9.
Carefully add calculated amount of MaMg solution to the pellet by slowly pouring it over the tube wall.
-
10.
(Optional) Transfer the resuspended protoplasts from the 10 mL tube to a wider and shallower container (e.g., Petri dish) in order to make further manipulations easier and reduce the risk of contamination.
-
11.
Pipette 300 μL of the protoplast suspension using a wide-bored blue tip into the microtube containing 30 μL DNA solution.
-
12.
Using a Pasteur pipette transfer the mixture of protoplasts and DNA to a 10 mL tube containing 300 μL PEG-CMS. Stir the mixture gently but thoroughly with the pipette tip. Gently suck up and expel the whole mixture once.
-
13.
Heat-shock the protoplasts by placing the tubes in the water bath at 45 °C for 5 min.
-
14.
Take the tubes out from the water bath and cool them in water at room temperature for 10 min.
-
15.
Reduce the concentration of PEG by diluting the mixture with 8 % mannitol. Diluting has to be done slowly over the next 30–60 min in 6–7 steps. Add stepwise twice 300 μL, twice 600 μL, and twice 1 mL aliquots of mannitol and finally top up to the volume of 8 mL. The protoplasts must be always mixed very gently but thoroughly by tilting and rolling the tube. Wait for 3 min between each addition to give the protoplasts enough time to recover.
-
16.
Centrifuge the protoplasts at 800 rpm for 4 min, no brakes (see Notes 18 and 19 ).
-
17.
Carefully remove the supernatant (see Note 20 ) and gently add 2 mL of PRM-L to each tube. Mix gently; do not shake.
-
18.
Incubate the tubes at 25 °C in the dark overnight (see Note 21 ).
-
19.
Next morning, incubate the regenerating protoplasts under the normal growth room light conditions until the PRM-T medium is ready to embed the protoplasts.
-
20.
Prepare PRM-T but do not add CaCl2 yet. Divide it into 10 mL aliquots into the tubes, one tube per transformation . Cool down the PRM-T to 45 °C in the preheated water bath.
-
21.
Centrifuge the protoplasts at 800 rpm for 3 min, no brakes (see Note 18 ).
-
22.
Take one of the PRM-T aliquots from the water bath and transfer it to the hood. Add CaCl2 in amount 100 μL per 10 mL of PRM-T.
-
23.
Carefully aspirate the supernatant from the tube with protoplasts and resuspend the protoplasts in residuum very gently by rocking, tilting, and turning the tube. Add 10 mL of PRM-T and pour this on three PRM-B plates (see Note 22 ).
3.3 Selection of the Genomic Transformants
An outline of the selection process is shown in Fig. 3.

Outline of the selection of Physcomitrella stable transformants. Protoplasts regenerate 5 days on PRM plate. To select the transformed colonies, a cellophane disc with colonies is transferred onto selective BCD-AT plate with antibiotics and incubated for 2–3 weeks. Surviving colonies are transferred on the BCD-AT plate and grown for 2 weeks without antibiotics, allowing unstable transformants (with non-integrated vector) to lose their antibiotic resistance. Spot inocula of all the colonies are then transferred to the selective BCD-AT plate with antibiotics in order to select stable transformants (with targeting DNA integrated into the genomic DNA). Black dots represent surviving colonies; grey dots represent dying colonies
-
1.
Cultivate the embedded protoplasts 5 days under standard conditions in the growth chamber (Fig. 2b) (see Note 23 ).
-
2.
Initiate the first selection by transferring the cellophane with the top agar containing regenerated protoplasts on BCD-AT plate supplemented with appropriate antibiotics. Cultivate for 2–3 weeks under the standard conditions in the growth chamber (see Note 24 ).
-
3.
Release the selection. With sterile forceps transfer colonies that show growth on the selective medium to the BCD-AT plates with no antibiotics and no cellophane. Cultivate for 2 weeks under the standard conditions in the growth chamber (see Note 25 ).
-
4.
Repeat the selection. Using sterile forceps transfer small part of the protonemal tissue from the edge of each colony (spot inoculum) to BCD-AT medium supplemented with antibiotics and no cellophane. Cultivate for 2 weeks under the standard conditions in the growth chamber.
-
5.
Select stable transformants that survive on the selection medium (see Note 26 ).
3.4 Preparation of the Material for Verification and Molecular Characterization of the Targeted Gene Disruption
-
1.
Transfer spot inoculum (small part of the protonemal tissue from the edge of the colony) of the wild type and the lines to be analyzed on the BCD-AT plates with cellophane. Seal the dish with the surgical tape to reduce evaporation. Cultivate under the standard conditions in the growth chamber for 3–4 weeks or longer until the colonies provide sufficient tissue (ca. 0.5–1 cm in diameter) (see Note 27 ).
-
2.
To obtain material for molecular analyses from colonies, pick the colony from the cellophane with forceps, dry it briefly with a filter paper, transfer into a 1.5 mL microcentrifuge tube, and freeze in liquid nitrogen.
-
3.
Grind the tissue to a very fine powder using a plastic pestle (cooled in liquid nitrogen) attached to a homogenizer. Keep the tissue frozen by scooping some liquid nitrogen into the tube.
-
4.
To establish a protonemal homogenate subculture from the confirmed transformants transfer the colony (Fig. 2c) on a 1/6 sector of the BCD-AT plate with cellophane, dissect the protonemal part of the colony to as small pieces as possible with forceps, and distribute over the sector of the plate (see Note 28 ). Cultivate under standard conditions in the growth chamber for about 2 weeks, until the tissue is dense and has fresh green color. Subculture the protonemal tissue several times (see Subheading 3.1, steps 2–4) (see Note 29 ). The aim is to achieve a yield 500 mg of the tissue per protonemal homogenate plate (see Note 30 ).
-
5.
To obtain material for molecular analyses from a protonemal homogenate tissue (Fig. 2a), scrape the protonemal tissue with a sterile spatula off of the cellophane and dry briefly between two layers of filter paper. Repeat drying approx. three times until almost no water comes out of the tissue. Weigh the tissue, transfer a maximum of 100 mg into the 1.5 mL microcentrifuge tube, and freeze in liquid nitrogen. Perform step 3 to grind the tissue.
-
6.
Extract DNA and RNA using a plant extraction kit (see Note 31 ).
3.5 Preparation of the Material for Phenotypic Analyses of the Protonemal Tissue and Gametophores
-
1.
To obtain protonemal tissue suitable for observation, subculture the protonemal tissue on the BCD-AT plates with cellophane (see Subheading 3.1, steps 2–4). Cultivate for a maximum of 7 days under standard conditions in the growth chamber (see Note 32 ).
-
2.
To induce gametophore production, take a little piece (about 1 mm) of the protonemal tissue from freshly grown protonemal homogenate plate (Fig. 2a) with the forceps (see Note 32 ). Transfer the spot inoculum to the BCD-AT plate overlaid with cellophane. Cultivate under the standard conditions in the growth chamber for 1 week or until the colonies are about 1 cm in diameter. Transfer the colonies onto the BCD plates, with no cellophane. Cultivate under standard conditions in the growth chamber until the colonies develop gametophores (leafy shoots) with approximately ten leafs (see Note 33 ).
-
3.
To compare colonies of different lines, inoculate protonemal spot inoculum (see step 2) of maximum six lines (including wild type) on one plate containing desired solid media. Arrange the colonies to the circle with approximately the same distance from the edge of the Petri dish and from each other. Cultivate under standard conditions in the growth chamber until the colonies are about 0.5–1 cm in diameter (see Note 34 ).
3.6 Short-Term Storage and Regeneration
-
1.
To store P. patens as a protonemal homogenate tissue, seal well-grown (5–7 days old) protonemal homogenate plate (Fig. 2a) with parafilm. Store the plate at 4–10 °C and illuminate for 2 h per day with a white light (see Note 35 ). To fully regenerate the tissue, subculture the tissue (see Subheading 3.1, steps 2–4) at least twice. Protonemal tissue plates can be stored for up to 3 months.
-
2.
To store P. patens as a colony, take a small piece of the protonemal tissue with sterile forceps or a small piece of the tissue from the edge of the colony (spot inoculum) and transfer to the BCD plate, no cellophane. Cultivate under standard conditions in the growth chamber for 2–3 weeks. Seal the dish with parafilm, store at 4–10 °C and illuminate the plates for 2 h per day with white light (see Note 35 ). Plates with colonies can be stored for 2–3 months. Regenerate the tissue by making spot inoculum and transfer to the BCD-AT plates (see Note 36 ).
4 Notes
-
1.
For example IKA Ultra Turrax. Previously we used a custom-made blender assembly, consisting of a glass tube and a metallic part with rotating blades. The blender assembly was attached to a drill-like rotor.
-
2.
A cardboard box without holes that closes very tightly is sufficient.
-
3.
Discs can be purchased from a packaging company.
-
4.
CaCl2 cannot be autoclaved added to the medium. Add corresponding amount of the CaCl2 solution to the cooled medium right before pouring it.
-
5.
We use Plant Agar P1001, Duchefa. Use of another agar may require optimization of the final concentration in the medium.
-
6.
We use Driselase from Basidiomycetes sp., SIGMA, D8037.
-
7.
Since adjusting pH in small volume might be difficult, making 100 mL of the MaMg solution and freezing is recommended.
-
8.
Proper dissolving of PEG requires repeated thorough mixing and may take time.
-
9.
Make sure that no precipitate is visible.
-
10.
Protoplast regeneration medium (PRM) is BCD-AT medium supplemented with 6 % (w/v) mannitol and higher concentration (10 mM) of CaCl2.
-
11.
According to the antibiotic resistance gene incorporated in the DNA targeting vector we use G418 at the concentration of 40 mg/L.
-
12.
It may take a while to practice this. The media must not be too wet (condensed water) to prevent wrinkling of the cellophane.
-
13.
Clear LB medium means no contamination. If the medium turns cloudy or opaque in 1–2 days, this is a sign of contamination.
-
14.
Cultivate until the plate is homogenously and densely grown by protonemal tissue of intense green color (Fig. 2a).
-
15.
Two plates are optimal to obtain sufficient amount of the tissue (about 1 g) and protoplasts for one transformation .
-
16.
The extent of the digestion can be monitored under the microscope.
-
17.
Filtration can be repeated for better removal of undigested tissue.
-
18.
Since the protoplasts are very fragile, it is recommended to turn the brake off completely. If it takes too long until the centrifuge stops, it is possible to turn the brake on when speed is down to ca. 80 rpm.
-
19.
Alternatively let the protoplasts settle down by leaving the tube standing upright on the bench for 30–60 min.
-
20.
The pellet is very loose.
-
21.
Place the tubes in a lighttight box and incubate in the growth chamber.
-
22.
PRM-T solidifies quickly at room temperature; therefore this step must be done fast.
-
23.
The protoplasts recovery may take 3–6 days. Check under the stereomicroscope if the cells proliferate and the filaments are formed.
-
24.
Colonies originated from untransformed cells turn light brown and die.
-
25.
This step allows non-genomic transformants to lose the non-integrated construct.
-
26.
Do not miss positive transformants showing reduced growth of the colony as an effect of the gene disruption.
-
27.
One colony gives enough tissue for PCR analysis of the gene targeting events, but not for all the subsequent analyses. It is also possible to establish a protonemal homogenate subculture (see Subheading 3.4, step 4) at this stage, which gives more tissue in shorter time, but is more laborious, especially in case of many positive colonies after the selection process.
-
28.
If an increased amount of the starting tissue is needed, gametophores (leafy shoots) can also be dissected and used as a source of the protonemal tissue.
-
29.
Reduce the amount of water for blending and the number of plates for inoculation during the first round of subculture.
-
30.
Another option is to homogenize the colony in a small amount of water in the homogenizer and inoculate on a BCD-AT plate with cellophane.
-
31.
To confirm targeted insertion event in the genome, PCR amplify and sequence both regions of insertion outward from the selection cassette. Use the outer primers in combination with primers to the selection cassette (Fig. 1). Southern blotting allows detection of multiple insertions in case they occur to the nonhomologous sites of the moss genome. To monitor the transcript production of the targeted gene, conduct the RT-PCR and Northern blotting.
-
32.
Use well-grown tissue that was subcultured at least twice consecutively and grown for 5–7 days under standard conditions in the growth chamber.
-
33.
While growth of gametophores is enhanced by cultivation on BCD medium, the overall growth of the colony is slower than on BCD-AT plates, hence the transfer from BCD-AT to BCD.
-
34.
PEG-mediated transformation can generate polyploids due to protoplast fusion. Polyploid colonies have different shape, more caulonemal tissue, and less gametophores than the wild-type haploid colonies.
-
35.
The most important is regular daily illumination rather than the quality and intensity of the light.
-
36.
Additional options for storage of the P. patens lines can be found in the literature.
References
Rensing SA, Lang D, Zimmer AD, Terry A, Salamov A, Shapiro H, Nishiyama T, Perroud PF, Lindquist EA, Kamisugi Y, Tanahashi T, Sakakibara K, Fujita T, Oishi K, Shin IT, Kuroki Y, Toyoda A, Suzuki Y, Hashimoto S, Yamaguchi K, Sugano S, Kohara Y, Fujiyama A, Anterola A, Aoki S, Ashton N, Barbazuk WB, Barker E, Bennetzen JL, Blankenship R, Cho SH, Dutcher SK, Estelle M, Fawcett JA, Gundlach H, Hanada K, Heyl A, Hicks KA, Hughes J, Lohr M, Mayer K, Melkozernov A, Murata T, Nelson DR, Pils B, Prigge M, Reiss B, Renner T, Rombauts S, Rushton PJ, Sanderfoot A, Schween G, Shiu SH, Stueber K, Theodoulou FL, Tu H, Van de Peer Y, Verrier PJ, Waters E, Wood A, Yang L, Cove D, Cuming AC, Hasebe M, Lucas S, Mishler BD, Reski R, Grigoriev IV, Quatrano RS, Boore JL (2008) The Physcomitrella genome reveals evolutionary insights into the conquest of land by plants. Science 319(5859):64–69. doi:10.1126/science.1150646, 1150646 [pii]
Wang XQ, Yang PF, Liu Z, Liu WZ, Hu Y, Chen H, Kuang TY, Pei ZM, Shen SH, He YK (2009) Exploring the mechanism of Physcomitrella patens desiccation tolerance through a proteomic strategy. Plant Physiol 149(4):1739–1750. doi:10.1104/pp.108.131714
Frank W, Ratnadewi D, Reski R (2005) Physcomitrella patens is highly tolerant against drought, salt and osmotic stress. Planta 220(3):384–394. doi:10.1007/s00425-004-1351-1
Charron AJ, Quatrano RS (2009) Between a rock and a dry place: the water-stressed moss. Mol Plant 2(3):478–486. doi:10.1093/mp/ssp018
Saavedra L, Svensson J, Carballo V, Izmendi D, Welin B, Vidal S (2006) A dehydrin gene in Physcomitrella patens is required for salt and osmotic stress tolerance. Plant J 45(2):237–249. doi:10.1111/j.1365-313X.2005.02603.x
Knight CD, Cove DJ, Cuming AC, Quatrano RS (2002) Moss gene technology. In: Gilmartin PM, Bowler C (eds) Molecular plant biology, vol 2. Oxford University Press, Oxford, pp 285–301
Cove D (2005) The moss Physcomitrella patens. Annu Rev Genet 39:339–358. doi:10.1146/annurev.genet.39.073003.110214
Quatrano RS, McDaniel SF, Khandelwal A, Perroud PF, Cove DJ (2007) Physcomitrella patens: mosses enter the genomic age. Curr Opin Plant Biol 10(2):182–189. doi:10.1016/j.pbi.2007.01.005
Ashton NW, Cove DJ (1977) The isolation and preliminary characterisation of auxotrophic and analogue resistant mutants of the moss, Physcomitrella patens. Mol Gen Genet 154(1):87–95. doi:10.1007/bf00265581
Ashton NW, Grimsley NH, Cove DJ (1979) Analysis of gametophytic development in the moss, Physcomitrella patens, using auxin and cytokinin resistant mutants. Planta 144(5):427–435. doi:10.1007/BF00380118
Schaefer D, Zryd JP, Knight CD, Cove DJ (1991) Stable transformation of the moss Physcomitrella patens. Mol Gen Genet 226(3):418–424
Schaefer DG, Zryd JP (1997) Efficient gene targeting in the moss Physcomitrella patens. Plant J 11(6):1195–1206
Kamisugi Y, Cuming AC, Cove DJ (2005) Parameters determining the efficiency of gene targeting in the moss Physcomitrella patens. Nucleic Acids Res 33(19):e173. doi:10.1093/nar/gni172
Acknowledgements
We thank Dr. Cuming and Dr. Kamisugi for expert advice and training in Physcomitrella transformation , as well as for providing us with the “Gransden” strain of P. patens and advice on its handling and for the vectors used for preparing constructs. This work was supported by the Austrian Science Fund (FWF [P26333]) to M.K.
Author information
Authors and Affiliations
Corresponding author
Editor information
Editors and Affiliations
Rights and permissions
Copyright information
© 2016 Springer Science+Business Media New York
About this protocol
Cite this protocol
Maronova, M., Kalyna, M. (2016). Generating Targeted Gene Knockout Lines in Physcomitrella patens to Study Evolution of Stress-Responsive Mechanisms. In: Duque, P. (eds) Environmental Responses in Plants. Methods in Molecular Biology, vol 1398. Humana Press, New York, NY. https://doi.org/10.1007/978-1-4939-3356-3_18
Download citation
DOI: https://doi.org/10.1007/978-1-4939-3356-3_18
Published:
Publisher Name: Humana Press, New York, NY
Print ISBN: 978-1-4939-3354-9
Online ISBN: 978-1-4939-3356-3
eBook Packages: Springer Protocols