
Abstract
Common human balding or hair loss is driven by follicle miniaturization. Miniaturization is thought to be caused by a reduction in dermal papilla size. The molecular mechanisms that regulate papilla size are poorly understood, and their elucidation would benefit from a tractable experimental model. We have found that dermal papilla cells from sheep spontaneously aggregate in culture to form papilla-like structures. Here, we describe methods for microdissecting dermal papillae from wool follicles, for initiating and maintaining cultures of ovine papilla cells, and for using these cells in an in vitro assay to measure the effect of bioactive molecules on aggregate size.
Access provided by CONRICYT – Journals CONACYT. Download protocol PDF
Key words
1 Introduction
The biology of wool follicles from sheep has a long history of scientific investigation, due its relevance to the wool industry [1]. The anatomy, development, physiology, and molecular biology of wool follicles are generally similar to those from other species. However, some idiosyncrasies of wool follicles and their constituent cells make them a good model for studying particular aspects of mammalian hair biology.
Dermal papilla cells (DPC) exhibit marked morphogenetic activity in addition to their multipotency [2, 3]. When cultured cells are implanted in the skin , they are able to reorganize to form a papilla and induce the growth of a new hair follicle [4–6]. The spontaneous aggregation of DPC in culture is likely to be another expression of this morphogenetic activity [6–8]. We have found that DPC from wool follicles aggregate particularly robustly. We have used these cells to develop an in vitro assay for bioactive molecules that influence aggregate size [9]. The molecular mechanisms that determine dermal papilla size are of interest because the size of the papilla influences the size of the whole follicle [10, 11]. Importantly, alterations in papilla size are thought to underlie follicle miniaturization associated with human hair loss [12, 13].
In this chapter, we describe methods for harvesting wool follicles from sheep skin and microdissecting the dermal papillae. The isolated papillae are then used to initiate DPC cultures which maintain robust aggregative behavior over numerous passages. We describe a standardized in vitro assay in which these cells are used to measure the effect of bioactive molecules on aggregate size. We have also adapted these methods to culture DPC from the pelage follicles of cattle [14], deer, and rats.
Microdissection of wool follicles to isolate the dermal papillae is technically difficult due to their small size. A certain amount of practice is usually required to develop the necessary manual skills. For beginners, we recommend starting with larger vibrissa follicles, either from rats or sheep. Vibrissa can be isolated from the upper lip skin of sheep by modifying the methods in Subheadings 3.1 and 3.2, steps 1–9. The papilla can then be isolated using methods previously described for rat vibrissae [15].
2 Materials
-
1.
Sheep . We usually obtain sheep skin specimens from a nearby abattoir. Lambs (typically <18 months old) are preferable, as cells from younger animals seem to grow more robustly (see Note 1 ).
-
2.
Stereomicroscope and cold light source (see Note 2 ).
-
3.
Serrated tip forceps (see Note 3 ).
-
4.
No. 4 watchmakers’ forceps (at least 2).
-
5.
No. 5 watchmakers’ forceps (at least 3).
-
6.
No. 24 scalpel blades with no. 4 handle.
-
7.
Curved-blade microscissors (World Precision Instruments, Sarasota, FL).
-
8.
Angled-blade microscissors (World Precision Instruments).
-
9.
26-G hypodermic needles, with 10 or 20 ml syringes to use as handles.
-
10.
Plastic universal tubes (30 ml, screw top).
-
11.
10-cm Petri dishes. Non-tissue-culture-treated dishes are better for follicle dissection, because they are shallower. Tissue-culture-treated dishes are necessary for growing DPC.
-
12.
Tissue-culture-treated 35 mm Petri dishes.
-
13.
Tissue-culture-treated 25 cm2 flasks (or other culture vessels as desired).
-
14.
Collagen-coated 12-well culture plates (Becton Dickinson, Oxford, UK).
-
15.
Dissection medium: minimum-essential medium (MEM) supplemented with 100 U/ml penicillin, 0.1 mg/ml streptomycin, 12.5 ng/ml amphotericin B, and 10 % lamb serum. Make up the day before to ensure the antibiotics are fresh.
-
16.
Culture medium: MEM supplemented with 100 U/ml penicillin, 0.1 mg/ml streptomycin, 12.5 ng/ml amphotericin B, and 20 % lamb serum.
-
17.
PBS (phosphate buffered saline): 8.0 g/l sodium chloride, 0.2 g/l potassium chloride, 1.15 g/l disodium hydrogen phosphate, 0.2 g/l potassium dihydrogen phosphate, pH 7.3 (tablets from Oxoid, Basingstoke, UK, cat. no. BR0014).
-
18.
PBS/EDTA: PBS with 0.6 mM EDTA.
-
19.
Trypsin solution: 0.25 % trypsin in PBS/EDTA.
-
20.
Freezing mix: 90 % lamb serum with 10 % dimethyl sulfoxide.
-
21.
Van Gieson’s solution (Sigma-Aldrich, St. Louis, MO).
3 Methods
3.1 Skin Collection
-
1.
Wear latex or nitrile cloves, and periodically rub them with 70 % ethanol as an antimicrobial precaution.
-
2.
Swab the work area with 70 % ethanol and paper towels.
-
3.
Swab the skin to be harvested with 70 % ethanol and paper towels (see Note 4 ).
-
4.
Shave the wool from the harvest site using a no. 24 scalpel blade in a standard holder (see Note 5 ).
-
5.
Clean the shaved site by wiping it with 70 % ethanol-saturated paper towels. Blot away any excess fluid.
-
6.
Make four scalpel incisions through the skin, to form a 2 × 2 cm square.
-
7.
Grasp one corner of the square with serrated-tip forceps. Use a fresh no. 24 scalpel to cut through the connective tissue beneath the skin, beginning at the same corner. Continue to cut beneath the square, lifting the free skin as you proceed, until the square of skin has been removed from the surrounding tissue (see Note 6 ).
-
8.
Place the skin in a Universal bottle approximately half-full with dissection medium. Place on ice for short-term storage and transport.
3.2 Follicle Dissection
-
1.
Work in a laminar flow cabinet; wipe down with 70 % ethanol and paper towels before beginning.
-
2.
Preferably, place a stereomicroscope and cold light source inside the cabinet and wipe down with 70 % ethanol (see Notes 7 and 8 ).
-
3.
Wear latex or nitrile cloves, and periodically rub them with 70 % ethanol.
-
4.
Throughout the dissection, work at room temperature but store tissue in dissection medium on ice while it is not being worked on.
-
5.
Using forceps to handle the skin, wash it through three changes of dissection medium, in three fresh 10 cm Petri dishes. Make sure the skin is fully immersed in medium. Leave the inner surface of the skin facing upward in the last dish, ensuring there is sufficient medium to just cover the skin.
-
6.
Place the dish and skin under the stereomicroscope, set to low-power magnification.
-
7.
Use a pair of curved microscissors to cut away any subcutaneous muscle, while using a pair of no. 4 watchmakers’ forceps in your other hand to hold the skin in place. This will expose a layer of connective tissue which typically has a fibrous texture.
-
8.
Use the microscissors to mince away the connective tissue from the centre of the skin piece, until the lower follicle bulbs begin to emerge (see Note 9 ).
-
9.
To harvest follicles, hold the forceps as close to horizontal as possible and pinch a small area of the minced skin. This will make the follicles stand up from the surrounding connective tissue. Use a pair of angled microscissors with the blades parallel to the forceps to cut away a cluster of follicles (see Note 10 and Fig. 1a). Transfer to a fresh 10 cm Petri dish containing dissection medium. Continue until sufficient follicles for the day have been harvested before proceeding to the next step.
Fig. 1 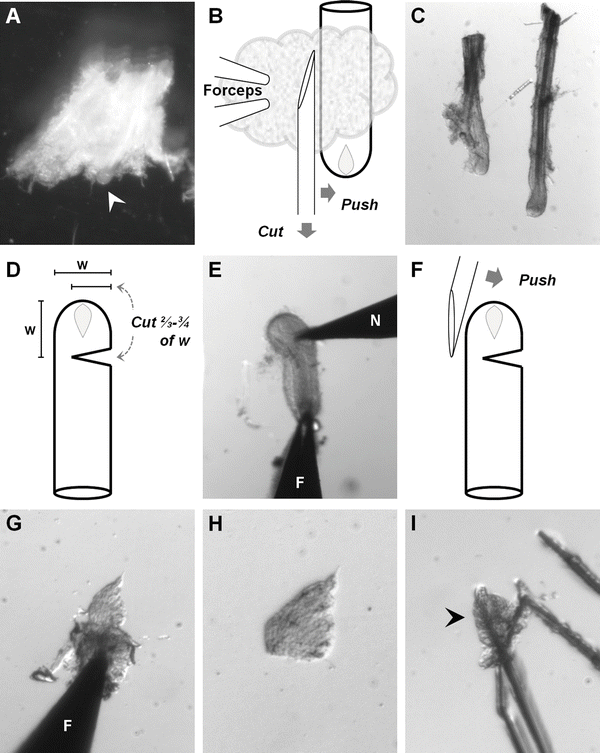
Dissection and isolation of dermal papillae . (a) A cluster of wool follicles embedded in connective tissue. The end-bulb of one follicle can be seen protruding from the connective tissue (arrowhead). (b) To cut follicles from the connective tissue, use the side of the needle to push against the follicle, stretching the connective tissue, while simultaneously drawing the tip of the needle through the tissue to cut it. (c) Two isolated wool follicles. (d) Cut \( \raisebox{1ex}{$2$}\!\left/ \!\raisebox{-1ex}{$3$}\right.-\raisebox{1ex}{$3$}\!\left/ \!\raisebox{-1ex}{$4$}\right. \) of the way through the follicle, a distance from the end approximately equal to the follicle width (w). (e) A follicle being cut. N needle, F forceps. (f) To invert the bulb of the cut follicle, push against it with the side of the needle. (g) An inverted follicle bulb, showing the papilla protruding toward the top of the image. F forceps. (h) An isolated dermal papilla . (i) A papilla (arrowhead) scratched onto the bottom of the culture dish
-
10.
Set the microscope to medium power magnification to isolate individual follicles. Use a pair of no. 5 watchmakers’ forceps to hold a cluster of follicles, pinning it to the bottom of the dish. Use a 26-G hypodermic needle to tease a follicle away from the attached remnants of connective tissue (see Note 11 and Fig. 1b, c). Transfer the isolated follicle to a fresh 35 mm dish of dissecting medium, using no. 5 watchmakers’ forceps to grasp it by the cut end. Do not touch the bulb containing the papilla to avoid damaging it. Continue until sufficient follicles for the day have been isolated before proceeding to the next step.
-
11.
Place seven drops of dissection medium in the lid of a 10 cm Petri dish (see Note 12 ). Transfer one follicle to each drop (see Note 13 ).
-
12.
Place 2.0 ml culture medium in a 35 mm Petri dish, pre-warmed to 37 °C. Place the 35 mm Petri dish inside a 10 cm dish to facilitate handling.
-
13.
Set the microscope to high power to isolate dermal papillae. Grasp the cut end of the follicle with a pair of no. 5 watchmakers’ forceps, simultaneously pinning it to the bottom of the Petri dish lid. Use a fresh 26-G hypodermic needle to make an incision \( \raisebox{1ex}{$2$}\!\left/ \!\raisebox{-1ex}{$3$}\right.-\raisebox{1ex}{$3$}\!\left/ \!\raisebox{-1ex}{$4$}\right. \) of the way through the follicle, positioned a distance above the very base of the bulb approximately equal to the follicle width (Fig. 1d and e).
-
14.
Use the non-beveled side of the needle tip to push against the follicle bulb on the non-cut side, to turn the bulb inside out (Fig. 1f and g). Semi-keratinized tissue from the nascent hair shaft (i.e., the keratogenous zone) should fall away easily, leaving a leaf-shaped dermal papilla protruding from the inverted dermal sheath. There may be some germinative epithelial tissue visible at the junction between the papilla and the dermal sheath (see Note 14 ).
-
15.
Use the needle tip to tease away excess germinative epithelium. Use the needle tip to cut the clean dermal papilla away from the dermal sheath (see Note 15 and Fig. 1h).
-
16.
Use a pair of no. 5 watchmakers’ forceps to transfer the papilla to a 35 mm Petri dish containing 2.0 ml culture medium, pre-warmed to 37 °C (see Note 16 ). Use a 26-G needle to gently stab through the papilla and make a small scratch on the bottom of the dish. The cut papilla should adhere to the scratch, holding it in place (Fig. 1i).
-
17.
Place 6–10 papillae in one 35 mm dish of culture medium (i.e., the papillae isolated from 1–2 batches of seven follicles, as in step 11 above, allowing for lost or damaged papillae). Place each dish in a tissue-culture incubator at 37 °C/5 % CO2 once it contains sufficient papillae (see Note 17 ). Do not move or disturb the dish for 1 week, to avoid the risk of papillae moving within the dish as cell outgrowth is initiating. Set up 2–4 dishes in a day.

3.3 DPC Culture
-
1.
For all DPC culture procedures, observe standard aseptic technique for mammalian cell culture, and standard procedures for discarding biological waste material.
-
2.
After 1 week, check the cultures for outgrowth of cells. DPC initially appear as scattered fibroblastic cells around the explants. Approximately ¾ of explants should produce cells. Replenish the culture medium every 3–4 days from this point on (i.e., twice per week).
-
3.
Continue to observe cell growth. Cell density should increase as they proliferate, and three-dimensional aggregates of cells should be seen in denser regions toward the centre of the culture. Passage the cells once they cover approximately half of the culture dish (see Note 18 ).
-
4.
To passage DPC, wash with three changes of PBS/EDTA (pre-warmed to 37 °C).
-
5.
Replace PBS/EDTA with 2.0 ml trypsin solution (pre-warmed to 37 °C). Immediately remove 1.5 ml.
-
6.
Incubate at 37 °C until the cells round up and detach, typically after 5–10 min. Tap the dish on a flat surface to aid detachment.
-
7.
Add 4.5 ml culture medium (pre-warmed to 37 °C). Gently aspirate the cell suspension and transfer to a tube for centrifugation.
-
8.
Centrifuge at 400 × g for 5 min to pellet the cells. Decant and discard the supernatant and resuspend the cells in 5.0 ml culture medium (pre-warmed to 37 °C).
-
9.
Seed into a 25 cm2 culture flask. Maintain at 37 °C/5 % CO2. Cells should be reattached by the next day. Continue to replenish the culture medium every 3–4 days.
-
10.
Once the cells are confluent, passage into a 10 cm culture dish (see Note 19 ). Follow the procedure described above, with volumes scaled up appropriately.
-
11.
For subsequent passages, re-seed the cells into fresh 10 cm dishes, splitting 1:2 or 1:4.
-
12.
To freeze cells, trypsinize as described above in steps 4–7.
-
13.
Count cells on a hemocytometer before centrifuging. Obtain 1.0–1.5 × 10⁷ cells from one confluent 10 cm dish. However this number is quite variable, because cells continue to proliferate after first appearing confluent.
-
14.
Centrifuge at 400 × g for 5 min to pellet the cells.
-
15.
Resuspend at 4.0–5.0 × 10⁶ cells/ml in freezing mix. Transfer 1 ml aliquots into cryovials.
-
16.
Cool slowly in a cell freezing canister in a −80 °C freezer.
-
17.
Store under liquid nitrogen.
-
18.
To thaw cells, warm a cryovial rapidly in a 37 °C waterbath.
-
19.
Seed cells from one vial into one 10 cm culture dish containing 9 ml culture medium (pre-warmed to 37 °C).
-
20.
Replenish the culture medium the next day. Maintain cultures and passage as described above.
3.4 Aggregation Assays
-
1.
Perform standardized aggregation assays in collagen-coated 12-well plates.
-
2.
Prepare cells by culturing in 10 cm dishes as described in Subheading 3.3. Allow cells to begin aggregating before beginning a standardized assay.
-
3.
Harvest the cells by trypsinization, count, and resuspend in culture medium at 1.33 × 10⁶ cells/ml (as in Subheading 3.3).
-
4.
Prepare a 12-well plate by adding 750 μl/well culture medium containing a bioactive at twice its final concentration, pre-warmed to 37 °C (see Note 20 ).
-
5.
Add 750 μl/well of the cell suspension (1.0 × 10⁶ cells/well). Maintain at 37 °C/5 % CO2.
-
6.
Begin half-volume medium changes the next day. Remove 750 μl of spent medium and add 750 μl of fresh medium. Ensure that the correct concentration of bioactive is maintained in each well.
-
7.
Perform a half-volume medium change every second day (see Note 21 ).
-
8.
Continue until numerous spheroid aggregates are seen throughout, typically after 1–2 weeks.
-
9.
Fix and stain the cells via the following steps:
-
PBS, two brief washes.
-
90 % ethanol with 5 % acetic acid and 5 % water, 20 min fixation.
-
Water, three brief washes.
-
Van Gieson’s solution, staining for 3 min.
-
Water, four 2 min washes.
-
50 % ethanol, 5 min wash.
-
70 % ethanol, brief wash.
-
95 % ethanol, brief wash.
-
100 % ethanol, two 3-min washes.
-
-
10.
Photograph the cells straight away, while still in the last wash. Use an Olympus SZ40 stereomicroscope and Leica DFC290 camera or equivalent. Ideally, photograph the entire well in a single field of view.
-
11.
Stained aggregates appear red-orange, with minimal staining of cell monolayers between the aggregates.
-
12.
Measure the diameter of aggregates from a digital photomicrograph, either manually or by image analysis.
4 Notes
-
1.
The lamb head is a convenient body site for collecting skin, because it has no commercial value and is removed from the carcass at an early stage of processing. It can therefore be obtained shortly after death with minimal disruption to abattoir operations. Wool-type follicles are found around the neck and the back of the head, whereas the muzzle has hair-type follicles (producing shorter but coarser fibers) and vibrissae . We routinely use wool-type follicles to initiate DPC cultures, and further standardize the body site by collecting the skin specimen from the neck, at a position that forms an equilateral triangle with the eye and the ear. However, we have successfully initiated cultures from other body sites with no obvious differences in cell growth or behavior. We aim to begin the skin collection within 15 min of death, but we have successfully initiated DPC cultures from lambs’ heads that were stored on ice for 2–3 h while they were transported to the lab. We have also initiated cultures from skin which was collected, washed as in Subheading 3.2, step 5, stored in dissection medium overnight at 4 °C, and then dissected the next day.
-
2.
We use 10× eyepieces with a microscope body that zooms to at least 40× magnification (preferably more). We illuminate the specimen from above using a cold light source with two fiber optic arms, positioned at around 45° each side of the back of the microscope. We prefer a base as flat as possible, and large enough to accommodate at least two 10 cm dishes. We then slide these alternatively in and out of the field of view without removing them from the base (see Subheading 3.2, step 16 and Note 16 ).
-
3.
Not all no. 5 watchmakers forceps have tips of equal fineness, but it is useful to have the finest available. It is also helpful to dedicate a pair of forceps for transferring isolated papillae from the dissection dish to the culture dish. Bend the tips slightly inward, so that they close at a larger than standard angle, accommodating an isolated papilla in the space between the tines just back from the tips (see Subheading 3.2, step 16 and Note 16 ). More generally, we use a different pair of forceps for different tasks, in order to minimize the transfer of tissue fragments and so keep both the instruments and dissection medium clean for the delicate final steps of the procedure.
-
4.
As the wool is typically quite dense, the ethanol needs to be worked through it by rubbing with saturated paper towels.
-
5.
Wet the wool thoroughly with more 70 % ethanol. Hold the edge of the scalpel blade at 45° to the skin surface while scraping the wool away. Place your free hand on the surrounding skin to stabilize it, taking care to shave away from your fingers. Keep a 70 % ethanol-saturated paper towel nearby, and remove shaved wool from the scalpel by wiping it onto the towel.
-
6.
As an additional antimicrobial precaution, the scalpel and forceps can be dipped into a Universal bottle half-full with 70 % ethanol, followed by one with dissection medium. This is useful if the instruments accidently come into contact with the work bench or with sheep skin that has not been swabbed with ethanol.
-
7.
If it is not possible to work with the stereomicroscope inside the cabinet, it can be set up on a nearby bench. Wipe down the bench and surrounding area liberally with 70 % ethanol. Try to set up the microscope away from any air currents that might be caused by opening doors or passing lab workers, etc.
-
8.
It is convenient to place an empty 10 cm Petri dish within easy reach on each side of the microscope. These can be used as temporary “tool racks” for dissection instruments (forceps, microscissors, and needles). Rest the instruments on the rim of the dish so that the working ends are over the centre of the dish, not touching any surface that might compromise sterility.
-
9.
The lower follicles are only loosely attached to the surrounding skin, so they can appear to move in and out of the surrounding connective tissue as the skin is manipulated during the mincing procedure. The follicles can be recognized by their smoother, less fibrous texture compared with the connective tissue. Adjust the magnification of the microscope as necessary to identify the follicles. Excessive mincing will begin to cut through follicles, which can then be seen as small cylinders within the connective tissue. If this happens, move to an adjacent area of skin and mince just sufficiently to expose intact follicles.
-
10.
The cluster of follicles will be held together by fragments of loosely attached connective tissue. Aim to adjust the size of the pinched area of skin so that clusters contain 5–10 follicles. Aim to pinch and cut the follicles so that the length of each follicle removed is at least four times its diameter. If the follicles do not stand up sufficiently on pinching, try mincing some more connective tissue away (see Subheading 3.2, step 7).
-
11.
The tip of the needle can be used like a scalpel to cut through connective tissue. Place the tip gently against the bottom of the dish and draw it through the connective tissue. Use the side of the needle to slightly stretch the connective tissue, to facilitate cutting close to the follicle (Fig. 1b).
-
12.
It is convenient to work in the lid instead of the dish because the rim is lower, facilitating access with instruments over a wide range of angles.
-
13.
Working with only one follicle per drop minimizes the presence of tissue fragments that are an inevitable by-product of dissection, thereby helping to keep the isolated papilla clean and readily identifiable.
-
14.
The germinative epithelium has a softer, less translucent appearance than the dermal papilla and dermal sheath tissue. The germinative epithelium is more sticky and more elastic when touched with the needle tip.
-
15.
It is important that the isolated dermal papilla is as free as possible of germinative epithelial tissue, as this can give rise to keratinocyte cells contaminating the subsequent culture. Keratinocytes persist after sub-culturing through several passages, and so cannot readily be eliminated once present.
-
16.
The isolated papilla is typically too small to be grasped by the forceps without crushing it. Instead, close the tips of the forceps first, and place them adjacent to the papilla, gently touching the underlying plastic. Then use the needle tip to push the papilla into the gap between the forceps’ tines, just back from the tips. Carefully withdraw the forceps containing the papilla from the drop of dissection medium. The papilla should stay in a small volume of medium trapped between the forceps’ tines. Using your free hand, remove the 10-cm Petri dish lid containing follicles from the microscope’s field of view, and replace it with the dish of culture medium. Lower the forceps holding the papilla into this dish, placing the papilla on the bottom. It is helpful to keep both the Petri dish lid containing follicles and the 35 mm culture dish on the microscope platform, so they can be readily slid in and out of the field-of-view with one hand. When transferring the papilla, there is a risk that it will fall out of the forceps as it is drawn through the meniscus of the medium. It can be helpful to adjust the focus of the microscope to observe the papilla throughout the transfer, allowing it to be seen in and recovered from the meniscus if necessary.
-
17.
Although wool follicle papillae are small, cell outgrowth is generally quite robust, therefore a small number of papillae are sufficient to initiate a culture. Larger numbers of papillae in one dish increase the risk of contaminating keratinocytes, or of microbiological contamination.
-
18.
Cell death can occasionally be visualized in the primary culture, particularly as patches of cells become larger and denser. We aim to passage the cells before this occurs, or while it is only minor. Continued growth of cells after passaging does not appear to be affected.
-
19.
From this point on, the cells can be maintained at high density without compromising their viability. Aggregative behavior is typically seen once the cells become confluent. It is not necessary to passage the cells as soon as they reach confluence; they can be allowed to aggregate without losing viability. However twice-weekly medium changes should be continued regardless of cell density.
-
20.
When conducting a dose–response experiment, it is convenient to prepare a stock solution of the bioactive which allows the correct final concentration to be achieved by adding different volumes of the stock to each well. An example to test the effect of lithium chloride is shown in Table 1 (see also [9]).
Table 1 Component volumes for a lithium chloride dose-response experiment -
21.
Alternatively, the culture volume can be increased to 3.0 ml per well and half-volume medium changes undertaken on the third day. If necessary, it is possible to fit all medium changes into a Monday–Friday schedule, as follows:
-
On Friday, add 1500 μl fresh medium to a 1500 μl culture without removing any spent medium. This constitutes a half-volume change while increasing the culture volume.
-
On Monday, remove 2250 μl spent medium and add 750 μl fresh medium. This constitutes a half-volume change while decreasing the culture volume.
-
On Wednesday, remove 750 μl spent medium and add 750 μl fresh medium.
-
References
Rogers GE (2006) Biology of the wool follicle: an excursion into a unique tissue interaction system waiting to be re-discovered. Exp Dermatol 15(12):931–949
Richardson GD, Arnott EC, Whitehouse CJ et al (2005) Plasticity of rodent and human hair follicle dermal cells: implications for cell therapy and tissue engineering. J Investig Dermatol Symp Proc 10(3):180–183
Yang CC, Cotsarelis G (2010) Review of hair follicle dermal cells. J Dermatol Sci 57(1):2–11
Inamatsu M, Tochio T, Makabe A et al (2006) Embryonic dermal condensation and adult dermal papilla induce hair follicles in adult glabrous epidermis through different mechanisms. Dev Growth Differ 48(2):73–86
Mahjour SB, Ghaffarpasand F, Wang H (2012) Hair follicle regeneration in skin grafts: current concepts and future perspectives. Tissue Eng Part B Rev 18(1):15–23
Ohyama M, Veraitch O (2013) Strategies to enhance epithelial-mesenchymal interactions for human hair follicle bioengineering. J Dermatol Sci 70:78–87. doi:10.1016/j.jdermsci.2013.02.004
Horne KA, Jahoda CA, Oliver RF (1986) Whisker growth induced by implantation of cultured vibrissa dermal papilla cells in the adult rat. J Embryol Exp Morphol 97:111–124
Jahoda CA, Oliver RF (1984) Vibrissa dermal papilla cell aggregative behaviour in vivo and in vitro. J Embryol Exp Morphol 79:211–224
Rufaut NW, Nixon AJ, Goldthorpe NT et al (2013) An in vitro model for the morphogenesis of hair follicle dermal papillae. J Invest Dermatol 133:2085–2088. doi:10.1038/jid.2013.132
Elliott K, Stephenson TJ, Messenger AG (1999) Differences in hair follicle dermal papilla volume are due to extracellular matrix volume and cell number: implications for the control of hair follicle size and androgen responses. J Invest Dermatol 113(6):873–877
Ibrahim L, Wright EA (1982) A quantitative study of hair growth using mouse and rat vibrissal follicles: I. Dermal papilla volume determines hair volume. J Embryol Exp Morphol 72:209–224
Jahoda CA (1998) Cellular and developmental aspects of androgenetic alopecia. Exp Dermatol 7(5):235–248
Whiting DA (2001) Possible mechanisms of miniaturization during androgenetic alopecia or pattern hair loss. J Am Acad Dermatol 45(3 Suppl):S81–S86
Rufaut NW, Goldthorpe NT, Wildermoth JE, Wallace OA (2006) Myogenic differentiation of dermal papilla cells from bovine skin. J Cell Physiol 209(3):959–966
Reynolds AJ, Jahoda CA (1991) Hair follicle stem cells? A distinct germinative epidermal cell population is activated in vitro by the presence of hair dermal papilla cells. J Cell Sci 99(Pt 2):373–385
Acknowledgements
The development of these culture methods was supported by the New Zealand Foundation for Research, Science and Technology (C10X0403), the Australian Wool Innovation Ltd. Sheep GENOMICS program (SG318), and the AgResearch Research and Capability Fund (A12258 and A13595).
Author information
Authors and Affiliations
Corresponding author
Editor information
Editors and Affiliations
Rights and permissions
Copyright information
© 2016 Springer Science+Business Media New York
About this protocol
Cite this protocol
Rufaut, N.W., Nixon, A.J., Sinclair, R.D. (2016). Culture of Dermal Papilla Cells from Ovine Wool Follicles: An In Vitro Model for Papilla Size Determination. In: Hoffman, R. (eds) Multipotent Stem Cells of the Hair Follicle. Methods in Molecular Biology, vol 1453. Humana Press, New York, NY. https://doi.org/10.1007/978-1-4939-3786-8_12
Download citation
DOI: https://doi.org/10.1007/978-1-4939-3786-8_12
Published:
Publisher Name: Humana Press, New York, NY
Print ISBN: 978-1-4939-3784-4
Online ISBN: 978-1-4939-3786-8
eBook Packages: Springer Protocols