
Abstract
Tandem ubiquitin-binding entities (TUBEs) act as molecular traps to isolate polyubiquitylated proteins facilitating the study of this highly reversible posttranslational modification. We provide here sample preparation and adaptations required for TUBE-based enrichment of the ubiquitin proteome from tumor cell lines or primary cells. Our protocol is suitable to identify ubiquitin substrates, enzymes involved in the ubiquitin proteasome pathway, as well as proteasome subunits by mass spectrometry. This protocol was adapted to prepare affinity columns, reduce background, and improve the protein recovery depending on the sample source and necessities.
Access provided by CONRICYT – Journals CONACYT. Download protocol PDF
Key words
1 Introduction
One of the most critical steps of the entire proteomic analysis procedure is sample preparation. Obtaining a 100 % representation of proteins from a biological sample certainly does not occur in practice but the most efficient methods display a high number of representative cellular proteins. Preservation of posttranslational modifications (PTMs) of proteins such as phosphorylation, ubiquitylation, or SUMOylation adds another level of complexity to the sample preparation process due to the transient and labile nature of these PTMs. The covalent attachment of one or more ubiquitin moieties to a protein substrate (known as protein ubiquitylation) implies a great diversity of conjugating and de-conjugating enzymes [1, 2], resulting in a vast repertoire of ubiquitin chains on the target proteins [3]. Consequently, this PTM is involved in numerous and crucial cellular processes [4, 5]. Different strategies have been developed to face the challenging steps of enrichment and identification of endogenous ubiquitylated proteins (including histidine pull-down and immunoaffinity purification) [6–8]. Tandem Ubiquitin Binding Entities are versatile research tools for the survey of the ubiquitin-proteasome pathway that have been successfully applied for the isolation and enrichment of polyubiquitylated proteins [9–11]. The fusion to a GST-tag allows a conventional affinity purification step by pull-down using glutathione-coupled beads. TUBEs have been demonstrated to be useful for isolation of ubiquitylated proteins from different biological sources such as cell lines, tissues, and organs [10]. Scaling up the pull-down protocol allowed the enrichment of protein samples for the study of global ubiquitylation events by mass spectrometry (MS) [12–14]. Besides the enrichment of ubiquitylated proteins in large scale, the pull-down protocol can also be suitable for the isolation of ubiquitin-interacting partners to provide a more complete view of the ubiquitin proteome.
The method described here is adapted for the isolation and identification of the ubiquitin proteome by MS . TUBEs are prepared in columns to be used as affinity matrix for capturing ubiquitin-modified proteins and interacting partners. Binding, washing, and elution steps are checked to optimize the enrichment of ubiquitylated proteins. Specific and background proteins are controlled at each step by Western blot (WB) analysis using an anti-ubiquitin antibody or gel staining in order to optimize protein recovery. The protocol should be adapted according to the source/type of biological sample since background can be increased by the presence of very abundant proteins in specific cell systems. If the aim is to isolate only ubiquitylated proteins, more stringent conditions and/or number of washes should be increased before elution to reduce the binding of nonspecific proteins. With the method described below, we have successfully isolated ubiquitylated proteins together with ubiquitin-interacting partners from tumor cell lines or primary cells such as mantle cell lymphoma (MCL) cells or red blood cells (RBCs) , respectively [15]. The abundance of hemoglobin in RBCs requires specific adaptations to remove this sticky protein (indicated in detail in Subheading 4). As TUBEs are GST-fusion proteins , a GST control should be included in parallel with each sample to discriminate background from specific proteins.
The method is divided into four sections: (1) coupling TUBEs/GST to glutathione beads , (2) cell lysis and sample clearance, (3) capturing and elution of proteins, and (4) sample concentration and gel electrophoresis . Figures 1 and 2 show a scheme of the general workflow.

Procedure to couple TUBEs/GST to GSH-agarose beads. Before covalent cross-linking using DMP, molecular traps were bound to agarose beads. After blocking active groups with ethanolamine, several washes are applied to eliminate unbound molecular traps and non-covalent interactions. Superscript numbers are associated to Subheading 4

Isolation of ubiquitylated proteins for MS analysis using TUBEs . After lysis of biological samples, ubiquitylated proteins and associated factors are captured, eluted, and concentrated following the illustrated procedure (Captured and eluted proteins are monitored by Western blot with an anti-ubiquitin antibody). Superscript numbers are associated to Subheading 4
2 Materials
Prepare all solutions using ultrapure water (18 M Ω cm at 25 °C) and analytical grade reagents. Solutions are filtered and stored at 4 °C (unless indicated otherwise). Filtering should be done inside a hood to avoid contaminations. Diligently follow all waste disposal regulations when disposing waste materials. Sodium azide is not added to the reagents; therefore solutions should be prepared as fresh as possible.
2.1 Coupling TUBEs/GST to Glutathione Beads
-
1.
Glutathione beads (Biontex, Germany): Beads are previously washed twice with cold PBS and centrifuged at 2000 rpm during 15 min after each wash and kept at 4 °C until use.
-
2.
Autoclaved PBS.
-
3.
TUBEs and GST proteins are produced in Escherichia coli (C41-DE3) using a standard protocol for recombinant protein production [9] or can also be purchased through Life-Sensors Inc (Malvern, PA, USA).
-
4.
Coupling buffer: 200 mM Borate buffer containing 3 M NaCl, pH 9. Boric acid (Sigma) is adjusted with NaOH, filtered by 0.22 μm membrane, and kept at room temperature. Do not store longer than a week as it precipitates.
-
5.
Cross-linking solution: 50 mM Solution of dimethyl pimelimidate (DMP, Fluka) is prepared just before use. Dissolve DMP directly in coupling buffer at room temperature (RT).
-
6.
Blocking buffer: 200 mM Ethanolamine (Sigma), pH 8.2. Carefully adjust pH with HCl in a fume hood. Filter and keep at 4 °C avoiding exposition to light by covering with aluminum foil.
-
7.
TUBEs buffer: 20 mM Phosphate buffer pH 7.5 (Na2HPO4, NaH2PO4 from Sigma) containing 1 % Igepal (Calbiochem), 2 mM EDTA (Sigma), 50 mM sodium fluoride (Sigma), 5 mM tetra-sodium pyro-phosphate (Sigma), and 10 mM β-glycerol-2-phosphate (Sigma). Filter through 0.22 μm membrane and store at 4 °C.
-
8.
Washing buffer 1: TUBEs buffer containing 1 M NaCl.
-
9.
Washing buffer 2: 200 mM Glycine (Sigma) pH 2.5. Filter and store at 4 °C.
-
10.
PBS-Tween 0.05 % (Tween 20, Sigma).
-
11.
Empty Poly-Prep® Chromatography Columns 9 cm height (BioRad).
-
12.
Rotating wheel for Eppendorf tubes (tube rotator).
-
13.
Refrigerated centrifuge for Eppendorf tubes (swing rotor is optimal).
2.2 Cell Lysis and Sample Clearance
-
1.
Tumor cell lines or primary cells are grown in appropriate medium. For MCL cells RPMI-1640 medium containing 10 % fetal bovine serum, 2 mM l-glutamine, and 50 μg/mL penicillin-streptomycin were used.
-
2.
Cold sterile PBS.
-
3.
TUBEs lysis buffer: Supplement just before use TUBEs buffer with 1 mM PMSF (Sigma), complete mini-EDTA-free protease inhibitor cocktail (Roche), 50 μM DUB inhibitor PR-619 (Calbiochem), and 200 nM proteasome inhibitor (Bortezomib , Velcade) (see Note 1 ). Keep on ice until needed.
-
4.
Round-bottom sterile polypropylene tubes (13–15 mL) suitable for sonication.
-
5.
Sonicator probe.
-
6.
Cold centrifuge (4 °C).
-
7.
Wet ice.
2.3 Capturing and Elution of Proteins
-
1.
Gravity columns pre-packed with TUBEs cross-linked beads (described in Subheading 3.1).
-
2.
TUBEs buffer (described in Subheading 2.1).
-
3.
Washing buffer 1: TUBEs buffer containing 1 M NaCl (prepared in Subheading 2.1).
-
4.
PBS-Tween 0.05 % (prepared in Subheading 2.1).
-
5.
Elution buffer 1: 200 mM Glycine pH 2.5 (same as washing buffer 2 in Subheading 2.1).
-
6.
Elution buffer 2: 1 % SDS (Sigma) prepared in PBS and warmed at 60 °C before use.
-
7.
1.5 M Tris–HCl, pH 8.8 (filter and store at RT).
-
8.
Rotating wheel.
2.4 Sample Concentration and Gel Electrophoresis
-
1.
2D-Clean up Kit (GE Healthcare).
-
2.
Ultrapure H2O.
-
3.
Lyophilizer.
-
4.
Parafilm.
-
5.
Vortex.
-
6.
Bath sonicator.
-
7.
Aspiration pump.
-
8.
Loading buffer (Laemmli buffer).
-
9.
Reagents and buffers for SDS-PAGE.
-
10.
Pre-cast acrylamide mini gel (1.5 mm thick) and 5-well comb.
-
11.
Fixing solution: 10 % Acetic acid and 30 % ethanol. Prepared in fresh.
-
12.
Destaining solution: 7 % Acetic acid, 10 % ethanol. Prepared in fresh.
-
13.
Sypro-Ruby protein gel stain (Invitrogen).
-
14.
Wipe Tissue (Kimberly-Clark Professional).
-
15.
Gel imager.
3 Methods
In order to reduce contaminants, affinity chromatography is performed within a clean hood using gloves during all the procedure. The method is divided into four sections:
3.1 Coupling TUBEs/GST to Glutathione Beads : Covalent Cross- Linking
-
1.
This step takes 2 days to be performed. If commercial TUBEs (Lifesensors) are already coupled to glutathione beads, start this procedure directly from Subheading 3.2. Never let the beads dry during any protocol step. Allow TUBEs or GST (control) binding to glutathione beads overnight (O/N) (Fig. 1). For a large-scale purification, incubate 600–700 μg of TUBEs (see Note 2 ) with 600–700 μL of PBS-washed glutathione beads in a 2 mL Eppendorf tube (e.g., prepare 1300 μL of a 50 % slurry glutathione-beads) (see Note 3 ). Adjust volume to submaximal tube capacity with PBS and incubate O/N at 4 °C using a wheel for rotating incubation.
-
2.
After TUBEs or GST incubation with glutathione beads, centrifuge at 500 × g for 3 min at 4 °C and remove supernatant (see Note 4 ).
-
3.
Wash beads twice with PBS and centrifuge for 3 min at 500 × g. Discard supernatant by aspirating or remove carefully using a pipette to avoid losing beads.
-
4.
Equilibrate beads by adding approximately 2 packed beads-volumes (Vol) of coupling buffer. Centrifuge and discard supernatant. Add 2 Vol of coupling buffer and incubate beads for 10 min by rotating at RT.
-
5.
Before cross-linking step, centrifuge as previously, discard supernatant, and add 1 Vol of fresh 50 mM DMP dissolved in coupling buffer (cross-linking solution). Incubate for 10 min at RT, centrifuge, discard supernatant and replace by 2 Vol. of cross-linking solution. Incubate for additional 30 min by rotating at RT.
-
6.
Wash twice with coupling buffer to remove DMP. Centrifuge and discard supernatant as previously indicated.
-
7.
To block active amino groups, wash beads with 2 Vol of blocking buffer, centrifuge, and discard supernatant. Add another 2 Vol of blocking buffer and incubate for 1 h rotating at RT.
-
8.
Wash twice with cold PBS.
-
9.
To remove non-coupled proteins, wash cross-linked beads twice with 2 Vol washing cold buffer 1. Incubate beads in each washing step 5 min by rotating at RT.
-
10.
Wash with cold PBS twice.
-
11.
Continue removing non-coupled protein by washing twice with 2 Vol of washing buffer 2. Do not incubate; only wash by inverting tube (see Note 5 ).
-
12.
Wash once with PBS and once more with washing buffer 2.
-
13.
Wash twice again with PBS and then transfer the cross-linked TUBEs beads to an empty polypropylene column. (If the procedure does not continue on the same day, keep beads in PBS at 4 °C in the Eppendorf tube). Coupled TUBEs beads should be used as fresh as possible.
-
14.
For the affinity chromatography step, all procedures should be done in a cold room or in a cold cupboard to ensure that all materials, buffers, and beads stay cold. Wash the beads inside the column with 5 Vol of washing buffer 2. Close column (bottom cap). Wait for 3 min and then open the bottom cap to discard the flow-through (FT).
-
15.
Wash beads twice with 5 Vol of cold PBS (see Note 6 ).
-
16.
Equilibrate beads into the column with 10 Vol of cold TUBEs buffer. Column is ready to use immediately with the lysed sample. (To check cross-linking efficacy, a sample of 10–20 μL of cross-linked beads may be analyzed by SDS-PAGE or WB anti-GST or anti-SV5) [9].
3.2 Cell Lysis and Sample Clearance
Cell lysis should be done on ice to avoid loss of protein modification and prevent other enzymatic activities. The time between the lysis and the incubation with the affinity column should be as short as possible. The following protocol has been performed with tumor cell lines or primary cells taking into account that the sample does not saturate the capacity of the coupled TUBEs beads to capture more than 80–90 % of all ubiquitylated proteins present in the sample.
-
1.
Cell culture maintenance: Mantle cell lymphoma (MCL) cells Z-138 are grown in suspension at 37 °C and 5 % CO2 humidity atmosphere. For protein extraction, around 50 × 106 cells are used for each condition or point (consider GST-bead control) (see Note 7 ). For a better manipulation and efficient cell lysis, each sample is splitted in two 13 mL round sterile tubes (25 × 106 cells each). Samples will be pooled later.
-
2.
Cells are pelleted by 5-min centrifugation 300 × g at RT. Wash cell pellet twice with 5 mL of cold PBS. Centrifuge and discard supernatant by aspiration (eliminate residual PBS as much as possible). Keep cell pellets on ice while performing lysis step.
-
3.
Cell lysis (Fig. 2): Prepare supplemented TUBEs lysis buffer just before use. Add 1 mL of TUBEs lysis buffer to each 25 × 106 cell pellet (see Note 8 ). While keeping samples on ice, disrupt cell pellet by three pulse sonication of 30 s each, and let cool between each pulse. The lysis step should be done as quickly as possible (see Note 9 ). Transfer the lysates to Eppendorf tubes and clarify sample by centrifuging at 20,000 × g during 10 min at 4 °C. Recover and pool supernatants to evaluate the input for each experimental condition. Keep a small sample for protein quantification. (Usually a lysate from 25 × 106 MCL Z-138 cell pellet resuspended in 1 mL contains about ≈2 mg/mL of total protein concentration, measured at A280nm.) Therefore, approximately 4 mg of total protein is applied to the TUBEs or GST columns (see Note 10 ).
3.3 Capturing of Ubiquitylated Proteins by Affinity Chromatography and Elution
Ubiquitylated proteins are often interacting with other protein factors, which could increase background level. For MS purposes, longer incubation times (>1 h) increase the presence of background proteins in the sample. Due to the high TUBEs affinity for poly-ubiquitin molecules (low nanomolar range) [9], the capture of ubiquitylated proteins is very efficient in a short time (30 min or less). According to the abundance of ubiquitylated proteins in the sample, the incubation time must be optimized to preserve specific proteins and discard nonspecific ones, also present in the GST control.
-
1.
Before starting the chromatography, do not forget to keep 50 μL of sample (input), mix with Laemmli buffer, and store at −20 °C. Analyze total ubiquitylated proteins by WB using anti-ubiquitin antibody .
-
2.
Binding proteins to TUBEs column (Fig. 2): Apply clarified lysates directly to respective column, TUBEs or GST-control, and be sure to close bottom cap before adding the lysate. Close also top cap and allow binding of ubiquitylated proteins to the beads. Incubate during 15–30 min at 4 °C (see Note 11 ). For a better capture, use a wheel to keep column in rotation.
-
3.
After the binding step, set the column into a support. To collect the flow-through fraction (FT), open first top cap and then bottom cap before collection. Keep a FT sample and mix with Laemmli buffer as it was done with the input. Keep FT fraction for WB analysis to verify that TUBEs are not saturated and ubiquitylated proteins are not being lost (see Note 12 ).
-
4.
Washing unbound proteins (Fig. 2): Wash column three times with 10 Vol of TUBEs buffer. Close both sides of the column and mix by inversion. Set column in its support and discard wash flow (see Note 13 ).
-
5.
Wash three times with 10 Vol PBS-Tween 0.05 %, close column, and wash as in the previous step (see Note 14 ).
-
6.
Eliminating nonspecific proteins: Before elution, wash beads twice with 10 Vol of washing buffer 1 (see Note 15 ).
-
7.
Eluting proteins from column (Fig. 2): Elution is performed in a sequential step: first, elute proteins with 1 Vol of elution buffer 1. Close the column, mix by flicking (do not invert), and wait for 5 min. Place column again in the support, open top and bottom caps, and collect the elution sample in a 15 mL tube (keep tube on ice to avoid ubiquitin de-conjugation). Add again 1 Vol of elution buffer 1 to rinse column walls, and collect on the same tube. Add immediately to the eluted fraction 0.1 Vol of Tris 1.5 M, pH 8.8 to neutralize pH. Repeat this step once with elution buffer 1, collect and keep fraction on ice.
-
8.
Second elution step using elution buffer 2 (pre-warmed at 60 °C): Add 1 Vol of elution buffer 2 and wait for 5 min mixing by flicking. Collect and apply 1 more Vol and collect in the same tube containing the previous eluted fraction. Repeat this step to recover tightly bound proteins (see Note 16 ). Neutralize eluted sample by adding Tris 1.5 M pH 8.8. Take care that the final Tris concentration does not exceed 100 mM.
-
9.
Mix tube to homogenize eluted fractions and freeze immediately at −80 °C (see Note 17 ). Eluted samples can be stored at −80 °C until required MS analysis.
-
10.
When optimizing your protocol, check also ubiquitylated proteins remaining on the beads by WB analysis. Transfer beads from column to Eppendorf tubes (with 1 Vol PBS). Drain PBS and add 300 μL of 3× Laemmli buffer.
3.4 Sample Concentration and Gel Electrophoresis
-
1.
Lyophilization and re-constitution of samples (Fig. 2): Keep the sample frozen until lyophilization starts. Make holes in the tube caps or replace caps with parafilm (with holes) before lyophilization. To preserve frozen samples during the lyophilization process, freeze them before in liquid nitrogen (NO2). Lyophilize samples overnight (see Note 18 ).
-
2.
Re-constitute sample in 500 μL ultrapure H2O. To avoid ubiquitin deconjugation events, sample can be supplemented with proteasome and de-ubiquitylase inhibitors, 20 μM MG132 and 50 μM PR619, respectively. Mix samples by vortexing for 15 s and/or sonicate for 5 min in a sonicator bath (see Note 19 ).
-
3.
Sample cleanup: Distribute sample in 100 μL aliquots (see Note 20 ). Add to each aliquot 450 μL of precipitant from 2D-clean up kit and incubate tube on ice for 15 min. Add 450 μL of co-precipitant, mix the content by vortexing for 10 s, and centrifuge tubes at 15,000 × g for 5 min (see Note 21 ). A pellet should be visible in the bottom of the tube (see Note 22 ). Carefully aspirate the supernatant with 1 mL blue tip. Briefly spin down the tubes and aspirate remaining liquid with a 200 μL yellow tip. Add 20 μL of H2O over the pellet followed by 1 mL of chilled wash buffer and 5 μL of wash additive. Vortex until the pellet gets in solution (see Note 23 ). Keep samples at −20 °C, mix tubes for 30 s, and incubate again at −20 °C. Repeat this action three times, incubate for 10–15 min between each vortex pulse, and keep samples O/N at −20 °C. Centrifuge for 5 min at 15,000 × g. Aspirate supernatant with a 1 mL blue tip. Spin down the tubes and aspirate the remaining liquid with a 200 μL yellow tip. Leave the pellet to dry out for 30 s keeping tubes with open caps; do not overdry pellet.
-
4.
Resuspend the pellet in loading buffer. Add 80 μL of 1× Laemmli buffer to the first tube aliquot and pipet up and down ten times. Take the liquid and transfer it to the next tube; repeat this procedure with all the tubes to pool into one sample. Then, apply additional 50 μL of loading buffer and repeat sample transfer. The final sample volume should be of approximately 130 μL.
-
5.
Mix protein sample by vortexing for 15 s and then boil during 5 min (repeat this twice). Keep 13 μL of sample for WB analysis; the remaining material is loaded in an SDS-PAGE gel for MS analysis. Figure 3 shows typical results from MCL in A and B or P. falciparum-infected red blood cells (iRBC) in C and D.
Fig. 3 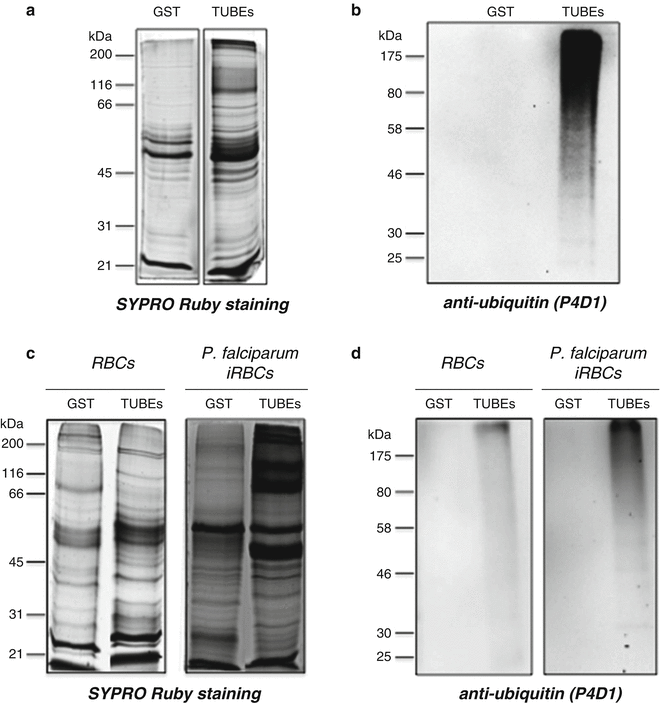
Proteins captured by TUBEs for MS analysis. (a) SYPRO-stained gel, 10 % acrylamide (90 % of total sample from MCL cells). (b) WB detection of total ubiquitylated proteins (10 % of total sample from MCL cells). (c) SYPRO-stained gel, 10 % acrylamide (90 % of total sample from non-infected RBCs and RBCs infected (iRBC) with Plasmodium falciparum ). (d) WB detection of total ubiquitylated proteins (10 % of total sample from RBC and iRBC). GST-coupled beads were used as control
-
6.
SDS-PAGE for mass spectrometry (Fig. 3a, c): Buy or cast gel according to the required percentage of acrylamide:bisacrylamide. After boiling samples, load the total volume of samples immediately. Load molecular weight markers leaving a well space between samples to avoid contaminations (see Note 24 ). Run the gel at 80 V for 10–15 min to let samples get into the stacking gel. Then increase the voltage to 125 V, for 10 % gel run for about 30–60 min (see Note 25 ).
-
7.
After gel electrophoresis , pry open the gel plates with the use of a clean spatula. Rinse the gel with pure MilliQ water and transfer carefully to a large glass petri dish.
-
8.
Stain gel with Sypro-Ruby according to the manufacturer’s instructions.
-
9.
Perform de-staining step until a clean background is observed.
-
10.
Document gel image in a digital imager.

4 Notes
-
1.
Other proteasome inhibitors such as MG132 (20 μM) can be used instead of bortezomib .
-
2.
The amount of TUBEs required to capture ubiquitylated protein from a given number of cells should be set up to avoid TUBEs saturation.
-
3.
Add a slight excess of beads before the coupling step since after several washes a considerable amount of beads is lost.
-
4.
During settings conditions, keep unbound fraction for WB analysis to verify that most ubiquitylated proteins were captured.
-
5.
The pH of washing buffer 2 could alter GST binding capacity, so it is important to control incubation time with this solution.
-
6.
Extra washes can be performed with SDS 1 % preheated at 60 °C (elution buffer 2) to remove non-cross-linked proteins. It depends on the elution stringency that will be used to elute the sample.
-
7.
Manipulate and scale the culture according to the biological sample since culture conditions are different for other cell types. The amount of cells used to isolate ubiquitylated proteins depends on the relative abundance of these proteins that will allow their optimal MS/MS detection. For example, around 2 x 10⁹ RBCs are needed to capture ubiquitylated proteins with 700 μg of TUBEs. The number of cells should be adjusted until no ubiquitylated proteins are detected in the flow-through for a fixed amount of TUBEs.
-
8.
During the sonication procedure, use 13 or 15 mL round-bottom tubes to avoid overflow and cell extract warming. 13 mL tubes adjust much better into sonication tip allowing an efficient lysis. Do not forget to keep tubes on ice.
-
9.
Lysis conditions should be set up for each biological sample. By reducing the lysis time ubiquitin de-conjugation/proteasomal degradation can be limited. No more than 15 min should be used.
-
10.
There is not a direct correlation between total protein concentration and abundance of ubiquitylated proteins. Ubiquitylation can be altered according to stimuli, cellular process, or pathology. For instance, cells treated with proteasome inhibitors can accumulate ubiquitylated proteins. If protein quantification is not possible, refer to cell number and set condition controlling by WB using anti-ubiquitin antibodies. This is the case for RBC lysates where hemoglobin interferes with standard techniques used to quantify protein concentration.
-
11.
Do not incubate samples with beads for more than 15–30 min; otherwise the background (nonspecific proteins) will increase. Be sure to close the column tightly in both sides to avoid spills.
-
12.
Flow-through can be passed through a new TUBEs column to avoid losing ubiquitylated proteins with weaker TUBEs affinity.
-
13.
If desired, keep all washes to concentrate them by TCA/DOC precipitation and control unbound ubiquitylated proteins by WB analysis.
-
14.
The number of washes and volumes may differ depending on the sample. For example higher number of washes are required when working with RBCs due to the hemoglobin content.
-
15.
For a RBC sample, the elution step started with the washing buffer 1. After a last wash with TUBEs buffer (10 Vol), add 1 Vol of washing buffer 1 (in this case this step is considered as elution). Close the column, mix, and wait for 5 min. Open column and collect the fraction. Add 1 more Vol of washing buffer 1 and collect the elution again.
-
16.
During elution step, the number of repetitions or rounds using elution buffer 1 and 2 can be increased to recover tightly bound proteins. For example, the elution stringency is higher for RBCs . To detach ubiquitylated proteins, 2 elution rounds with washing buffer 1, 6 rounds with elution buffer 1, and 4 rounds with elution buffer 2 are required. To set up the number of rounds required to recover most ubiquitylated proteins, all fractions are analyzed by WB anti-ubiquitin.
-
17.
The final elution volume is around 5 mL for MCL cells. To recover most ubiquitylated proteins 2 rounds with elution buffer 1 and 2 rounds with elution buffer 2 are required. Each round includes 2 Vol of approximately 600 microlitres ul/Vol.
-
18.
Avoid large volumes or if necessary split sample before freezing. If needed, allow samples to dry out for more than a night.
-
19.
Final suspension volume could be 500 μL to maintain a limited number of aliquots for the cleanup step.
-
20.
If you plan to use a kit for cleanup, scale the sample according to the manufacturer’s instructions.
-
21.
Large quantities of interfering substances can compromise protein precipitation in the sample. Therefore, precipitant and co-precipitant solutions are added in larger volumes than recommended by the kit manufacturer.
-
22.
Sometimes the protein gets strongly attached to the Eppendorf wall and thus a pellet is not easily visible. Proceed with the cleanup protocol even if the pellet is not visible after the first centrifugation.
-
23.
If precipitated protein sticks to the tube after washing buffer addition, carefully scratch the tube wall with a 200 μL tip. If the proteins are not well detached, final precipitation will fail.
-
24.
Separation between samples and markers is essential to avoid protein contamination when cutting gel slides.
-
25.
Running time may change depending on the sample, buffer, size of the gel, etc. Check that no protein runs out of the gel by following the gel migration blue front.
References
Hershko A, Ciechanover A (1998) The ubiquitin system. Annu Rev Biochem 67:425–479
Glickman MH, Ciechanover A (2002) The ubiquitin-proteasome proteolytic pathway: destruction for the sake of construction. Physiol Rev 82(2):373–428
Komander D, Rape M (2012) The ubiquitin code. Annu Rev Biochem 81:203–229. doi:10.1146/annurev-biochem-060310-170328
Xolalpa W, Perez-Galan P, Rodríguez MS et al (2013) Targeting the ubiquitin proteasome system: beyond proteasome inhibition. Curr Pharm Des 19(22):4053–4093
Mata-Cantero L, Lobato-Gil S, Aillet F, Rodriguez MS (2015) The ubiquitin-proteasome system (UPS) as a cancer drug target: emerging mechanisms and therapeutics. In: Wondrak SL (ed) Stress response pathways in cancer. Springer Science + Business Media, Dordrecht, pp 225–264. doi:10.1007/978-94-017-9421-3-11
Hjerpe R, Rodriguez MS (2008) Efficient approaches for characterizing ubiquitinated proteins. Biochem Soc Trans 36:823–827
Matsumoto M, Hatakeyama S, Oyamada K et al (2005) Large-scale analysis of the human ubiquitin-related proteome. Proteomics 5(16):4145–4151
Schwertman P, Bezstarosti K, Laffeber C et al (2013) An immunoaffinity purification method for the proteomic analysis of ubiquitinated protein complexes. Anal Biochem 440(2):227–236
Hjerpe R, Aillet F, Lopitz-Otsoa F et al (2009) Efficient protection and isolation of ubiquitylated proteins using tandem ubiquitin-binding entities. EMBO Rep 10:1250–1258
Aillet F, Lopitz-Otsoa F, Hjerpe R et al (2012) Isolation of ubiquitylated proteins using tandem ubiquitin-binding entities. Methods Mol Biol 832:173–183. doi:10.1007/978-1-61779-474-2_12
Rubel CE, Schisler JC, Hamlett ED et al (2013) Diggin’ on u(biquitin): a novel method for the identification of physiological E3 ubiquitin ligase substrates. Cell Biochem Biophys 67(1):127–138. doi:10.1007/s12013-013-9624-6
Altun M, Kramer HB, Willems LI et al (2011) Activity-based chemical proteomics accelerates inhibitor development for deubiquitylating enzymes. Chem Biol 18(11):1401–1412. doi:10.1016/j.chembiol.2011.08.018
Lopitz-Otsoa F, Rodriguez-Suarez E, Aillet F et al (2012) Integrative analysis of the ubiquitin proteome isolated using tandem ubiquitin binding entities (TUBEs). J Proteomics 75(10):2998–3014. doi:10.1016/j.jprot.2011.12.001
Shi Y, Chan DW, Jung SY et al (2011) A dataset of human endogenous ubiquitination sites. Mol Cell Proteomics 10(5):M110.002089. doi:10.1074/mcp.M110.002089
Mata-Cantero L, Azkargorta M et al (2016) New insights into host-parasite ubiquitin proteome dynamics in P. falciparum infected red blood cells using a TUBEs-MS approach. J Proteomics 29(139):45–59. doi:10.1016/j.jprot.2016.03.004.
Acknowledgments
We thank Valérie Lang for the critical reading of this document, Gaël Roué for providing MCL cell lines, and Mikel Azkargorta and Felix Elortza for their technical support. This work was funded by the Ministerio de Economia y Competitividad, Spain grant BFU2011-28536 (MSR), Diputación Foral de Gipuzkoa (MSR and FA), and GSK OPEN-LAB foundation. LMC was supported by the GSK OPEN-LAB foundation. The authors would like to acknowledge networking support by the Proteostasis COST Action (BM1307).
Author information
Authors and Affiliations
Corresponding author
Editor information
Editors and Affiliations
Rights and permissions
Copyright information
© 2016 Springer Science+Business Media New York
About this protocol
Cite this protocol
Xolalpa, W., Mata-Cantero, L., Aillet, F., Rodriguez, M.S. (2016). Isolation of the Ubiquitin-Proteome from Tumor Cell Lines and Primary Cells Using TUBEs. In: Matthiesen, R. (eds) Proteostasis. Methods in Molecular Biology, vol 1449. Humana Press, New York, NY. https://doi.org/10.1007/978-1-4939-3756-1_8
Download citation
DOI: https://doi.org/10.1007/978-1-4939-3756-1_8
Published:
Publisher Name: Humana Press, New York, NY
Print ISBN: 978-1-4939-3754-7
Online ISBN: 978-1-4939-3756-1
eBook Packages: Springer Protocols