
Abstract
West Nile virus is the most widespread mosquito-borne virus in the world, and the most common cause of encephalitis in the USA. Surveillance for this medially important mosquito-borne pathogen is an important part of public health practice. Here we present protocols for testing environmental samples such as mosquitoes, nonvertebrate mammals, and birds for this virus, including RT-PCR, virus isolation in cell culture, and antigenic assays, as well as serologic assays for antibody detection.
Access provided by CONRICYT – Journals CONACYT. Download protocol PDF
Key words
1 Introduction
1.1 Biology and Epidemiology
West Nile virus ( Flavivirus , Flaviviridae) is a spherical enveloped virion, ~50 nm in diameter , with a capsid surrounded by a host -derived lipid membrane containing two glycoproteins, the envelope (E) and the membrane protein (M). Multiple copies of the capsid protein surround single-stranded positive sense RNA, approximately 11 kb in length, which contains a single open reading frame that is translated cotranslationally and posttranslationally by cellular and viral proteases into three structural proteins , capsid (C), premembrane (prM)/membrane (M), and envelope (E) at the 5′ end of the genome and seven nonstructural proteins (NS1, NS2A, NS2B, NS3, NS4A, NS4B, and NS5) at the 3′ end.
WNV is currently the most widely distributed arbovirus in the world, occurring on all continents except Antarctica. The virus was first isolated from the blood of a febrile woman in the West Nile district of Uganda in 1937 [1]. Prior to 1996, occasional epidemics occurred in Africa, Eurasia, Australia, and the Middle East, but few cases of West Nile neuroinvasive disease (WNND) were observed [2]. Virus activity increased noticeably from 1996 to 1999 in the Mediterranean basin, southern Romania, and the Volga delta in southern Russia; then in 1999, WNV was introduced into the Western Hemisphere, where it spread rapidly in the USA, Canada, and Central and South America over the next four years. WNV is now the leading cause of encephalitis in the USA and Canada.
Worldwide, WNV is maintained in nature in an enzootic cycle between ornithophilic mosquitoes and susceptible avian hosts. Epizootics/epidemics occur in horses and humans, but these incidental hosts are considered “dead-end” because the level of viremia is below the threshold required to infect mosquitoes. Approximately 65 different mosquito species and 326 bird species have been found infected in the USA, although not all are competent hosts [3]. Culex species mosquitoes are the major vectors globally, with the particular species dependent on geographic location. In the northeastern USA, it has been estimated that Culex pipiens L. is likely responsible for 80 % of human WNV infections [4]. In the western USA, Cx tarsalis is the predominant vector to humans, and in the southern USA, Cx quinquefasciatus. Birds belonging to the order Passeriformes are the major amplification hosts.
Phylogenetic analysis reveals two major lineages of WNV, I and II [5], and several possible lineages that are newly recognized, III [6], IV [7], and V [8]. Lineage 1 includes three sublineages: 1a, which is distributed in Africa, the Middle East, Europe, and the Americas; 1b, found in Australia, also known as KUN; and lineage 1c, which includes strains isolated in India. Lineage II is generally confined to sub-Saharan Africa and Madagascar. Migratory birds play a major role in the spread of WNV throughout the world. Migratory routes from Africa to Europe and Asia are well understood, and WNV virus and antibodies have been isolated from migrating species [9, 10]. Successful spread of the virus by birds is dependent on avian viremia that is sufficiently high and long lasting to survive during migratory travel and remain infectious to mosquitoes.
Infection with the virus leads to a wide range of disease symptoms from mildly febrile to severely neurologic, but asymptomatic infections occur most frequently. While the disease appears to be more severe in older individuals, all ages may become severely ill. Until 2008, severe WNND in humans almost exclusively had been associated with lineage 1 strains, but since 2004, lineage 2 strains have been found circulating in Central, Southern and Eastern Europe, and have been responsible for major outbreaks in Hungary, Austria, Greece, Romania, Italy, and the Volgograd region of Russia [11–13]. There have been approximately 42,000 cases of WN disease in the USA between 1999 when the virus was introduced into the New York City area and December 2014 (Arbonet, Arboviral Diseases Branch, CDC).
1.2 Clinical
Laboratory diagnosis of WNV infection is predominantly serological [14], although caution is advised because of the high degree of cross-reactivity among flaviviruses [15, 16]. Paired acute and convalescent sera are recommended for confident determination of etiology of disease, where a fourfold rise between the two is necessary for confirmation [17], or a fourfold difference between related flaviviruses. Diagnosis by serological methods is particularly difficult in areas where Japanese encephalitis virus (JEV) and/or dengue virus (DENV) are co-circulating, e.g., India and tropical Americas, respectively, and more recently, Zika virus (ZIKV; Flavivirus, Flaviviridae). Secondary infections present additional problems in interpretation. Serologic assays include the standard IgM and IgG enzyme-linked immunosorbent assay (ELISA) , immunofluorescent antibody assay (IFA) , microsphere immunoassay (MIA) , and confirmatory plaque reduction neutralization test (PRNT). Many horses are now vaccinated against WNV and therefore the diagnostician must be certain to distinguish naturally occurring antibody from that resulting from vaccination. Laboratory protocols for the standard PRNT assay are described below (Subheading 3.11). Procedures for RT-PCR and virus isolation assays (Subheadings 3.6–3.8) are seldom used for clinical samples because of transient and low viremia.
1.3 Surveillance
Surveillance for medically important mosquito-borne pathogens is an important part of public health practice. It is meant to provide an early warning of increased levels of viral activity allowing control measures to be undertaken. Field specimens, especially mosquitoes and dead birds, collected as part of surveillance programs, are tested for the presence of viral nucleic acid by standard or real-time RT-PCR (Subheadings 3.6 and 3.7, respectively), viral antigen by IFA (Subheading 3.9) and antigen-capture dipstick assay (Subheading 3.10), or infectious virus (Subheading 3.8). Rapid test protocols have been developed in response to the expansion of WNV in the USA [18–20]. In some locations, sentinel birds are tested for antibody by indirect ELISA on serum (Subheading 3.13), using protocols similar to those used in equine and human diagnostics. A flowchart for testing field specimens is presented in Fig. 1. In addition, serological surveys using indirect ELISA (Subheadings 3.13) and PRNT (Subheading 3.11) of various wildlife populations such as small mammals, deer, and wild birds have yielded important information about distribution of WNV; however, the problem is one cannot be certain where or when the infection occurred. Horses and other equids that die following neurologic symptoms should also be tested, first for rabies, then for WNV, by cell culture virus isolation or RT-PCR.

Typical workflow management of field collected samples
1.4 Safety
It is important to note that WNV is classified as a BSL-3 agent by CDC [21]. Once WNV is identified in a diagnostic specimen, subsequent handling of infectious virus from that sample should be conducted in a Biosafety Level-3 laboratory using a Class II biological safety cabinet (BSC) by laboratory staff who are trained to work at this level of containment . Staff must wear appropriate personal protective gear including lab coats, goggles, and gloves to protect themselves from infection. It is best practice for all submitted specimens to be handled as infectious material.
2 Materials
2.1 Preparation of Mosquito Test Samples
-
1.
Class II biological safety cabinet (BSC).
-
2.
Retsch Mixer Mill, MM 301 (Retsch, Inc., Newtown, PA) (see Note 1 ).
-
3.
TissueLyser adapter set (holds 2 × 24 microfuge tubes) for Mixer Mill 301 (Qiagen Inc., Valencia, CA).
-
4.
Qiagen benchtop centrifuge , Model 4-15C, with 2 × 96 plate rotor and deep well buckets (see Note 2 ).
-
5.
Daisy 4.5 mm steel airgun shot (BBs), zinc plated.
-
6.
Mosquito diluent: PBS supplemented with 20 % heat-inactivated fetal bovine serum (FBS), 100 units/mL of penicillin, 100 μg/mL of streptomycin, 10 μg/mL gentamicin, 1 μg/mL Fungizone (Amphotericin B).
-
7.
BA-1 Diluent: M-199 medium with Hanks’ salts, 1 % bovine serum albumin, 350 mg/L of sodium bicarbonate, 100 units/mL of penicillin, 100 μg/mL of streptomycin, 10 μg/mL gentamicin, 1 μg/mL of Fungizone in 0.05 M Tris, pH 7.4. Store at 2–8 °C, expiration 3 weeks.
-
8.
RLT Lysis buffer for RNA purification using RNeasy Mini Kit protocol (see item 4 in Subheading 2.4).
-
9.
Lysis/Binding Solution for RNA purification by MagMAX technology (see item 12 in Subheading 2.5).
2.2 Preparation of Nonhuman Mammal Test Samples
-
1.
Materials listed for mosquitoes (see Subheading 2.1).
-
2.
Scalpels, sterile disposable.
2.3 Preparation of Avian Test Samples
-
1.
Materials listed for mosquitoes (see Subheading 2.1).
-
2.
Scalpels, sterile disposable.
-
3.
Cotton swabs with plastic shafts or swabs made of polyester (polyester fiber tipped applicator, Thermo Fisher Scientific) (see Note 3 ).
2.4 RNA Purification by Qiagen RNeasy (See Note 4 )
-
1.
95–100 % ethanol, ACS grade or higher quality.
-
2.
β-mercaptoethanol.
-
3.
RNeasy Mini Kit (Qiagen, Inc.). Each kit contains spin columns, 1.5 mL collection tubes, 2 mL collection tubes (additional tubes may be purchased separately), RNase-free water, and buffers RLT, RW1, and RPE (see items 4–6 in this section for buffer preparation and storage and see Note 5 for safety precautions).
-
4.
Buffer RLT (Lysis Buffer): check buffer for precipitate and if present incubate at 80 °C until dissolved. Add β-ME (10 μL/mL RLT), store at RT and use within 1 month (see Note 6 ).
-
5.
Buffer RW1 (Wash 1 Buffer): ready to use without additions, Store at RT.
-
6.
Buffer RPE (Wash 2 and 3 Buffer): add four volumes of 96–100 % ethanol to prepare a working solution. Store at RT.
-
7.
Microcentrifuge .
2.5 RNA Purification by MagMAX Technology
-
1.
Polystyrene U bottom 96-well plates and lids.
-
2.
100 % ethanol, ACS grade or higher quality.
-
3.
100 % isopropanol, ACS grade or higher quality.
-
4.
β-mercaptoethanol.
-
5.
Orbital shaker for 96-well plates.
-
6.
Magnetic stand for 96-well plates: Ambion 96-well magnetic stands are recommended.
-
7.
MagMAX-96 Total RNA Isolation Kit (Ambion/Thermo Fisher Scientific). Each kit contains Lysis/Binding Concentrate, Wash Solution 1 Concentrate, Wash Solution 2 Concentrate, RNA Rebinding Concentrate, Elution Buffer , MagMAX Turbo DNase Buffer, RNA Binding Beads, Lysis/Binding Enhancer, and TURBO DNase (see items 8–11 in this section for buffer preparation and storage).
-
8.
Wash Solution 1: Add 6 mL 100 % isopropanol to bottle labeled Wash Solution 1 Concentrate. Store at RT.
-
9.
Wash Solution 2: Add 44 mL 100 % ethanol to bottle labeled Wash Solution 2 Concentrate. Store at RT.
-
10.
RNA Rebinding Solution: Add 6 mL 100 % isopropanol to the bottle labeled RNA Rebinding Concentrate and mix well. Store at RT.
-
11.
Bead Mixture (prepare on day of use). Vortex the RNA Binding beads at moderate speed to form a uniform suspension before pipetting. Combine equal volumes of RNA Binding Beads and Lysis/Binding Enhancer. The final volumes required are 20 μL per reaction or 2.2 mL per plate (includes 10 % overage, which is recommended to account for pipetting error). Place the prepared bead mix on ice and use within 1 day.
-
12.
Lysis/Binding Solution (prepare on day of use). For each reaction add 63 μL of β-mercaptoethanol to 77 μL of Lysis/Binding Solution Concentrate or add 9 mL of β-mercaptoethanol to 11 mL of Lysis/Binding Solution Concentrate (entire bottle). Mix thoroughly, store at RT and use within 1 day (see Note 6 ).
-
13.
Diluted TURBO DNase (prepare during Wash step 2, see item 7 in Subheading 3.5). For one reaction add 1 μL of DNase to 49 μL of MagMAX TURBO DNase Buffer . For 96 reactions, add 5.4 mL of TURBO DNase to 5.4 mL of MagMAX TURBO DNase Buffer.
2.6 Standard RT-PCR
-
1.
Thermocycler , Applied Biosystems, Model 2720.
-
2.
PCR Enclosure, Labconco Purifier.
-
3.
Qiagen One-step RT-PCR kit (cat. No. 210212).
-
4.
Primers (Table 1, Sets 4–5). Prepare 25 μM stocks in RNase/DNase-free water, and store in aliquots at −20 °C in a manual defrost freezer.
Table 1 Primers and probes for detection of WNV by standard or real-time RT-PCR -
5.
Owl EasyCast horizontal B2 mini gel system (Owl Separating Systems Inc. Portsmouth NH).
-
6.
Gel electrophoresis combs (variety of sizes).
-
7.
Ultrapure agarose (Invitrogen/Thermo Fisher Scientific).
-
8.
GelRed nucleic acid gel stain, 10,000× in water (Biotium, Inc.) (see Note 7 ).
-
9.
Tris–acetate–EDTA (TAE) Buffer , 50× (Thermo Fisher Scientific). Dilute the 50× Buffer to a working concentration of 1× before use. For each electrophoresis fresh 1× buffer should be used. The 1× composition is 40 mM Tris, 20 mM Acetate and 1 mM EDTA with a pH around 8.6.
-
10.
10× BlueJuice gel loading buffer (Invitrogen/Thermo Fisher Scientific) (see Note 8 ).
-
11.
1 kb ladder (1 μg/mL) (Invitrogen/Thermo Fisher Scientific). Working Solution: 10 μL 1 kb ladder, 10 μL 10× BlueJuice, and 80 μL H2O.
-
12.
UV transilluminator.
-
13.
Digital camera such as Canon Power Shot A590 IS with UV-Light filter and appropriate hood or a Polaroid camera with UV-light filter (use with Polaroid film 667).
2.7 Real-Time (Quantitative) RT-PCR
-
1.
Thermocyler: ABI Prism 7500 Real-time PCR System (Applied Biosystems/Thermo Fisher Scientific).
-
2.
Eppendorf centrifuge , model 5810R with A-2-DWP rotor, or similar centrifuge that will handle 96-well plates.
-
3.
TaqMan RNA-to-CT 1-Step Kit (Applied Biosystems cat.no. 4392653). The kit has two components. Vial 1: DNA polymerase mix (2×) contains AmpliTaq Gold DNA Polymerase, dNTPs with dUTP, Passive Reference 1, and optimized buffer components. Vial 2: RT enzyme mix (40×) contains ArrayScript Reverse Transcriptase and RNase Inhibitor .
-
4.
96-well optical reaction plates (Applied Biosystems).
-
5.
Optical adhesive covers (Applied Biosystems).
-
6.
Primers and probes (Table 1, Sets 1–3). Prepare stocks of primers (100 μM) and probes (25 μM) in RNase/DNase-free water, and store in aliquots at −20 °C in a manual defrost freezer.
-
7.
WNV Standards: Purify RNA from a WNV viral stock with known titer , dilute to 1 × 10⁶ PFU/mL, and prepare serial 10-fold dilutions equivalent to 1000, 100, 10, 1, and 0.1 PFU/10 μL. Store in 100 μL aliquots at −70 °C.
-
8.
Negative RNA extraction controls: prepare by including extraction buffer without sample in each RNA extraction procedure (RNeasy or MagMAX).
-
9.
Positive extraction control: homogenize tissue from a known WNV-positive sample in RLT lysis buffer (see item 4 in Subheading 2.4), and store at −70 °C in 100 μL aliquots. For each RNA extraction dilute an aliquot 1:10 with lysis buffer and include in the RNA purification and RT-PCR procedures (see Note 9 ).
2.8 Immuno-fluorescence Assay for Viral Antigen
-
1.
BSC.
-
2.
Fluorescence microscope equipped with epi-illumination and excitation and emission filter sets designed for the fluorophore used.
-
3.
Incubator (37 °C, 5 % CO2).
-
4.
Staining trays designed to hold slides in a horizontal position.
-
5.
Moist chamber (Plexiglas or plastic container with lid that will hold staining trays above moist paper towels or similar substrate).
-
6.
Staining jars or dishes.
-
7.
Warming Tray (e.g., Cole-Parmer slide warmer Model 771).
-
8.
10-well microscope slides (Diagnostic slides, Thermo Scientific).
-
9.
Cell scrapers.
-
10.
5 mL Pipettes.
-
11.
Cover slips, 22 × 50 mm.
-
12.
Acetone (prechilled to −20 °C).
-
13.
Blotting paper.
-
14.
PBS, pH 7.6 (enough to fill staining dishes/Coplin jars twice).
-
15.
Primary antibodies—antisera to viral antigen(s) for which assay is performed.
-
16.
Secondary antibodies (conjugate)—Anti-IgG antibodies conjugated with fluorescent marker (usually FITC). This antibody must recognize the species from which the primary antibody was derived. FITC has excitation and emission spectrum peak wavelengths of approximately 495 and 519 nm, respectively. Like most fluorochromes, it is prone to photobleaching.
-
17.
Evans Blue counterstain, 1.0 % stock in sterile Millipore water, store in aliquots at −20 °C. Use at a 1:1000 dilution in PBS (0.001 %). This azo dye has a high affinity for serum albumin and will stain cell cytoplasm. It fluoresces with excitation peaks at 470 and 540 nm and an emission peak at 680 nm.
-
18.
Mounting medium: VECTASHIELD hardset antifade mounting medium (Vector Laboratories).
2.9 Isolation of Live Virus in Cell Culture
-
1.
BSC.
-
2.
Incubator , 37 °C, 5 % CO2.
-
3.
Inverted light microscope with phase contrast optics.
-
4.
Confluent cell monolayers : Cell lines commonly used for infection of arboviruses are listed in Table 2. Cells are diluted to 2 × 10⁵ c/mL, and seeded into 6-well plates at 3 mL/well or T25 or T75 flasks at 5 or 15 mL/flask, respectively. The monolayer should be ready for infection 3–5 days later. Before infecting, examine cell monolayers for density and vitality under the microscope. Monolayers should be at least 90 % confluent, but not overgrown. Maintenance medium (cell line-specific growth medium with FBS reduced to 2 %) is used after the cells reach confluency and during virus infection.
Table 2 Cell lines commonly used for arbovirus isolation -
5.
Test samples: homogenized mosquito or vertebrate tissue (Subheading 3.1), infected cell culture samples, oral swabs, serum, or CSF.
-
6.
PBS-2 %: calcium/magnesium-free PBS supplemented with 2 % FBS.
-
7.
BA-1 Diluent (see item 7, in Subheading 2.1).
-
8.
Mosquito Diluent (see item 6 in Subheading 2.1).
2.10 VectorTest WNV Antigen Assay
-
1.
VectorTest WNV Antigen Assay Kit (VecTOR Test Systems, Inc., Thousand Oaks, CA, cat. no. WNV-K050) containing Antigen Assay dipsticks, Grinding solution, Copper-coated BBs, tubes and racks.
-
2.
Vortex.
-
3.
Centrifuge .
-
4.
Swabs (polyester fiber tipped applicators, Thermo Fisher Scientific).
2.11 Plaque Reduction Neutralization Test (PRNT)
-
1.
CO2 incubator (5 % CO2, 37 °C).
-
2.
Light box for visualization of viral plaques.
-
3.
BSC.
-
4.
Confluent Vero cell monolayers in 6-well plates (see item 4 in Subheading 2.9).
-
5.
BA-1 Diluent (see item 7, in Subheading 2.1).
-
6.
Growth Medium (2× MEM + 10 % FBS): 2× Minimal Essential Medium with 10 % Fetal Calf Serum , 200 units/mL penicillin, and 200 μg/mL streptomycin. Store at 4 °C, expiration 3 weeks.
-
7.
1.2 % Oxoid Agar: add 1.2 g of Oxoid agar to 100 mL of H2O in a 250 mL Wheaton bottle. Autoclave on liquid cycle, store at RT, and microwave to liquefy before use.
-
8.
Neutral Red Solution, 3.3 mg/mL.
-
9.
96-well cell culture U-bottom plates.
-
10.
Test tubes, snap-cap.
-
11.
Virus stocks, with known Vero cell titer in PFU (plaque forming units)/mL. Choice of virus stocks used in each assay is based on the patient’s history, including travel.
-
12.
PRNT-confirmed positive and negative serum specific for each virus employed in the assay. Positive control must neutralize virus at 1:10 dilution or greater. Negative control must show no neutralizing ability at lowest dilution (1:10).
-
13.
Nutrient agar overlay (prepare this overlay during infection of cells and use within 1 h). Combine equal parts of 45 °C 2× MEM + 10 % NCS and 1.2 % agarose that has been melted by microwave and cooled to 45 °C; hold the mixture at 45 °C until use.
2.12 Preparation of Crude WNV Antigen for Indirect ELISA
-
1.
BSC.
-
2.
Sonicator, Branson Digital Cell Disrupter, Model S 250D, equipped with large capacity cup horn.
-
3.
Vero cell monolayers in T75 flasks (see item 4 in Subheading 2.9).
-
4.
WNV stock virus with a known Vero cell titer .
-
5.
0.2 M glycine, pH 9.5.
-
6.
0.5 % Triton X-100 in PBS.
2.13 Indirect ELISA for Detection of WNV Antibody in Avian Serum
-
1.
PBS with 0.05 % Tween 20 (PBS-T). Store at RT, prepare fresh weekly.
-
2.
Coating Buffer : 0.3975 g Na2CO3, 0.7325 g NaH2CO3, and 250 mL of ddH2O. Stir until dissolved, adjust pH to 9.6, store at RT, prepare fresh weekly.
-
3.
PBS with 0.05 % Tween 20 and 0.5 % bovine albumin (PBS-T + BA). Stir until dissolved, store at 4 ° C, prepare fresh weekly.
-
4.
Blocking Buffer (BB): PBS with 0.05 % Tween 20 and 5.0 % skim milk powder. Add 50 g Difco skim milk powder to 1 L of PBS-T. Stir until dissolved, store at 4 °C, and make fresh weekly. Warm if necessary to completely dissolve the powder.
-
5.
HCL 1:20: 300 mL dH2O, 15 mL hydrochloric acid (see Note 10 ). Mix, store at RT. No expiration.
-
6.
Immulon 1B flat-bottom 96-well plates.
-
7.
ELISA AutoPlate Washer, ELx 405.
-
8.
ELISA Ultra Microplate Reader, ELx 808, Bio-Tek Instruments, Inc.
-
9.
Humidity chamber (e.g., plastic container with moist paper towels).
-
10.
WNV-positive control avian serum .
-
11.
WNV-negative control avian serum.
-
12.
Goat anti-bird IgG-heavy and light chain antibody , conjugated with HRP (Bethyl Labs, Montgomery, TX).
-
13.
TMB 2-Component Microwell Peroxidase Substrate Kit (KPL, Inc., Gaithersburg, MD). Bring to RT before mixing components for use.
3 Methods
3.1 Preparation of Mosquito Test Samples
-
1.
Perform all procedures in a BSC in the BSL-3 laboratory.
-
2.
Mosquitoes, after collection in the field , should be sorted by species, and pools of 10–50 placed in 2.0 mL safe-lock microfuge tubes, each containing a single BB. Store samples at −70 °C until homogenized.
-
3.
Determine how each mosquito pool should be tested. To prepare samples for both live virus isolation and RT-PCR, follow steps 4 and 5 in this section. For samples to be tested by RT-PCR only, follow step 6 in this section (see Notes 11 and 12 ).
-
4.
Remove mosquito sample tubes from the freezer and place on ice. Add 0.75–1.0 mL of Mosquito Diluent to each tube of mosquitoes.
-
5.
Place the tubes in the 24-well Mixer Mill adapter racks that have been prechilled at 4 °C, and then secure in the Mixer Mill. Homogenize for 30 s at 24 cycles/s, and then place on ice for 5 min. It is important to keep the samples as cold as possible to minimize the activity of RNases released from the tissue during homogenization . Microfuge at 4 °C for 5 min at 8000 × g. Transfer the supernatant to a 1.5 mL microfuge tube and store at −80 °C. This preparation is ready for live virus isolation (Subheading 3.8) and purification of RNA by RNeasy or MagMAX (see Subheading 3.4 or 3.5, respectively).
-
6.
For mosquito samples that will not be used for live virus isolation, homogenize directly in RNA lysis buffer (RLT buffer for the RNeasy procedure and Lysis/Binding Solution for MagMAX). Follow the same procedure described for Mosquito Diluent (see item 5 in this section).
3.2 Preparation Nonhuman Mammal Test Samples
-
1.
Place vertebrate tissue obtained from necropsies performed off-site in specimen jars, send to the laboratory, and store at −80 °C. For detection of WNV brain tissue is tested most often. For safety during handling, all mammalian samples should be confirmed as negative for rabies virus before shipment to the lab.
-
2.
Place the frozen tissue in its jar on a bed of ice in a BSC. Thaw the tissue slightly and cut three sections of less than 1 mm3 from different areas, since the virus may not be evenly distributed throughout the tissue. A 3 mm cube of tissue weighs approximately 30 mg. Place the sections together in a 2.0 mL safe-lock tube containing 1 BB and 1 mL of buffer : RLT lysis buffer for RNeasy purification, Lysis/Binding Solution for MagMAX RNA purification, or BA-1 diluent for live virus isolation.
-
3.
Place the tubes in the Mixer Mill 24-well adapter racks. Homogenize for 4 min at 24 Hz, and then place on ice for 5 min. To achieve uniform homogenization , stop the mixer mill after 2 min and rotate the tubes in the sample adapters.
-
4.
Clarify by microcentrifugation at 4 °C for 5 min at 8000 × g, and transfer the supernatant to a new microfuge tube.
-
5.
Use aliquots of this preparation for RNA purification and RT-PCR or live virus isolation in cell culture , depending on the buffer used for homogenization. Or store at −80 °C for later use.
3.3 Preparation of Avian Test Samples
-
1.
Dead bird carcasses collected for WNV testing are deemed acceptable if collected within 48 h of death and appear to be in relatively good condition (intact, no physical decay or appearance of insect larvae) then frozen at −20 °C [22]. Three categories of samples may be collected: (1) Brain, heart, kidney, and spleen, (2) Feathers : vascular and non-vascular, and (3) Oral and cloacal swabs.
-
2.
Brain, heart, kidney, and spleen: Perform necropsies aseptically; store harvested tissues at −70 °C. For testing thaw the tissues at 4 °C and place on ice. Using a sterile disposable scalpel excise a 50 mg portions (3 × 3 × 6 mm) from each tissue and place in a microfuge tube containing 1 mL of buffer appropriate for the downstream application. Homogenize and clarify as described in Subheading 3.2.
-
3.
Feathers : At necropsy examine each bird for wing flight feathers (remiges) and tail flight feathers (retrices) that contain vascular pulp (see Fig. 2). Pull feathers containing vascular pulp from the feather follicle and aseptically cut at the distal end of the umbilicus. Place the umbilicus containing vascular pulp in a microfuge tube containing 1 mL of mosquito diluent, and freeze at −70 °C. For testing, thaw sample and with forceps remove vascular pulp from the umbilicus and create a 10 % (wt/volume) suspension in 1 mL buffer appropriate for the downstream application. Vortex the sample until it appears homogeneous and clarify by microcentrifugation at 4 °C for 5 min at 8000 × g. Proceed with isolation of infectious virus or RNA purification and RT-PCR (see Note 13 ). For VectorTest samples, pull feathers containing vascular pulp from wing or tail and then express the pulp onto a swab. Mix the swab in VectorTest buffer (see Subheading 3.10).
Fig. 2 
The schematic representation of a typical bird feather and the location of the vascular pulp. The feathers are pulled from the feather follicle and aseptically cut at the distal end of the umbilicus. The umbilicus contains the vascular pulp
-
4.
Oral and cloacal swabs. Swab birds in a BSC, if possible. Place entire carcass in a plastic bag with the head protruding. Open the bird’s beak and place a swab into the oral cavity, then move it vigorously around the oropharyngeal cavity and the proximal esophagus. Place each swab into an appropriate buffer (depending on downstream application) and swirl it for at least 20 s. Press swab on side of tube to ensure release of material into buffer. Vortex or swirl sample until it appears homogeneous, then clarify by microcentrifugation for 5 min at 8000 × g. Take multiple swabs from each bird. Store samples at 4 °C for further processing, or −70 °C for future processing. Downstream processing consists of RNA isolation by RNeasy or MagMAX followed by RT-PCR, isolation of live virus, or VectorTest for detection of protein (see Note 14 ).

3.4 RNA Purification by RNeasy Mini Kit
-
1.
All RNeasy procedures should be carried out at room temperature (15–25 °C) See Note 4 .
- 2.
-
3.
For samples that were homogenized in RLT buffer , place 350 μL of clarified homogenate in a microfuge tube, add 350 μL of 70 % ethanol, and mix well by pipetting up and down. For samples that were homogenized in Mosquito Diluent (mosquitoes), add 100 μL of clarified homogenate to 350 μL of RLT, and then add 250 μL of 96–100 % ethanol and mix well. Do not centrifuge after the addition of ethanol (see Note 15 ).
-
4.
Bind RNA to the silica-based membrane by transferring the 700 μL sample with ethanol to an RNeasy mini spin column positioned in a 2 mL collection tube. Microfuge for 15 s at 8000 × g. Carefully transfer the spin column to a clean 2 mL collection tube.
-
5.
Wash the membrane with bound RNA three times. For the first wash, add 700 μL of RW1 Buffer to the column, microfuge for 15–30 s at 8000 × g, and then carefully transfer the spin column to a clean 2 mL collection tube.
-
6.
For the second wash, add 500 μL of RPE Buffer to the column, microfuge for 15–30 s at 8000 × g, and then carefully transfer the spin column to a clean 2 mL collection tube.
-
7.
For the third wash, add 500 μL of RPE Buffer to the column, microfuge for 2 min at 8000 × g, and then carefully remove the column and place it in a 1.5 mL collection microfuge tube (see Note 16 ).
-
8.
To elute RNA from the column add 30–50 μL of RNase-free water onto the center of the membrane without touching, and allow it to adsorb for 1–10 min. Centrifuge for 1 min at 8000 × g. If the expected yield is greater than 30 μg, repeat the elution with another 30–50 μL of water, reusing the collection tube.
-
9.
The purified RNA is ready for use in standard or real-time RT-PCR assays. Store at −20 to −70 °C.
3.5 RNA Purification by MagMAX Technology
-
1.
The MagMax-96 total RNA lysis kit is designed for high throughput purification of total RNA in a 96-well plate format. It can be used with either multichannel pipettes or with robotic liquid handlers (See Note 4 ).
-
2.
Sample preparation. Disrupt and homogenize samples in freshly prepared Lysis/Binding Solution or Mosquito Diluent using standard homogenization procedures (see Subheadings 3.1–3.3). For samples homogenized in mosquito diluent, add 50 μL of each clarified homogenate to the well of a polystyrene U bottom plate, and then add 50 μL Lysis/Binding Solution. For samples homogenized in Lysis/Binding Solution add 100 μL of each clarified homogenate to the 96-well plate. For all samples add 60 μL of 100 % isopropanol, place lid on plate, and shake for 1 min.
-
3.
Add bead mixture: Gently vortex the bead mixture to resuspend the magnetic beads. Add 20 μL of bead mixture to each sample. Cover the plate and shake for 5 min on an orbital shaker at maximum speed to bind the RNA to the RNA Binding Beads.
-
4.
Magnetically capture the RNA binding Beads. Move the processing plate to the magnetic stand to capture the RNA Binding beads. Leave the plate on the magnetic stand until the beads have completely pelleted; when the mixture becomes transparent the capture should be complete (see Note 17 ).
-
5.
Carefully aspirate and discard the supernatant without disturbing the beads, and remove the processing plate from the magnetic stand.
-
6.
Wash 1. Add 150 μL of Wash Solution 1 to each sample and shake for 1 min. Recapture the beads on the magnetic stand beads. Carefully aspirate and discard all supernatant without disturbing the beads, and remove plate from the magnetic stand. It is critical to remove the plate from the magnetic stand before the subsequent wash step.
-
7.
Wash 2. Add 150 μL of Wash Solution 2 (ethanol added) to each sample and shake at maximum speed for 1 min. Recapture the beads on the magnetic stand, aspirate and discard the supernatant , and remove the plate from the stand. Be sure to remove all of Wash Solution 2 before the DNase treatment step. Prepare Diluted TURBO DNase during the Wash 2 step.
-
8.
Turbo DNase Treatment. Add 50 μL of Diluted TURBO DNase to each sample and shake the plate for 10–15 min at maximum speed (see Note 18 ).
-
9.
Final RNA cleanup. Add 100 μL of RNA Rebinding Solution to each sample and shake for 3 min at maximum speed. In this step, the RNA is bound to the RNA Binding Beads again. Magnetically capture the RNA Binding Beads and discard the supernatant. Wash twice with 150 μL Wash Solution 2. Dry beads by shaking for 2 min at maximum speed (see Note 19 ).
-
10.
Elute the RNA by adding 50 μL of Elution Buffer to each sample and shaking vigorously for 3 min at max speed. Capture the RNA Binding Beads on the magnetic stand. Transfer the supernatant , containing purified RNA, to a nuclease-free container appropriate for your application, such as a 96-well plate.
3.6 Standard RT-PCR
Real-time RT-PCR assays are specific and high throughput. For bird and mosquito surveillance , specimens are confirmed as WNV when positive results are obtained with two different primer/probe sets. If results are equivocal, RNA often is reextracted from the tissue homogenate by RNeasy and a standard RT-PCR assay is performed.
-
1.
Prepare samples by isolating RNA from test samples by RNeasy or MagMAX technology (see Subheadings 3.4 and 3.5).
-
2.
Prepare Master Mix (MM) in a PCR hood that is located in a room separate from the thermocycler and gel electrophoresis procedures. Keep all reagents on ice or use cold blocks. Use the reagents supplied in the Qiagen One-step RT-PCR kit. The WNV primer sets used for standard RT-PCR are sets 4 and 5 listed in Table 1 [19]. Each reaction requires 40 μL of MM and 10 μL of sample. Determine total volume of MM needed for the entire set of reactions and prepare enough for an extra 2 reactions (Table 3).
Table 3 Master mix for standard RT-PCR (Qiagen OneStep RT-PCR kit) -
3.
Set up the reaction tubes by pipetting 40 μL MM into each RT-PCR tube, and then add 10 μL of the RNA sample. Secure caps on the tubes and place in the thermocycler.
-
4.
Thermocycler conditions for both WNV primer sets (Table 1, sets 4 and 5) consist of 50 °C for 30 min to synthesize the first-strand cDNA ; 95 °C for 15 min to inactivate the reverse transcriptase and to activate DNA Taq polymerase; 35 cycles of 94 °C for 45 s, 56 °C for 45 s, and 72 °C for 1 min for PCR amplification ; a final elongation at 72 °C for 10 min, then hold at 4 °C until ready for gel electrophoresis .
-
5.
Assemble Owl EasyCast Horizontal electrophoresis box in the casting position.
-
6.
Prepare 1.5 % agarose gel: weigh 1.5 g ultrapure agarose and dissolve in 100 mL 1× TAE buffer in an appropriate vessel (1-L Erlenmeyer flask). Microwave until dissolved (1–2 min) and allow to cool to 60 °C. Add 10 μL Gel Red per 100 mL of cooled agarose.
-
7.
Pour warm gel into the casting stand and immediately place the appropriate comb into the gel (10- or 20-well). Allow approximately 20 min for the gel to solidify.
-
8.
To load the gel, fill the gel box with approximately 750 mL of 1× TAE buffer, up to fill line on gel box. Mix each sample with BlueJuice (four parts sample one part BlueJuice). Load samples into the wells (up to 20 μL per 12-well comb; up to 15 μL per 20-well comb). Load at least one additional well with a 1 kb ladder sample.
-
9.
Run the gel: connect the gel apparatus to a power supply and run at 150 V Constant (VWR model 300 power supply). Typical run time is 30 min, when DNA bands are adequately separated.
-
10.
Visualize the gel: remove the gel and place it on a transilluminator. With safety shield in place turn on the UV-light to visualize bands. Photograph the gel for a permanent record.
3.7 Real-Time (Quantitative) RT-PCR
-
1.
Prepare MM in a PCR hood that is located in a room separate from the thermocycler and any downstream processing. Keep all reagents on ice or use cold blocks. Use the reagents supplied in the ABI TaqMan One-Step RT-PCR Kit. The WNV primer sets used for standard RT-PCR are sets 1–3 listed in Table 1 [18, 19, 23]. Each reaction consists of 40 μL of MM and 10 μL of sample. Determine total volume of MM needed for the entire set of reactions and prepare enough for an extra 2 reactions (Table 4).
Table 4 Master mix for real-time RT-PCR (TaqMan RNA-to-CT 1-Step Kit) -
2.
TaqMan plate setup. Place a 96-well optical reaction plate in a cold block or on ice. Add 40 μL of MM to each well (may be done with a multichannel pipette). Add 10 μL of RNA template, serial dilutions of WNV standards or DNase/RNase-free water (No Template Control) to each well. Cover the reaction plate with an optical adhesive cover, seal well. Centrifuge the reaction plate so that all liquid is in the bottom of the wells (1000 × g for 3 min).
-
3.
Place the plate in the ABI 7500 instrument and turn it on. Open the software and choose File > New. Refer to the ABI Absolute Quantification Getting Started Guide (pp. 40–45) to set up the run [24]. Enter sample information and concentrations of the standards.
-
4.
Set the thermocycler conditions and start the run. The thermocycler conditions for the WNV primers listed in Table 1 are: 30 min at 48 °C and 10 min at 95 °C (rep 1); 15 s at 95 °C and 1 min at 60 °C (rep 40). Save the file as a *.sds file. You can also save as a *.sdt (template) file for future use.
-
5.
Download data. When the run is complete, go to Results/Amplification Plot; select the entire plate (upper left corner) and click Analyze. Using the Results Tab you can view the results, change parameters, omit samples, and manually set baseline and threshold. If any parameters are changed the data must be reanalyzed. The default baseline is automatically set from 6 to 15 cycles. Reset the cycles if the amplification begins before a CT of 15. The threshold is automatically set by the software, and should be located in the geometric phase of the amplification curve. For the WNV primer sets the threshold is usually maintained at 0.2. View the Standard Curve, which displays the values for the samples designated as standards.
-
6.
Analyze the data. The CT value is the amplification cycle at which fluorescence increases above threshold. The Rn value is relative change in fluorescence at the end of the amplification. These two values are used to analyze the data. Export these values for each test and standard sample into an Excel file. Express results as CT values or Relative PFU calculated by linear regression from the standard curve. A sample is determined to be positive if the CT value is equal to or less than the threshold CT value and the Rn value is two or more times the average of eight negative wells.
3.8 Isolation of Live Virus in Cell Culture
Changes in cell morphology caused by infectious virus, called cytopathic effect (CPE) , are an important tool for surveillance . Cell monolayers prepared from cell lines that are permissive for the virus are infected with the test material, incubated for a period of time and observed for morphological changes. For surveillance purposes, the presence of CPE is indicative of the presence of virus that must be further identified or confirmed with additional testing, usually by PCR or immunoassay.
-
1.
To infect the cells, decant media from a 6-well plate (or T-25 flask) containing a confluent monolayer of cells. Vero cells are used most often (see item 4 in Subheading 2.9 and Note 20 ). Inoculate each well with 100 μL (200 μL for T-25 flask) of test material such as mosquito or vertebrate homogenate, swabs, or feather pulp (see Subheadings 3.1–3.3).
-
2.
Mock-infect at least one well or flask for each assay, by inoculating with 100 μL (or 200 μL) of BA-1 diluent. This is an important control which is used to evaluate CPE by comparing uninfected and infected monolayers.
-
3.
Incubate at 37 °C, 5 % CO2, for 60 min, rocking plates gently every 15–20 min to allow absorption of virus to the cells.
-
4.
At the end of the infection period, add 3 mL (5 mL for T-25 flask) of cell maintenance medium to each well. Do not remove the inoculum. Incubate at 37 °C, 5 % CO2, for up to 7 days.
-
5.
Examine plates each day post infection under the phase contrast microscope, using the uninfected control for comparison. CPE may consist of cell rounding, fusion, swelling or shrinking, death, or detachment from the surface, and is rated on a scale of 1+, which means less than 25 % of the cells are affected, to 4+ where all of the cells in the monolayer are involved (see Note 21 ).
-
6.
When no or questionable CPE is observed, the samples may be passed for two additional rounds as follows. Decant media from a fresh uninfected cell monolayer (6-well plate or T-25 flask). Transfer medium from the first passage to the new cells (0.5 mL for 6-well plates and 1.5 mL for T-25 flask). Include another uninfected control. Adsorb, overlay, incubate, and examine for CPE as described for the initial infection. If no CPE is observed after 1 week, repeat the procedure for a third round.
-
7.
CPE-positive samples may be identified further by IFA of infected cells (see Subheading 3.9) and/or RT-PCR. For analysis of the viral culture by PCR, purify RNA from 100 μL of culture fluid by Qiagen RNeasy kit and perform standard RT-PCR (see Subheading 3.6) or real-time RT-PCR (see Subheading 3.7).
-
8.
When 50 % of the monolayer is exhibiting CPE, virus stocks may be harvested. Add 800 mL of culture supernatant to a cryotube containing 200 μL of FBS. Mix well, a using micropipette, and transfer 500 μL to a second tube to give two 500 μL aliquots. Store at −80 °C.
3.9 Immunofluorescence Assay for Viral Antigen
-
1.
Prepare slides by applying infected cells exhibiting 2–3+ CPE to microscope slides (see Subheading 3.8 for infection procedure). Using a pencil, label slides with sample information. Gently but thoroughly scrape infected cell monolayer into the media . Break down clumps of cells by gentle trituration, using a 1000 μL micropipette. Transfer material to a 15 mL centrifuge tube and vortex at high speed to further disrupt clumps of cells. Dispense 20 μL to each well of a 10-well slide. Allow slides to air-dry in the BSC for 2 h at RT or ½ h on warming tray. Fix slides by immersing in −20 °C acetone for 30 min. Remove from acetone and allow to air-dry. Use immediately for IFA or store in slide boxes at −80 °C. Prepare uninfected and positive control slides in addition to test samples.
-
2.
Prepare appropriate dilutions of primary and secondary antibodies in PBS. Secondary antibody may be diluted in PBS containing Evans Blue counterstain (0.001 %).
-
3.
Prepare a moist chamber by placing soaked paper towels in the bottom of closable chamber.
-
4.
Prepare enough PBS, pH 7.6, to fill the staining dishes twice and add enough PBS to staining dishes to completely immerse slides.
-
5.
Stain slides with primary antibody as follows. Place slides to be stained on a tray in moist chamber. Add 18 μL primary antibody to each well. Incubate in the moist chamber at 37 °C for 1 h.
-
6.
To rinse slides, carefully remove contents of each well by aspiration with micropipette or vacuum, avoiding cross contamination between wells. Dip each slide in PBS, then immerse slides in fresh PBS for 15 min. Gently shake-off excess PBS and allow to air-dry for 20 min at RT or 5 min on a warming tray.
-
7.
Stain slides with secondary antibody . Add 18 μL of diluted secondary antibody to appropriate wells. Incubate in the moist chamber at 37 °C for 30 min. Briefly rinse each slide by dipping in PBS, then immerse in fresh PBS bath for 15 min.
-
8.
To mount coverslips, remove slides from PBS bath and shake gently to remove excess liquid. Blot bottom and sides of slides and dry as much of the space between the wells as possible without disturbing the cells in the wells. Add a drop of mounting medium into each well, then carefully lower a coverslip over the wells, trying to avoid air bubbles. Allow to set for 15 min.
-
9.
Read slides on a fluorescent microscope using a 20× objective. Concentrate readings on areas where cells are well separated (not clumped). Positive cells will fluoresce bright green while negative cells will appear dull background green or red if Evans Blue was used. The percentage of positive cells in a positive culture will vary between 30 % and 80 % (see Note 22 ).
3.10 VectorTest WNV Antigen Assay
The VectorTest is a dipstick format, qualitative, immunochromatographic test that uses type-specific monoclonal antibodies to detect WNV antigen [25].
-
1.
Mosquito Specimens: Place 1–50 mosquitoes into the provided plastic culture tube provided in the VectorTest kit.
-
2.
Mix the Grinding Solution by inverting the bottle five times. Dispense 2.5 mL onto mosquitoes and add 4 BBs to tubes.
-
3.
Vortex the capped tubes for 1 min at high speed until the mosquito pool is homogenized into a slurry. A centrifugation step may be performed to remove excess mosquito debris before running the test
-
4.
Dispense 250 μL of mosquito homogenate into the conical tube provided and insert a test strip with arrows pointing down.
-
5.
To interpret the test, remove the test strip from the solution and compare it to the pictorial sample provided in the test kit (see Fig. 3). The assay results should be read within 30 min of performing the test.
Fig. 3 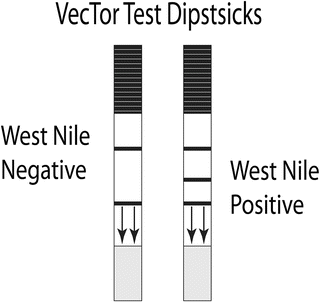
Diagram of the Vector Test Assay. The reagent zone of the test strip is coated with WNV monoclonal antibody (mAb) conjugated to colloidal gold. These antibodies will migrate up the test strip with the test material. The detection zone contains immobilized unlabeled WNV mAb that will capture WNV antigen as it migrates up the strip. The control zone contains immobilized reagents that will capture any gold-conjugated monoclonal antibodies that do not bind to the detection zone to demonstrate that the sample migrated through the test zone. The bottom of the dipstick, indicated by arrows, is placed in a tube containing the test material, which will be wicked onto the strip and migrate through the three zones. After 15 min the strip is removed and read. A positive sample will develop a reddish-purple color in both the control and the detection zones. Negative samples develop color only in the control zone. If no color develops, the test is invalid
-
6.
Test oral, cloacal, or feather pulp swabs (see steps 3 and 4 in Subheading 3.3) by swirling each swab for at least 20 s in 1 mL of Grinding Solution in the tube provided in the kit. Press the swab on the side of the tube to ensure release of material into solution. Vortex the sample until it appears homogeneous, and clarify by microcentrifugation for 5 min at 8000 × g. Proceed with the VectorTest (steps 4 and 5 in this section). Vertebrate tissue also may be tested by taking swabs directly from the parenchyma of the tissue, and processing as for oral swabs.

3.11 Plaque Reduction Neutralization Test
The plaque-reduction neutralization test (PRNT) is considered the gold standard procedure for the identification of arbovirus isolations [26–28]. Adapted for the “clinical” setting, it may be used to assist in the diagnosis of arboviral infections. Since the test is costly, time-consuming, and requires a BSL-3 facility, it usually is not used as a clinical screening tool. Other useful applications of this procedure include epidemiological studies of antibody seroprevalence in human, animal, or wild bird populations [29–31] and evaluation of current or new vaccine efficacy [32]. A common screening method with a large number of samples for serosurvey is to do ELISA and confirm with PRNT [31, 33]. The protocol described here is for clinical situations where two serum samples from the same individual are compared to detect a recent infection.
-
1.
Preparation of 96-well plates with diluted serum. Dilute test and control serum 1:2.5 in BA-1 Diluent, and heat-inactivate at 56 °C for 30 min to remove nonspecific neutralizing substances (see Note 23 ). Aliquot 100 μL of BA-1 diluent in columns 2–12 of a 96-well plate, and then add 100 μL of diluted and heat-inactivated serum samples to columns 1 and 2, using one row for each test or positive control serum (see Note 24 ). Make twofold serial dilutions of test sera as follows. Mix contents of column 2 with a multichannel micropipette, and transfer 100 μL to column 3. Repeat the dilution procedure in columns 3–12, and discard the last 100 μL. Prepare an identical plate for each virus used in the assay, including positive and negative controls.
-
2.
Preparation of virus dilutions. The viruses chosen for neutralization in each PRNT assay are determined by patient history, with information on travel to areas endemic for arboviruses such as DEN, JEV, ZIKV, and YFV of high importance. Thaw each virus stock and dilute to 200 PFU/100 μL in fresh BA-1, preparing a sufficient amount to apply 100 μL for each serum dilution plus extra for back titration to verify its concentration. For back titration, take an aliquot of the 200 PFU/100 μL dilution and prepare 100, 10 and 1 PFU/100 μL dilutions in BA-1.
-
3.
Neutralization. Add 100 μL of the 200 PFU/100 μL virus stock to each dilution of test serum and control serum. Each well now will contain 100 PFU/100 μL of virus, and the starting dilution of each test serum sample (in column A) usually will be 1:10. Add the virus control back-titration dilutions to three vacant wells of the same 96-well plate. Incubate the plate at 4 °C overnight or 37 °C for 1 h.
-
4.
Infection of cells. At the end of the neutralization incubation, infect the Vero cell monolayers with the neutralized virus. Remove the medium from 6-well plates containing confluent cell monolayers (see item 4 in Subheading 2.9). Inoculate 100 μL of each virus/serum mixture into a separate well. For back-titration of each virus, inoculate duplicate wells with 100 μL of each dilution. Inoculate one plate with BA-1 only to serve as an infection control. Rock the plates gently to evenly distribute the inoculum over the monolayer, and incubate at 37 °C for 1 h to allow adsorption of virus to the cells. During the infection period, prepare nutrient agar overlay. At the end of the 1 h infection period, add 3 mL of agar overlay to each well, allow it to solidify at room temperature and incubate at 37 °C, 5 % CO2 until plaques develop (approximately 2 days for EEEV, 3 days for WNV, 5 days for SLEV, and 4–5 days for JEV).
-
5.
Count plaques and determine neutralization titer . When plaques start to appear stain the cells by adding to each well a second agar overlay, similar to the first but with the addition of neutral red (2 mL stock solution per 100 mL overlay, final concentration 66 μg/mL). After an overnight incubation the plaques should be visible and ready to count. Using a light box, count plaques and record numbers daily until no further significant increase in plaque number is observed (see Note 25 ). Neutralization titers are determined as the highest dilution of test serum or positive control serum that inhibits formation of at least 90 % of the plaques as compared with the virus control back titration . The back titration of the 100 PFU/100 μL dilution should exhibit 30–100 plaques per well. If more than 20 or less than 100 plaques develop, the assay should be repeated.
-
6.
Interpretation of results. A fourfold difference in PRNT titers between related flaviviruses as well as a fourfold rise in titer between paired acute and convalescent sera are required for confident determination of etiology of disease. If paired acute and convalescent sera are not included in the PRNT, it is not possible to determine if neutralizing antibody detected by the assay is due to a recent or past infection. When secondary infections with a different flavivirus occur, results can be confusing and easily misinterpreted.
3.12 Preparation of Crude WNV Antigen for Indirect ELISA
-
1.
Virus infection. Seed two T-75 flasks with Vero cells and allow to grow to 90–95 % confluency (see item 4 in Subheading 2.9). Infect one flask with WNV at a multiplicity of infection of 0.1 PFU/cell in 1 mL of culture medium. Mock-infect the other flask with 1 mL of culture medium. After adsorption of the virus at 37 °C for 1 h, add 14 mL of medium and incubate at 37 °C until CPE reaches 3+ (most cells rounded, usually at 48 hpi). Freeze the flasks with their contents at −70 °C overnight. The mock-infected flask will be processed as negative crude antigen.
-
2.
Harvest virus. Thaw the cultures and scrape the cells off the flask surface into the culture medium with a cell scraper. Always handle the uninfected flask first and take great care not to cross-contaminate the samples. Centrifuge media and cell debris for 15 min at 3000 × g, and discard the supernatant medium. Resuspend the cellular fraction in 1.5 mL PBS per T-75 flask (represents a 10× concentration). Freeze the preparations at −70 °C overnight.
-
3.
Preparation antigen. Thaw and add 1.5 mL of 0.2 M glycine, pH 9.5, to the contents of each flask, and then transfer to 50 mL centrifuge tubes. Sonicate indirectly in an ice water bath at 100 mV for three bursts of 20 s. Allow 1 min of cooling between bursts. Place tubes in a 37 °C water bath for 4.5 h, vortexing every 45–60 min.
-
4.
Inactivate antigen: Add an equal volume of 0.5 % Triton X-100 in PBS (3 mL/t-75 flask) and leave at 4 °C for 2 h with occasional vortexing. Centrifuge at 10,000 × g for 10 min at 4 °C. Store the supernatant in aliquots at −70 °C.
-
5.
To confirm inactivation of virus in the antigen preparation, inoculate Vero cell monolayers and monitor for CPE (see Subheading 3.8). Triton X-100 will produce cell toxicity; therefore, pass at least one time to eliminate the possibility that apparent toxicity is not the result of viral infection.
-
6.
Titrate antigen at a dilution range of 1:50–1:1000 to determine the optimal concentration for use in ELISA (see steps 1 and 2 in Subheading 3.13 and Note 27 ).
3.13 Indirect ELISA for Detection of WNV Antibody in Avian Serum (see Note 26)
-
1.
Determine optimal dilutions for each preparation of negative and positive antigen, negative and positive serum controls, serum test samples, and anti-species conjugate by checkerboard titration (see Note 27 ).
-
2.
Crude antigen: Optimal concentrations of crude antigen are defined as those yielding the highest mean P/N value for known positive samples and P/N values closest to unity (one) for known negative samples. Generally a 1:100 or 1:200 dilution is optimal. Consider Positive and Negative crude antigen as a paired set and use identical dilutions for each batch (see Note 28 ).
-
3.
Negative and positive serum controls: Determine optimal dilutions by checkerboard titration
-
4.
Serum test samples usually are tested at concentrations of 1:50–1:200. Initial screening assays often use only one dilution, usually determined by the nature and amount of test material available. If an end point ELISA titer is required, samples should be serially diluted across the plate.
-
5.
Secondary antibody (anti-species conjugate) optimal dilutions are suggested by the manufacturer. However, it is advisable to test this sample by checkerboard, also (see Note 29 ).
-
6.
Coat 96-well ELISA plates with antigen. Dilute negative and positive crude antigen in coating buffer and apply 50 μL per well, placing negative antigen in columns 1, 4, 7, and 10 and positive antigen in columns 2, 3, 5, 6, 8, 9, 11, and 12. Incubate in a moist chamber at 4 °C overnight (or 37 ° C for 1 h).
-
7.
Wash excess antigen from the plate. Using the plate washer, aspirate the antigen and wash three times with PBS-T. Blot plates by inverting over paper towels and tapping gently.
-
8.
Block plates by adding 100 μL of Blocking buffer (BB) to each well. Incubate plates in the humidity chamber at 37 °C for 1 h. Aspirate BB with the plate washer, but do not rinse.
-
9.
Apply test serum . Dilute each test serum sample in PBS-T + BA while the ELISA plate is incubating with BB. After removing the BB add 50 μL of each serum sample to three wells (one coated with negative antigen and two with positive antigen). Include blank (PBS-T + BA) and appropriately diluted positive and negative control serum samples in each assay. Incubate the plates in the humidity chamber at 37 °C for 1 h. Wash with PBS-T using the plate washer, and blot gently.
-
10.
Apply HRP conjugated secondary antibody . Dilute HRP conjugated goat anti-bird antibody in PBS-T + B, add 50 μL to each well, and incubate in the humidity chamber at 37 °C for 1 h. Wash with PBS-T using the plate washer and blot by inverting and gentle tapping.
-
11.
Apply HRP TMB substrate. Prepare the substrate by mixing equal volumes of room temperature TMB Peroxidase Substrate and Peroxidase Substrate Solution B in a clean polypropylene or glass container immediately before use. Add 50 μL to each well, cover the plates, and incubate in the dark at RT for 8 min. A deep blue color will develop. Stop the reaction by adding 50 μL of 1:20 HCL to each well. The color will turn yellow (see Note 30 ).
-
12.
Measure optical density . Wipe the bottom of the plate and read in the ELISA microplate reader within 30 min at a wavelength of 450 nm.
-
13.
Compute the positive/negative (P/N) value of each sample by dividing the mean OD of positive antigen-containing wells by the OD of the negative antigen-containing wells. Samples with a P/N values less than 2 are considered positive and often are tested further by PRNT for confirmation [28].
4 Notes
-
1.
If a ball mixer is not available, a hand operated homogenizer system (Thomas Scientific cat. no/1191H97) may be substituted, using disposable pestles (Kimble-Kontes cat. no. Z359947).
-
2.
Since this centrifuge does not have aerosol tight containers, the entire centrifuge has been placed in a biological safety cabinet to comply with safety rules for the BSL-3 laboratory.
-
3.
Cotton swabs with wooden shafts may contain materials which inhibit PCR. Plastic or metal shafts are preferable.
-
4.
RNase precautions: before working with RNA, clean the lab bench and pipettes with an RNase decontamination solution such as Ambion RNaseZap, RNaseKiller or any other commercial RNASE decontaminating solution. Wear laboratory gloves for all RNA procedures to protect you from the reagents and protect the RNA from nucleases present on the skin. Use RNase-free pipet tips to handle the reagents.
-
5.
Buffer RLT contains guanidine thiocyanate, Buffer RLC contains guanidine hydrochloride, and Buffer RW1 contains a small amount of guanidine thiocyanate. Guanidine salts can form highly reactive compounds when combined with bleach. If liquid containing these buffers is split, clean with suitable laboratory detergent and water. If the spilt liquid contains potentially infectious agents, clean the affected area first with laboratory detergent and water, and then with bleach.
-
6.
Dispense β-ME into Buffer in a fume hood and wear appropriate protective equipment.
-
7.
GelRed is a fluorescent nucleic acid stain designed to replace highly toxic ethidium bromide (EB) for staining DNA and RNA in agarose and polyacrylamides gels. It is more sensitive than EB and has the desirable features of long term stability, optical properties identical with EB, and it can be discarded directly down the drain or in regular trash because it is environmentally safe.
-
8.
BlueJuice 10× loading buffer contains 65 % (w/v) sucrose, 10 mM Tris–HCl (pH 7.5), 10 mM EDTA, and 0.3 % (w/v) Bromophenol Blue. When mixed with the DNA sample, the sucrose makes the sample heavier than the running buffer and prevents it from diffusing away from the well, and the blue dye allows tracking of the sample when the gel is run.
-
9.
The WNV positive control used in our laboratory is prepared from a crow that is highly positive by real-time RT-PCR, having a CT value of less than 16. Thus, the homogenized sample may be diluted before RNA purification.
-
10.
Safety Note: make sure to add the acid to the water.
-
11.
WNV-positive mosquito pools of up to 50 individuals may contain only one infected mosquito, and thus, the pool cannot be split to process for live virus isolation and RT-PCR separately. If both assays are to be performed, homogenize the pool initially in mosquito diluent to prevent degradation of the virus by lysis buffers (see Note 12 ). Then clarify the homogenate by centrifugation and take aliquots for isolation of infectious virus in cell culture and/or RNA purification by RNeasy or MagMAX procedures.
-
12.
Lysis buffers (RLT from the RNeasy Kit and Lysis/Binding Buffer from the MagMAX procedure) contain guanidine salts which are chaotropic agents that destroy the three-dimensional structure of proteins, thus inactivating RNases that are released during homogenization of the tissues . The RNA from mosquitoes homogenized in these lysis buffers is well-preserved, but the integrity of virus is compromised and the samples cannot be used for live virus isolation. When mosquito samples are homogenized initially in mosquito diluent, the quantity and quality of RNA obtained from mosquito samples will be somewhat compromised due to the release of RNases. It is recommended that the samples be kept chilled during all steps of the procedure to minimize RNA degradation.
-
13.
One study [34] comparing WNV present in avian tissues, oral and cloacal swabs, and feather pulp found that viral titers in the vascular pulp samples were up to four times higher than tissue samples and swabs. Another study [35] using the Vector antigen test found that feather pulp was an excellent source of WNV antigen in certain infected bird species.
-
14.
Oral and cloacal swabs have been used for detection of WNV in other vertebrate species [36–38].
-
15.
Ethanol promotes selective binding of RNA to the silica-based membrane in the column
-
16.
It is very important that all ethanol be removed from the sample to prevent degradation of RNA; use care in removing the column after the last spin so that the column does not contact the flow-through. If carryover is observed or suspected, transfer the spin column to a clean 2 mL collection tube and repeat the centrifugation.
-
17.
The capture time depends on the magnetic stand used; with the Ambion 96-well Magnetic-Ring Stand, the capture time is 2–3 min.
-
18.
When the Diluted TURBO DNase is added to the sample, nucleic acids are released from the RNA Binding Beads and genomic DNA is degraded.
-
19.
Drying the beads removes residual ethanol which otherwise could interfere with downstream applications.
-
20.
Although WNV will amplify in C636 cells, CPE usually is not observed, and plaques do not form. Therefore this cell line is not suitable for detection of virus by the presence of CPE, or for immunofluorescence assays.
-
21.
Early examination of inoculated cells may reveal damage caused by toxicity from a component of the inoculum. The distinction between CPE and cytotoxicity often can be resolved during subsequent daily examinations, since CPE due to viral infection is progressive, spreading through the monolayer with time.
-
22.
It is important to compare “positive cells” to the positive and negative controls. Some antibodies create substantial background “fluorescence” which can be misinterpreted. Persistent background fluorescence may be reduced by adding 0.2 % BSA to the PBS used for antiserum dilutions.
-
23.
Storage of serum samples and mild hemolysis has not been observed to affect cell growth or reproducibility of results.
-
24.
If an insufficient volume of test serum is available, a higher starting dilution, usually 1:10, may be used [28]. Diluted positive and negative serum controls may be used for at least 3 months provided they remain contaminant free (not cloudy, no pH change) and do not lose reactivity.
-
25.
Stained monolayers that appear to be dried out with uncountable plaques may be caused by allowing the monolayers to dry during infection or incubation. Take care to keep the time that the plate covers are removed to a minimum. Drying also could be caused by adding the agar overlay when its temperature is too hot. Light staining of the cells may be due to precipitation of neutral red out of solution, which may be avoided by adding the neutral red to 56° agar before combining the agar with 2× medium. Light staining may also be due to unhealthy cells, which will not take up the stain optimally.
-
26.
This screening assay has been used to study the prevalence of WNV infection within wild bird populations [28, 39]. A similar assay may be used for other wildlife populations, as well as for detection of IgG in clinical samples.
-
27.
A checkerboard titration (CTB) is an ELISA designed to determine the optimal concentration of one or two ELISA assay components The CBT assay is accomplished by serial dilution of one reagent across the plate and serial dilution of a second reagent down the plate. This design permits you to analyze different concentrations of two reagents in each well to determine the optimal combination of both reagents. The maximum number of reagents that can be titrated on one plate is two. However, if you have a reasonable estimate of the optimal concentration, it is possible and efficient to test fewer dilutions, and thus include more than one CBT on a plate.
-
28.
It is important that enough antigen is available on the surface of wells for antibody binding. Excess antigen is wasteful. It is critical that the immobilized antigen molecule be coated to the surface as a monolayer to ensure the greatest precision. An ideal monolayer coverage has no void areas on the surface (indicating the concentration is too low) or unstable multilayer formation from protein-protein interactions (indicating the concentration is too high). Excessive concentrations of coating protein may actually lead to less coating.
-
29.
Common dilutions are 1:1000–1:2000. Avoid using it too concentrated (wasteful and may cause background) or too dilute (may not detect weak positives).
-
30.
TMB (3,3′,5,5′-tetramethylbenzidine) is a chromogen that yields a blue color when oxidized by HRP. The blue color change can be read on a spectrophotometer at a wavelength of 650 nm, and the blue color continues to develop over time enabling collection of sequential OD readings for a kinetic or non-stopped ELISA. When the reaction is stopped by addition of acid (HCL) a stable yellow color results that may be read at 450 nm.
References
Smithburn KC, Hughes TP, Burke AW, Paul JH (1940) A neurotropic virus isolated from the blood of a native of Uganda. Am J Trop Med Hyg 20:471–473
Hayes CG (2001) West Nile virus: Uganda, 1937, to New York City, 1999. Ann N Y Acad Sci 951:25–37
Petersen LR, Brault AC, Nasci RS (2013) West Nile virus: review of the literature. JAMA 310(3)
Kilpatrick AM, Kramer LD, Campbell SR, Alleyne EO, Dobson AP, Daszak P (2005) West Nile virus risk assessment and the bridge vector paradigm. Emerg Infect Dis 11(3):425–429
Lanciotti RS, Ebel GD, Deubel V, Kerst AJ, Murri S, Meyer R, Bowen M, McKinney N, Morrill WE, Crabtree MB, Kramer LD, Roehrig JT (2002) Complete genome sequences and phylogenetic analysis of West Nile virus strains isolated from the United States, Europe, and the Middle East. Virology 298(1):96–105
Hubalek Z, Rudolf I, Bakonyi T, Kazdova K, Halouzka J, Sebesta O, Sikutova S, Juricova Z, Nowotny N (2010) Mosquito (Diptera: Culicidae) surveillance for arboviruses in an area endemic for West Nile (Lineage Rabensburg) and Tahyna viruses in Central Europe. J Med Entomol 47(3):466–472
Lvov DK, Butenko AM, Gromashevsky VL, Kovtunov AI, Prilipov AG, Kinney R, Aristova VA, Dzharkenov AF, Samokhvalov EI, Savage HM, Shchelkanov MY, Galkina IV, Deryabin PG, Gubler DJ, Kulikova LN, Alkhovsky SK, Moskvina TM, Zlobina LV, Sadykova GK, Shatalov AG, Lvov DN, Usachev VE, Voronina AG (2004) West Nile virus and other zoonotic viruses in Russia: examples of emerging-reemerging situations. Arch Virol Suppl 18:85–96
Bondre VP, Jadi RS, Mishra AC, Yergolkar PN, Arankalle VA (2007) West Nile virus isolates from India: evidence for a distinct genetic lineage. J Gen Virol 88(Pt 3):875–884
Rappole JH, Derrickson SR, Hubalek Z (2000) Migratory birds and spread of West Nile virus in the Western Hemisphere. Emerg Infect Dis 6(4):319–328
Rappole JH, Hubalek Z (2003) Migratory birds and West Nile virus. J Appl Microbiol 94(Suppl):47S–58S
Ciccozzi M, Peletto S, Cella E, Giovanetti M, Lai A, Gabanelli E, Acutis PL, Modesto P, Rezza G, Platonov AE, Lo PA, Zehender G (2013) Epidemiological history and phylogeography of West Nile virus lineage 2. Infect Genet Evol 17:46–50
Bakonyi T, Ferenczi E, Erdelyi K, Kutasi O, Csorgo T, Seidel B, Weissenbock H, Brugger K, Ban E, Nowotny N (2013) Explosive spread of a neuroinvasive lineage 2 West Nile virus in Central Europe, 2008/2009. Vet Microbiol 165(1-2):61–70
Kolodziejek J, Marinov M, Kiss BJ, Alexe V, Nowotny N (2014) The complete sequence of a West Nile virus lineage 2 strain detected in a Hyalomma marginatum marginatum tick collected from a song thrush (Turdus philomelos) in Eastern Romania in 2013 revealed closest genetic relationship to strain Volgograd 2007. PLoS ONE 9(10), e109905
Shi PY, Wong SJ (2003) Serologic diagnosis of West Nile virus infection. Expert Rev Mol Diagn 3(6):733–741
Martin DA, Biggerstaff BJ, Allen B, Johnson AJ, Lanciotti RS, Roehrig JT (2002) Use of immunoglobulin M cross-reactions in differential diagnosis of human flaviviral encephalitis infections in the United States. Clin Diagn Lab Immunol 9(3):544–549
Martin DA, Muth DA, Brown T, Johnson AJ, Karabatsos N, Roehrig JT (2000) Standardization of immunoglobulin M capture enzyme-linked immunosorbent assays for routine diagnosis of arboviral infections. J Clin Microbiol 38(5):1823–1826
Tardei G, Ruta S, Chitu V, Rossi C, Tsai TF, Cernescu C (2000) Evaluation of immunoglobulin M (IgM) and IgG enzyme immunoassays in serologic diagnosis of West Nile virus infection. J Clin Microbiol 38(6):2232–2239
Shi P-Y, Kauffman EB, Ren P, Felton A, Tai JH, Dupuis AP, Jones SA, Ngo KA, Nicholas DC, Maffei JG, Ebel GD, Bernard KA, Kramer LD (2001) High throughput detection of West Nile virus RNA. J Clin Microbiol 39(4):1264–1271
Lanciotti RS, Kerst AJ, Nasci RS, Godsey MS, Mitchell CJ, Savage HM, Komar N, Panella NA, Allen BC, Volpe KE, Davis BS, Roehrig JT (2000) Rapid detection of West Nile virus from human clinical specimens, field-collected mosquitoes, and avian samples by a TaqMan reverse transcriptase-PCR assay. J Clin Microbiol 38(11):4066–4071
Kauffman EB, Jones SA, Dupuis AP, Ngo KA, Bernard KA, Kramer LD (2003) Virus detection protocols for West Nile virus in vertebrate and mosquito specimens. J Clin Microbiol 41(8):3661–3667
Health USDoHaHSCfDCaPaNIo (2009) Biosafety in microbiological and biomedical laboratories (BMBL), 5th edn. US Government Printing Office, Washington, DC
Nemeth NM, Young GR, Burkhalter KL, Brault AC, Reisen WK, Komar N (2009) West Nile virus detection in nonvascular feathers from avian carcasses. J Vet Diagn Invest 21(5):616–622
Briese T, Lipkin I (2000) Testing for West Nile. Lancet 356(9235):1110–1111
Biosystems A (2005) Absolute quantification getting started guide
Burkhalter KL, Lindsay R, Anderson R, Dibernardo A, Fong W, Nasci RS (2006) Evaluation of commercial assays for detecting West Nile virus antigen. J Am Mosq Contr Assoc 22(1):64–69
Lindsey HS, Calisher CH, Matthews JH (1976) Serum dilution neutralization test for California group virus identification and serology. J Clin Microbiol 4:503–510
Calisher CH, Monath TP, Karabatsos N, Trent DW (1981) Arbovirus subtyping: applications to epidemiologic studies, availability of reagents, and testing services. Am J Epidemiol 114(5):619–631
Ebel GD, Dupuis AP, Nicholas D, Young D, Maffei J, Kramer LD (2002) Detection by enzyme-linked immunosorbent assay of antibodies to West Nile virus in birds. Emerg Infect Dis 8(9):979–982
Dupuis AP 2nd, Peters RJ, Prusinski MA, Falco RC, Ostfeld RS, Kramer LD (2013) Isolation of deer tick virus (Powassan virus, lineage II) from Ixodes scapularis and detection of antibody in vertebrate hosts sampled in the Hudson Valley, New York State. Parasit Vectors 6:185. doi:10.1186/1756-3305-6-185
Berl E, Eisen RJ, MacMillan K, Swope BN, Saxton-Shaw KD, Graham AC, Turmel JP, Mutebi JP (2013) Serological evidence for eastern equine encephalitis virus activity in white-tailed deer, Odocoileus virginianus, in Vermont, 2010. Am J Trop Med Hyg 88(1):103–107. doi:10.4269/ajtmh.2012.12-0236
Blitvich BJ, Fernandez-Salas I, Contreras-Cordero JF, Marlenee NL, Gonzalez-Rojas JI, Komar N, Gubler DJ, Calisher CH, Beaty BJ (2003) Serological evidence of West Nile virus infection in horses, Coahuila State, Mexico. Emerg Infect Dis 9(7):853–856
Cha GW, Cho JE, Ju YR, Hong YJ, Han MG, Lee WJ, Choi EY, Jeong YE (2014) Comparison of four serological tests for detecting antibodies to Japanese encephalitis virus after vaccination in children. Osong Public Health Res Perspect 5(5):286–291. doi:10.1016/j.phrp.2014.08.003
Ometto T, Durigon EL, de Araujo J, Aprelon R, de Aguiar DM, Cavalcante GT, Melo RM, Levi JE, de Azevedo Junior SM, Petry MV, Neto IS, Serafini P, Villalobos E, Cunha EM, Lara Mdo C, Nava AF, Nardi MS, Hurtado R, Rodrigues R, Sherer AL, Sherer Jde F, Geraldi MP, de Seixas MM, Peterka C, Bandeira Dde S, Pradel J, Vachiery N, Labruna MB, de Camargo LM, Lanciotti R, Lefrancois T (2013) West Nile virus surveillance, Brazil, 2008–2010. Trans R Soc Trop Med Hyg 107(11):723–730. doi:10.1093/trstmh/trt081
Docherty DE, Long RR, Griffin KM, Saito EK (2004) Corvidae feather pulp and West Nile virus detection. Emerg Infect Dis 10(5):907–909. doi:10.3201/eid1005.030825
Stone WB, Okoniewski JC, Therrien JE, Kramer LD, Kauffman EB, Eidson M (2004) VecTest as diagnostic and surveillance tool for West Nile virus in dead birds. Emerg Infect Dis 10(12):2175–2181
Klenk K, Snow J, Morgan K, Bowen R, Stephens M, Foster F, Gordy P, Beckett S, Komar N, Gubler D, Bunning M (2004) Alligators as West Nile virus amplifiers. Emerg Infect Dis 10(12):2150–2155
Tiawsirisup S, Blitvich BJ, Tucker BJ, Halbur PG, Bartholomay LC, Rowley WA, Platt KB (2010) Susceptibility of fox squirrels (Sciurus niger) to West Nile virus by oral exposure. Vector Borne Zoonotic Dis 10(2):207–209. doi:10.1089/vbz.2008.0158
Padgett KA, Reisen WK, Kahl-Purcell N, Fang Y, Cahoon-Young B, Carney R, Anderson N, Zucca L, Woods L, Husted S, Kramer VL (2007) West Nile virus infection in tree squirrels (Rodentia: Sciuridae) in California, 2004–2005. Am J Trop Med Hyg 76(5):810–813
Chiles RE, Reisen WK (1998) A new enzyme immunoassay to detect antibodies to arboviruses in the blood of wild birds. J Vector Ecol 23(2):123–135
Briese T, Glass WG, Lipkin I (2000) Detection of West Nile virus sequences in cerebrospinal fluid. Lancet 355(9215):1614–1615
Author information
Authors and Affiliations
Corresponding author
Editor information
Editors and Affiliations
Rights and permissions
Copyright information
© 2016 Springer Science+Business Media New York
About this protocol
Cite this protocol
Kauffman, E.B., Franke, M.A., Kramer, L.D. (2016). Detection Protocols for West Nile Virus in Mosquitoes, Birds, and Nonhuman Mammals. In: Colpitts, T. (eds) West Nile Virus. Methods in Molecular Biology, vol 1435. Humana Press, New York, NY. https://doi.org/10.1007/978-1-4939-3670-0_15
Download citation
DOI: https://doi.org/10.1007/978-1-4939-3670-0_15
Published:
Publisher Name: Humana Press, New York, NY
Print ISBN: 978-1-4939-3668-7
Online ISBN: 978-1-4939-3670-0
eBook Packages: Springer Protocols