
Abstract
Withania coagulans (Stocks) Dunal (Solanaceae), also known as ‘Panir Bandh’ is an important medicinal plant that is extensively used as a home remedy for several diseases in the Indian subcontinent. The plant possesses specific steroidal lactones known as withanolides which show high level of pharmaceutical activity against a broad spectrum of microorganisms. Natural propagation of the plant occurs through Seed but due to unisexual nature of the flowers; chances of Seed setting are very limited and the plant is on the verge of extinction because of overexploitation and reproductive failure. Plant tissue culture techniques offer opportunities for ex situ conservation and mass multiplication of endangered plant species through micropropagation and also enhancement of in vitro biosynthesis of bioactive compounds. In this chapter we present protocols for the mass multiplication of W. coagulans, assessment of clonal fidelity by RAPD, and estimation of bioactive compounds (withanolides) by thin layer chromatography (TLC) and reverse phase HPLC developed in our laboratory.
Access provided by CONRICYT – Journals CONACYT. Download protocol PDF
Key words
1 Introduction
W. coagulans (Stocks) Dunal (synonym: Puneeria coagulans Stocks), commonly known as Indian rennet, is distributed in the warmer and drier parts of India [1]. The plant is native of the Asia-temperate (Western Asia: Afghanistan) and Asia-tropical regions. It is a rare and endangered medicinal plant restricted to the Northern part of Indian subcontinent and observed only twice in Rajasthan in the vegetative state only [2]. The plant has a long tapering light brown root, it is surmounted by a knotty crown from which spring several shrubby, flexose round branches, 1–5 ft in length (see Fig. 1). The whole plant is covered with small branched and pointed white hairs, which give it a hoary appearance. The odor is pungent and disagreeable like horse’s urine. The chromosome number is 2n = 48.

Withania coagulans plant growing in field
The plant has diverse pharmacological properties, including anti-inflammatory, anticancer, chemoprotective, hepatoprotective, immunomodulatory, antifungal and antibacterial, hypoglycemic, hypolipidemic, antihyperglycemic, cardiovascular, and central nervous system related activities [3–5]. W. coagulans is commercially important also because of its ability to coagulate milk due to the presence of an enzyme in the fruits of the plant. The concentrated enzyme can successfully be used in place of animal rennet to prepare soft cheese like cheddar. The essential oil of the plant is found to be active against Micrococcus pyogenes var. aureus and Escherichia coli [6]. This plant is well recognized in the native system of medicine for the treatment of ulcers, rheumatism, dropsy, consumption, sensile debility, asthma, biliousness, strangury, dyspepsia, flatulent colic, and other intestinal infections. In the Indian subcontinent, the fruits are used as blood purifier and the twigs of the plant are chewed for cleaning teeth [7].
The chemistry of W. coagulans has been comprehensively studied and several groups of chemical constituents such as steroidal lactones , alkaloids, flavonoids , and tannin have been identified, extracted, and isolated [8, 9]. The major chemical constituents of the plant, withanolides , are mainly localized in leaves and roots [9]. The withanolides are a group of naturally occurring C-28 steroidal lactones built on an intact or rearranged ergostane framework, in which C-22 and C-26 are appropriately oxidized to form a six-membered lactone ring. The basic structure is designated as the withanolide skeleton (see Fig. 2) [10–12].

Basic withanolide skeleton
The withanolide skeleton is a 22-hydroxyergostan-26-oic acid-26, 22-lactone structure. There are many structural alternatives of withanolides with modifications either of the carbocyclic skeleton or the side chain and these have been described as modified withanolides or ergostane type steroids related to withanolides. The characteristic feature of withanolides and ergostane type steroids is one C8 or C9-side chain with a lactone (either six-membered or five-membered) or lactol ring, fused with the carbocyclic part of the molecule through a carbon–carbon bond or through an oxygen bridge. Appropriate oxygen substituents may lead to formation of new bonds, aromatization of rings, and many other kinds of rearrangements resulting in compounds with novel structures [11, 13, 14].
According to Mishra et al. [15] W. coagulans is phytochemically unique in predominantly producing the neuroactive metabolite withanolide A in aerial parts of the plant, implying relatively easier and economical harvest of the withanolide. Naturally, W. coagulans propagates through seeds but seed setting is limited due to unisexual nature of flowers. Reproductive failure and overexploitation have rendered the species highly vulnerable to complete extinction [16]. Therefore, there is an urgent need of ex situ conservation of this important medicinal plant through micropropagation techniques.
2 Materials
2.1 Media Preparation: (See Notes 1 – 3 )
-
1.
Stock solutions of Murashige and Skoog (MS) medium (Table 1).
Table 1 Composition of MS basal medium -
2.
Agar.
-
3.
Beakers, measuring cylinder.
-
4.
1 N HCl/1 N NaOH.
-
5.
Stock solutions of different plant growth regulators.
-
6.
Sucrose .
2.2 Surface Sterilization
-
1.
“Extran” liquid detergent.
-
2.
Mercuric chloride.
-
3.
Distilled water.
2.3 Analysis of Clonal Fidelity by RAPD
2.3.1 Genomic DNA Isolation
-
1.
Leaf samples: 2 g fresh leaves.
-
2.
Cetyl trimethyl ammonium bromide (CTAB) extraction buffer (100 ml): 2 % (w/v) CTAB, 1.4 M NaCl, 20 mM EDTA, 100 mM Tris–HCl pH 8.0 (see Note 4 ).
-
3.
Tris EDTA (TE) buffer (100 ml): 10 mM Tris–HCl (pH 8.0), 1 mM EDTA (pH 8.0) (see Note 5 ).
-
4.
Ice-cold isopropanol.
-
5.
Chloroform–isoamyl alcohol (24:1 v/v).
-
6.
Sodium acetate (3.0 M) pH 5.2 (Adjust pH with glacial acetic acid).
-
7.
Ethanol (100 % and 70 %).
-
8.
RNAse A: 10 mg/ml (see Note 6 ).
-
9.
Milli-Q Water.
2.3.2 PCR for DNA Amplification
-
1.
Template DNA.
-
2.
PCR tubes (see Note 7 ).
-
3.
dNTP mix.
-
4.
RAPD primer.
-
5.
Taq DNA Polymerase.
-
6.
Taq Buffer solution (with MgCl2).
-
7.
Milli-Q Water.
2.3.3 Gel Electrophoresis
-
1.
Gel electrophoresis setup unit.
-
2.
Agarose (1.2 % w/v) (see Note 8 ).
-
3.
TAE buffer (50×) (see Note 9 ).
-
4.
Ethidium bromide (1 % w/v in Milli-Q water) (see Note 10 ).
-
5.
Gel loading dye (6×) (see Note 11 ).
2.4 Analysis of Secondary Metabolites (Withanolides ) by TLC and HPLC
2.4.1 Secondary Metabolite Extraction
-
1.
Plant material (shoot buds and leaves, 2 g).
-
2.
Mortar and pestle.
-
3.
Methanol (25 % (v/v) in water).
-
4.
Separatory funnel.
-
5.
n-hexane.
-
6.
Chloroform.
2.4.2 Thin Layer Chromatography
-
1.
TLC plates (precoated Silica Gel G-60 plates).
-
2.
Solvent system (see Note 12 ).
-
3.
Anisaldehyde reagent (see Note 13 ).
-
4.
Standard withanolides .
2.4.3 HPLC Analysis
-
1.
Methanol (HPLC grade).
-
2.
Deionized water (HPLC grade).
-
3.
Acetic acid (HPLC grade).
-
4.
Reverse-phase (RP) column (Eclipse XDB c-18, particle size 1.8 μm, 4.5 mm × 250 mm).
-
5.
Authentic withanolide standards.
3 Methods
3.1 Micropropagation of W. coagulans
3.1.1 Preparation of Medium
Basal medium used in the present study is MS (Murashige and Skoog, 1962) medium [17].
-
1.
Prepare stock solutions of various inorganic and organic nutrients of MS medium (Table 1). To prepare stock solutions of growth regulators, dissolve auxins (IAA, IBA , PAA, NAA ) in few drops of absolute alcohol and cytokinins (BA, Kn) in few drops of 1 N HCl, and make up the final volume by adding distilled water (20 mg/100 ml) (see Note 1 ).
-
2.
Prepare the medium by mixing all the mineral nutrients, sucrose (3 %, w/v), and growth regulators in appropriate quantities (see Notes 2 and 3 ).
-
3.
Adjust the pH to 5.8 by 1 N HCl/NaOH.
-
4.
Weigh appropriate amount of agar (0.9 %) and mix in the medium followed by heating in a microwave oven until the agar is dissolved (see Note 8 ).
-
5.
Stir the medium and dispense approximately 40 ml or 20 ml into 100 ml Erlenmeyer flask or culture tubes, respectively.
-
6.
Plug the culture vessel s with non-absorbent cotton and wrap with paper prior to autoclaving at 121 °C and 1.06 kg/cm2 pressure for 20 min.
-
7.
Use the autoclaved medium after solidification.
3.1.2 Aseptic Manipulations
-
1.
Autoclave all other accessories such as conical flasks, measuring cylinders, reagent bottles, Petri plates, forceps, and scalpel blades.
-
2.
Measured volume of distilled water required for surface sterilization of field explants should also be sterilized by autoclaving.
-
3.
Clean the laminar air flow cabinet with spirit and put all the required accessories along with the culture vessel s containing medium and distilled water.
-
4.
Irradiate the cabinet with UV rays for 25–30 min.
-
5.
After irradiation open the cabinet and start the surface sterilization process under a continuous airflow (see Note 14 ).
3.1.3 Surface Sterilization, Explant Culture, and Incubation
-
1.
Excise the explants from mature plants and wash with liquid detergent “Extran” (5 %, v/v) for 5–10 min and rinse 4–5 times thoroughly with sterile distilled water.
-
2.
For surface sterilization dip the explants in mercuric chloride (0.1 %, w/v) solution in laminar airflow cabinet for 3 min and wash with distilled water 3–4 times.
-
3.
Inoculate the explants in the medium with the help of forceps and scalpel on a spirit lamp/burner in the cabinet (see Note 15 ).
-
4.
Place the nodal segments having axillary buds and shoot tip s with apical meristem separately in the culture vessel containing shoot induction medium (see Note 2a) in such a way that the cut end of the explant remains in contact with the medium.
-
5.
Inoculate the horizontally excised leaf explants of appropriate size (2–3 cm long), with petiolar end abaxially on the shoot induction medium (see Note 2b).
-
6.
Incubate the cultures in the growth chamber at 26 ± 1 °C under 16/8 h photoperiod with 25 μmol/m2/s photosynthetic photon flux density provided by white fluorescent tubes.
3.1.4 Subculture of Shoot Buds
-
1.
Within 3 weeks of incubation bud break occurs from the nodal segments and shoot tip s (see Fig. 3a, b).
Fig. 3 
Morphogenic response of Withania coagulans cultured on MS medium supplemented with various growth regulators. (a) Bud break from nodal explant , (b) Bud break from shoot tip explant, (c) Multiplication response of shoot buds, (d) Elongation of shoot buds, (e) Rooting response of in vitro -regenerated shoots, (f) Field-transferred plant
-
2.
Transfer the primary shoots to fresh medium after 4–5 weeks of culture incubation.
-
3.
Excise the shoot buds induced from the explant into groups each having 3–4 shoot buds.
-
4.
Inoculate these clusters on the first stage shoot proliferation medium (see Note 2c).
-
5.
Within 3–4 weeks the multiplication of shoot buds occurs (see Fig. 3c). Transfer the developed shoots on second stage shoot proliferation medium for further growth and elongation of shoots (see Note 2d).
-
6.
Within 2 weeks of culture elongation occurs in the shoots (see Fig. 3d).

3.1.5 Rooting , Hardening , and Field Transfer of Plantlets
-
1.
Excise and inoculate the elongated shoots (>3 cm) on first step rooting medium (R1) for pulse treatment for 7 days (see Note 3a).
-
2.
Transfer the shoots on second step rooting medium (R2) (see Note 3b).
-
3.
The roots emerge from the shoot after 3 weeks of culture (see Fig. 3e).
-
4.
Carefully take out the regenerated plantlets with well-developed shoot and root systems and wash thoroughly with tap water to remove agar clinging to roots.
-
5.
Prepare earthen pots containing mixture of garden soil and vermiculite (1:1) and transfer the plantlets in the pots followed by transfer to green house at 26 ± 1 °C temperature and 85 % humidity.
-
6.
After acclimatization transfer the plants to field conditions (see Fig. 3f).
3.2 Analysis of Clonal Fidelity by RAPD
3.2.1 Genomic DNA Isolation from Mother Plant and Tissue Culture Raised Plantlets
CTAB method of Doyle and Doyle [18] as described below is used to isolate genomic DNA.
-
1.
Collect young leaf samples from at least 15–20 tissue culture raised plants growing in the field condition.
-
2.
Grind 100 mg of frozen plant material to fine powder with mortar and pestle using liquid nitrogen.
-
3.
Transfer the powder immediately to 5 ml of pre-warmed (65 °C) CTAB extraction buffer and 2 μl RNase A.
-
4.
Incubate the mixture for 1 h at 65 °C in a water bath and mix gently after every 10 min.
-
5.
Add equal volume of chloroform–isoamyl alcohol (24:1, v/v) to the mixture and centrifuge the resultant slurry at 12,000 rpm (18,500 × g) at 4 °C for 10 min.
-
6.
Separate the upper aqueous phase after centrifugation and transfer to test tubes.
-
7.
Add 2 μl RNase A to each tube at this step and incubate at room temperature for 30 min.
-
8.
To each test tube, add 0.6 volume of ice-cold isopropanol to the aqueous phase followed by gentle but thorough mixing by inverting the tubes several times. At this stage, the DNA-CTAB complex is precipitated out. Centrifuge the precipitate containing DNA by centrifugation at 6000 rpm at 4 °C for 10 min.
-
9.
Wash the pellet with 70 % ethanol by gentle agitation followed by centrifugation (10 min, 5000 rpm, 4 °C).
-
10.
Discard the ethanol and allow to air-dry the pellet obtained after centrifugation and add 100 μl of TE buffer and leave overnight for dissolving the DNA.
-
11.
The concentration of purified DNA in the solution is estimated on 0.8 % (w/v) agarose gel electrophoresis by comparing with uncut lambda DNA of known concentration.
3.2.2 Molecular Analysis Using RAPD
-
1.
PCR amplification: Prepare the PCR reaction mixture on ice bath in 25 μl volume by mixing all the components given in Table 2.
Table 2 Composition of PCR reaction mixture -
2.
Spin the PCR tube containing reaction mixture for few seconds and place the tubes in the thermal cycler for PCR amplification. Set the PCR amplification conditions as follows:
Initial denaturation at 94 °C for 4 min followed by 40 cycles of 94 °C for 45 s, 37 °C for 45 s and 72 °C for 2 min, and a final extension at 72 °C for 10 min.
-
3.
Gel electrophoresis: Prepare the 1.2 % (w/v) agarose gel (100 ml) using l× TAE gel running buffer.
-
4.
Mark the height of the level of buffer with a mark on the outside of the flask. Boil the solution in microwave to dissolve the agarose completely; swirl flask occasionally to mix. Check the height of the liquid level in the flask. If necessary, add sterile distilled water to bring the liquid back to the original level.
-
5.
Allow the dissolved agarose to cool to about 45–50 °C and add 2–3 μl EtBr solution (1 mg/ml) and mix.
-
6.
Pour the agarose into a gel casting tray after sealing properly the ends and placing appropriate comb to make the gel wells. Allow the gel to solidify. This can take 15–20 min, depending on the agarose concentration.
-
7.
Once the gel is solidified, remove the comb from the gel. To aid in removing the comb, pour a small amount of 1× TAE running buffer around the comb before loosening the comb (see Note 16 ).
-
8.
Transfer the gel on the gel tray to the gel tank. Add 1× TAE running buffer to immerse the gel completely (see Note 9 ).
-
9.
Prepare DNA samples in eppendorf tubes to be loaded on the gel. Add 1.0 μl of gel loading buffer for every 5 μl of DNA sample. Mix the sample and loading buffer completely.
-
10.
Carefully load the samples in the gel wells. In the very first well of the gel load the appropriate DNA molecular marker (0.1 Kb or 1.0 Kb). Record which samples are loaded in which lane.
-
11.
Connect the apparatus to the power pack and allow electrophoresis to proceed at 5 V/cm of the gel.
-
12.
When tracing dye reaches the end of the gel, turn-off the power, remove the gel from the casting tray, and visualize the bands on gel documentation system.
-
13.
Analyze the RAPD banding pattern for monomorphic and polymorphic bands present in the gel and the size of the bands by comparing with the 0.1 Kb and 1 Kb DNA molecular weight marker (see Fig. 4a, b).
Fig. 4 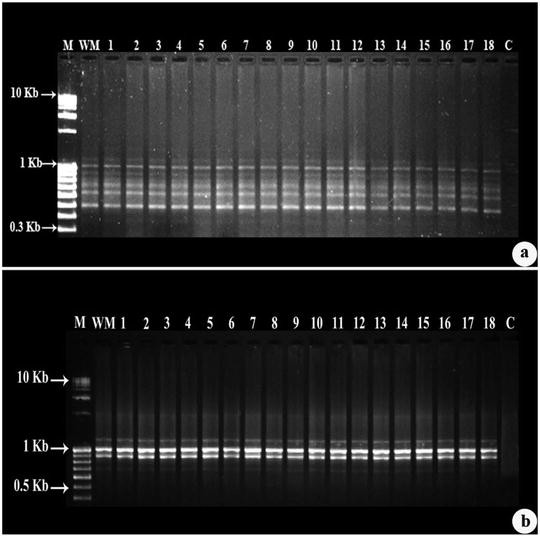
Agarose gel electrophoresis of RAPD fragments. (a) Banding profile amplified by RAPD primer OPT-8, (b) Banding profile amplified by RAPD primer OPF-6

3.3 Estimation of Secondary Metabolites by TLC and HPLC
3.3.1 Extraction of Withanolides from W. coagulans
-
1.
Extract 2 g freshly harvested plant material from W. coagulans three times with 20 ml extraction system containing 25 % methanol (v/v, in distilled water) in Erlenmeyer flask on a platform shaker at 30–40 rpm for 1 h in each extraction (see Note 17 ).
-
2.
Filter the solvent composition and recover the extract. Pool all the three filtrates and put in the separating funnel for liquid–liquid partition chromatography.
-
3.
At first, treat the extract with equal amount of n-hexane in the separating funnel to remove the pigments and fatty acids (see Note 18 ).
-
4.
Discard the lower n-hexane layer and repeat the process three times.
-
5.
Treat the defatted and depigmented extract with chloroform (equal volume, three times) to recover withanolides in the chloroform layer.
-
6.
Pool the chloroform fractions of each extract and allow to dry at room temperature.
-
7.
Dissolve the residue in known volume (1 ml) of HPLC grade methanol and filter through a 0.45 μm membrane filter prior to TLC and HPLC.
3.3.2 Qualitative Analysis of Withanolides by TLC
Qualitative withanolide profiling is done through TLC as described by Jain et al. [19].
-
1.
Fill the chromatography chamber with the solvent system and cover the chamber with glass lid for saturation (see Note 12 ).
-
2.
Meanwhile load 10 μl sample on the preactivated silica gel G-60 plate along with the authenticated withanolide standards (see Note 19 ).
-
3.
Place the plate in the saturated chamber and allow the solvent to run. Remove the plate after completion of the solvent run on the plate and air-dry the plate.
-
4.
Develop the plate by spraying anisaldehyde reagent followed by heating at 110 °C (see Note 13 ).
-
5.
Mark the spots visible after development with reference to the standard withanolides .
3.3.3 Quanitative Analysis of Withanolides by HPLC
Quanitative withanolide profiling was done through HPLC as described by Jain et al. [19].
-
1.
In the present study the quantification of extracts is analyzed through an analytical HPLC system having solvent reservoir bottles, solvent delivery pumps, degasser, autosampler, column oven, reverse phase column (Eclipse XDB c-18, particle size 1.8 μm, 4.5 mm × 250 mm), and UV-Diode Array Detector.
-
2.
A gradient program with HPLC grade water (pump A) and HPLC grade methanol (pump B) each containing 0.1 % acetic acid is used (see Note 20 ).
-
3.
Set the solvent gradient as A:B, 60:40 to 25:75, 0 to 45 min; 10:90, 45 to 60 min at a flow rate of 0.6 ml/min with a reference wavelength of 227 nm.
-
4.
Load the sample vial in the autosampler tray and set the injection volume to 10 μl in the program.
-
5.
Set the column temperature at 27 °C during the run.
-
6.
Use the authenticated withanolide standards to ascertain their discrete resolution from each other under these conditions.
-
7.
Data acquisition is done on the Agilent Chemstation 2.0. For computation of withanolide concentration in the samples prepare a calibration curve of concentration versus detector response (peak area) and regression equation (Y = mX + C) for each standard separately, using different concentrations (50–1000 ng/μl) of standard solution (1.0 mg/ml) in HPLC grade methanol.
-
8.
Calculate the concentration of different withanolides present in the extract by using the detector response of HPLC chromatogram for each withanolide peak at the same retention time as in the standard withanolide chromatogram and the regression equation (see Fig. 5).
Fig. 5 
HPLC chromatogram of shoot culture s of W. coagulans. (a) Standard withaferin A, (b) Standard withanolide A, (c) Standard withanone, (d) Chromatogram of extract isolated from shoot cultures of W. coagulans

4 Notes
-
1.
Label all the stocks and store in refrigerator. Use stock solutions within a week of preparation. Mix thermostable chemicals with other ingredients of the media before autoclaving, while filter-sterilized thermolabile chemicals are added to the autoclaved media in the laminar air flow cabinet.
-
2.
Use following concentrations and combinations of PGRs in the medium for shoot bud induction and proliferation.
-
(a)
Shoot induction medium for shoot tip and nodal segments : N-6-benzyladenine (BA) 2.2 μM in the MS medium.
-
(b)
Adventitious shoot induction medium for leaf explant : Combination of BA 22.2 μM and kinetin (Kn) 2.3 μM in MS medium.
-
(c)
First stage shoot proliferation medium : Combination of BA 2.2 μM and Kn 2.3 μM in MS medium.
-
(d)
Second stage shoot proliferation medium : Combination of BA 2.2 μM, Kn 2.3 μM, and phloroglucinol (PG) 3.9 μM in MS medium.
-
(a)
-
3.
Use following concentrations and combinations of PGRs in the medium for rooting.
-
(a)
First step rooting medium (R1): choline chloride (CC) 71.6 μM, PG 3.9 μM in half-strength MS medium.
-
(b)
Second step rooting medium (R2): indole-3-butyric acid (IBA ) 1.2 μM, phenylacetic acid (PAA) 3.6 μM, CC (71.6 μM), and PG (3.9 μM) in half-strength MS medium.
-
(a)
-
4.
Autoclave Tris–HCl, NaCl, and EDTA. CTAB should be added after autoclaving and extraction buffer should be preheated (65 °C) before using.
-
5.
Dissolve and make up to 100 ml with distilled water, autoclave and store at 4 °C.
-
6.
Dissolve RNase A in TE and boil it for 15 min at 100 °C to destroy DNase and store at −20 °C.
-
7.
Autoclave the PCR tubes to avoid any contamination during the reaction.
-
8.
When using the microwave, be sure to use cotton gloves (temperature proof) to pick up hot flasks. Do not swirl a flask to mix the contents of the flask until the flask has cooled briefly. Point the mouth of the flask away from you. Swirling an overheated flask may cause the liquid inside to “boil out” of the hot flask.
-
9.
To prepare 50× TAE, mix Tris 242 g, glacial acetic acid 57.1 ml, 0.5 M EDTA pH 8.0 in 100 ml distilled water. Make up the volume to 1000 ml and autoclave. Add 2 ml of 50× TAE in 98 ml of distilled water to prepare 1× gel running buffer.
-
10.
Always wear nitrile gloves while handling EtBr as it is carcinogenic.
-
11.
Mix 30 % (v/v) glycerol in water and add 0.25 % (w/v) bromophenol blue and 0.25 % (w/v) xylene cyanol. Store the dye at −20 °C.
-
12.
Prepare the solvent system by mixing chloroform, ethyl acetate, methanol, and toluene (74:4:8:30; v/v) in a chromatography chamber and cover the chamber with lid for saturation.
-
13.
250 μl anisaldehyde in a mixture of 20 ml acetone, 80 ml water, and 10 ml 60 % perchloric acid.
-
14.
Make sure that the UV light is turned off before opening the cabinet.
-
15.
The accessories should be properly heated on the spirit lamp and hands should also be properly wiped with spirit. Special care must be taken to avoid the tissue being touched by hot forceps/scalpels as it reduces the viability of the tissue.
-
16.
When removing the comb, do not disturb the wells since deformed wells may affect the proper mobility of the DNA.
-
17.
Filter the extract and collect the filtrate in a separate flask. Extract again with fresh extraction system (25 % methanol (v/v, in water).
-
18.
Shake vigorously the separating funnel containing extract and n-hexane and remove the vapors by inverting the funnel and opening the tap.
-
19.
Let the sample dot dry after each drop of extract is added. The drying keeps the pigment dot from spreading out too much.
-
20.
All the solvents to be used for HPLC must be filtered by the 0.45 μm membrane filter to avoid any contamination during the run.
References
Kirtikar KR, Basu BD (1999) Indian medicinal plants. International Book Distributors, Dehradun
Bhandari MM (1995) Flora of the Indian desert. MPS Repros, Jodhpur, India
Gupta GL, Rana AC (2007) Withania somnifera (Ashwagandha): a review. Phcog Rev 1:129–136
Maurya R, Akanksha J (2010) Chemistry and pharmacology of Withania coagulans: an Ayurvedic remedy. J Pharm Pharmacol 62:153–160
Jain R, Kachhwaha S, Kothari SL (2012) Phytochemistry, pharmacology, and biotechnology of Withania somnifera and Withania coagulans: a review. J Med Plants Res 6:5388–5399
Hemalatha S, Wahi AK, Singh PN, Chansouria JPN (2004) Hypoglycemic activity of Withania coagulans Dunal in streptozotocin induced diabetic rats. J Ethnopharmacol 93:261–264
Atta-ur-Rahman A, Dur-e-Shahwar NA, Choudhary MI (2003) Withanolides from Withania coagulans. Phytochemistry 63:387–390
Atta-ur-Rahman A, Abbas S, Dur-e-Shawar NA, Jamal AS, Choudhary MI (1993) New withanolides from Withania spp. J Nat Prod 56:1000–1006
Kapoor LD (2001) Handbook of Ayurvedic medicinal plants. CRC Press, Boca Raton, FL
Tursunova RN, Maslennikova VA, Abubakirov NK (1977) Withanolides in the vegetable kingdom. Chem Nat Comp 13:131–138
Glotter E (1991) Withanolides and related ergostane-type steroids. Nat Prod Rep 8:415–440
Alfonso D, Bernardinelli G, Kapetanidis I (1993) Withanolides from Iochroma coccineum. Phytochemistry 34:517–521
Kirson I, Glotter E, Lavie D, Abraham A (1971) Constituents of Withania somnifera Dun. XII. The withanolides of an Indian chemotype. J Chem Soc (C) 2032–2044
Mirjalili MH, Moyano E, Bonfill M, Cusido RM, Palazon J (2009) Steroidal lactones from Withania somnifera, an ancient plant for novel medicine. Molecules 14:2373–2393
Mishra S, Sangwan RS, Bansal S, Sangwan NS (2012) Efficient genetic transformation of Withania coagulans (Stocks) Dunal mediated by Agrobacterium tumefaciens from leaf explants of in vitro multiple shoot culture. Protoplasma 250:451–458
Jain R, Sinha A, Kachhwaha S, Kothari SL (2009) Micropropagation of Withania coagulans (Stocks) Dunal: a critically endangered medicinal herb. J Plant Biochem Biotechnol 18:249–252
Murashige T, Skoog F (1962) A revised medium for rapid growth and bioassays with tobacco cultures. Physiol Plant 15:473–497
Doyle JJ, Doyle JL (1990) Isolation of plant DNA from fresh tissue. Focus 12:13–15
Jain R, Sinha A, Jain D, Kachhwaha S, Kothari SL (2011) Adventitious shoot regeneration and in vitro biosynthesis of steroidal lactones in Withania coagulans (Stocks) Dunal. Plant Cell Tiss Org Cult 105:135–140
Author information
Authors and Affiliations
Corresponding author
Editor information
Editors and Affiliations
Rights and permissions
Copyright information
© 2016 Springer Science+Business Media New York
About this protocol
Cite this protocol
Jain, R., Kachhwaha, S., Kothari, S.L. (2016). In Vitro Shoot Cultures and Analysis of Steroidal Lactones in Withania coagulans (Stocks) Dunal. In: Jain, S. (eds) Protocols for In Vitro Cultures and Secondary Metabolite Analysis of Aromatic and Medicinal Plants, Second Edition. Methods in Molecular Biology, vol 1391. Humana Press, New York, NY. https://doi.org/10.1007/978-1-4939-3332-7_18
Download citation
DOI: https://doi.org/10.1007/978-1-4939-3332-7_18
Published:
Publisher Name: Humana Press, New York, NY
Print ISBN: 978-1-4939-3330-3
Online ISBN: 978-1-4939-3332-7
eBook Packages: Springer Protocols