
Abstract
In nature, entomopathogenic nematodes in the genera Heterorhabditis and Steinernema are obligate parasites of insects. The nematodes are used widely as biopesticides for suppression of insect pests. More than a dozen entomopathogenic nematode species have been commercialized for use in biological control. Most nematodes intended for commercial application are produced in artificial media via solid or liquid fermentation. However, for laboratory research and small greenhouse or field trials, in vivo production of entomopathogenic nematodes is the common method of propagation. Additionally, small companies continue to produce nematodes using in vivo methods for application in niche markets. Advances in mechanization and alternative production routes (e.g., production geared toward application of nematodes in infected host cadavers) can improve efficiency and economy of scale. The objective of this chapter is to describe basic and advanced procedures for in vivo production of entomopathogenic nematodes.
Access provided by CONRICYT – Journals CONACYT. Download protocol PDF
Key words
1 Introduction
Nematodes are round worms of the phylum Nematoda. Entomopathogenic nematodes (EPNs) are insect parasites that are mutualistically associated with bacterial symbionts; the bacteria have a primary role in killing the host [1]. Although some other genera are considered to be entomopathogenic [2], in this chapter we focus exclusively on the genera Heterorhabditis , and Steinernema because they are the only entomopathogenic nematodes for which mass production methods have developed, and they are the only ones sold commercially for biocontrol purposes.
A generalized life cycle of EPNs is depicted in Fig. 1. The only free-living stage, known as the infective juvenile (IJ) or dauer stage, enters the host through natural openings (mouth, anus, spiracles), or occasionally through the insect cuticle [1]. After entering the host’s hemocoel, the nematode’s symbiotic bacteria are released and the host dies usually within 24–72 h. Also, once inside the insect, IJs molts, and the nematodes carry out 1–3 generations while the bacteria also proliferate [3]. New IJs form once nutrition is depleted and then exit the insect cadaver searching for new hosts.

A generalized life cycle of entomopathogenic nematodes (USDA-ARS; art by B. Joyner)
Entomopathogenic nematodes, which are widely known for their safety to humans and other nontarget organisms, are mass produced for purposes of biological insect control. More than 90 species of steinernematids and heterorhabditids have been described to date, and of these at least 13 species have reached commercial development [1]. The bulk of EPNs produced for biocontrol are reared in vitro (mostly in liquid culture but also to some extent in solid fermentation). However, in vivo EPN production is generally employed for purposes of laboratory research and small-scale efficacy trials in the greenhouse or field. Relative to in vitro methods, in vivo approaches have a lower economy of scale due to costs of labor and costs of insect hosts required for infection. Nonetheless, small companies continue to produce EPNs using in vivo technology for commercial application. Advances in mechanization of in vivo methodology and insect host production have led to improvements in efficiency. In this chapter, we present both basic and advanced approaches for in vivo production.
2 Materials
2.1 Basic Methods (White Trap , Culture, and Strain Maintenance)
-
1.
Petri dishes (60–100 cm diam.) for inoculation and White traps (see Fig. 2).
Fig. 2 
A typical White trap . The area around the inner Petri dish is filled with water below the level of dish. Nematode progeny crawl over the smaller inner dish lid into the surrounding water trap (USDA-ARS)
-
2.
Filter paper (Whatman No. 1) or similar absorbent paper.
-
3.
Pipette (automatic or otherwise) .
-
4.
Tissue culture flasks (250–300 ml volume).
-
5.
Insect hosts (e.g., wax worms, Galleria mellonella ).
-
6.
Forceps.
-
7.
Nematode counting chamber.
-
8.
Dissecting microscope .
-
9.
Viable entomopathogenic nematode IJs .

2.2 Optimization and Scale-Up
The materials same as in the Basic Method (see Subheading 2.1) as well as the following:
-
1.
Large dishes for inoculation such as 150 mm Petri dish or, for larger inoculations a metal or plastic tray up to 5000 cm2.
-
2.
If using the dunk/immersion inoculation method, a large colander and a large bowl or tank that the colander or strainer can fit into.
-
3.
Harvest trays to mimic a large White trap and a large tub to enclose them (see Fig. 3), e.g., central tray may be 35 cm × 30 cm × 5 cm (depth) and holding container 90 cm × 40 cm × 12.5 cm (depth) with two harvest trays in each tub.
Fig. 3 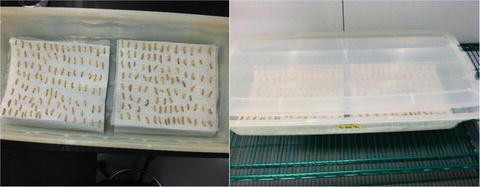
Large harvest trays with nematode-infect Galleria mellonella ; entomopathogenic nematodes emerge and crawl into the water trap surrounding the trays (USDA-ARS; photo by S. Byrd)
-
4.
Absorbent material for lining the inoculation and harvest trays such as paper towels.
-
5.
Pumps and aquarium stones for aeration and concentration of IJs.
-
6.
Holding containers or buckets for holding harvested IJs.
-
7.
Polyurethane sponge for formulation.

2.3 Advanced/Automated Methods
Advanced methods described later include improved methods for rearing the insect host, Tenebrio molitor ; automatic methods of separating optimal sizes for nematode infection; improved diets for more efficient insect rearing and for enhancing nematode virulence; mechanized methods for host inoculation; mechanized methods for formulating and packaging infected cadavers; and methods for storing nematodes in gel crystals of polyacrylamide.
2.3.1 Improved Insect Production
Although other hosts are also amenable to in vivo EPN production (e.g., G. mellonella or others), T. molitor was selected as host for advanced nematode production because infected larvae tend to maintain better structural integrity than infected lepidopteran larvae, which tend to break apart easily. In addition, T. molitor does not produce a cocoon, which can interfere with nematode inoculation, and adults do not fly or produce scales, which eliminates the need for specialized cages and a filtration system for the air handling system.
-
1.
Stackable fiberglass trays (Type 1) 59.37 cm long × 30.48 cm wide × 15.24 cm deep (23.375 × 12 × 6 in.) with lid.
-
2.
Stackable fiberglass trays (Type 2) 59.37 cm long × 30.48 cm wide × 7.37 cm deep (23.375 × 12 × 3.125 in.).
-
3.
Stackable fiberglass trays (Type 3) 65.4 cm long × 45.08 cm wide × 15.24 cm deep (25.75 × 17.75 × 6 in.) with lid and dolly (one lid and dolly for every six trays).
-
4.
Nylon screen standard No. 20 (850 μm openings).
-
5.
Nylon screen standard No. 35 (500 μm openings).
-
6.
Fiberglass trays (Type 4) 52 × 39.5 × 12 cm.
-
7.
Plastic lunch containers 2.20 × 1.50 × 0.52 cm (950 ml).
-
8.
Food grade wheat bran.
-
9.
Food grade dry potato squares.
-
10.
Diet supplements (see Subheading 3.3.1. Diet Supplements).
-
11.
Spray bottles.
-
12.
Three-screen circular separator 30″ diameter (76.2 cm).
-
13.
Screen for circular 30″ separator with rectangular openings 1.85 × 127 mm (0.073 × 0.5″).
-
14.
Screen for 30″ circular separator with rectangular openings 1.6 × 127 mm (0.065 × 0.5″).
-
15.
Screen for 30″ circular separator with 500 μm square openings (standard No. 35).
-
16.
Type “Z” conveyor.
-
17.
Vibratory feeder.
-
18.
Hydraulic hopper lift table.
-
19.
Seed blowers (two).
-
20.
Diet supplements: Dry potato flour, dry chicken egg white (albumin), soy protein, peanut oil, manganese sulfate, cholesterol, reverse osmosis (RO water).
-
21.
Planetary motion electric kitchen mixer with stainless steel bowl.
-
22.
Kitchen spatula.
-
23.
Electronic balance.
-
24.
Twelve-cavity Teflon-coated cookie pans.
-
25.
Stainless steel ice-cream scoop 2 oz (28.35 g) capacity.
-
26.
Vacuum oven.
2.3.2 Automated Inoculation and Harvest
-
1.
For LOTEK inoculation: perforated aluminum trays, a relative humidity chamber with air vents (or humidified room), pipetting system to inoculated insect hosts (note T. molitor is not amenable to this method). For LOTEK harvesting: An aqueous reserve tank to distribute water, valve (controlled by time for water passage), separating screens, waste water deflector, and storage tank.
-
2.
For automatic pipetting: Multiple stacked trays with manifold pipettes connected with hosing to a central inoculation tank. Nematodes and host insects.
-
3.
For the Gel System: polyacrylamide gel (or other suitable gel), bags to hold the gel with a Tyvec® strip added for aeration, nylon screen (1–2 mm holes; polyester or other screen may be used as well) with a plastic lip to hold insect host cadavers.
2.3.3 Production and Formulation of Cadavers
-
1.
Automatic insect cadaver packing machine.
-
2.
Air compressor with a minimum capacity of 150 PSI.
-
3.
Masking tape 1.5 in. wide (3.6 cm).
3 Methods
3.1 Basic Methods (White trap , Culture, and Strain Maintenance)
Generally, in vivo approaches are based on two-dimensional systems consisting of production in trays and shelves (see refs. 1, 4). Most systems revolve around the concept of a White trap (see refs. 5, 6), which is a device used for harvesting IJs that takes advantage of the progeny IJ’s natural migration away from the host cadaver upon emergence. Overall, the basic approach consists of inoculation, harvest (e.g., via White trap), concentration, and if necessary, decontamination.
-
1.
Nematodes are inoculated into Petri dishes (or similar dish or tray) lined with filter paper or any other inert absorbent material. Inoculation is performed by applying IJs in aqueous suspension onto the absorbent material.
-
2.
The concentration of nematodes required varies by insect host and nematode species. The last instar larvae of the greater wax moth, Galleria mellonella , is the most common host used because it is extremely susceptible and easy to obtain (e.g., in a number of countries the insect is produced commercially for fish bait or pet food). For most nematode species, a rate of 25–100 IJs per G. mellonella larva is sufficient to produce infection.
-
3.
The concentration of nematodes can be determined by placing a known volume of stock suspension on a dish or preferably using a nematode counting chamber and then calculating the number of IJs per ml. The counts should be made under a dissecting microscope. If necessary the stock solution can be diluted for ease of counting (optimum numbers to count should fall between 30 and 200) and then the concentration can be calculated based on the dilution factor. For example, if a 100× dilution is made from the original stock solution (1 ml IJ suspension + 99 ml water) then the actual count should then be multiplied by the dilution factor (100×). For more accurate estimates, it is best to count the sample at least three times and obtain an average.
-
4.
The total volume of IJ suspension applied to each dish or tray will vary depending on size of the tray and type of absorbent material. For example, if using a 100 mm Petri dish lined with Whatman No. 1 filter paper a total volume of 1 ml aqueous suspension can be applied whereas approximately 0.35 ml of suspension should be applied if using a 60 cm Petri dish. It is critical that a moist surface is maintained on the medium to allow the nematodes to move and to help create the high relative humidity required. However, excess moisture (i.e., standing water) is detrimental.
-
5.
The number of insects in the dish is also important. For example, if using a 100 mm Petri dish then ten G. mellonella larvae per dish is a suitable number. Thus, with the 100 mm Petri dish and ten G. mellonella one would apply 1 ml of EPNs at 250–1000 IJs per ml. The application of suspension can be made using any pipetting devise.
-
6.
Once inoculated, the dishes should be incubated for 2–4 days before infected cadavers are transferred to White traps. The optimum incubation temperature will vary by nematode species (see ref. 1). Most nematodes can reproduce well at 25 °C, which therefore serves as a standard in most cases. However, certain species such as Steinernema feltiae have lower optimum temperatures (e.g., closer to 21 °C) whereas others such as Steinernema riobrave prefer higher temperatures such as 30 °C.
-
7.
After incubation, the nematode-infected cadavers are transferred to White traps . Only those cadavers showing patent infections (typical signs of infection for the pathogen of interest) should be transferred. Patent infections for heterorhabditids are typically indicated by a reddish color and for steinernematids a brown or tannish coloration should appear in the infected host (see refs. 1, 6). Black or putrid cadavers should be removed. The White trap consists of a dish or tray on which the cadavers rest; the dish is surrounded by water, which is contained by a larger arena (see Fig. 2).
-
8.
Once IJs begin to emerge the nematodes should be harvested daily until emergence ceases. Depending on nematode and species as well as incubation temperature, emergence may begin as early as 7 days postinfection and can last for 3 weeks. In G. mellonella, emergence is likely to begin 9–11 days postemergence and the bulk of IJs will have exited by about 16 days. Usually, the heaviest emergence occurs within 5–7 days after its initiation (and one may choose to stop harvesting at that point).
-
9.
Harvest is achieved simply by removing the center dish of the White trap and pouring off IJs into a suitable storage vessel. Most commonly, IJs are stored in tissue culture flasks.
-
10.
The IJs should be stored under refrigeration. For most steinernematids, a storage temperature between 4 °C and 10 °C is suitable whereas most heterorhabditids store best at temperatures between 4 °C and 13 °C (depending on species).
-
11.
In aqueous suspension (such as in culture flasks), IJs should be kept at concentrations lower than 10,000 per ml to avoid overcrowding and oxygen deprivation. Also, the volume of suspension in the culture flask should allow for adequate oxygenation, e.g., a maximum of 20 % of the vessel’s volume should be liquid. Depending on nematode species, IJs can generally be stored in this manner for 2–6 months. However, if the IJs are to be used for experimental purposes, it is customary to only allow 2–3 weeks of storage prior to use to ensure maximum fitness of the nematodes (see Notes 1 – 7 for assessment and maintenance of quality and fitness in IJs during in vivo production).
3.2 Optimization and Scale-Up
Based on the simple White trap methods indicated earlier, the process can be optimized and scaled-up to suit the needs of small field trials or cottage scale commercial ventures. Aspects that can be optimized and scaled-up include nematode species or strain as well as host species, inoculation rate and approach, host density and tray size, harvest, storage, and environmental conditions.
-
1.
The choice of nematode species is critical and can make a huge difference in IJ yields. However, the nematode choice also depends heavily on which insect pest one may be targeting (as virulence will vary by species and strain as well). Variation in yield among nematode species is roughly inversely proportional to IJ size, yet some species simply have innately high reproductive capacities, such as H. indica and S. riobrave. For example, yields of S. riobrave (average IJ length = 622 mm) may exceed 300,000 IJs per insect in G. mellonella, whereas for a large nematode such as S. glaseri (average body length of IJ = 1133 mm) yields do not exceed 50,000 IJs in the same host. Certain strains (within species) also may vary substantially in yield.
-
2.
The choice of host insect is also important. As mentioned earlier, G. mellonella is the most common insect host used for in vivo laboratory and commercial EPN production. Only a few EPNs exhibit relatively poor reproduction in G. mellonella (S. kushidai, S. scapterisci, and S. scarabaei). The yellow mealworm, T. molitor , has also been used for in vivo production extensively. A few others that have been studied for in vivo production include tobacco budworm, Heliothis virescens, pink bollworm, Pectinophora gossypiella, corn earworm, Helicoverpa zea , and house cricket, Acheta domesticus.
-
3.
Nematode yield is generally proportional to insect host size, yet IJ yield per mg insect (within host species), and susceptibility to infection, is usually inversely proportional to host size or age. In addition to yield, ease of insect culturing and susceptibility to IJs are important factors when choosing a host. Finally, the choice of host species and nematode for in vivo production should rely on nematode yield per cost of insect, and the suitability of the nematode to the target pest.
-
4.
Approaches for optimization of inoculation procedures can be modeled on Shapiro-Ilan et al. (see ref. 7). The method of inoculation can be important and may be optimized depending on host and nematode species. The goal is to expose nematodes to insect hosts and reach infection in the most efficient manner possible. Options include pipetting, applying nematodes to insect food, or dunking the hosts in a nematode suspension. Pipetting is the most common method; various types of pipettes can be used. Applying nematodes to insect diet tends to be inefficient because the food will need to be removed at a later time. However, for certain cases where infectivity is low using other methods, higher rates of infection may be achieved using the diet method.
-
5.
The dunking or immersion method of inoculation can be very efficient. For most EPN species, dunking last instar G. mellonella in suspensions of IJs concentrated at 5000–7000 per ml can achieve high rates of infection. Relatively large numbers of larvae can be dunked at a time (e.g., 500–1000). The hosts are dunked into a suspension of IJs using a large strainer or colander (such as one used for straining pasta). The insects should be submerged completely for a short duration such as 1–3 s. After submersion, the insects are dumped onto a large tray containing absorbent material, most commonly paper. Note, some host–nematode combinations are not amenable to the dunking method, e.g., T. molitor and H. bacteriophora (see ref. 7).
-
6.
Regardless of the inoculation method, the inoculation rate (concentration of IJs and amount applied) should be optimized for each particular host and nematode species. The goal is to reach as close to 100 % patent infections as possible because subsequent removal of noninfected or poorly infected hosts is time consuming. However, if IJ concentration is too high (higher than needed to maximize the infection rate) then the percentage of nonpatent infections may increase.
-
7.
In addition to optimizing inoculation method and rate, the host density should be optimized for maximum efficiency. If density becomes too high the yield per insect will decrease due to overcrowding.
-
8.
As suggested earlier, optimum inoculation parameters will vary by host and nematode species. Nonetheless, in one study (see ref. 7) optimum concentrations reported were 4000 IJs per ml for dunking G. mellonella in suspensions of H. bacteriophora or S. carpocapsae, 21,000 IJs per ml for inoculating T. molitor with S. carpocapsae using the dunking method, and 400 IJs per insect for inoculating T. molitor with H. bacteriophora using the pipette method (as dunking was not effective for this combination).
-
9.
Furthermore, in terms of host density, optimum levels to maximize the yield per tray were 0.07–0.13 g host per cm2 for G. mellonella, and 0.04 g host per cm2 for inoculation of T. molitor . Ideally, inoculation parameters should be optimized for each production operation individually.
-
10.
The size of tray used for inoculation depends on the scale desired. At a certain point the tray becomes too large and unwieldy. Some examples of scaled-up inoculations tray sizes may include 180–3000 cm2. The trays can be of essentially any hard material (e.g., plastic or metal) as long as an absorbent surface such as paper can be lined within.
-
11.
Once insect hosts are inoculated, the trays must be incubated at a suitable temperature (optimized for each nematode species or strain) and then infected hosts are transferred to harvest trays after 2–4 days.
-
12.
Scaled-up harvest trays that mimic large White traps can be constructed in variable sizes (see example in Fig. 3). The infected hosts rest upon absorbent moist material on the raised harvest tray and emerging IJs migrate into a surrounding water trap. The trays should have paper or similar absorbent material around the sides to wick water. The harvest trays can be enclosed, but some aeration should be allowed (lids can be left ajar). Holes in the trays through the absorbent material may allow for increased movement of IJs into the water below. The water should not be too deep and thereby cause oxygenation problems; approximately 2–4 cm depth is suitable.
-
13.
IJs can be harvested from the large White trap harvest trays by pouring the suspension into a bucket. Alternatively, if there are numerous trays, the IJs can be pumped into a central collection tank.
-
14.
Throughout the process, environmental conditions should be optimized such as for temperature, aeration, and relative humidity. To minimize overcrowding effects leading to oxygen deprivation (infected cadavers can emit harmful gases such as ammonia), precautions should be taken to allow for adequate airflow. Ideally, a pass-through HEPA filter system is implemented. However, aeration should be balanced with maintaining a high humidity which is also critical for nematode productivity within the host. If humidity is kept sufficiently high in the production room (close to 100 %) then it is not necessary to enclose the harvest trays.
-
15.
Following harvest, if refrigerated storage in culture flasks is not feasible due to the large number of IJs collected, the nematodes can be kept under refrigeration in aqueous suspension in buckets or other large containers as long as the suspensions are fully aerated. Aeration can be achieved with normal pumps such as aquarium pumps and bubble stones, which come in various sizes. The nematodes can be stored in this manner at concentrations up to 50,000 IJs per ml for up to 2 months.
-
16.
Rather than holding the IJs in large quantities of aqueous suspension, it may be preferable to concentrate and formulate the nematodes in a carrier. For commercial purposes this is considered to be a necessary step as large quantities of liquid suspension are unwieldy. Concentration can be achieved by gravity settling, but prolonged periods of settling may be detrimental due to oxygen deprivation.
-
17.
The concentration process can be accelerated by vacuum filtration. One method is to use reverse suction on an air pump and pull water through an aquarium stone. The IJs will concentrate into a paste-like substance (appearing somewhat like peanut butter) at which time the paste can be spread onto sponge or mixed with another suitable carrier (see ref. 4). Centrifugation may also be used for concentrating IJs, but the costs for suitable centrifuges that would be appropriate are generally prohibitive for in vivo operations.
-
18.
Sponge formulations can hold approximately 0.1 million IJs per cm2 and may be stored for 6 months or more under refrigeration. Other formulations such as certain types of vermiculite, peat, or clay have been used to hold much higher concentrations of nematodes.
3.3 Advanced/Automated Methods
3.3.1 Improved Insect Production
Insect production for T. molitor consists of three basic systems including the reproduction or adult system, the growth or larval system, and the separation system.
3.3.2 Tenebrio Molitor Rearing
An environmentally controlled rearing room is required. The preferred environmental conditions are between 24 and 27 °C and a minimum of 70 % RH. Lights are not required and the room may be kept dark during most of the time. Late larval stages of T. molitor could benefit by lower temperatures because they produce significant metabolic heat, which can increase the temperature of the rearing trays by 5–9 °C depending on the density (Morales-Ramos, unpublished).
-
1.
Tray modification. Type 1 trays are modified by cutting the bottoms of the trays and replacing the bottoms with nylon screen standard No. 20 (850 μm). Three circular windows are cut in each of the longer sides and covered by nylon screen for ventilation. Type 3 trays are modified in a similar way, but the screen used to replace the bottom is standard No. 35 (500 μm). Circular windows as described earlier are cut, 6–7 in each of the longer sides and three in the shorter sides of type 3 trays and covered with nylon screen. Trays type 2 and 4 remain unmodified.
-
2.
Reproduction. The adult tray system consists of one modified type 1 tray stacked on one unmodified type 2 tray (see Fig. 4). Tray type 1 holds the food and adult beetles, and tray type 2 collects first instars. From 250 to 300 adults (1:1 sex ratio) are introduced in each tray type 1 and provided with 400 g of wheat bran and 30 g of adult supplement. The food provided is sufficient to maintain the adults for 2 months and additional feeding is not required. Adults must be provided with water twice a week by using a spray bottle to distribute water uniformly. The adult density range recommended here (between 8.4 and 14 adults per dm2) has been determined to be optimal to minimize cannibalization of eggs by adults and to reduce adult mortality (see ref. 8). Female beetles oviposit and glue their eggs on the surfaces of the tray and on the food particles. Eggs hatch in approximately 8 days at 26 °C (see ref. 9) and first instars tend to migrate to the bottom of the tray where they fall down through the nylon screen to the collection tray (see Fig. 4B).
Fig. 4 
Adult tray system. (A) Tray type 1 (a) open and showing adults with food sitting on top of a tray type 2 (b). (B) Tray type 2 (b) open showing small food particles with first instars ready for collection
-
3.
Progeny collection. First instars are collected once a week and the collection from each tray is placed in one plastic lunch box and provided with 4 g of wheat bran. Adults are maintained in production for a period of 8–9 weeks. During this period, adult females produce 85–90 % of their oviposition potential and older females will produce few eggs (see ref. 8). Adults older than 9 weeks are discarded and replaced by newly emerging ones.
-
4.
Growth. Small larvae are maintained in the plastic lunch boxes for a period of 6 weeks and then transferred to the larval tray system (see Fig. 5A). The larval tray system consists of 1–5 modified type 3 trays stacked on top of one unmodified type 3 tray (see Fig. 5B). All six trays are placed on a dolly and the top tray is covered with a lid (see Fig. 5A). At the end of 6 weeks, the contents of between six and eight lunch containers (each containing the larvae collected from one adult box per week) are transferred to one of the modified type 3 trays. Higher larval densities will increase development time and larval mortality reducing the productivity of the system (Morales-Ramos, unpublished). Each larval tray is provided weekly with between 400 and 500 g of wheat bran depending on the feeding rate. In addition, each tray is provided with 20–40 g of larval supplement. If the environmental conditions in the room are maintained with a relative humidity higher than 70 %, larvae do not require watering. If difficulties exist in maintaining this RH level, larvae must be provided with water at least twice a week by spraying or dripping. Larvae remain in this tray system for a period ranging between 6 and 9 months depending on temperature, larval density, and humidity. Food consumption by larvae should be monitored weekly. A drastic drop in food consumption indicates that larvae are close to pupation and they are ready for separation (Morales-Ramos, unpublished).
Fig. 5 
Larval tray system. (A) Stacks of modified type 3 trays sitting on top of one unmodified type 3 tray and a dolly. (B) Open system showing larvae with food on a modified tray (a) and frass collected in the unmodified tray at the bottom (b)
-
5.
Separation. Because T. molitor exhibits developmental plasticity, the larval stage goes through a variable number of instars ranging from 12 to 22 (see ref. 10). Variable numbers of instars result in substantial variability in the larval development time (see refs. 9, 11). This means that synchronization of developmental stages is not possible in T. molitor and therefore, larvae must be separated by sizes even if they belong to the same cohort. The process of separation has been mechanized by combining existing technologies into a novel insect separation process (see ref. 12) (see Fig. 6A). When larvae are ready to be separated, a larval stacked tray system is rolled into the separation room, which holds the separation system. The separation system (see Fig. 6A) consists of a vibratory feeder (a), a conveyor (b), a 3-screen circular separator (c) with four dischargers (see Fig. 6C), and two seed blowers (d). Trays are emptied into the vibratory feeder, which distributes larvae mixed with food in a uniform way into the conveyor (see Fig. 6B). The conveyor moves the larvae and food mixture into the 3-screen separator by dumping the material into the top opening. Because the food material may contain fine dust it is advisable to install an aspiration or vacuum system connected to a bell-shaped collector on the top of the separator to collect fine dust. A similar system may also be required on top of the vibratory feeder. The larvae and food mix will pass through three separation screens inside the machine.
Fig. 6 
Larval separation system (A) consisting of a vibratory dispenser (a), conveyor (b), three-screen circular separator (c), and two seed blowers (d). (B) The vibratory feeder spreads larvae and food on the conveyor, which transports and dumps the mix into the separator. (C) The three screen divides the mix into four discharges consisting of (1) large size larvae, (2) intermediate size larvae, (3) small size larvae mixed with food, and (4) frass
-
6.
Distribution of separation portions. The first screen has rectangular openings (1.85 × 127 mm) and the second screen has smaller rectangular openings (1.6 × 127 mm). Rectangular openings facilitate the separation of larvae by minimizing their ability to grab to the screen. The third screen is a conventional standard No. 35 screen with 500 μm square openings. Food and larvae are separated into four groups which are released from four dischargers located around the separator (see Fig. 6C). The first discharge group includes the largest larvae, which are suitable for nematode infection or for colony reproduction. The second discharge group includes intermedium size larvae that can be used for nematode infection, returned to the colony to continue developing, or can be sold for different purposes. The third discharge group includes smaller larvae mixed with food and this portion is returned to the colony to continue developing. Only frass particles and trash will emerge through the last discharger. Frass can be utilized as organic fertilizer.
-
7.
Pupae collection. A portion of the older larvae obtained from the first separator discharger during the separation process are returned to the colony to obtain new adults for reproduction. These groups comprise larvae of 1–3 instars before pupation. Because T. molitor has a variable number of instars, pupations are not synchronized and can be spread out over a period of 2 months or more. Older larvae are placed in unmodified type 4 trays and monitored daily for pupation. Pupae are collected daily and placed in an environmental chamber at 15 °C to stop development. Pupae can remain at this temperature for up to 2 weeks without suffering adverse effects. Once a week, a group of 350 of the stored pupae are selected and transferred to a clean type 4 tray lined with tissue paper and placed at rearing conditions to complete development. Resulting adults are used for reproduction.


3.3.3 Diet Supplements
Two supplement formulations are used for T. molitor production. The first formulation is used to increase fecundity of adult beetles (adult supplement) (see ref. 9) and the second formulation is used to increase larval survival and nematode virulence (larval supplement) (see ref. 13).
-
1.
Adult supplement preparation. To prepare 500 g of dry supplement, 420 g of dry potato flour, 60 g of dry egg white, 10 g of soy protein, and 10 g of peanut oil are dispensed into a stainless steel mixer bowl. The ingredients are mixed using a spatula and 1000 ml of RO water (1 l) is added to the mix. The formulation is then mixed using an electric blender for 20 min.
-
2.
Larval supplement preparation. Ingredients required for 500 g of dry supplement include, 398.9 g of dry potato flour, 50 g of dry egg white, 25 g of soy protein, 25 g of peanut oil, 0.75 g of manganese sulfate, and 0.35 g of cholesterol. The ingredients are placed in a stainless steel mixer bowl and mixed using a spatula. Then 1 l of RO water is added to the blend and mixed for 20 min using an electric blender.
-
3.
Supplement pellet preparation. Using an ice cream scoop (60 ml), portions of the supplements are dispensed into the cavities of a cookie pan. The cookie pans are introduced into a vacuum oven at 58 °C and exposed to a negative pressure of 1010 mbar for a period of 48 h. The dry supplement pellets should weigh approximately 27 g each. Supplements are dried in this manner to facilitate storage and lengthen shelf life. They can be stored for more than 1 year if maintained dry. Adults and larvae have no problem eating the dry supplement, which can be added directly into the rearing trays.
3.3.4 Automated Inoculation and Harvest
With improved low cost and highly fit host insects in hand, the next step in automating the in vivo EPN production process is to mechanize inoculation and harvest. Any approach that reduces labor will contribute to cost efficiency.
-
1.
Inoculation can be mechanized using a multiple or automated pipette system. Multiple plastic trays (e.g., approximately 2500 cm2) with paper towel lining, or a similar absorbent material, can be stacked in a shelf-like manner. Each tray will hold host insects (G. mellonella or T. molitor ) at optimized densities (see earlier). A central aerated-bubbling tank of IJ inoculum is then pumped into multiple pipettes that cover the area of each tray. Several shelf systems can be added in parallel. The shelves can be open to the air if they are in a room with high humidity (>95 %) or they can be enclosed with an associated mechanism to add humid air (via pumping or a pool of water below). The infected insect hosts are then incubated and transferred after 2–4 days for harvesting.
-
2.
One option for automated inoculation and harvesting is the LOTEK system (see ref. 14). A mechanized harvest device, LOTEK, allows for automated collection of IJs from stacked trays; the IJs are pumped to a central collection tank; unlike the White trap method, nematode migration into a water reservoir is not required. Briefly, the system consists of perforated aluminum holding trays to hold insect hosts during inoculation and harvesting. The trays can be 30 cm × 26 cm × 4 cm (see ref. 14) though they can also be customized as needed. Perforations in the tray should be small (e.g., 1.6 mm) to allow passage of nematodes but prevent insect hosts from passing through. The insects, such as G. mellonella larvae, are inoculated directly on the trays and incubated in stacked fashion. The trays are then mounted on an automated harvester with misting nozzles. The misting washes emerging nematodes downward where are they collected and concentrated into a storage tank.
-
3.
In another approach, the “Gel System” automated harvesting is combined with a final packaging step in the same setup (see ref. 15). Infected host cadavers are placed on a substrate intended as the formulation carrier (such as a gel) within the final package; once IJs emerge the cadavers are removed and that the final nematode product is ready for shipment or storage (see Fig. 7). In one example, the carrier is moist polyacrylamide gel (1 g gel to 75 ml water), a nylon screen (hole size approximately 1–2 mm) with plastic rim holding the infected hosts is placed on top of the gel, and IJs emerge naturally into the gel; the gel and harvest screen are enclosed in a ventilated plastic bag. Ventilation can be accomplished with a simple straw (see Fig. 7) which is removed once IJ emergence ceases or, a Tyvek® strip can be used to ventilate the bag efficiently (and this is less cumbersome than the straw). After the IJs have emerged the nylon screen and host cadavers are removed. The bag containing gel and IJs is then ready for storage and usage (e.g., commercial sale or experimentation). Five to ten million IJs can be stored in bags originating from 1.0 g of gel (e.g., 100 infected T. molitor may be suitable for this size). The size of the apparatus can be altered to suit the user’s needs.
Fig. 7 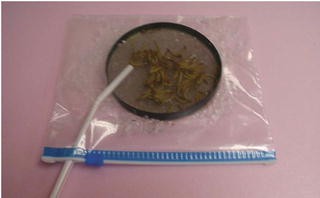
“Gel System” setup with entomopathogenic nematode infected Tenebrio molitor larvae on a screen on top of a polyacrylamide gel (USDA-ARS)

3.3.5 Production and Formulation of Cadavers
An alternate approach for in vivo production is culture and delivery of EPNs in their infected host cadavers (see ref. 1). In this method, nematodes are applied to the target site in their infected hosts, and pest suppression is achieved subsequently by progeny IJs that emerge from the cadavers. Production and application of nematodes in infected hosts may be more efficient than other in vivo production methods because harvest and concentration steps are removed from the process. Furthermore, certain studies have indicated that nematodes applied using the cadaver approach exhibited superior dispersal, infectivity, survival, and efficacy (see ref. 1).
Infected hosts are produced as described earlier except nematodes are not harvested from the cadavers; rather, the infected hosts are stored or used directly for application. Infected hosts can be produced using G. mellonella . However, when G. mellonella are infected with EPNs the cadavers are relatively fragile and can stick together. To overcome this issue, host cadavers can be formulated to enhance their integrity (see refs. 1, 16). One suitable formulation consists of dipping the cadavers in a starch suspension (1 %) and then rolling them in a clay powder (see ref. 16). An alternative approach is to use hard bodied insects as the host cadaver, such as T. molitor, which have some natural resistance to rupturing or sticking together upon handling (see ref. 17).
To further the ease of use, cadavers of T. molitor larvae infected by EPNs can be packed between two sheets of masking tape using a specially designed automatic machine (see ref. 18) (see Fig. 8A). This machine operates by pneumatic actuators and it is computer controlled.

Cadaver packing machine showing two masking tape sources (A). The components of the machine (B) packs infected cadavers of Tenebrio molitor larvae by moving them from the cadaver holder (a) to a mechanical positioner (b), which positions the cadavers on a masking tape stripe (d). A second masking tape stripe (e) is rolled over the cadavers by a mechanical arm (c). A press (f) sets the two masking tape stripes glued in between cadavers while at the same time moves the stripe to set the next cadaver
-
1.
The packing machine is loaded with two rolls of masking tape, connected to an air pressure source, turned on and set in standby mode. The cadaver receptacle (see Fig. 8B) is filled with infected T. molitor larvae cadavers. When the machine is activated, individual cadavers are picked up and positioned on the sticky side of a masking tape strip by a mechanical positioner (see Fig. 8B, b). The machine moves the tape with adhered cadavers 7 cm per cycle at the end of which it deposits a new cadaver on the tape. As the tape with adhered cadavers moves, a second strip of masking tape is placed on top of the first thereby enclosing the cadavers in two strips; the two lines of tape are set together by a press which compresses the tape in between cadavers. The machine can operate continuously as long as it has enough tape and cadavers. Packed cadavers can be rolled and cut in sections for storage or delivery.
4 Notes
-
1.
It is important to ensure a high level of quality control when producing EPNs for experimental or commercial purposes. One measure of quality control is percentage of viable IJs. A sample of IJs in aqueous suspension is placed onto Petri dish and the number of live or dead IJs is determined by prodding each nematode with a dissecting needle. Note that IJs may appear straight when they are stressed but will respond when prodded. At least 50 IJs should be counted and the count should be repeated at least three times. It may be desirable to create a lined grid on the Petri dish to assist in keeping track of which nematodes were assessed.
-
2.
Another method to determine quality and fitness of EPNs is by measuring virulence (the ability to cause disease/mortality in a target host). The assays can follow similar procedures described earlier for inoculating insect hosts in Petri dishes on filter paper (see Subheading 3.1). Yet, assays conducted in soil or sand will give a more real-world assessment. Most EPNs should be able to kill a high percentage of G. mellonella (>90 %) if using 50–200 IJs per insect; if this is not achieved then the virulence of the EPNs may be compromised due to various reasons such as environmental conditions, poor nutrition, strain deterioration (see below), etc. Given that G. mellonella is exceptionally susceptible to EPNs, a less susceptible host would provide a more precise virulence assessment (such as T. molitor, for which 200–800 IJs per insect may be needed or a specific commercial target pest can be used).
-
3.
EPN quality can also be assessed by measuring the number of IJs invading a host (see ref. 6). A known quantity of IJs is placed on a Petri dish lined with filter paper, e.g., 100 IJs in 0.35 ml on a 60 cm dish, with one insect host such as G. mellonella. After 1–3 days the insect can be dissected and the number of invading nematode relative to the total applied is counted. In general, for most EPN species, one can expect 3–5 % invasion for heterorhabditids and 5–10 % for steinernematids. To facilitate the dissection, the insects can be digested using a pepsin solution first (see ref. 6).
-
4.
A high level of contaminants in the harvested IJ suspension (e.g., fungi, protists, etc.) may be detrimental to nematode longevity or quality. Therefore, a decontamination step may be beneficial in such cases, and some producers may do this routinely. Previously many laboratories used 0.1 % formalin, and some may still use it, but generally this has fallen out of favor due to safety concerns. An alternative is to use a low concentration of sodium hypochlorite (e.g., 1–3 %). In extreme cases, the nematodes may need to be surface sterilized. This can be accomplished by placing IJs in 5–10 % sodium hypochlorite or 0.1 % hyamine (methylbenzethonium chloride) for 15–20 min and then washing 1–3 times.
-
5.
Quality and longevity of harvested nematodes can also be compromised by the presence of dead IJs or other nematode stages in the suspension; ideally suspensions should be maintained at ≥95 % live IJs. Dead IJs and other nematode stages can be separated by screening them out. A fine mesh screen (e.g., 500 mesh) can be partially immersed in a vessel with bubbling water, and the mixed suspension is applied on top of the screen. The fine mesh will allow IJs to pass through while dead IJs and larger nematode stages remain on the screen. Some fine cloths or tissue papers will also work for this purpose.
-
6.
If IJs are tending to stick together in suspension a surfactant might be added such as a drop of Triton X-100; if the nematodes are clumping due to fungal contamination, sodium bicarbonate (1 g per 50 ml) may be added (see ref. 6).
-
7.
Another issue that can impact nematode quality and fitness is beneficial trait deterioration (also called strain deterioration or attenuation) (see refs. 1, 19). Trait deterioration results from repeated culturing and is due to inbreeding depression or other genetic or nongenetic causes. Therefore, as much as possible, it is imperative to minimize the number of passages through any given host. Additionally, trait deterioration can be deterred through the creation of homozygous inbred lines (see refs. 1, 19).
References
Shapiro-Ilan DI, Han R, Qiu X (2014) Production of entomopathogenic nematodes. In: Morales-Ramos J, Rojas G, Shapiro-Ilan D (eds) Mass production of beneficial organisms: invertebrates and entomopathogens. Academic, Amsterdam, pp 321–356
Dillman AR, Chaston JM, Adams BJ, Ciche TA, Goodrich-Blair H, Stock SP, Sternberg PW (2012) An entomopathogenic nematode by any other name. PLoS Pathog 8, e1002527
Lewis EE, Clarke DJ (2012) Nematode parasites and entomopathogens. In: Vega FE, Kaya HK (eds) Insect pathology, 2nd edn. Elsevier, Amsterdam, pp 395–424
Shapiro-Ilan DI, Gaugler R (2002) Production technology for entomopathogenic nematodes and their bacterial symbionts. J Ind Microbiol Biotech 28:137–146
White GF (1927) A method for obtaining infective nematode larvae from cultures. Science 66:302–303
Kaya HK, Stock SP (1997) Techniques in insect nematology. In: Lacey LA (ed) Manual of techniques in insect pathology. Academic, San Diego, CA, pp 281–324
Shapiro-Ilan DI, Gaugler R, Tedders WL, Brown I, Lewis EE (2002) Optimization of inoculation for in vivo production of entomopathogenic nematodes. J Nematol 34:343–350
Morales-Ramos JA, Rojas MG, Kay S, Shapiro-Ilan DI, Tedders WL (2012) Impact of adult weight, density, and age on reproduction of Tenebrio molitor (Coleoptera: Tenebrionidae). J Entomol Sci 47:208–220
Morales-Ramos JA, Rojas MG, Shapiro-Ilan DI, Tedders WL (2013) Use of nutrient self-selection as a diet refining tool in Tenebrio molitor (Coleoptera: Tenebrionidae). J Entomol Sci 48:206–221
Morales-Ramos JA, Rojas MG, Shapiro-Ilan DI, Tedders WL (2010) Developmental plasticity in Tenebrio molitor (Coleoptera: Tenebrionidae): analysis of instar variation in number and development time under different diets. J Entomol Sci 45:75–90
Morales-Ramos JA, Rojas MG, Shapiro-Ilan DI, Tedders WL (2011) Self-selection of two diet components by Tenebrio molitor (Coleoptera: Tenebrionidae) larvae and its impact on fitness. Environ Entomol 40:1285–1294
Morales-Ramos JA, Rojas MG, Shapiro-Ilan DI, Tedders WL (2011) Automated insect separation system. US Patent 8,025,027 B1
Shapiro-Ilan DI, Rojas MG, Morales-Ramos JA, Tedders WL (2012) Optimization of a host diet for in vivo production of entomopathogenic nematodes. J Nematol 44:264–273
Gaugler R, Brown I, Shapiro-Ilan DI, Atwa A (2002) Automated technology for in vivo mass production of entomopathogenic nematodes. Biol Control 24:199–206
Shapiro-Ilan DI, Tedders WL, Morales-Ramos JA, Rojas MJ (2014) System and method for producing beneficial parasites. US Patent 8,677,935
Shapiro-Ilan DI, Lewis EE, Behle RW, McGuire MR (2001) Formulation of entomopathogenic nematode-infected-cadavers. J Invertebr Pathol 78:17–23
Shapiro-Ilan DI, Tedders WL, Lewis EE (2008) Application of entomopathogenic nematode-infected cadavers from hard-bodied arthropods for insect suppression. US Patent 7,374,773
Morales-Ramos JA, Tedders WL, Dean CB, Shapiro-Ilan DI, Rojas MG (2013) Apparatus for packing arthropods infected with entomopathogenic nematodes. US Patent 8,505,236 B1
Bai C, Shapiro-Ilan DI, Gaugler R, Hopper KR (2005) Stabilization of beneficial traits in Heterorhabditis bacteriophora through creation of inbred lines. Biol Control 32:20–227
Author information
Authors and Affiliations
Corresponding author
Editor information
Editors and Affiliations
Rights and permissions
Copyright information
© 2016 Springer Science+Business Media New York
About this protocol
Cite this protocol
Shapiro-Ilan, D.I., Morales-Ramos, J.A., Rojas, M.G. (2016). In Vivo Production of Entomopathogenic Nematodes. In: Glare, T., Moran-Diez, M. (eds) Microbial-Based Biopesticides. Methods in Molecular Biology, vol 1477. Humana Press, New York, NY. https://doi.org/10.1007/978-1-4939-6367-6_11
Download citation
DOI: https://doi.org/10.1007/978-1-4939-6367-6_11
Published:
Publisher Name: Humana Press, New York, NY
Print ISBN: 978-1-4939-6365-2
Online ISBN: 978-1-4939-6367-6
eBook Packages: Springer Protocols