
Abstract
The existing conventional attendance system requires students to manually provide their signature on the attendance sheet. The drawback of this conventional method is the loss of time in jotting down the attendance, leading to human error and cheating issues and the inability of capturing and storing the attendance record for other essential university activities. In this project, Radio Frequency Identification (RFID)-enabled Smart Attendance Management System (RFID-SAMS) will be designed to cater to the limitation of the conventional attendance system. The RFID-SAMS system function to enrolled students and staff data and course related information, record and monitor students’ attendance and their movement during any courses attended. Its ability to uniquely identify each person based on their RFID tag type of ID card make the process of taking the attendance easier, faster and secure as compared to conventional method. The uniqueness of RFID-SAMS is the capability to detect any duplication RFID event readings and miss readings. In addition, this system has been enhanced to cater the latest ubiquitous technology such as the mobile devices, which are Window Phone and Windows Surface RT. The overall system provides an efficient, accurate and portability solution and work well for the real-life attendance environment within the university.
Access provided by Autonomous University of Puebla. Download conference paper PDF
Keywords
26.1 Introduction
The emergence of electronic paradigm for learning compared to traditional method and availability of almost all information on the information superhighway (Internet), nowadays have caused students to be less motivated to come to the lecture rooms than ever before. Laziness on the part of students, nonchalance to schoolwork, extra social activities that have no importance in aiding the objectives of the institution and a lot more, may prevent students from attending lectures. Sequel to these, lecturers and administrators in most developing countries have had to come up with ways to ensure a healthy participation from students, and make sure that the student-lecturer interactive relationship is kept intact. This in some cases have come in simple forms like roll calls, while in more interesting cases, can be formats like surprise quizzes, extra credit in class, etc. These strategies are however time consuming, stressful and laborious because the valuable lecture time that could otherwise been used for lectures is dedicated to student attendance taking and sometimes not accurate. In addition to all these challenges, the attendances are recorded manually by the tutor and therefore are prone to personal errors. There arises a need for a more efficient and effective method of solving this problem. A technology that can solve this problem and even do more is the RFID technology [2, 4, 5]. The existing conventional requires students to manually sign the attendance sheet every time they attend a class. As common as it seems, such system lacks of automation, where a number of problems may arise. This include the time unnecessarily consumed by the students to find and sign their name on the attendance sheet, some students may mistakenly or purposely signed another student’s name and the attendance sheet may got lost [4]. For instance, in the last time our school held a career fair for students to hunt internship. This fair is compulsory for students of third and final year to attend. Then, the attendance list had to be used. In the process of students signing attendance, attendance list had to be passed one by one, if some students signed wrongly the administrator would not recognize any more, if the last student finished signing putted it aside and forgot to back to administrator, the list is easy to be lost. Therefore, the traditional attendance system has a lot of weaknesses. Besides that, the old attendance system has another drawback, which is the data of attendance list is hard to connect to other system. If the user wants to calculate the percentage of attendance or some others, he has to calculate manually or input by typing. Therefore, the RFID attendance system generated and this system can solve all problems as before.
Attendance system is one of the most important things to ensure students attend for the particular lectures. Some universities regulate class attendance as compulsory to each student who registered for a particular course. Normally in Malaysian university, students are required to attend the class not less than 80 % per semester otherwise student will be barred from taking any examinations [1]. Therefore, the attendance system is very significant in school or university [3].
The aim of this project is for improving the efficient and accuracy of students signing attendance and lecturer could view and track students’ attendance. The objectives of the system are listed as below: (i) To design a webpage-enabled RFID system that functions on smartphone and tablet. (ii) To provide an effective system capable of detecting misses reading and duplication reading. (iii) Integrate Monte Carlo simulation algorithms in generating RFID EPC ID linked to students’ cards information for enrollment purposes. The significant of this system is to implement a complete and novel prototype application for Windows Phone application and Windows Surface application.
The rest of the paper is organized as follows: Section 26.2 starts with related works that background of current attendance system. The methodology of this project will be introduced in Sect. 26.3. Section 26.4 is the project implementation. Finally, the discussion and conclusion present in Sects. 26.6 and 26.7 respectively.
26.2 Background and Related Work
In early edition of wireless communication systems, there are a few technology have been successfully applied in attendance system such as biometrics, barcode, smart card and etc. RFID nowadays has taken a concern in providing wireless communications with security features as well as improved the previous technology such as the communication done in wireless, fast, and easy to operate [1].
26.2.1 Biometric Time Attendance System
Biometric Time Attendance System with USB flash drive data download facility, this facility is useful for attendance data gathering when your Biometric Attendance Machine is installed on gate of office and your server or pc is placed far. LAN cable connectivity is not possible. UBS pen drive data download option will be very convenient for such case. You can collect employee attendance records from Attendance Device whenever required to generate Attendance reports [1].
26.2.2 Barcode
Barcode technology is a method of identification, which is used to retrieve in a shape of symbol generally in bar, vertical, space, square, and dots, which have different width with each one. A reader or scanners are required to identify the data that represent by barcode by using light beam and scan directly to barcode. During scanning process a scanner measured intensity of reflected light at black and white region. A black region will absorb the light meanwhile white region will reflect it [1].
26.2.3 Smart Cards
Smart card is built with variety of chip with a simple memory consisting of byte of information may have range from 1K up to 64K of microcontroller or multi-application memory. Smart card is used as individual identification; building access and network access are part of a multi-tiered program that is in the final stage of rolling out. The data in smart card can be read when a physical contact is made with a reader [1, 4, 5].
26.3 Methodology
We use the SDLC in completing this project. Among the steps involve here is listed as below:
-
(a)
Project Planning: In the project planning phase, it will present the plan and the structure of the project.
-
(b)
Project Analysis: This section will present the analysis of this project according to the current attendance system and user requirement.
-
(c)
Project Design: This section shows the design and seven main functions will be designed of the project.
-
(d)
Project Implementation: This section will explain which programming language and what tools will be used to develop this project. Monte Carlo simulation and data flow diagram of the project will be presented also.
26.3.1 Project Planning
This project has two parts (shown as Fig. 26.1), one is web page system and the others are smartphone and tablet application.

Overall system architecture of smart attendances system
After student enters or leaves the classroom by scanning RFID card lecturer could view the attendance situation of the class and the movement of different student through web page system, smartphone system and tablet system. Student could view his attendance only and movement only through web page system, smartphone system and tablet system. Besides that, lecturer or student could track the attendance history by both systems.
26.3.2 Project Analysis
Attendance system is one of the most important things to ensure students attend for the particular lectures. Some universities regulate class attendance as compulsory to each student who registered for a particular course. Normally in Malaysian university, students are required to attend the class not less than 80 % per semester otherwise student will be barred from taking any examinations [1].

Case diagram of smart attendance system project
26.3.3 Project Design
This system has six major functions, those are: It is listed as below:
-
1.
Web-based application of this system can let user to insert, display and track student’s attendance and movement in the class.
-
2.
Lecturer could view the situation of his/her courses attendance.
-
3.
Displaying and monitoring lecturer information (courses taught or shared and usage of lecture hall).
-
4.
Administrator can track the allocation of classes.
-
5.
Simulate a classroom using RFID-enabled smart card. Besides that, this system will also have some issues have to be solved like allocating two different courses to one lab at the same time happens. This is due to human error in manually assigning courses according to the classroom. For attendance model, when dozens of students sign attendance, missed reading occurred how students recognize that.
26.3.4 Project Implementation
This project is expected to provide a smart attendance system for different users to sign attendance and view situation of attendance. When the users enter the classroom or lecture hall, they have the option either to swipe their card on the reader or simply let the card detected by the reader. The card attached with RFID tag, which can be detected by the reader as long as certain range of distance between the tag and the reader is complying. Once the reader detect and obtain the information, it will be then saved to its own database automatically. In addition the lack of automated attendance system in the School of Computer Sciences especially in our lecture halls is our main motivation undesigning this prototype. Figure 26.3 shows the data flow of the whole system.

DFD of smart attendances system
For web page system, we have used ASP.Net, CSS, and JavaScript through Microsoft Visual Studio 2013 to implement. The other two are Windows Phone application and Windows Surface application, in this application we will adopt Windows Phone 8 platform to implement. The simulation algorithm, which is Monte Carlo, will be integrated as well. Monte Carlo simulation is a method for exploring the sensitivity of a complex system by varying parameters within statistical constraints. These systems can include financial, physical and mathematical models that are simulated in a loop, with statistical uncertainty between simulations. The results from the simulation are analyzed to determine the characteristics of the system [2]. Monte Carlo is used in our system aim to generating a new batch of students automatically.
26.4 Implementation
The system includes two different parts. The first part is the web page platform. The second is the ubiquitous platform. All this parts are integrated to function together.
The system is able to function according to three different user roles. This roles and privileges follow the access control and authorization principles. We are following the Discretionary Access Control (DAC) model [6]. Among the three users listed below are:
-
(a)
Administrator
An administrator is a user with the highest privileges and authorization. Typically, an administrator can enroll students and lecturer, register course for students and lecturers, using Monte Carlo simulation.
-
(b)
Lecturer
A lecturer is a user who has enrolled by administrator. Typically, a lecturer can check and track the students’ attendance and class movement.
-
(c)
Student
A student is a user who has lowest privileges and authorization. Typically, a student can only check his attendance and class movement.
26.4.1 RFID-Enabled Smart Attendance Management System-Web Page
Web page system has eight main functions; these are user login, user forgetting password, user registration, course registration, setting class time, lecturer and student checking attendance, and Monte Carlo simulation. Next is the detail of each function.
-
1.
Login
The first step of using his system is login the system, Fig. 26.4 is the interface of “User Login”. Once a user is logged into the system, he could use the system according to his roles and rights.
Fig. 26.4 
Login interface
-
2.
Forgetting Password
If user forgets his/her password user could fetch his/her password through this system. User has to enter the correct email address and matric number or staff number, and then system will generate a six alphabets password and send it to user’s mail box. After that, user could login through this new password and change to his/her familiar password.
-
3.
Registration
After admin click the Enroll Student link system will jump to student registration page. In this page, admin could register student by entering student basic information (First Name, Last Name, Matric No., Email Address, Birthday, Gender, Year of Study, School Name), after all the information finish entering just click Register button, this student will be registered and you will see this student will be record at the bottom table. If one of the information does not enter correctly, system will not register this student and a red “*” will be shown beside the required field. Lecturers cannot register a new account for themselves, and only the administrators have right to register a new account for lecturer. After admin register a new account for lecturer, lecturer could login by his/her email address as username and staff number as initial password. At last but not least, admin could click Finish Registration to go back to home page.
After admin click the Enroll Staff link system will jump to staff registration page. In this page, admin could register staff by entering staff basic information (First Name, Last Name, Staff No., Email Address, Birthday, Gender, Year of Study, School Name), after all the information finish entering just click Register button, this staff will be registered and you will see this staff will be record at the bottom table. If one of the information does not enter correctly, system will not register this staff and a red “*” will be shown beside the required field. Staff cannot register a new account for themselves, and only the administrators have right to register a new account for staff. After admin register a new account for staff, staff could login by his/her email address as username and staff number as initial password. At last but not least, admin could click Finish Registration to go back to home page.
-
4.
Register Course
After admin finishes register a lecturer, admin could help lecturer to register the course. Before the course registration, admin has to choose the teaching year and semester of the course; otherwise the system will not register the course and a red “*” will be shown beside the required field. After admin finishes register a student, admin could help student to register the course. Before the course registration, admin has to choose the teaching year and semester of the course; otherwise the system will invoke the validation checking. If one course is not registered for lecturer, system will not allow any student to register this course also.
-
5.
Admin Set Class Time
Admin could click the Set Class for Lecturer link to help lecturer to set class time. After admin choose a lecturer and a course the system will jump to the set class time interface, then admin has to choose a building number, room number, start time, end time and class date. Admin could enter a range of class date, and then system will register the class for every week. When admin fill in all the class information, he just click Confirm button, the system will setting class successful, and admin just clicks Finish button to set another course. If admin does not fill in all required information and click Confirm button, the system will not set the class and a red “*” will be shown beside the required field.
-
6.
Lecturer Checking Student Attendance and Movement
After lecturer login the system, he could click View Attendance link to check student attendance for each class, which he taught. Next lecturer could search the courses by teaching year and semester, after the lecturer click the check button of one course, system will list all the classes, which are set by admin. Next lecturer could click the check button of one class and system will jump to Student Attendance interface. At this time, if it is the first time of checking attendance of this class, lecturer has to click refresh button to get the latest situation of student attendance. If it is not the first time checking, lecturer does not have to click refresh button anymore. And then, system will show the situation of attendance and attendance statistic of this class. Next, lecturer could click check button of each student to check his/her movement of such class. After lecturer click check button of each student, system will jump to Student Movement interface and it will show the movement record of this student. At the bottom of this interface, system shows the time of this student staying in classroom. At last but not least, lecturer could click Choose Another Student button to check movement of another student.
-
7.
Student Checking Attendance and Movement
After student login the system, he could click View My Attendance link to check his attendance for each class, which he has to attend. Next student could search the courses by teaching year and semester, after the student click the check button of one course; system will list all the classes and his attendance status. And then, student could click check button of each class and system will jump to Student Movement interface and it will show his movement record. At the bottom of this interface, system shows the time of this student staying in classroom. At last but not least, student could click Choose Another Class button to check his movement of another class.
-
8.
Monte Carlo Simulation
After admin login the system, admin could click Monte Carlo Simulation link to generate a new batch of students and register the courses for each through the simulator. When the system jump to the Monte Carlo Simulation interface, click Create Student button, and system will generate a batch of students (200 students) and admin could click Log button to check the students’ information. After that, admin could click Register Course button to register the courses for each student, which are generated by Monte Carlo simulator. Then, admin could click Register Course button of each student to check the situation of course registration. Figure 26.5 is the simple code of Monte Carlo Simulation.
Fig. 26.5 
Monte Carlo simple code


26.4.2 Ubiquitous Platform
In this section we will introduce the ubiquitous characteristics of this system. For this system we have embedded RFID model, smartphone and tablet. Next we will introduce the detail of each part.
-
1.
RFID
In RFID platform we use MIFARE522_MODULE as hardware reader and passive tag to implement the function. This platform has three main functions; these are student signing attendance, duplication reading, miss reading, and sending email, Fig. 26.6 shows the RFID model and tags. Next is the detail of each function.
Fig. 26.6 
RFID reader and tags
-
(a)
Signing Attendance for Students
When students enter the classroom he just let his RFID card on the reader and he will hear two beep sounds, it means the reader have detected the card and recorded student enter the classroom. If students want to go out of the class, he also has to scan the card and he will hear a beep sound. It means the system have record the students already out of the classroom. At last, lecturer will calculate the attendance time and determine the attendance for each student through this system.
-
(b)
RFID-Attendance event Duplication Reading
The aim of doing a duplication reading is in case of someone duplicate the card and sign attendance for students. After the students scan the card, system will check the truth of the card, if the card is a fake one, system will beep three times and it will not be record in the system. If the card is a real one, system will record the data in the system.
-
(c)
RFID-Attendance event Miss Reading
The aim of miss reading is in case of students just put his card on the reader but the system will not record this student and students do not know. After a student scans his card, the system will give a feedback by beep sound and send an email to student. When students do not hear the beep sound and do not receive the email, it means system did not detect the card and students have to scan again.
-
(d)
Email Generation
In this function, system will send an email to user in two situations. One is when students scan the card, system will send an email to students and tell them they current status. Second, if a person uses a fake card to sign attendance for a student, system will find it out and send an email to the real user to tell him someone has duplicated your card.
-
(a)
-
2.
Smartphone and Tablet Platform (Windows Phone and Windows Surface)
For Windows Phone and Windows Surface systems, each of one has three main functions; these are user login, lecturer checking student attendance, and student checking attendance. Next is the detail of each function.
-
(a)
Login/Logoff Function
When user login the system (Windows Phone and Windows Surface part), user has to enter their correct username, password and choose correct use type. Username is the users email address, and initial password is user matric number or staff number. If one of the information does not correct user cannot login and system will show an error message to user. Figure 26.7 shows the user login interface of Windows Phone and Fig. 26.8 shows the user login interface of Windows Surface.
Fig. 26.7 
User login (Windows Phone)
Fig. 26.8 
User login (Windows Surface)
-
(b)
Lecturer Checking Student Attendance and Movement
After lecturer login the Windows Phone and Windows Surface system, he could press View Attendance button to check student attendance for each class, which he taught. Next the system will show the course list base on teaching year, after the lecturer press one of the courses, system will list all the classes, which are set by admin. Next lecturer could press one of the classes and system will jump to Student Attendance interface. System will show the situation of attendance and if lecturer presses the Statistic button, system will jump to next interface and show the attendance statistic of this class. Next, lecturer could press any of the students to check his/her movement of this class. After lecturer press one of the students, system will jump to Student Movement interface and it will show the movement record of this student. At the bottom of this interface, system shows the time of this student staying in classroom. At last but not least, lecturer could press back button to check movement of another student. Figures 26.9 and 26.10 show the interface of lecturers check student attendance.
Fig. 26.9 
Lecturers check students attendance (Windows Phone)
Fig. 26.10 
Lecturers check students attendance (Windows Surface)
-
(c)
Student Checking Attendance and Movement
After student login the smartphone system or tablet system, he could press View Attendance button to check his attendance for each class. Next the system will show the course list base on teaching year, after the student press one of the courses, system will list all the classes, and his attendance status. And then, student could press one of the classes and system will jump to Student Movement interface and it will show his movement record. At the bottom of this interface, system shows the time of this student staying in classroom. At last but not least, student could press back button to check his movement of another class. Figures 26.11 and 26.12 show the interface of students check student attendance.
Fig. 26.11 
Students check students attendance (Windows Phone)
Fig. 26.12 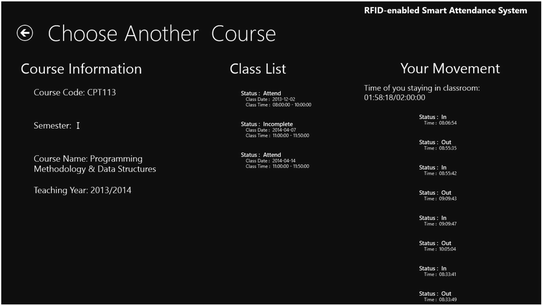
Students check students attendance (Windows Surface)
-
(a)


26.5 Testing
In order to do the testing, users log in as the administrator, lecturer and students. RFID system, web page system, smartphone application and tablet application were fully tested. Below are the results of the function testing.
26.5.1 Testing Web Page Function
The web page application has several functions such as user login, user changing password, lecturer checking student attendance and etc. Below are the tested functions.
Based on Table 26.1, we demonstrate that all the functions work successfully. The role of the administrator could register student and lecturer, register course for student and lecturer, setting class time for lecturer and simulate a batch of student by Monte Carlo simulator. The role of lecturer could check student attendance and movement of each student and check attendance statistic of each class. The role of student could check his own attendance and movement.
26.5.2 Testing Windows Phone and Windows Surface Function
The smartphone and tablet application has several functions such as user login, user changing password, lecturer and student checking attendance and movement and etc. Below are the tested functions.
Based on Table 26.2, we demonstrate that all the functions work successfully. The role of lecturer could check student attendance and movement of each student and check attendance statistic of each class. The role of student could check his own attendance and movement.
26.5.3 Testing RFID Function
In RFID part, it has several functions such as students signing attendance, duplication reading checking, miss reading feedback and sending email. Below are the tested functions.
Based on Table 26.3, we demonstrate that all functions work successfully. RFID system could perform students signing attendance, duplication reading checking, miss reading feedback and email generation.
26.6 Discussion
This RFID smart attendance system implemented based on the requirement that has been set during the analysis stage and able to expand the requirement during the design stage to make the attendance system more advances.
However, this project still has some challenges and limitations to be improved. There are several weakness of this system have to be improved. First, the connection port of RFID reader is TTL port and the connection port of server uses USB port, but the efficient transmission distance between these two ports is about 500 m, if the user wants to extend the distance he has to use repeater, this is very troublesome. Second, in the process of students scanning card and entering classroom, sometime the system will send the email to students, and in the period of system sending email, reader cannot read the card until sending finished. This phenomenon decreases the efficiency of reading cards. Third, if a student scans his card at the beginning of this class, and then he leaves the classroom until the class finished he comes back and scans his card. And student could pass the card to other student to let them help to sign attendance, for these phenomena system cannot be detected. So that, this system still cannot eliminate student absent the class completely. In the future, this system could be combined with Near Field Communication (NFC) function to improve the weakness of this system. Nowadays, NFC becomes more and more popular in mobile device, and this function is based on RFID technology, hence this system could be combined with this function and let students to sign attendance by using smartphone and tablet. At last but not least, with the development of technology the completeness of this system could be improved and this system could be more and more completed.
26.7 Conclusion
This project provides a smart attendance system for students to sign attendance and view movement of student. When the students enter the classroom or lecture hall, they have to let the card detected by the reader. The reader can detect the card attached with RFID tag as long as certain range of distance between the tag and the reader is complying. Once the reader detect and obtain the information, it will be then saved to its own database automatically. Besides that, students can leave the classroom but they have to let the card detected by the reader also. So that teachers or lecturers not only can view the percentage of coming students, earl leave and absent students, but also they can see which students come, early leave and absent no matter by web page system, smartphone system or tablet system. As a student, he/she could through web page system, smartphone system or tablet system to look up his/her attendance situation and movement situation. The outcome of the project especially the importance of RFID based attendance system can stand as an extension to the existing student card currently used in our University. In addition the lack of automated attendance system in the School of Computer Sciences especially in our lecture halls is our main motivation undesigning this system.
Although this project has met the basic requirement, it still has space to be improved. In the future this project could combine with the NFC technology, the RFID reader and tag could be change to a mobile device has NFC function. Then students could use only smartphone to sign attendance and it is very convenience.
References
Abd Wahab MH, Abdul Kadir H, Mohd Yusof MN, Sanudin R, Tomari MR (2009) Class attendance system using active RFID: a review. Compilation of papers 2009, vol 2, pp 9–21
Arulogun OT, Olatunbosun A, Fakolujo OA, Olaniyi OM (2013) RFID-based students attendance management system. Int J Sci Eng Res 4(2):1–9. ISSN 2229-5518
Jiang L, Li Y (2012) Attendance technology on campus research and application. In: National conference on information technology and computer science (CITCS 2012), pp 40–42
Kassim M, Mazlan H, Zaini N, Salleh MK (2012) Web-based student attendance system using RFID. In: Control and system graduate research colloquium (ICSGRC), 2012 IEEE, pp 213–218
Lim TS, Sim SC, Mansor MM (2009) RFID based attendance system. In: Industrial electronics and applications (ISIEA), 2009 IEEE, pp 778–782
Stalling W, Bauer M, Howard M (2011) Computer security: principles and practice. Pearson Education Limited. ISBN No. 9780132775069
Ujan EIA, Ismaili IA (2011) Biometric attendance system. In: 2011 IEEE/ICME international conference on complex medical engineering (CME), pp 499–501
Acknowledgments
The authors would like to extend our greatest appreciation and gratitude to the organization of Innovate Malaysia Design Competition and Microsoft for providing various technical and soft skills training, technical support as well as the Nokia smartphone.
Author information
Authors and Affiliations
Corresponding author
Editor information
Editors and Affiliations
Rights and permissions
Copyright information
© 2015 Springer Science+Business Media Dordrecht
About this paper
Cite this paper
Zhi, M., Mahinderjit Singh, M. (2015). RFID-Enabled Smart Attendance Management System. In: Park, J., Pan, Y., Kim, C., Yang, Y. (eds) Future Information Technology - II. Lecture Notes in Electrical Engineering, vol 329. Springer, Dordrecht. https://doi.org/10.1007/978-94-017-9558-6_26
Download citation
DOI: https://doi.org/10.1007/978-94-017-9558-6_26
Published:
Publisher Name: Springer, Dordrecht
Print ISBN: 978-94-017-9557-9
Online ISBN: 978-94-017-9558-6
eBook Packages: EngineeringEngineering (R0)