
Abstract
Deformity of the knee associated with osteoarthrosis (OA) is a common presenting complaint to the orthopedic surgeon. In a normal knee, approximately 60 % of the weight-bearing forces are transmitted through the medial compartment and 40 % through the lateral compartment. The varus knee with unicompartmental OA of the medial compartment has an altered limb alignment and subsequently more load is distributed to the affected compartment. Despite the expanding indications for knee arthroplasty, it is advantageous to delay arthroplasty given the higher wear rate and likelihood of future complex revisions if the primary surgery is performed in patients at a young age [1]. Proximal tibial osteotomy, a joint-preserving procedure, has been reported as a viable surgical option for younger patients with isolated medial compartment arthritis. The aim of the surgery is to shift the weight-bearing axis away from the diseased area, as this relieves the pain and suppresses the disease progression. It has been reported that young active patients with isolated medial compartment disease and varus knee alignment have the highest likelihood of a good outcome with an osteotomy [2, 3]. This can delay, or potentially avoid, the need for a total knee arthroplasty.
Access provided by Autonomous University of Puebla. Download chapter PDF
Keywords
These keywords were added by machine and not by the authors. This process is experimental and the keywords may be updated as the learning algorithm improves.
Introduction
Deformity of the knee associated with osteoarthrosis (OA) is a common presenting complaint to the orthopedic surgeon. In a normal knee, approximately 60 % of the weight-bearing forces are transmitted through the medial compartment and 40 % through the lateral compartment. The varus knee with unicompartmental OA of the medial compartment has an altered limb alignment and subsequently more load is distributed to the affected compartment. Despite the expanding indications for knee arthroplasty, it is advantageous to delay arthroplasty given the higher wear rate and likelihood of future complex revisions if the primary surgery is performed in patients at a young age [1]. Proximal tibial osteotomy, a joint-preserving procedure, has been reported as a viable surgical option for younger patients with isolated medial compartment arthritis. The aim of the surgery is to shift the weight-bearing axis away from the diseased area, as this relieves the pain and suppresses the disease progression. It has been reported that young active patients with isolated medial compartment disease and varus knee alignment have the highest likelihood of a good outcome with an osteotomy [2, 3]. This can delay, or potentially avoid, the need for a total knee arthroplasty.
The first report of successful tibial osteotomy in the English literature was written by Jackson and Waugh in 1961 [4]. Coventry et al. [5] and Insall et al. [6] subsequently reported their results with a closing wedge technique. Coventry modified the previously performed procedures by executing the osteotomy proximal to the tibial tubercle, which had several advantages – the osteotomy was performed closer to the area of the deformity, the bone involved was cancellous and tended to heal rapidly, and the patient could bear weight on the leg because the pull of the quadriceps stabilized the osteotomy. However, there are many potential complications of this method. Some complications include neurovascular injury, compartment syndrome, intra-articular fracture, infection, delayed union or nonunion, instability, recurrent varus deformity, and valgus overcorrection [7]. In addition, major corrections cause an offset of the proximal tibia that may compromise placement of the tibial component of a total knee arthroplasty.
An opening wedge technique was initially more popular in Europe, and Hernigou et al. [3] reported their long-term results in 1987. A major advantage of this technique is that it allows precise adjustment of angular correction intraoperatively. This technique may be less invasive, and it does not involve violation of the anterior compartment of the leg. In addition, dissection is away from the peroneal nerve, thereby decreasing the likelihood of injury. The proximal tibiofibular joint is not disturbed during this procedure. HTO has the advantages of maintaining the bone stock and correcting the deformity close to its origin, which may facilitate subsequent arthroplasty [6], and the osteotomy is technically easier. Disadvantages to this technique include the need for the bone graft to fill the osteotomy site. The options are iliac crest graft, allograft, and bone substitutes. Good results have been reported with hydroxyapatite wedges in conjunction with fibula autograft. In comparison with closing wedge osteotomies, there is an increased incidence for delayed union or nonunion and the loss of angular correction as the opening wedge osteotomy heals.
Recently, HTO has gained popularity after meniscal transplantation and cartilage-preserving surgeries. If malalignment is noted in a patient who is considered for meniscal transplantation, the realignment osteotomy is recommended in conjunction with meniscal transplantation. Verdonk et al. [8] published 10-year follow-up data on 42 meniscal allograft transplantations, of which 11 underwent concurrent HTO. Although all subgroups had substantial symptoms, the subgroup of medial meniscal transplant combined with HTO had a greater improvement than did the group undergoing isolated medial meniscal transplantation.
Cartilage-preserving surgery has advanced significantly in the past several years, with techniques such as microfracture, autologous chondrocyte implantation, and autologous osteochondral transplantation becoming more widespread. Good results have been reported, with comparable results for microfracture as well as autologous chondrocyte implantation at medium-term follow-up [9, 10]. However, isolated cartilage-preserving surgery is generally contraindicated in the setting of malalignment. Theoretically, this type of procedure would have a more favorable outcome if the healing cartilage surface was not subjected to the increased mechanical forces present in a malaligned knee. More recent work has shown the combination of HTO and microfracture to have good clinical outcomes at 2-year follow-up [11]. In this chapter, we will discuss the role of HTO in cartilage repair surgery. We routinely do medial-based opening wedge high tibial osteotomy fixed with TomoFix plate.
Indications and Contraindications of HTO in Cartilage Repair
Osteoarthrosis of the knee has many causative factors. Degenerative changes of the articular cartilage can occur through tension, compression, or shear. Malalignment into a varus position will overload the medial condyles of the femur and tibia. The rationale behind the osteotomy is to correct the angular deformity at the knee and therefore decrease the excessive weight-bearing load across the affected compartment that is the most involved by the degenerative process. The indications for the patients selected for proximal tibial osteotomy should have mostly unicompartmental OA with axial malalignment.
-
1.
Young persons with chondral lesions in the medial compartment of knee with varus deformity and normal lateral compartment and normal patellofemoral joint with intact lateral meniscus are the best candidates for HTO. However, it is contraindicated in a patient with an open growth plate.
-
2.
There is no definite chronological age below which one should undergo high tibial osteotomy. The age of 40–60 is the most suitable, but activity level, lifestyle, and general health must all be considered. Early treatment of the unicompartmental OA in relatively young patients is expected to produce better results when the articular changes are in the initial stage of the degenerative process.
-
3.
BMI less than 30. Obesity has a negative effect on the outcome of surgery in many orthopedic operations. Most orthopedists would agree that excess body weight could make a patient better candidate for osteotomy than for arthroplasty, but it is also true that obesity will represent a negative factor in view of the possible general postoperative complications.
-
4.
Osteotomy would be best performed for primarily unicompartmental OA in knees with generally well-maintained range of motion at least 100° of flexion, less than 10° of flexion contracture.
-
5.
An intact lateral joint compartment and intact soft tissue covering of the medial head of the tibia were further preconditions.
-
6.
Osteotomy should preferably not be performed in patients with rheumatoid arthritis, very unstable knees, or knees with greater than 20° of varus deformity, because, according to Insall [6], these knees are complicated by an associated severe ligamentous laxity and subluxation. A patient who has varus deformity and anterior cruciate ligament insufficiency may be treated with an anterior cruciate ligament reconstruction in addition to proximal tibial osteotomy.
-
7.
HTO should not be done in patients with severe bone loss (more than a few millimeters) of the medial tibia or medial femur. When medial compartment bony support is insufficient, congruent weight bearing on both tibial plateaus after the osteotomy is not possible.
-
8.
The presence of severe varus deformity (>20°) may be associated with subluxation of the tibia. Subluxation greater than 1 cm is an absolute contraindication to osteotomy.
-
9.
Poor general medical condition, chronic smoker, inflammatory disease, severe osteoporosis, and bad peripheral vascular status (no foot pulse) are among the general contraindications to HTO.
Pre-op Evaluation
Clinical Examination
The goal of knee osteotomy is to realign the mechanical axis of the limb, thereby shifting weight-bearing forces from a diseased compartment to a more normal compartment. The subjective pain intensity was determined by means of a visual analogue scale (VAS) from 0 to 10 (0 = no pain, 10 = unbearable pain). Knee range of motion should be evaluated because outcomes have been shown to deteriorate with diminished levels of knee flexion [12].
The Radiological Documentation Included
-
1.
Double-leg-standing AP radiograph of the entire lower limb with patella facing forwards: To draw the mechanical axis and calculate the amount of varus correction needed (Fig. 24.1)
Fig. 24.1 
Mechanical axis showing varus malalignment
-
2.
Standard supine AP and lateral view: To assess the lateral laxity by comparing the joint line convergent angle (Fig. 24.2) of the standing and supine films and calculate the posterior tibial slope in lateral view (Fig. 24.3)
Fig. 24.2 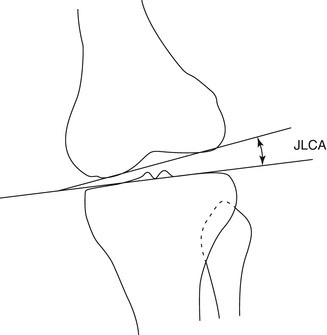
The JLCA is formed by a line tangent to the distal femoral condyles and a line tangent to the tibial plateau
Fig. 24.3 
Radiograph showing the angle of inclination of the tibial plateau according to the MH method using three lines. The first green is tangential to the tibial crest, the second blue is tangential to the proximal tibial articular surface, and the third line is perpendicular to the line of the tibial crest. The angle formed by the second and the third lines is equivalent to the posteroinferior slope of the plateau
-
3.
Skyline view: Used to assess the patellofemoral articulation
-
4.
MRI knee for cartilage sequence: To assess the size, area, and thickness of chondral lesion and to check the integrity of the other intra-articular structures.


Preoperative Planning
For the preoperative planning, we use an AP long-leg weight-bearing radiograph. The measurement of the mechanical axis is a line drawn from the center of the femoral head to the center of the ankle mortise. In normal knee the mechanical axis passes through the center of the joint or slightly varus (approximately 1° medially). In varus malalignment, the mechanical axis passes the tibial plateau more medially than the physiological mechanical axis deviation (MAD) of 10 mm. The anatomic axis is a line drawn through the center of the shaft of the femur and through the center of the shaft of the tibia. In the normal knee, the two lines cross each other in the center of the joint, making an angle of 5° (physiologic valgus). According to these parameters as the reference points of “normality,” the deformity is measured. In the setting of the treatment of an isolated medial femoral chondral injury associated with malalignment, it is unclear whether knees will have better outcomes if overcorrected into valgus or simply corrected into physiologic alignment. Recent biomechanical work has shown that the medial compartment is completely unloaded with correction to between 6° and 10° of anatomic valgus and that the load is equalized between the medial and lateral compartments, with correction to between 0° and 4° of anatomic valgus. The study’s authors recommended from these biomechanical data that treatment for varus gonarthrosis be overcorrection of the mechanical axis and that treatment for isolated medial femoral condyle chondral injuries involves only correction to physiologic alignment as opposed to overcorrection [13].
The first step is to draw the mechanical axis line from the center of the femoral head to the center of the talus. Next, a line that is parallel to the tibial plateau is drawn. A third line is drawn with the desired mechanical axis from the center of the femoral head to a point 62 % lateral on the transverse diameter of the tibial plateau [14]. The line of the desired mechanical axis is continued to the center of the ankle in its postoperative position. The center of rotation of angulation (CORA-D) lies in the lateral cortex at the tip of the fibula. Line DS connects CORA with the middle of the ankle joint. Line DS′ is drawn from CORA to the center of the ankle in its postoperative position and crosses the desired mechanical axis at the center of the ankle. The angle between lines DS and DS′ forms the correction angle (alpha). This correction angle (alpha) is transposed over the proposed osteotomy site (DO-DO′) which will give the amount of opening osteotomy (O-O′) (Fig. 24.4). The other way is to use the TomoFix bone spreader, which measures the angle of opening directly.


Preoperative planning of the osteotomy. Overcorrection of the new mechanical axis according the work of Fujisawa (From AO folder p. 4)
When there is severe ligamentous laxity, to plan the operation on radiographs made with the patient standing can lead to overcorrection, a potentially greater problem than undercorrection. If clinical examination showed ligamentous laxity, then calculate the joint line convergence angle, which is formed by a line tangent to the distal femoral condyles and a line tangent to the tibial plateau [15]. A single-leg weight-bearing full radiograph and a double-leg full radiograph, always in standing position, are obtained to measure the lower limb alignment. The difference in the joint line convergence angle between the two radiographs represents the component of malalignment due to ligamentous laxity. To prevent overcorrection, the soft tissue laxity is subtracted from the overall valgus correction.
Anesthesia
The operation is performed under spinal or general anesthesia with or without femoral block. Intravenous antibiotic prophylaxis is used according to hospital guidelines.
Positioning of the Patient
We prefer a normal operating table with the patient in a supine position and the C-arm of an image intensifier set up opposite the surgeon. Position the patient in such a way that the hip, knee, and ankle joint can be visualized with the image intensifier. The patient is draped as usual in knee surgery. The tourniquet is applied well proximal over the thigh (Fig. 24.5).


Supine position and the C-arm of an image intensifier set up opposite the surgeon
Surface Markings
The surface markings of patella, patellar tendon, tibial tuberosity, medial joint line, and posteromedial border of proximal tibia are identified and marked with knee in 90° flexion (Fig. 24.6).


Surface markings with knee in 90° flexion
Techniques
The osteotomy we propose here is based on the opening wedge technique. We used new fixation device (TomoFix™) with an adapted surgical technique which allows stable fixation of the osteotomy. The procedure begins with examination under arthroscopy.
Arthroscopy
To ensure an intact lateral joint compartment and to treat additional intra-articular lesions, a knee arthroscopy is first performed on every patient to assess the cartilage lesion, degree of involvement of the other compartment, and the cruciate ligaments and meniscus. Debridement of the cartilage lesion and microfracture is done in a standard way. Meniscal tears, loose bodies, osteophytes, and chondral flaps can cause mechanical symptoms that can be treated successfully with arthroscopy.
Incision and Exposure
After diagnostic knee arthroscopy, when indicated, a 5-cm vertical skin incision is made over the anteromedial aspect of the tibia, 2 cm medial to the tibial tuberosity starting from 1 cm below the joint line. The incision is performed directly down to the bone. A subperiosteal dissection is performed anteriorly under the patellar tendon and posteriorly deep to the pes anserinus tendons and superficial medial collateral ligament. Release of the more anterior fibers of the tibial attachment of the superficial medial collateral ligament is performed to place a Hohmann’s retractor under the posterior surface of the tibia to protect the neurovascular bundle during osteotomy (Figs. 24.7 and 24.8). In a biomechanical study under reproducible dynamic loading conditions using pressure-sensitive films with the corrected axis running through the “Fujisawa point,” the load changed only after the complete release of the MCL from medial to lateral (64 %) [16].


Pes anserinus elevation


Hohmann’s retractor under the medial collateral ligament
Osteotomy
Position the knee in such a way to get the true AP view of the tibial plateau. This step is very crucial to do the osteotomy in the correct direction. The direction of the osteotomy in the frontal plane was marked with a 2.5-mm threaded K-wire under fluoroscopic control starting from 4 cm below the medial joint line, driven obliquely upward, laterally towards the tip of the fibular head (Fig. 24.9). There should be at least 1 cm of bone below the lateral tibial plateau to prevent intra-articular fracture during osteotomy [2]. Because the proximal tibia is sloped posteriorly, the osteotomy should be made in an oblique fashion to maintain an adequate bridge of bone along the posterior cortex of the tibia to facilitate the plate fixation [17].


Guidewire placement, 4 cm below the joint line, directed towards the tip of fibula
Mark the posterior 2/3 and anterior 1/3 of the medial surface of the tibia just below the guidewire. The first osteotomy is done in the posterior 2/3, parallel to the tibial slope, and ended 1 cm from the lateral cortical margin at the level of the tip of the fibula. The saw blade is placed immediately below the guidewire to avoid proximal migration osteotomy into the joint. The saw blade should be adjusted to get an end on view in the image before starting the osteotomy (Figs. 24.10 and 24.11). This step is very important to make the posterior cut parallel to the tibial slope.


Osteotomy blade below the guidewire, parallel to tibial slope, while Hohmann’s retractor placed posteriorly


End on view of the saw blade
The neurovascular structures are protected with Hohmann’s retractor until the completion of the posterior osteotomy. The parallelism between the saw blade and guidewire is checked intermittently under image. The saw is advanced slowly and intermittently with continuous cold-water irrigation to prevent thermal necrosis. The strong posteromedial cortex is osteotomized completely without violating the lateral tibial cortex as it is the hinge for correction. The osteotomy should be done within 1–1.5 cm from the lateral cortex to avoid loss of hinge which will lead to unstable situation (Figs. 24.12 and 24.13). This complication can be avoided by constantly checking under II (image intensifier).


Posterior 2/3 osteotomy


Posterior 2/3 osteotomy to within 1–1.5 cm from the lateral cortex
The second anterior osteotomy is performed bicortically at 135° to the first osteotomy, angled upwards, proximal to tibial tuberosity, like a V shape. At least 1.5 cm thickness of tibial tuberosity should be maintained to prevent the fracture (Fig. 24.14)


Anterior osteotomy 135° to the posterior cut and 1.5 cm behind the tibial tuberosity, directed proximal to the tubercle
Opening the Osteotomy Gap
Osteotomy gap should be opened gradually over several minutes in order to prevent the fracture of the lateral cortex. A chisel is inserted below the guidewire and advanced gradually up to the entire length of osteotomy, taking precautions not to fracture the lateral hinge. The second chisel is inserted in between the first one and the guidewire, advanced until it reaches few mm lesser length than the first one. Insert the third chisel between the other two but to a lesser length. This stacking technique gradually opens the osteotomy, leaving the lateral tibial cortex intact (Figs. 24.15 and 24.16).


Stacking technique with three chisels


Placement of the chisel
Now, the chisels and guidewire are removed and the TomoFix bone spreader is inserted gradually until it reaches the lateral hinge. The spreader is opened slowly over a period until the desired opening angle is reached. The readings on the TomoFix bone spreader will directly give the angle of correction (Figs. 24.17, 24.18 and 24.19). Now, the alignment is checked with the leg in full extension and proper rotation using the cable method or alignment rod. The osteotomy gap is fine-tuned to get the mechanical axis through a point 62 % lateral on the transverse diameter of the tibial plateau.


TomoFix bone spreader


The TomoFix bone spreader position checked with image


The TomoFix bone spreader is calibrated to desired angle
The TomoFix bone spreader is removed and the lamina spreader is inserted anteriorly while the assistant is opening the osteotomy gently with valgus force (Fig. 24.20).The lamina spreader is opened gradually while maintaining the valgus force until the osteotomy gap opens sufficiently such that the chromos wedge can be inserted.


Lamina spreader in place
The selected chronOS bone wedge is inserted posteriorly to fill the osteotomy gap.
Placing the graft posteriorly is important to maintain the normal tibial slope (Fig. 24.21).


Osteotomy gap filled with chronOS bone wedge posteriorly
The bone spreader is removed and the prepared TomoFix plate is positioned 1 cm below the joint line on the medial surface of the tibia. Avoid placing the plate too anteriorly as doing so will increase the tibial slope. Likewise, placing the plate too posteriorly will decrease the slope. The plate is held temporarily with K-wires used proximally and distally. Locking screws are inserted according to the standard principles of locking plate. The final alignment is checked under image intensifier (Figs. 24.22 and 24.23). While the wound is irrigated, take care not to wash away the bone graft and the hematoma in the osteotomy gap. Then, it is closed over a drain without suction. Sterile compression dressings are applied.


TomoFix plate in place


Final image after fixation
Postoperative Follow-Up
After the operation, the knee is immobilized in a hinged knee brace in full extension or at flexion of approximately 10°, which allows full range of movements when unlocked. Passive flexion as well as extension in a continuous passive motion device is started the day after surgery. The drains are removed 48 h later. The patients are allowed to walk with touchdown weight bearing from second postoperative day and are discharged from the hospital in 4–5 days. Range of motion exercises and muscle strengthening exercises are encouraged. Plain X-rays are taken at 6 weeks postoperatively, and if healing is adequate, progressive weight bearing is allowed. Usually the bracing is discontinued at 6 weeks and weight bearing is increased gradually to full weight bearing. The weight-bearing radiographs are taken at the 6th, 12th week, and the 6th month to ensure maintenance of correction and healing (Fig. 24.24).


Preoperative and 6 months postoperative X-ray showing mechanical axis
Complications and Troubleshooting
Intra-articular Fracture
Malpositioning of the guidewire closer to the lateral tibial plateau will lead to intra-articular fracture (Fig. 24.25). This can be avoided by perfect positioning of the guidewire not less than 1 cm below the lateral tibial plateau. The incidence of fracture is high if the wire is placed less than 1 cm away [18, 19]. Always do the osteotomy below the guidewire as the wire prevents the proximal migration of the osteotomy into the joint. Do not open the osteotomy without completely cutting the posteromedial tibial cortex. If fracture occurs, it can be managed by fixing through the proximal screws of the plate.


Intra-articular fracture due to early opening up of osteotomy without cutting the posterior cortex
Loss of Lateral Hinge
An intact bony hinge is essential for the stability and when correctly preserved it prevents the osteotomy from any possible dislocation. If the hinge is lost, then osteotomy becomes unstable. It needs staple fixation by another lateral incision or fixation through the proximal screws (Fig. 24.26).


Loss of lateral hinge, fixed with the proximal screws of the plate
This complication can be prevented by proper selection of the osteotomy site and careful monitoring under image during the osteotomy. The osteotomy should be proximal enough in the tibia to avoid maximum step-off of the bone profile and to address a more stable fixation.
Neurovascular Damage
Injuries to the vessels are not frequent. This could be safely protected by correct use of a Hohmann’s retractor posteriorly or by keeping the knee flexed during the osteotomy. However, Zaidi et al. shows that flexion of the knee does not move the popliteal artery away from the tibia. It remains vulnerable to injury during high tibial osteotomy [20].
Delayed Union, Nonunion, and Loss of Angular Correction
This is a rare complication as the cancellous bone heals better. Heavy smokers and individuals with generalized bone disorders may be at risk. In comparison with closing wedge techniques, there is an increased potential for delayed union or nonunion, as well as for the loss of angular correction as the opening wedge osteotomy heals. By proper selection of the patients, this issue can be avoided.
Alteration of Tibial Slope
Tibial slope refers to the angle created by a line drawn from the anterior aspect to the posterior aspect of the proximal tibial plateau with a perpendicular line down the tibial diaphysis on a lateral radiograph. The normal posterior tibial slope is 10° ± 3°. During the operation, there was a tendency for the slope to enlarge, as the strong medio-dorsal ligaments and the pes anserinus act against the opening of the osteotomy (Fig. 24.27). To prevent flexion malalignment, soft tissue release should be carried out, especially in the case of contract medial capsule and ligaments. This complication can be avoided by making the posterior osteotomy parallel to posterior slope and placing the graft posteriorly. Positioning the plate too anteriorly will result in increased tibial slope and vice versa. The fixation system is the most stressed in the dorsal area of the osteotomy, as the plate lies anteromedial and there is no primary bone contact in the posterior aspect of the osteotomy. This relative instability was shown by a frequently visible formation of callus at the posterior cortex [17].


Pre-op and post-op X-rays showing increase in tibial inclination which prevents the full extension
Patella Baja
In lateral closing wedge osteotomy, patella baja (decreased patellar height) may be caused by interstitial scarring of the patella ligament and new bone formation behind the patellar ligament in the site of the osteotomy, as well as contracture in and around the patellar ligament because of immobilization [21]. This can be minimized by rigid fixation early mobilization of knee joint [22]. In medial opening wedge osteotomy, distalization of the tibial tuberosity and a relative elevation of the joint line may lead to patella baja (Fig. 24.28). Patellar tracking may also be affected by HTO. This may result in anterior knee pain, and it may increase the risk of patellofemoral osteoarthritis due to increased contact stress across the patellofemoral joint. The effects of HTO on patellar height and patellar tracking may be of minimal clinical relevance, but in extensive opening wedge corrections, the effects may be quite large and adversely affect the patellofemoral joint [23]. Medial opening wedge osteotomy below the tibial tuberosity can be performed to avoid patella infera in varus knees, which may have a protective effect on the patellofemoral joint [24].


Caton-Deschamps ratio (red/blue) showing patella baja after high tibial osteotomy
Adjuvant Tibial Tuberosity Osteotomy (TTO) for the Treatment of Patellofemoral Chondral Ulcer: Technical Details
Introduction
Patellofemoral cartilage lesions are due to different causes including sports trauma, traffic accidents, osteochondritis dissecans, patellofemoral malalignment and idiopathic chondromalacia. Patellofemoral malalignment encompasses a number of conditions, isolated or variously associated, such as increased Q-angle, high-riding patella (patella alta), trochlear dysplasia, increased femoral anteversion, excessive tension of lateral retinaculum, absence of medial patellofemoral ligament and vastus medialis obliquus hypotrophy [25–27]. Such disorders lead to altered articular congruence between patella and femoral trochlea that often progresses to severe cartilage damage of one or both patellar facets. Some cartilage defects are thought to be related to patellofemoral malalignment. In such cases the malalignment may be the source of knee pain and disability, and the cause of progression to patellofemoral osteoarthritis.
Realigning the extensor mechanism at the level of the tibial tubercle improves patellar tracking and unloads overloaded patellar articular surfaces [28, 29]. Numerous surgical techniques have been described in the literature to treat patellofemoral (PF) pain, chondrosis, and instability. The most notable include medialization, initially described by Roux and later popularized by Elmslie and Trillat, for the treatment of PF instability [30, 31] and anteriorization of the tibial tubercle described by Maquet [32] performed to treat PF pain associated with arthritis. Each of these procedures takes advantage of important technical alterations in patellar kinematics. Anteriorization of the tubercle elevates the distal extensor mechanism and serves to shift patellar contact forces proximally, while medialization results in a decrease of the lateral force vector. Fulkerson originally designed a tubercle osteotomy known as the anteromedialization (AMZ) to address patellofemoral chondrosis in conjunction with patellofemoral tilt and/or chronic patella sublaxation while avoiding complications of the Maquet technique [33]. This technique decrease in resultant force and increase in contact area would thus decrease joint surface stress, potentially decreasing the condition of overload contributing to pain [34].
The importance of anteromedialization technique for cartilage restoration procedure, which can optimize/minimize joint surface stress, was not realized initially. Brittberg et al. demonstrated poor result of autologous cultured chondrocyte implantation for treatment of patellofemoral cartilage defects when this joint surface stress factors was not taken into consideration [35]. Although no randomized studies compared isolated AMZ to AMZ with cartilage restoration, the improved patient score of patellofemoral chondrosis treated with AMZ and cartilage restoration reported by Minas and Bryant are promising [36]. Other authors also have demonstrated superior results of combining AMZ with PF cartilage restorative procedures such as autologous chondrocyte implantation and osteoarticular grafting procedures within the PF compartment to either procedure performed independently [37–40]. According to Pidoriano et al., anteromedialization of the tibial tubercle improves knee function and relieves anterior knee pain in 90 and 85 % of type I and II patellar cartilage lesions (inferior pole and lateral facet), respectively, with lower success rates for type III (medial facet, 56 %) and type IV defects (proximal pole or diffuse lesions, 20 %) [41]. Gigante et al. also reported significant clinical improvement after 36 months of distal realignment and autologous chondrocyte implantation in treating large, isolated, patellar cartilage lesions associated with patellofemoral malalignment [42].
Patient Selection: Indications and Contraindications
Conservative treatment including rehabilitation program, bracing, and orthotics should be optimized before considering surgical intervention for patient with PF pain or maltracking. When standard conservative measures have failed, surgical intervention followed by careful rehabilitation often is successful if the underlying pathomechanics can be identified and addressed surgically. Patellofemoral chondral disease represents a spectrum with differing severities of altered loading, subluxation, chondrosis, or arthrosis. Indications for tibial tuberosity osteotomy (TTO) are primarily based upon mechanical and chondral pathologies specific to each individual knee. A TT–TG distance of 15 mm is considered normal; values of 20 mm are abnormal and should be considered for a tibial tubercle osteotomy [26, 43]. The optimal candidate for TTO are patients with isolated chondrosis of the distal or lateral patella, who have excessive lateral patellar tilt and/or subluxation associated with an increased TT–TG distance and minimal trochlear [35] chondrosis. This surgical technique also can be used as an adjunct procedure to patellofemoral cartilage restoration in an effort to improve the contact area and decrease PF forces to optimize the biomechanical environment of the new cartilage implant.
The contraindications include certain location of chondrosis as demonstrated by Pidoriano et al. [41]. Anteromedialization of tibial tubercle should be avoided in cases when the patellar chondrosis was medial, proximal, diffuse or with central trochlear or/and patellar involvement. It is also contraindicated in patients with a normal TT–TG distance and in patients who have symptoms not explained by an increased TT–TG distance. Standard contraindications to any osteotomy must also be considered, which includes smoking, infection, inflammatory arthropathy, marked osteoporosis inhibiting adequate fixation, complex regional pain syndrome, arthrofibrosis, inability to minimally weight-bear, and noncompliant patients.
Preoperative Preparation
The expected outcomes, risks, benefits, and potential complications are reviewed with the patient and his or her family by the surgeon. Proper history and thorough physical examination will be done by the surgeon. Patient imaging routinely begins by obtaining conventional radiographs as a screening tool: standing anteroposterior (AP), 45° flexion posteroanterior (PA “Rosenberg”), flexion lateral, shallow angle axial (Merchant), and long leg coronal alignment radiographs. To accurately assess patella subluxation, computed tomography (CT) of the patellofemoral joint is performed. It also allows calculation of desired anteromedialization based on the tibial tubercle to trochlear groove (TT–TG) distance. Anteriorization of between 10 and 15 mm decreases PF stress loads by approximately 20 % and results in minimal sagittal rotation of the patella, while medialization of 10–15 mm will normalize the TT–TG distance [26, 44]. For assessment of articular injury, MRI will provide information and will guide the type of cartilage repair; however, arthroscopy remains a gold standard procedure to assess chondral lesion.
Anaesthesia
The type of anesthesia used for the case is discussed with the patient and anesthesiologist. General or regional anaesthesia together with nerve blocks, including sciatic and femoral, will be decided by anesthesiologist. Co-morbidities and patient preference are taken into consideration. Patient without co-morbidities is scheduled for day surgery procedure and that will allow discharge on the same day. Prophylactic antibiotics are also given by anesthesia prior to the skin incision.
Patient Setup
Examination Under Anesthesia
The patient is positioned in the supine position with a side post and a gel-pad under the ipsilateral hemipelvis. This facilitates an initial arthroscopic evaluation of the knee and limits external rotation of the limb during the osteotomy. An examination under anaesthesia is initially performed to assess the Q angle, range of motion, patellar mobility, and tilt. It is imperative to compare to the contralateral knee exam. The procedure of choice is determined based on the clinical examination and radiographic findings. The surgical area is shaved and wiped with alcohol. A tourniquet is then applied to the operative thigh and set to 250–300 mmHg. After prepping the operative extremity with betadine, the leg is draped in the standard sterile fashion.
Surgical Approach
Arthroscopic Evaluation
The surgery begins with identifying surface anatomy, including the patella, the borders of the patellar tendon, and the tibial tubercle. This surface anatomy is marked using marker pen. Initially, a diagnostic arthroscopy is performed. Through a superior lateral portal, using a 70-degree arthroscope, a complete assessment of the patellofemoral joint is possible. This portal allows for a safe evaluation of the joint, without risk of damaging the articular cartilage or the infrapatellar fat pad. The areas of chondrosis are regionally mapped using the ICRS region knee mapping system noting that significant patellar chondrosis may lead to termination of the procedure unless concomitant cartilage restoration has been planned. Arthroscopic lateral release will be done based on clinical and CT/MRI evaluation of patellar tilts if indicated. If the lateral retinaculum has been determined to be tight from the clinical examination, an open lateral release is performed.
Open surgery begins with a longitudinal incision just lateral to tibial crest, runs approximately 8–10 cm distally beginning at the patellar tendon insertion to the tibial tubercle (Fig. 24.29). The incision can be extended proximally to allow adequate exposure if concomitant cartilage restoration is being performed. If indicated, an open lateral release will be done. The lateral retinaculum is visualized. A nick is then made in the retinaculum with a no. 15 blade. Metzenbaum scissors are then used to complete the release proximally up to the vastus lateral obliquus (VLO) and distally through the patellotibial ligaments. The distal portion of the release is extended beyond the tibiofemoral joint, between the patellar tendon and the Gerdy tubercle. Care should be used to avoid injury to the lateral meniscus during the release. Proximally, the release is angled at about 45 ° at the level of the VLO to avoid injury to this structure, which can result in severe quadriceps weakness or medial patellar subluxation.


Long lower limb radiograph and CT patella tracking shows bilateral patella subluxation
The patella tendon is identified and released from capsule medially and laterally to allow protection with a retractor and later tubercle elevation. The lateral incision is extended distally along the lateral margin of the tibial tuberosity and tibial crest allowing subperiosteal elevation of the anterior compartment musculature and thereby exposing the lateral wall of the tibia.
Anteromedialization can be performed using commercially available AMZ osteotomy systems (Tracker, DePuy Mitek, Inc, Raynham, New Jersey, and the T3 System, Arthrex, Inc, Naples, Florida). Fulkerson originally used an external fixator pin clamp to direct multiple pins in the osteotomy plane and then complete it with osteotomes [45]. The senior author performs osteotomy without using an external fixator pin clamp. The osteotomy begins with two pre-drilled hole over anterior cortex of the tibial, 1.5 cm distal to the patella tendon insertion and another 1.5 cm from the first hole (Fig. 24.30). This important step is essential to predetermine the site for fixation with the cortical screws after AMZ procedure.


(a) Lateral incision along lateral margin of tibial tuberosity and tibial crest. (b) The proximal screw should be placed 1.5 cm from patella tendon attachment. (c) The distal screw would be placed 1.5 cm apart
A series of 3.2-mm drill bits are then used to guide the osteotomy angle. It begins proximal to the patella tendon insertion, 45° angle from anterolateral to posteromedial. Then, the drill bits are placed from posterolateral to anteromedial direction to guide an anteromedialization of the osteotomy along 7–8 cm of tuberosity pedicle. They are placed under direct visualization of the lateral tibial crest. The drill is tapered distally to 2- to 3-mm anteriorly to hinge the osteotomy. Once the angle of the cut has been determined, the proximal portion of the osteotomy, just proximal to the patellar tendon insertion, is completed using a quarter-inch curved osteotome through a predrill holes. This proximal cut connects the medial and lateral edges of the osteotomy and prevents the osteotomy from extending into the tibial plateau. Using K-wires through a predrill hole as a guide, a meticulous osteotomy is completed from lateral to medial tibial crest to create a 6–7 cm of tibial tuberosity pedicle. Extra precaution is taken to ensure if the soft tissue over the medial and distal borders of the tuberosity pedicle remains intact to encourage healing of osteotomy and to avoid non-union (Figs. 24.31 and 24.32).


(a) Four K-wires inserted through predrilled hole to guide the osteotomy. (b) A meticulous osteotomy is completed from lateral to medial tibial crest to create a 6–7 cm of tibial tuberosity pedicle


A straight osteotome is used to pivot the tubercle preserving medial soft tissue sleever
Once the osteotomy is complete, a half-inch straight osteotome is used to pivot the tubercle (Fig. 24.33). The bone pedicle is hinged distally and pushed up the inclined plane. Once the tubercle is hinged, it is transferred medially. A ruler is used to measure the required amount of anteriorization and medialization based on preoperative calculations. If required, the pedicles can be moved proximally or distally to address any underlying patella alta or infra. A Kirschner wire is used to temporarily secure the pedicle when correct positioning has been achieved (Fig. 24.34).


A ruler is used to measure the required amount of anteriorization and medialization. Note the tubercle was transferred about 1.2 cm medially


A K-wire and 4.5 mm tap are used to maintain the pedicle before fix with two 4.5 mm cortical screws
The tuberosity pedicle is then drilled through a pre-drilled hole until the posterior cortex. Before the pedicle is fixed with cortical screw, 4.5 mm taps are used to maintain the pedicle to avoid it from “twisted” or moved while cortical screw is inserted on the pedicle at the transferred site. This extra step is important to maintain the precise location of the tubercle according to the pre-operative measurement. Two parallel 4.5-mm bicortical screws are then used to fix the tubercle (Fig. 24.35).


Intra operative assessment of stability and position of transferred tubercle in both extension and flexion of the knee
The position and stability is then confirmed by clinical examination, including range of motion, patellar tracking, glide, and tilt. After thorough irrigation, the surgical site is closed in a standard fashion.
Pearls and Pitfalls
Pearls
Excellent result of the procedure begins prior to the surgery.
-
1.
Careful assessment of the underlying pathomechanics is critical for a successful outcome; these include malalignment of the extensor mechanism, trochlear dysplasia, soft-tissue imbalance, and chondral damage.
-
2.
Preoperative counseling on patient expectation and rehabilitation is extremely important to prepare the patient for surgery and recovery.
-
3.
The TT–TG measurement is an objective alternative to the Q-angle, quantifying the concept of tibial tuberosity malalignment. The mean TT–TG distance is 13 mm in asymptomatic patients and is considered excessive when above 20 mm.
-
4.
Strengthening of proximal core muscles must be a focus of rehabilitation in conjunction with local musculature.
-
5.
Meticulous osteotomy to ensure the medial site of tubercle remains intact to reduce risk of delayed union or non-union.
-
6.
The use of K-wire and 4.5 mm tap to avoid the pedicle from twisting while insertion of screws.
Pitfalls
Common pitfalls exist through every phase of the treatment including patient selection, operative technique, and post-operative rehabilitation.
-
1.
Poor patient selection. Diffuse or proximal patellar chondrosis should not be treated with anteromedialization. The increased joint reaction forces can exacerbate the symptoms and progression of the arthritis.
-
2.
Increased medial patellofemoral and tibiofemoral stress can be detrimental due to over medialization of the tibial tubercle.
-
3.
Pitfalls during the osteotomy include too shallow a cut, which results in little cancellous bone and mostly cortical bone to transfer. This pitfall can lead to a delayed union or nonunion. Another pitfall that can occur during the osteotomy includes not making the proximal cut behind the patellar tendon with the osteotome. This proximal cut connects the medial and lateral edges of the osteotomy and prevents the cut from extending proximally into the metaphysis or tibial plateau.
-
4.
Weight bearing too early can lead to a fracture of the proximal tibia if the patient is returned to full weight bearing prior to radiographic healing.
Complications
Postoperative complications after TTO are similar to those encountered for other bony realignment including, fracture, malunion, nonunion, delayed union, loss of fixation, neurovascular injury, infection, compartment syndrome, deep venous thrombosis and rarely pulmonary embolism. Complications specific to TTO include symptomatic hardware, persistent pain, arthrofibrosis and stiffness, progressive chondral deterioration, complex regional pain syndrome, and intra-operative injury to the neurovascular structures including the popliteal artery and its trifurcation [46] and the deep peroneal nerve.
Rehabilitation
The postoperative rehabilitation actually begins before the elective procedure with a thorough discussion between the patient, surgeon, and a physical therapist to outline realistic expectations and anticipated progression to return to play. Postoperatively the patient is treated with standard compression dressings, protective bracing, and is monitored for immediate complications. The knee is protected with a hinged knee brace in extension which is unlocked at 2 weeks and discontinued when there is adequate lower extremity control (usually by 6 weeks). Range of motion is allowed up to 60 ° and will be modified throughout the rehabilitation process to accommodate for concomitant cartilage restorative procedures. Partial weight using crutches is allowed up to 6 weeks and will gradually full weight bearing is allowed once radiograph shows acceptable union of the osteotomy site.
Post-operative Follow-up
Routine radiograph in AP and lateral view to determine correct position of the screw will be done post-operatively. The follow-up will be conducted 2, 6 weeks, 3, 6 and 12 months after surgery, and once a year thereafter, and includes functional assessments, physical examinations and radiographic evaluations of the operated knee. If a concomitant cartilage restorative procedure was performed, a MRI with cartilage sequence will be reviewed at 1 year post-operatively. All patients are followed for a minimum of 2 years (range 2–13 years; median, 6.2 years) (Fig. 24.36).


Postoperative AP and lateral radiographs demonstrating the preservation of the distal bony sleeve
References
Nagel A, Insall JN, Scuderi GR (1996) Proximal tibial osteotomy. A subjective outcome study. J Bone Joint Surg Am 78:1353–1358
Sprenger TR, Doerzbacher JF (2003) Tibial osteotomy for the treatment of varus gonarthrosis. Survival and failure analysis to twenty-two years. J Bone Joint Surg Am 85:469–474
Hernigou P, Medevielle D, Debeyre J, Goutallier D (1987) Proximal tibial osteotomy for osteoarthritis with varus deformity: a ten to thirteen year follow-up study. J Bone Joint Surg Am 69:332–354
Jackson JP, Waugh W (1961) Tibial osteotomy for osteoarthritis of the knee. J Bone Joint Surg Br 43:746–751
Coventry MB (1965) Osteotomy of the upper portion of the tibia for degenerative arthritis of the knee. J Bone Joint Surg Am 47:984–990
Insall JN, Joseph DM, Msika C (1984) High tibial osteotomy for varus gonarthrosis: a long-term follow-up study. J Bone Joint Surg Am 66:1040–1048
Coventry MB (1985) Upper tibial osteotomy for osteoarthritis. J Bone Joint Surg Am 67: 1136–1140
Verdonk PC, Verstraete KL, Almqvist KF, De Cuyper K, Veys EM, Verbruggen G, Verdonk R (2006) Meniscal allograft transplantation: long term clinical results with radiological and magnetic resonance imaging correlations. Knee Surg Sports Traumatol Arthrosc 14:694–706
Knutsen G, Drogset JO, Engebretsen L, Grøntvedt T, Isaksen V, Ludvigsen TC, Roberts S, Solheim E, Strand T, Johansen O (2007) A randomized trial comparing autologous chondrocyte implantation with microfracture. Findings at five years. J Bone Joint Surg Am 89(10):2105–2112
Knutsen G, Engebretsen L, Ludvigsen TC, Drogset JO, Grøntvedt T, Solheim E, Strand T, Roberts S, Isaksen V, Johansen O (2004) Autologous chondrocyte implantation compared with microfracture in the knee. A randomized trial. J Bone Joint Surg Am 86-A(3):455–464
Sterett WI, Steadman JR (2004) Chondral resurfacing and high tibial osteotomy in the varus knee. Am J Sports Med 32:1243–1249
Weale AE, Lee AS, McEachern AG (2001) High tibial osteotomy using a dynamic axial external fixator. Clin Orthop 383:154–167
Mina C, Garrett WE, Pietrobon R, Glisson R, Higgins L (2008) High tibial osteotomy for unloading osteochondral defects in the medial compartment of the knee. Am J Sports Med 36:949–955
Fujisawa Y, Masuhara K, Shiomi S (1997) The effect of high tibial osteotomy o osteoarthritis of the knee. Orthop Clin North Am 10:585–608
Brown GA, Amendola A (2000) Radiographic evaluation and preoperative planning for high tibial osteotomies. Oper Tech Sports Med 1:2–14
Agneskirchner JD, Hurschler C, Stukenborg-Colsman C, Imhoff AB, Lobenhoffer P (2004) Effect of high tibial flexion osteotomy on cartilage pressure and joint kinematics: a biomechanical study in human cadaveric knees. Winner of the AGA-DonJoy Award 2004. Arch Orthop Trauma Surg 124(9):575–584
Staubli AE, Jacob HA (2010) Evolution of open-wedge high-tibial osteotomy: experience with a special angular stable device for internal fixation without interposition material. Int Orthop (SICOT) 34:167–172
Rossi R, Bonasia DE, Amendola A (2011) The role of high tibial osteotomy in the varus knee. J Am Acad Orthop Surg 19:590–599
Poignard A, Flouzat Lachaniette CH, Amzallag J, Hernigou P (2010) Revisiting high tibial osteotomy: fifty years of experience with the opening wedge technique. J Bone Joint Surg Am 92:187–195
Zaidi SHA, Cobb AG, Bentley G (1995) Danger to the popliteal artery in high tibial osteotomy. J Bone Joint Surg Br 77-B:384–386
Brouwer RW, BiermaZeinstra SMA, van Koeveringe AJ, Verhaa J (2005) Patellar height and the inclination of the tibial plateau after opening-wedge tech high tibial osteotomy the open versus the closed-wedge technique. J Bone Joint Surg Br 87-B:1227–1232
Billings A, Scott DF, Camargo MP, Hofmann AA (2000) High tibial osteotomy with a calibrated osteotomy guide, rigid internal fixation, and early motion: long term follow-up. J Bone Joint Surg Am 82:70–79
Gaasbeek R, Welsing R, Barink M, Verdonschot N, van Kampen A (2007) The influence of open and closed high tibial osteotomy on dynamic patellar tracking: a biomechanical study. Knee Surg Sports Traumatol Arthrosc 15:978–984
Stoffel K, Willers C, Korshid O, Kuster M (2007) Patellofemoral contact pressure following high tibial osteotomy: a cadaveric study. Knee Surg Sports Traumatol Arthrosc 15:1094–1100
Arendt EA, Fithian DC, Cohen E (2002) Current concepts of lateral patella dislocation. Clin Sports Med 21(3):499–519
Dejour H, Walch G, Nove-Josserand L, Guier C (1994) Factors of patellar instability: an anatomic radiographic study. Knee Surg Sports Traumatol Arthrosc 2(1):19–26
Desio SM, Burks RT, Bachus KN (1998) Soft tissue restraints to lateral patellar translation in the human knee. Am J Sports Med 26(1):59–65
Boden PB, Pearsall AW, Garrett WE Jr, Feagin JA Jr (1997) Patellofemoral instability: evaluation and management. J Am Acad Orthop Surg 5:47–57
Fulkerson JP (1994) Patellofemoral pain disorders: evaluation and management. J Am Acad Orthop Surg 2:124–132
Roux C (1888) Recurrent dislocation of the patella: operative treatment. Rev Chir 8:682–689
Goldthwait JE (1904) Slipping or recurrent dislocation of the patella: with the report of eleven cases. Boston Med Surg J 150:169–174
Maquet P (1978) Biomechanics of the patello-femoral joint. Acta Orthop Belg 44:41–54
Fulkerson JP, Becker GJ, Meaney JA et al (1990) Anteromedial tibial tubercle transfer without bone graft. Am J Sports Med 18(5):490–497
Beck PR, Thomas AL, Farr J, Lewis PB, Cole BJ (2005) Trochlear contact pressure following anteromedialization of tibial tubercle. AM J Sport Me 33:1710–1715
Brittberg M, Lindah A, Nilsson A, Ohlsson C, Isaksson O, Petersen L (1994) Treatment of deep cartilage defects in the knee with autologous chondrocyte transplantation. N Engl J Med 331:889–895
Minas T, Bryant T (2005) The role of autologous chondrocyte implantation in the patellofemoral joint. Clin Orthop Relat Res 436:30
Farr J (2007) Autologous chondrocyte implantation improves patellofemoral cartilage treatment outcomes. Clin Orthop Relat Res 463:187–194
Henderson IJP, Lavigne P (2006) Periosteal autologous chondrocyte implantation for patellar chondral defect in patients with normal and abnormal patellar tracking. Knee 13:274–279
Peterson L, Brittberg M, Kiviranta I et al (2002) Autologous chondrocyte transplantation. Biomechanics and long-term durability. Am J Sports Med 30:2–12
Steinwachs M, Kreuz PC (2007) Autologous chondrocyte implantation in chondral defects of the knee with a type I/III collagen membrane: a prospective study with a 3-year follow-up. Arthroscopy 23:381–387
Pidoriano AJ, Weinstein RN, Buuck DA, Fulkerson JP (1997) Correlation of patellar articular lesions with results from anteromedial tibial tubercle transfer. Am J Sports Med 25(4):533–537
Gigante A, Enea D, Greco F, Bait C, Denti M, Schonhuber H, Volpi P (2009) Distal realignment and patellar autologous chondrocyte implantation: mid-term results in a selected population. Knee Surg Sports Traumatol Arthrosc 17:2–10
Beaconsfield T, Pintore E, Maffulli N, Petri GJ (1994) Radiological measurements in patellofemoral disorders. A review. Clin Orthop 308:18–28
Cohen ZA, Henry JH, McCarthy DM et al (2003) Computer simulations of patellofemoral joint surgery. Patient-specific models for tuberosity transfer. Am J Sports Med 31:87–98
Fulkerson JP (1983) Anteromedialization of the tibial tuberosity for patellofemoral malalignment. Clin Orthop Relat Res 177:176–181
Kline AJ, Gonzales J, Beach WR et al (2006) Vascular risk associated with bicortical tibial drilling during anteromedial tibial tubercle transfer. Am J Orthop 35:30–32
Author information
Authors and Affiliations
Corresponding author
Editor information
Editors and Affiliations
Rights and permissions
Copyright information
© 2014 ESSKA
About this chapter
Cite this chapter
Shukrimi, M., Manivannan, S., Lee, J., Hui, J.H.P. (2014). High Tibial Osteotomy in Cartilage Repair. In: Shetty, A.A., Kim, SJ., Nakamura, N., Brittberg, M. (eds) Techniques in Cartilage Repair Surgery. Springer, Berlin, Heidelberg. https://doi.org/10.1007/978-3-642-41921-8_24
Download citation
DOI: https://doi.org/10.1007/978-3-642-41921-8_24
Published:
Publisher Name: Springer, Berlin, Heidelberg
Print ISBN: 978-3-642-41920-1
Online ISBN: 978-3-642-41921-8
eBook Packages: MedicineMedicine (R0)