
Abstract
Radical prostatectomy is one of the gold standard treatments for clinically localized prostate cancer. Since introduced in 2001 robotic assistance has significantly changed the surgical management of clinically localized prostate cancer. Within a decade, robot assisted laparoscopic radical prostatectomy (RALP) is being utilized worldwide. In the USA, more than 80 % of radical prostatectomies are performed with robot assistance [1]. Several technical modifications evolved with the principle of achieving trifecta. Our group introduced the concept of pentafecta with key components of local tumor control with negative surgical margins, less perioperative morbidity while preserving continence and sexual function [2].
Access provided by CONRICYT-eBooks. Download chapter PDF
Keywords
1 Introduction
Radical prostatectomy is one of the gold standard treatments for clinically localized prostate cancer. Since introduced in 2001 robotic assistance has significantly changed the surgical management of clinically localized prostate cancer. Within a decade, robot assisted laparoscopic radical prostatectomy (RALP) is being utilized worldwide. In the USA, more than 80 % of radical prostatectomies are performed with robot assistance [1]. Several technical modifications evolved with the principle of achieving trifecta. Our group introduced the concept of pentafecta with key components of local tumor control with negative surgical margins, less perioperative morbidity while preserving continence and sexual function [2].
Currently, RALP is performed with the da Vinci® system (Intuitive Surgical, Sunnyvale, CA). RALP has attracted the attention of urologists to take advantage of its superior three-dimensional (3-D) vision, 7° of freedom of movement truly mimicking the movements made during standard open surgery, lack of tremor, and superior ergonomics compared to standard laparoscopy. These advantages favor shorter learning curve for complex laparoscopic skills such as intracorporeal suturing and knot tying.
Multiple RALP series demonstrated safety, efficiency, and reproducibility of the procedure. Meta-analysis across multiple high volume centers demonstrated clear advantages in perioperative morbidity and functional outcomes [3, 4].
Our technique is based upon the open approach as described by Walsh and the standard laparoscopic approach. However, after having performed more than 9,000 cases, our technique has evolved significantly, including several refinements to further improve surgical outcomes and reduce patient morbidity. In the present manuscript, we perform a detailed description of our surgical technique of RALP and provide practical recommendations based on available reports and personal experience. We herein describe the surgical technique we currently perform at our institution.
2 Preoperative Preparation
One hour prior to incision, the patient receives 1 g IV cephazolin (first-generation cephalosporin). Prior to induction of anesthesia, sequential compression devices are placed on the lower extremities and the patient receives 5,000 units of subcutaneous heparin. At this point the patient is positioned in low lithotomy, ensuring that thighs are not overextended to avoid neuropraxia. All pressure points including shoulders, elbows and wrists are carefully and thoroughly padded. The patient is placed within a bean bag which is fixed to the table aided by adhesive tape. Abdominal hair is trimmed and the patient is prepped and draped in a sterile fashion. An orogastric tube is inserted before insufflation along with an 18-French Foley catheter with 15 cc sterile water in the balloon.
3 Intra-abdominal Access and Trocar Placement (Figs. 54.1–54.6)
Most published RALP series follow the same basic principles with only subtle modifications. Positioning of the patient in extended lithotomy and steep Trendelenburg is the standard. Likewise, most series utilize the transperitoneal approach as it provides a larger working space, particularly important during lymph-node dissection and urethrovesical anastomosis [5–7]. A six-trocar transperitoneal approach is utilized in all cases. Access to the abdominal cavity is obtained via a 1 cm supra-umbilical incision using a Veress needle insufflating up to 15 mmHg. Indicates our port placement.

Patient positioning for RALP
-
Step 1: Incision of the Peritoneum and Entry into the Space of Retzius
Instruments
-
Right arm: Monopolar scissors (Da Vinci Si setting: 25 W or Da Vinci Xi setting: 2)
-
Left arm: Bipolar forceps (Da Vinci Si setting: 25 W or Da Vinci Xi setting: 2)
-
Fourth arm: Prograsp forceps
-
Assistant: Microfrance grasper and suction
-
Scope: 0° lens
A transverse peritoneal incision is made through the median umbilical ligament and extended on both sides in an inverted U fashion to the level of the vasa deferens laterally. The fourth arm provides countertraction for this step. The peritoneum is dissected down to the pubic tubercle, which is the anatomical landmark used to follow the pubic rami lateral and horizontally so as to not produce inadvertent injury to epigastric vessels above the rami. It is important to dissect the peritoneum all the way up to the base of the vasa for optimum release of the bladder to allow a tension-free vesicourethral anastomosis.
-
-
Step 2: Incision of the Endopelvic Fascia (EPF) and Identi cation of the Dorsal Venous Complex (Figs. 54.7 and 54.8)
Instruments
-
Right arm: Monopolar scissors (Da Vinci Si setting: 25 W, Da Vinci Xi setting: 2)
-
Left arm: Bipolar forceps (Da Vinci Si setting: 25 W, Da Vinci Xi setting: 2)
-
Fourth arm: Prograsp forceps
-
Assistant: Microfrance grasper and suction
-
Scope: 0° lens
The important landmarks are bladder neck, base of the prostate, levator ani muscles, and apex of the prostate. After defatting the prostate, the fourth arm is used to retract it contralaterally so as to provide adequate exposure and tension on the EPF. The EPF is opened (with blunt dissection) toward the base of the prostate and then followed toward the apex of the prostate to nally identify the dorsal venous complex (DVC) and the notch where the dorsal ligation and suspension stitch will be placed. This step is performed using cold scissors and taking extra caution in identifying any accessory pudendal arteries that may travel along the EPF. Proceeding from the base to the apex, the bers of the levator ani are dissected off the prostate with the round edge of the scissors until the DVC and urethra are visualized. Use caution when dissecting and cutting the pubo-prosatic ligaments because if carried out too medially it will de nitely lead to injury of the DVC and unnecessary bleeding. Full dissection of the apex is best performed at the end of the procedure.
Fig. 54.2 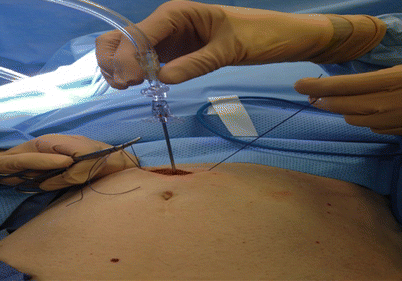
Supra-umbilical incision, support stiches in the rectus sheath and Veress needle insufflation
Fig. 54.3 
Camera port placement (Da Vinci Xi 8 mm trocar)
-
-
Step 3: Ligation of the DVC (Figs. 54.9–54.12)
Instruments
-
Right arm: Large robotic needle driver
-
Left arm: Large robotic needle driver
-
Assistant: Laparoscopic scissors and needle driver
-
Scope: 0° lens
We use Caprosyn 1 on a large CT1 needle. The needle is held two-third back at a 45° angle and placed in the notch between the urethra and DVC. The needle is pushed straight across at 90° and then the wrist is turned to curve around the apex of the prostate. At this point we prefer to use the slip knot to tie as it prevents the suture from loosening as it is tied. A second suture is then placed to suspend the urethra to the pubic bone and secondarily ligate the DVC. The DVC is encircled and then stabilized against the pubic bone along with the urethra (Fig) 22.
-
-
Step 4: Anterior Bladder Neck (BN) Dissection (Figs. 54.13 and 54.14)
Instruments
-
Right arm: Monopolar scissors (Da Vinci Si setting: 25 W, Da Vinci Xi setting: 2)
-
Left arm: Bipolar forceps (Da Vinci Si setting: 25 W, Da Vinci Xi setting: 2)
-
Fourth arm: Prograsp forceps
-
Assistant: Microfrance grasper and suction
-
Scope: 30° lens directed downward
The scope is changed to a 30° down-facing lens for the BN dissection. Although some authors use 0° scope throughout the case, we believe that this angled lens is optimal to see inferiorly and to visualize the correct planes. Key points here to correctly identify the BN is identifying where the bladder fat ends on the prostate in the form of an inverted “U” (Fig. 14.4); another trick is to pull on the Foley catheter and visualize the balloon as it reaches the base of the prostate. However, although useful, this can be misleading in patients with prior transurethral resection of the prostate (TURP) or in the presence of median or anterior lobes. The robotic arms also provide a moderate amount of visual feedback to facilitate localization of the boundaries (double-pinch maneuver). This step is begun by cauterizing the superficial veins that are located in the midline with the bipolar forceps. Then the bladder is dissected off the prostate in the midline using a continuous sweeping motion of the monopolar scissors and traction with the bipolar forceps while visualizing the bladder fibers. The key is to stay in the midline to avoid lateral venous sinuses until the anterior bladder neck is opened and the Foley catheter visualized. Once the anterior urethra is divided, the Foley catheter is retracted out of the bladder using the fourth arm, in an upward manner to expose the posterior bladder neck.
-
-
Step 5: Posterior Bladder Neck (Figs. 54.15 and 54.16)
Instruments
-
Right arm: Monopolar scissors (Da Vinci Si setting: 25 W, Da Vinci Xi setting: 2)
-
Left arm: Bipolar forceps (Da Vinci Si setting: 25 W, Da Vinci Xi setting: 2)
-
Fourth arm: Prograsp forceps
-
Assistant: Microfrance grasper and suction
-
Scope: 30° lens directed downward
The posterior BN dissection is generally considered to be the most challenging step of the operation for the novice robotic surgeon. The difficulty is in appreciating the posterior tissue plane between the bladder and prostate and the direction and depth of dissection necessary to locate the seminal vesicles. After incising of the anterior BN, any remaining peripheral bladder attachments should be divided to atten out the area of the posterior bladder neck and allow precise visualization and dissection of the posterior plane. The full thickness of the posterior bladder neck should be incised at the precise junction between the prostate and the bladder. The lip of the posterior BN is then grasped with the fourth arm and retracted upward. The bipolar forceps is then used for traction thus visualizing the correct plane between prostate and bladder. The dissection is directed posteriorly and slightly cephalad (toward the bladder) to expose the seminal vesicles. It is important to avoid dissecting caudally (toward the prostate) as there is a possibility of entering the prostate and missing the seminal vesicles completely.
-
-
Step 6: Seminal Vesicle (SV) Dissection (Fig. 54.17)
Instruments
-
Right arm: Monopolar scissors (Da Vinci Si setting: 25 W, Da Vinci Xi setting: 2)
-
Left arm: Bipolar forceps (Da Vinci Si setting: 25 W, Da Vinci Xi setting: 2)
-
Fourth arm: Prograsp forceps
-
Assistant: Microfrance grasper and suction
-
Scope: 30° lens directed downward
Once the posterior BN dissection is complete, the vasa and SVs can be identified. The thin fascial layer over the SVs and vasa should be opened to free the structures for retraction. The fourth arm is used to retract the left vas superiorly and laterally. Dissection continues on the medial side of the vas due to the inexistence of vessels in this area, until the tip of the left SV is venous complex. (e) Second pass through the dorsal venous complex and the periostium on the retropubis. (f) The final stitch is tied. (Reprinted with permission from Patel et al.) reached. When this occurs it is grasped and retracted with the fourth arm elevating it away from the neuro structures that lie beneath (hypogastric plexus). The vas is then clipped with a 10 mm hem-o-lock followed by clipping of the vessels of the tip of the SV. Then the SV is dissected completely to the base. This procedure is carried out similarly on the right side.
Fig. 54.4 
Port position marking for Da Vinci Si surgical robot assisted radical prostatectomy
Fig. 54.5 
Port in place for Da Vinci Si surgical robot assisted radical prostatectomy
-
-
Step 7: Denonvilliers’ Fascia and Posterior Dissection (Fig. 54.18)
Instruments
-
Right arm: Monopolar scissors (Da Vinci Si setting: 25 W, Da Vinci Xi setting: 2)
-
Left arm: Bipolar forceps (Da Vinci Si setting: 25 W, Da Vinci Xi setting: 2)
-
Fourth arm: Prograsp forceps
-
Assistant: Microfrance grasper and suction
-
Scope: 30° lens directed downward
Once the SVs have been dissected completely to the base, the right SV is handed over to the assistant for upward traction; the left SV is retracted using the fourth arm. Downward traction of the undersurface of the prostate with the bipolar forceps is applied and blunt dissection using the monopolar scissors on the base of the SVs correctly identifies Denonvilliers’ fascia (visualized as a bright pearly white plane). Denonvilliers’ fascia is then entered and dissected laterally and caudally until reaching the apex of the prostate.
Fig. 54.6 
Port in place for Da Vinci Xi surgical robot assisted radical prostatectomy
-
-
Step 8: Neurovascular Bundle (NVB) Preservation (Figs. 54.19–54.21,
Instruments
-
Right arm: Monopolar scissors (Da Vinci Si setting: 25 W, Da Vinci Xi setting: 2)
-
Left arm: Bipolar forceps (Da Vinci Si setting: 25 W, Da Vinci Xi setting: 2)
-
Fourth arm: Prograsp forceps
-
Assistant: Microfrance grasper and suction
-
Scope: 30° lens directed upward
Athermal Early Retrograde Release: Our approach to nerve-sparing portion is unique as we perform it in a retrograde fashion, mirroring the open approach. It is based upon the philosophy of minimal traction, athermal, and early release of the neurovascular bundle with precise identi cation at the mid-prostate prior to ligating the prostatic pedicle.
Prior to performing this portion, it is essential to fully dissect the posterior plane up to the apex and laterally to the bundles. Prior DVC ligation is also key as this decompresses large periprostatic veins that can potentially be a frustrating source of bleeding.
For release of the left NVB, the assistant grasps the prostate and rotates it contralaterally (to the right). When dissecting the right NVB the fourth arm is used instead of the assistant to rotate and elevate the prostate, grasping the SVs and border of the prostate in an alternating manner. With the prostate rotated laterally, the lateral pelvic fascia is incised and peeled like an onion until the neuro- vascular bundle is identified. Once this is accomplished, early release of the neurovascular bundle can then be performed. The levator fascia is elevated with the bipolar forceps and incised along the lateral aspect of the prostate. At the level of the apex and mid-portion of the prostate, the avascular plane between the neurovascular bundle and prostatic fascia is developed with caution, using the bipolar forceps to maintain the neurovascular steady and the monopolar scissors used to peel the prostate off the bundle. The importance of the assistant in this step cannot be stressed enough as they are in charge of maintaining a bloodless operating field for clear visualization of the bundle as well as contralateral traction. Once the posterior plane is reached, the retrograde dissection begins toward the prostatic pedicle and then toward the apex of the prostate. No thermal energy is used during dissection of the bundle or ligation of the pedicle. The path of the bundle has now been clearly delineated and focus can now turn to controlling the prostatic vascular pedicle. The pedicle is controlled with hem-o-lock clips placed above the level of the already released bundle. This technique allows complete neuro-vascular bundle sparing without the use of any thermal energy, trauma, or inadvertent damage.
Fig. 54.7 
Incision of endopelvic fascia
-
-
Step 9: Apical Dissection (Figs. 54.22–54.25)
Instruments
-
Right arm: Monopolar scissors (Da Vinci Si setting: 25 W, Da Vinci Xi setting: 2)
-
Left arm: Bipolar forceps (Da Vinci Si setting: 25 W, Da Vinci Xi setting: 2)
-
Fourth arm: Prograsp forceps
-
Assistant: Microfrance grasper and suction
-
Scope: 30° lens directed downward
The landmarks are the ligated DVC, urethra, apex of the prostate, and NVB. Again, it is essential to have securely ligated DVC to prevent bleeding, which may interfere with the apical dissection and division of the urethra under direct vision. Cold scissors are used to carefully divide the DVC and create a long urethral stump facilitating the anastomosis. Complete dissection of the apex and urethra is facilitated by the 10× magnification that the robot provides. Once the urethra has been identified, the bipolar forceps is used to create a plane on the posterior surface of the urethra separating it from the musculofascial plate before incising with cold scissors. The rhabdosphincter is then incised with caution, avoiding any posterior lip that the prostate may have at this location.
Fig. 54.8 
Incision of endopelvic fascia and identification of notch between DVC and urethra
Fig. 54.9 
Ligation of dorsal venous complex
Fig. 54.10 
Ligation of dorsal venous complex
Fig. 54.11 
Anterior suspension stitch
Fig. 54.12 
Anterior suspension stitch
Fig. 54.13 
Identifying anterior bladder neck by fat line and pinching with robotic arms
Fig. 54.14 
Incision of anterior bladder neck and Foley catheter is retracted out of the bladder using the fourth arm, in an upward manner to expose the posterior bladder neck
Fig. 54.15 
Lip of the posterior BN is then grasped with the fourth arm and retracted upward
Fig. 54.16 
Plane between prostate and bladder developed
Fig. 54.17 
The fourth arm is used to retract the left vas superiorly and laterally
Fig. 54.18 
Identification of Denonvilliers fascia
Fig. 54.19 
Preservation of neuro-vascular bundle- right side
Fig. 54.20 
Preservation of neuro-vascular bundle- right side
Fig. 54.21 
Bilateral preserved neuro-vascular bundle
Fig. 54.22 
Apical Dissection
Fig. 54.23 
Transection of urethra with adequate stump length
Fig. 54.24 
Urethra division in progress
Fig. 54.25 
Urethra divided at prostate apex
Fig. 54.26 
Posterior layer reconstruction started
Fig. 54.27 
Posterior layer reconstruction in progress
Fig. 54.28 
Posterior layer reconstruction partially complete
Fig. 54.29 
Posterior layer reconstruction completed
Fig. 54.30 
Vesico urethral anastomosis in progress
Fig. 54.31 
Vesico urethral anastomosis in progress
Fig. 54.32 
Vesico urethral anastomosis in progress
Fig. 54.33 
Vesico urethral anastomosis in progress
Fig. 54.34 
Vesico urethral anastomosis completed
-
-
Step 10: Bladder Neck Reconstruction, Modified Posterior Reconstruction of the Rabdosphincter and Urethrovesical Anastomosis (Figs. 54.26–54.34)
Instruments
-
Right arm: Large robotic needle driver
-
Left arm: Large robotic needle driver
Before starting the bladder neck reconstruction it is essential to check the position of ureteral ori- ces and their distance from the edge of the bladder neck. Bilateral plication over the lateral aspect of the bladder is then performed using sutures of 3-0 Monocryl, with 6 in. length, in an RB-1 needle. The suture begins laterally and runs medially until the bladder neck size matches that of membranous urethra. The same suture subsequently runs laterally, back to the beginning of the suture in the lateral edge of the bladder neck; the suture is then tied.
Prior to performing the vesicourethral anastomosis, we perform a modi ed reconstruction of the pelvic oor, re-attaching Denonvilliers’ fascia to the rhabdosphincter as following the principles described by Francesco Rocco et al. 24 For this step, we use a 12 cm double arm 3-0 Monocryl suture on an RB1 needle attached together. We proceed to identify the free edge of Denonvilliers’ fascia, which is approximated to the posterior aspect of the rabdosphincter and posterior median raphe running one of the arms of the suture and tied. A second layer is then run with the second arm of the suture, approximating the posterior bladder neck to the posterior lip of the urethra 25.
A continuous modified van Velthoven vesicourethral anastomosis is then performed. Two 8 in. 3-0 Monocryl sutures on RB1 needles (dyed and undyed) are tied together with ten knots to provide a bolster for the anastomosis. The posterior urethral anastomosis is performed rst with one arm of the suture starting at the 5 o’clock position until reaching the 10 o’clock position in a clock-wise fashion. This is followed by completion of the anterior anastomosis with the second arm of the suture in a counterclockwise fashion and then tying both sutures on the urethral stump 26. The key to performing an efficient rapid watertight anastomosis is to use both hands when suturing; that is, the left hand feeds the suture to the right and so forth. Having a long urethral stump, normal-sized bladder neck, clear operative field, and exerting perineal pressure (in some instances) contributes to this also. Once the anastomosis is completed, a new 18 Fr Foley catheter is placed and saline solution is used to irrigate and eliminate any clots and also to confirm a watertight anastomosis. A Jackson–Pratt drain is placed at the pelvic rim and then all trocars are removed under direct vision.
-


Conclusion
After one decade after the first RALP was performed, multiple large series are currently mature enough to demonstrate outcomes with at least comparable data to most experienced open centers.
It is clear that the evolution of minimally invasive surgery from standard laparoscopy to robotics has given the surgeon a great advantage over the latter, regarding magnification. However, these advantages provided rely solely on the expertise of the surgeon, team, and the manner in which he applies his surgical knowledge. As with any foray into new technology and surgical procedures, the development of technical modifications and surgical refinements are inevitable with increasing experience, explaining the role of surgical volume in ultimately improving the outcomes. During our learning experience, we developed several technical modifications that currently allow us to perform the procedure with shorter operative time, improved oncological and functional outcomes, and low overall complication rates.
References
Walsh PC, Donker PJ. Impotence following radical prostatectomy: insight into etiology and prevention. J Urol. 1982;128:492–7.
Gillitzer R, Thüroff JW. Technical advances in radical retropubic prostatectomy techniques for avoiding complications. Part II: vesico-urethral anastomosis and nerve-sparing prostatectomy. BJU Int. 2003;92:178–84.
Orvieto MA, Zorn KC, Gofrit ON, et al. Surgical modi cations in bladder neck reconstruction and vesicourethral anastomosis during radical retropubic prostatectomy to reduce bladder neck contractures. Can J Urol. 2006;13:3353–7.
Steinberg PL, Merguerian PA, Bihrle 3rd W, et al. The cost of learning robot-assisted prostatectomy. Urology. 2008;72:1068–72.
Binder J, Kramer W. Robotically assisted laparoscopic radical prostatectomy. BJU Int. 2001;87:408–10.
Villavicencio H, Esquena S, Palou Redorta J, et al. Robotic radical prostatectomy: overview of our learning curve. Actas Urol Esp. 2007;31:587–92.
Patel VR, Palmer KJ, Coughlin G, et al. Robot-assisted laparoscopic radical prostatectomy: perioperative outcomes of 1500 cases. J Endourol. 2008;22:2299–305.
Author information
Authors and Affiliations
Corresponding author
Editor information
Editors and Affiliations
Rights and permissions
Copyright information
© 2017 Springer International Publishing Switzerland
About this chapter
Cite this chapter
Ganapathi, H.P., Ogaya-Pinies, G., Rogers, T., Patel, V.R. (2017). Robotic Assisted Radical Prostatectomy. In: Patel, V., Ramalingam, M. (eds) Operative Atlas of Laparoscopic and Robotic Reconstructive Urology. Springer, Cham. https://doi.org/10.1007/978-3-319-33231-4_54
Download citation
DOI: https://doi.org/10.1007/978-3-319-33231-4_54
Published:
Publisher Name: Springer, Cham
Print ISBN: 978-3-319-33229-1
Online ISBN: 978-3-319-33231-4
eBook Packages: MedicineMedicine (R0)