
Abstract
In ballistic science, a bullet’s journey may be divided into three stages (Kneubuehl BP. Wound ballistics: basics and applications. Berlin/Heidelberg: Springer; 2011): initial stage, from firing to muzzle exit, intermediate stage, when the bullet is “in flight,” and terminal stage, from impact onwards. Understanding this later stage is important to understanding the mechanism of injury. All modern military weapons have a rifled barrel which imparts a rotational movement around the longitudinal axis of the bullet termed spinning. When the bullet leaves the barrel, other movements are present. Theoretically, they all are parasitic movements which decrease the accuracy of the projectile, but increase the wounding capacity after impact through oscillations (yawing), precession (wobbling), and nutation (rosette pattern). These parasitic movements increase the destabilization characteristics of a jacketed bullet inside the target, and this is crucial to the actual transfer of energy. The precise description of what actually happens between impact and final arrest of the bullet has been a matter for debate for a long time, almost as long as the history of firearms itself. In the early 80s, Fackler, from the US Army, developed the concept of “wound profile.”
Access provided by Autonomous University of Puebla. Download chapter PDF
Keywords
- Orthopedic ballistic trauma
- Ballistic trauma in orthopedics
- Wound profile in ballistic trauma
- Bullet injuries in orthopedics
- Entry-exit bullet wounds
In ballistic science, a bullet’s journey may be divided into three stages [1]:
-
1.
Initial stage: from firing to muzzle exit
-
2.
Intermediate stage: bullet’s path through the air
-
3.
Terminal stage: from impact onwards
Understanding this later stage is important to understanding the mechanism of injury. All modern military weapons have a rifled barrel which imparts a rotational movement around the longitudinal axis of the bullet termed spinning. When the bullet leaves the barrel, other movements are present. Theoretically, they all are parasitic movements which decrease the accuracy of the projectile, but increase the wounding capacity after impact through oscillations (yawing), precession (wobbling), and nutation (rosette pattern). These parasitic movements increase the destabilization characteristics of a jacketed bullet inside the target, and this is crucial to the actual transfer of energy.
The precise description of what actually happens between impact and final arrest of the bullet has been a matter for debate for a long time, almost as long as the history of firearms itself. In the early 80s, Fackler, from the US Army, developed the concept of “wound profile” [2] (Figs. 8.1, 8.2, and 8.3).

(a) The ubiquitous Kalashnikov and 1 (b) the British SA80

A 7.62 × 39 mm AK-47 round and fragments

Bullet paths in tissue simulant glycerine soap blocks (Swiss Army Ballistic Laboratory in Thun, Switzerland. ICRC war surgery seminar, 2005) lower blocks: NATO caliber 7.62 × 51 fmj bullet (full metal jacket) upper blocks: .308 WIN sp bullet (soft point) Despite their names, these bullets differ only by the fact that one is jacketed and the other is a “soft point.” Same velocity and same mass: equal amount of kinetic energy but totally different “profile” of energy transfer along the bullet path. The amount of energy transfer but mainly the timing of this transfer is crucial in determining a particular profile. It is essential to realize that the maximum amount of energy transfer can take place deep in the tissue (with severe damage deep under an innocent-looking superficial wound) and that entry-exit wounds can occur in different combinations
This is still used today to study the behavior of different kinds of bullets. The wound profile is obtained by shooting a bullet in a block of tissue simulant [3] (glycerine soap or gelatine) and observing the characteristics of the bullet’s path:
-
Entry hole dimension and shape depending on the position of the bullet at impact.
-
Initial narrow tract called the “neck.”
-
An intermediate zone, more or less wide, the “belly.”
-
Final tract at the end of which you find the bullet (if the block is long enough).
-
You may also observe fragmentation of the bullet with two or more secondary paths or deformation without fragmentation.
The entry hole may be small, corresponding to the actual caliber of the bullet presenting tip forward or it may be much greater, for example when a bullet strikes the target sideways. This latter mechanism was called “ricochet” [4] by Kneubuehl, and it happens every time the bullet hits something in flight, like a branch, or bounces off a hard surface and is destabilized before hitting the target (Fig. 8.4).

Ricochet effect (Swiss Army Ballistic Laboratory in Thun, Switzerland. ICRC war surgery seminar, 2005). A 7.62 × 51 fmj bullet (same as in lower blocks of 38–1) has been destabilized just before impact by placing a wooden broomstick along its flight path (note the small nick on the stick) resulting in a sideway impact of the bullet with a resulting almost instant transfer of energy totally different from the lower blocks profile in Fig. 9.3. This phenomenon is actually quite common in real cases when bullets are fired through vegetation or hit walls or ground before the final human target
The “neck” is the initial tract. It is narrow, generally no more than twice the caliber of the bullet. The narrow tract indicates a very low energy transfer to surrounding tissues (Fig. 8.5). The critical feature here is its length as it indicates the distance traveled by the bullet before tumbling.

(a) X-ray of low velocity bullet lodged adjacent to proximal humerus and (b) clinical picture. You can appreciate the entry wound
After tumbling there is an intermediate part, the belly, of much larger diameter and volume. This is the part of the bullet path with maximum energy transfer, the amount of which can be visualized by the volume of the belly part. This part corresponds to the temporary cavity where tissues are stretched in a radial and outward way with respect to the bullet path. The final tract may be single or multiple according to a possible fragmentation of the bullet. In this part the energy transfer is low again as indicated by the narrowness of the tract.
This kind of wound profile is a conceptual tool. It shows the behavior of a particular bullet in a homogeneous medium. It can be used to compare different bullets’ behavior. Obviously, every single bullet has its own wound profile depending on such factors as velocity, mass, ability to expand or not, and tumbling characteristics (Fig. 8.6). Mass and velocity are the two determinants of the kinetic energy carried by the bullet at the moment of impact. The kinetic energy is directly proportional to the mass while it is proportional to the square of the velocity. Thus, to increase the energy of a projectile, the firing system must increase the velocity, as it can be seen from the following equation:

(a) A fighter looking for targets from a roof in Libya and (b) A 50 mm caliber machine gun in an Afghan police vehicle
where KE = kinetic energy in the bullet, M = mass of the bullet, and V = velocity of the bullet.
Increasing the mass is not practical in terms of magazine capacity or total number of rounds that can be carried around by a single soldier. Therefore, a quest for high velocity and small calibers has taken place in the last few decades. The important point to remember is that high velocity is associated with a higher kinetic energy, thus giving a particular bullet a higher wounding capacity. The actual wound is the result of how much of this energy is transferred to the tissues. The maximum energy transfer occurs when the bullet tumbles in the tissues, i.e., when the cross-sectional area abruptly increases, and obviously, this will reach 100 % if the bullet comes to a rest within the tissues. The velocity that determines the available amount of kinetic energy is the one at the point of impact on the target, which can be quite low, and not the muzzle velocity, which is supersonic in all modern assault rifles.
The analysis of wound profiles has some interesting surgical applications: First of all it is important to notice that the transfer of energy is not homogeneous along the bullet path. This is important regarding the extension of the debridement to be done in different parts of the wound. Maximum tissue damage will occur in correspondence of the temporary cavity while tissue surrounding the “neck” portion of the tract may experience very little damage. It also means that a wound can have a superficial benign aspect while deeper anatomic structures are severely damaged (Fig. 8.7). The length of the “neck” can exceed the width of a human limb as is the case of the 7.62 × 51mm wound profile where it is around twenty centimeters (see Figs. 8.3 and 8.4), or it can be significantly shorter like the one associated to the 5.45 mm fired by the AK-74 (less than 5 cm). Some bullets behave differently at different velocities, not only in terms of quantity of energy that is transported and released but also in terms of different morphology of the wound profile itself with maximum energy transfer occurring at different depths. The other point is that many jacketed bullets do break apart, especially at high velocities (short-range shooting), creating secondary tracts in different directions implying an even more thorough debridement and meticulous exploration of the wound.

(a) Entry-exit wounds at mid-thigh level (St. Kizito Hospital, Karamoja, Uganda, 1997), these wounds of identical appearance are most likely produced by a fmj bullet with a long initial “neck.” The bullet exited the slim thigh before tumbling. (b) A bullet has penetrated this leg and impacted the bone. Significant fragmentation is evident
So far we’ve considered the behavior of bullets in glycerine soap (with a density very close to muscle) which is a human body tissue simulant. It is possible to add to glycerine soap some elements to simulate specific biological tissues structures, such as the bone or blood vessels. For the bone, in “wound ballistics,” Kneubuehl uses hollow cylinders of different wall thicknesses filled with gelatin, to simulate bone marrow, and covered with a latex film, to simulate periosteum. This artificial bone is then inserted in a glycerine soap block. Many different fractures can be observed, from simple punch-hole fractures to butterfly patterns which are generated by an increase in hydraulic pressure in the marrow. It is interesting to note that, all the bone fragments are found within the temporary cavity and that they are not acting as secondary missiles.
Fracture patterns seen in the field on real patients are sometimes of such a severity (see Fig. 8.8) that some additional mechanism must have a role. Forces like compression, extension, and torque acting on a bone are modifying and amplifying the fracture pattern. This is more marked on lower limb skeletal structures because of body weight action. A bone, like the femur or tibia, hit during the weight-bearing part of the gait will fracture in a much more severe and unpredictable way than if not weight bearing. The lesion shown in Fig. 8.8 has been produced, according to witnesses, by a single shot on a running woman fleeing the firefight.

Severe fracture pattern in left distal femur (Emergency Hospital, Lashkar Gah, Afghanistan, 2008), this kind of severe fragmentation can be seen in patients that were hit while walking or running. Weight-bearing long bones like tibia and femur undergo a complex sequence of compression, flexion-extension, and rotational forces during the gait. If a bone is hit exactly when under maximum stress from flexion or rotation forces, extreme fracture patterns can be the result. According to witnesses, this young woman was hit by a single shot while running away from a firefight. She ultimately was amputated at thigh level
1 Treatment Principles
In treating ballistic fractures, some principles are firmly established. A broad review of the literature from different sources [5–8], either civilian or military, shows a wide consensus on some basic points:
-
All war wounds are contaminated and the first goal of war surgery is the avoidance of infection.
-
The single most important surgical procedure in the treatment of ballistic lesions is the initial debridement and irrigation.
-
Irrigation is done with large volumes (from 3 l upwards) and low pressure (bulb or gravity fed systems).
-
The first choice for irrigation fluid is sterile normal saline [9], the second choice is potable water.
-
Although antibiotics should be given as soon as possible, they are NOT a substitute for proper surgical debridement.
-
War wounds are NEVER closed primarily.
-
Initial rigid internal fixation is contraindicated. Initial stabilization must be achieved by external fixation, skeletal traction, or splints/casts following the principles of damage control orthopedics.
-
Treatment should systematically include soft tissue management from the beginning.
-
Delayed primary closure for standard ballistic wounds is done at 4 or 5 days after initial debridement (Fig. 8.9).
Fig. 8.9 
(a) X-ray of a young female’s left foot gunshot wound, (b) clinical picture, and (c) an external fixator has been placed to reestablish length of the lateral column following thorough debridement and wash out

1.1 First Steps
After life-threatening injuries have been ruled out or taken care of, the patient must be washed. This means tap water and soap (e.g., castile soap) in a suitable workspace in the emergency room or immediately before the operating room. All wounds should be covered by sterile dressings and these should NOT be removed at this point before surgery. The washing of the wound and its immediate surroundings is done in operating room under anesthesia. This initial washing is NOT part of the irrigation process which is done in conjunction with the debridement, which is the surgical removal by sharp excision of all debris and devitalized tissues:
-
Skin: sharp excision of skin edges of the wound (1–2 mm). Skin is precious for soft tissue so spare as much as possible.
-
Muscle: excision of dead or nonviable muscle is particularly important although it is often clinically difficult to distinguish viable muscle from nonviable one. The four C’s may be used as a guide (color, consistency, contraction, circulation) but in many borderline instances they have proven unreliable.
-
Bone: loose bone fragments with no soft tissue attachment to must be removed. If you decide to leave a bone fragment in situ, make sure it has a strong attachment to soft tissue and try to assess its vascularization by snipping a bit of it and check for bleeding. Exposed bone may be protected by soft tissue coverage. For example, medial gastrocnemius rotation flap is an excellent reliable technique for the proximal tibia.
-
Fat: liberal excision of fat.
-
Nerves, vessels, and tendons: as far as possible these structures must be protected.
Although debridement is based on simple principles, it is actually technically demanding and the surgeon must keep in mind that it is the most important single surgical procedure determining the final outcome. When performing a debridement a surgeon should always anticipate the needs of the delayed primary closure. The need for flaps or skin grafts should be assessed and anticipated for the next surgical plan of action. If there is a plastic surgeon in the field, or someone with similar expertise, the procedure should be carried in close coordination.
-
Irrigation: This is closely associated with debridement. Its importance is such that in their excellent book Combat orthopedic surgery, Owens and Belmont dedicate a full chapter to this issue. Irrigation has been practiced for centuries yet with minimal scientific background. All kinds of additives have been used according to personal beliefs or experience of individual surgeons. The vast majority of them have been shown to be at least useless and potentially harmful (hydrogen peroxide, for example, is still occasionally used despite its recognized tissue toxicity). The current recommendations of the US Army Institute of Surgical Research which are used in the Joint Theater Trauma System Clinical Practice Guidelines (JTTS-CPG) are to use of normal saline, sterile water, or tap water (potable) if one of or both the former are not available. The optimal method of delivery is by gravity-fed systems or by bulb syringes, no pulse lavage or high-pressure systems.
The volume of fluid required is large, from one to over ten liters. For open fractures you may use the following volumes: 3 l for Gustilo I, 6 l for Gustilo II, and 9 l minimum. These large amounts can quickly deplete your normal saline stock, so be prepared and order more (if possible) or use sterile (boiled) or potable water in the initial phases of irrigation & debridement and use saline only for the final washout (see Fig. 8.9).
1.2 Intra-articular Bullets
One of the few indications to explore and remove bullets from patients is when these are lodged in a joint, the spinal canal. The presence of a bullet in a joint can cause a severe inflammatory reaction and synovitis which will damage the knee joint (see Fig. 8.10).

(a) An x-ray showing a bullet in a knee, (b) medial incision and removal of bullet from inside the joint, and (c) removal of plastic cartridge from a bird-hunting rifle
2 Compartment Syndrome and Fasciotomies
Compartment syndrome can occur in any limb segment but is prevalent in the leg and the forearm. The examination of patients must always be done with this possibility in mind. The indication for fasciotomy is based solely on the clinical examination. The presence of distal pulses does NOT rule out developing compartment syndrome, neither does an open fracture. Pain is greater than expected, relentless and doesn’t subside even after splitting or removal of every bandage or cast, and is refractory to adequate analgesia. It is elicited by palpation of the involved compartment and by passive stretching of muscle compartments. The classic five P’s (pain, paraesthesia, pallor, paralysis, pulselessness) are signs of advanced compartment syndrome, and you should never wait for these before making a decision. Military protocols following a gunshot wound to the extremities include prophylactic fasciotomies to prevent the development of compartment syndrome. There is no place for semi or partial fasciotomies. Always use full length skin incisions and make sure ALL compartments are decompressed (Fig. 8.11) (see Chap. 28).

A H-incision technique for decompression of anterior and lateral compartments (Emergency Hospital, Kabul, Afghanistan, 2012); the anterior compartment may be missed if the skin incision on the lateral side of the leg is too posterior. Don’t incise more than two finger breadth from the tibial crest. When you encounter the deep fascia make a first, short, transverse cut to positively identify the intermuscular septum. From each end of this first transverse cut, you can then make two parallel longitudinal incisions to decompress the anterior and lateral compartments
3 Fracture Management
Always think about what is the simplest and safest solution. Conservative treatment should always be considered, even at some “functional” cost. In well-resourced healthcare systems, some conservative treatments are not acceptable because of inferior functional outcomes when compared with operative or complex reconstructive procedures. This higher functional outcome cannot be an argument in an austere environment, where either the equipment or the implants themselves are simply not available or the risks associated with internal fixation are not acceptable. A remote community farmer is much better with a femur fracture treated conservatively resulting in a modest degree of shortening that can be compensated with a shoe raise, than with an infected plate which may eventually lead to an osteomyelitis from which he may never recover. You must think in terms of reasonable results even if sometimes you’ll have to choose the lesser evil.
-
Splints: unless you have the luxury of ready-to-use fiberglass splints with padding and bandage, you’ll have to make your own with POP (Plaster of Paris) in a traditional way. These POP splints are inexpensive and can be adapted to many clinical settings. They are most useful for upper limb fractures and for leg and foot fractures. The use of POP splints for femur fractures is much less efficient than traction or external fixation, but can be used in the pediatric setting. Do not forget however that POP in a tropical or equatorial environment, with high ambient humidity, will take a long time to harden and it may be difficult to tolerate.
-
Traction: very efficient, fast, and easy to apply. Skeletal traction for lower limb is best done with Steinman pins through calcaneus for leg fractures and through proximal tibia for femur fractures. Traction through distal femur should not be used as it denies the possibility of further treatment with Perkins traction. For humerus fractures, traction is applied by means of a Kirschner wire (K-wire) through the olecranon. The use of a K-wire implies a tensioning traction bow is necessary, so you should make sure it is available. Inadequate traction, or poorly set up and monitored, can cause great harm, so you must be familiar in its application and use, and close attention to pin site care must be adhered to (Fig. 8.12).
Fig. 8.12 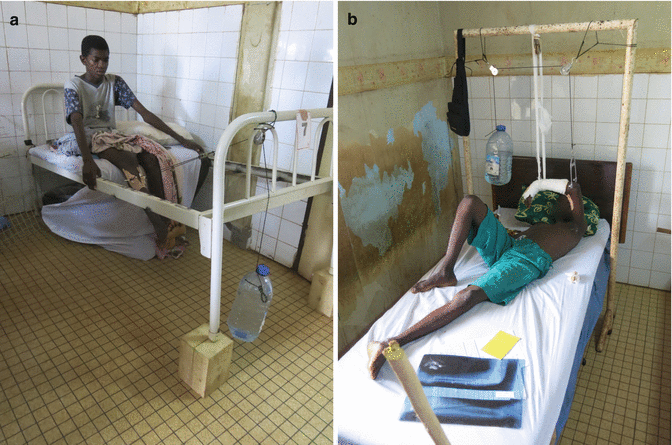
(a) Perkins traction for femur fractures (Complexe Pediatrique, Bangui, Central African Republic, 2013). (b) Transolecranon traction for open fracture of distal humerus (complexe pediatrique, Bangui, Central African Republic, 2013)
Traction is applied through a transtibial Steinmann pin, a simple rope traction bow, and a custom-made traction weight. The distal half of the bed is removable and can easily be put back in position during the intervals between the exercise sessions (four to six times a day).

-
Among conservative treatment options, only the Perkins traction is able to fulfill the following points: maintenance of alignment of bone fragment, excellent rotational control (when the knee is flexed and the leg is vertical, physiological rotation is automatic), avoidance of distraction (because of muscle contraction), encouragement of joint motion, and maintenance of muscle tone. Mean duration of traction is eight weeks. This method has been extensively used in many remote African hospitals and owed its popularity to Maurice King Peter Bewes who described it in details in Primary Surgery, a bible for low-tech environments published by Oxford University Press.
-
In transolecranon traction for open fracture of distal humerus (Fig. 8.12b) after immediate surgical debridement in theater, the use, initially, of this makeshift overhead traction system allowed for optimal care of the wound in the anterior aspect of distal arm. An associated closed fracture of distal forearm is also present. This young patient was successively treated with a cast, applied with the traction in situ. In austere environments, it is impossible to engage in complex reconstruction and osteosynthesis of open comminuted periarticular fractures. The conservative approach is the safest alternate and, very often, gives satisfactory results.
-
External fixation: if available, it is the best solution for treatment for fractures with soft tissue loss or vascular lesions. The realities in an austere environment require that an ex-fix should be simple, effective, and quick to apply. Generally half-pins and monoaxial static configurations, like the older Hofmann design, are adequate. Classic configuration of three pins above and three pins below the fracture site with a double bar should be the goal. This configuration is stable enough to allow weight bearing and can be progressively “deconstructed” to render it dynamic thus allowing for a better fracture site compression. When one of the bone fragments is short, you can use a T-shaped configuration to avoid spanning the joint and still allowing mobilization (Fig. 8.13). In many instances, an ex-fix can be used as definitive stabilization, otherwise they can be removed as soon as the soft tissue deficit has healed and substituted by a cast.
Fig. 8.13 
Proximal humerus fracture from bullet injury treated with T-shaped ex-fix (Emergency Hospital, Lashkar Gah, Afghanistan, 2008), when one of the fracture segments is short, this configuration is simple and effective. Notice the soft tissue wound safely healed. This patient was treated initially with thorough debridement and irrigation, followed by immediate stabilization with this ex-fix. A delayed primary closure (DPC) was performed 5 days later. The ex-fix was retained as a definitive stabilization

4 Soft Tissue Management
All war wounds, whether or not they are associated with fractures, are left open after the initial surgery. Nevertheless, you must plan your closure strategy right from the beginning. At initial surgery you should anticipate the need for eventual flaps or skin grafts. The standard classic procedure, strictly followed by such organizations like the international committee of the red cross (ICRC) and the NGOs Emergency and Medicines sans frontieres (MSF), is that the wound is treated by delayed primary closure (DPC) after 3 to 6 days post-op. This is a basic, safe strategy that proved successful in many civilian war hospitals in the last decades all over the world. Nevertheless, you will still encounter wounds that cannot be managed this way at the prescribed time and will need further debridement and irrigation before they become safe for closure, or the soft tissue defect is such that some sort of plastic or reconstruction procedure may be necessary [10, 11]. In this latter case, always start with the simplest procedures like spontaneous granulation (second intention), split-thickness skin graft (SSG), and local rotation flaps. (See Chap. 46) (Fig. 8.14).

Cross-leg flap for open right leg fracture (Emergency Hospital, Kabul, Afghanistan, 2012), picture taken at three weeks post-op, just prior to weaning procedure. The pedicled flap was raised from the medial aspect of the left proximal leg at DPC time (five days after initial trauma), along with a cancellous bone graft from the iliac crest and stabilization with an ex-fix. Donor site was immediately covered with an SSG. Pedicled flaps like this one and the inguinal MacGregor flaps are still a workhorse in many remote parts of the world
4.1 Amputations
The decision to amputate is always a difficult one except when the magnitude of the trauma is such that there are no doubts in anybody’s mind, particularly in the patient’s mind. It is often the result of emotionally charged discussions with the patient and/or the relatives. Religious beliefs concerning body integrity are often involved. Not an easy task, there are no substitutes here for experience and surgical wisdom (see Chap. 29).
5 Physiotherapy
It is an integral part of the treatment and should be started immediately. It requires dedicated personnel that you will have to train on he spot to meet the specific needs of your patients. (See Chap. 23.)
References
Kneubuehl BP. Wound ballistics: basics and applications. Berlin/Heidelberg: Springer; 2011.
Fackler ML, Malinowski JA. The wound profile: a visual method for quantifying gunshot wounds components. J Trauma. 1985;25:522–9.
Kneubuehl BP. General wound ballistics. In: Wound ballistics: basics and applications. Berlin/Heidelberg: Springer; 2011. p. 87–160.
Coupland RM. Wound ballistics and surgery. In: Wound ballistics: basics and applications. Berlin Heidelberg: Springer; 2011. p. 305–19.
Giannou C, Baldan M, Molde A. War surgery: working with limited resources in armed conflict and other situations of violence, vol. 1 and 2. Geneva: ICRC; 2013.
Office of the Surgeon General. Emergency war surgery, fourth United States revision. Fort Sam Houston: Borden Institute; 2014.
Owens BD, Belmont PJ, editors. Combat orthopedic surgery: lessons learned in Iraq and Afghanistan. Thorofare: Slack Incorporated; 2011.
Mattox KL, Moore EE, Feliciano DV, editors. Trauma. 7th ed. New York: McGraw-Hill; 2013.
Waterman S, Fleming ME, Owens BD. Chapter 11: Irrigation and debridement. In: Owens BD, Belmont PJ, editors. Combat orthopedic surgery: lessons learned in Iraq and Afghanistan. Thorofare: Slack Incorporated; 2011.
US Army Institute of Surgical Research. Joint theater trauma system-clinical practice guidelines. Department of Defense; 2012.
Ritenour AE, Dorlac WC, Fang R, Woods T, Jenkins DH, Flaherty SF, Wade CE, Holcomb JB. Complications after fasciotomy revision and delayed compartment release in combat patients. J Trauma. 2008;64(2 Suppl):s153–62.
Further Reading
Courbil LJ, editor. Chirurgie d’urgence en situation precaire. Editions Pradel (in French). 1996.
Elsayed N, Atkins J. Explosion and blast-related injuries. Amsterdam: Elsevier Academic Press; 2008.
Hopperus Buma A, et al., editors. Conflict and catastrophe medicine. New York: Springer; 2009.
King M, Bewes P. Primary surgery (reprint). Vol. 2. Trauma. Oxford Medical Publications; 1993. Also available at http://www.primary-surgery.org/ps/vol2/html/index.html.
Lerner A, Soudry M. Armed conflict injuries to the extremities. Berlin: Springer; 2011.
Mahoney P, Ryan J, Brooks A, William Schwab C. Ballistic trauma. London: Springer; 2005.
Martin M, Beekley A, editors. Front line surgery. New York: Springer; 2011.
Masquelet A, Gilbert A. An atlas of flaps of the musculoskeletal system. Published by Informa Healthcare, 2001.
Moran SL, Cooney III WP. Soft tissue surgery. Philadelphia: Lippincott Williams & Wilkins; 2001.
Nessen SC, Lounsbury DE, Hetz SP, editors. War surgery in Afghanistan and Iraq. Washington, DC: Office of the Surgeon General, Borden Institute, Walter Reed Army Medical Center; 2008.
Trueta J. Principles and practice of war surgery. St. Louis: Mosby Company; 1943.
Author information
Authors and Affiliations
Corresponding author
Editor information
Editors and Affiliations
Rights and permissions
Copyright information
© 2016 Springer International Publishing Switzerland
About this chapter
Cite this chapter
Ley, P. (2016). Orthopedic Ballistic Trauma. In: Robinson, J. (eds) Orthopaedic Trauma in the Austere Environment. Springer, Cham. https://doi.org/10.1007/978-3-319-29122-2_8
Download citation
DOI: https://doi.org/10.1007/978-3-319-29122-2_8
Published:
Publisher Name: Springer, Cham
Print ISBN: 978-3-319-29120-8
Online ISBN: 978-3-319-29122-2
eBook Packages: MedicineMedicine (R0)