
Abstract
It is now well known that there are many neuron subtypes in brain. For instance, a few subtypes of pyramidal cell in each layer and 10 or more non-pyramidal cell subtypes are found in neocortex. Their activity and functional role in the microcircuit are different among each cell subtype. Therefore, neuron subtype identification is very important to understand the functional role of the recorded neurons whose physiological firing properties are studied. Neuronal subtypes are morphologically and neurochemically distinct, so histological and immunohistochemical staining of the recorded cells promotes the cell identification. In this chapter, histological tissue preparation methods, for chemical marker identification, dendritic and axonal arborization tracing analysis, and observation by electron microscopy including block face scanning microscopy, of biocytin-injected recorded cells are described.
Access provided by CONRICYT – Journals CONACYT. Download protocol PDF
Keywords
1 Introduction
The cortex is composed of 6 layers. Different connections among outputs, inputs [1], and the many different neuronal subtypes [2–9] occur in the microcircuits of each layer to result in our higher brain function. For instance, two major pyramidal cell subtypes are known in cortical layer V: corticopontine (CPn) cells projecting to the ipsilateral pons and crossed-corticostriatal (CCS) cells projecting to both sides of the striatum [6], and each has a distinct functional role in cortical microcircuits [10]. They are so called thick-tufted and slender-tufted cells, respectively [11]. The firing [12] and connection properties [13], transcription factor Ctip2 expression [9], and dendritic complexity [6] are different between CPn and CCS cells (Fig. 1). Pyramidal cells in layer II/III are also composed of a few subtypes with different projections [2, 14]. Non-pyramidal cells are the other major neuron type and are the inhibitory neurons of cortex (Fig. 1). They can be classified into more than ten subtypes [3, 4], and even more subtypes are found in hippocampus [15]. The morphology, firing properties, neurochemical marker expression, and functional connectivity are different among the various subtypes [3, 4, 15–19]. Altogether, we can identify at least more than 20 neuron subtypes in the cortex, and their activity is different during the different states of brain activity. Therefore, neuron activity analysis with subtype identification is very important to understand the functional architecture of the neuronal microcircuit. In most cases, the different cell subtypes are morphologically and neurochemically distinct, so morphological study of the physiologically analyzed cells should be a key issue for cell subtype identification. Therefore, determining different three distinct properties of a recorded neuron is key for the identification of the neuronal subtype: first, electrophysiological membrane property (fast spiking or regular spiking, etc); second, morphology of the neuron (dendritic and axonal arborization patterns, somatic shape, etc); and third, neurochemical marker expression (neurotransmitter, calcium binding protein, neuropeptide, transcription factor, and so on).

Subtypes of cortical pyramidal and non-pyramidal cells. Upper panel show drawings of different subtypes of cortical pyramidal cells in layer II/III, V, and VI, and lower panels non-pyramidal cells in different layers. Cell soma and dendrites are shown in black, and axonal fibers are shown in red. The examples of firing patterns after step-current injection are shown. CCS crossed-corticostriatal, CPn corticopontine, PRC perirhinal cortex, COM commissural, CTh corticothalamic, FS fast spiking, LS late spiking, RS regular spiking, CRF corticotropin-releasing factor, VIP vasoactive intestinal polypeptide
In this chapter, the histological staining protocols with fundamental principles and/or practical tips to investigate morphological and neurochemical characterization of the recorded cell are described step by step. The fixation is fundamentally important. Rapid microwave-enhanced fixation provides a good tissue preservation [20, 21]. Resection of the fixed slice to thinner sections raises the possibility to get a good immunoreactivity of neurochemical markers of the recorded cell soma as well as good and complete staining of the dendrites and axons [8]. Preparation of the slice tissue for electron microscopy (EM) observation provides information about connectivity with synapses of the recorded cell [22]. These anatomical investigations promote our understanding of the functional role of the recorded cells and contribute to brain microcircuit architecture analysis.
2 Material
2.1 Fixation
2.1.1 Paraformaldehyde
The fixative including paraformaldehyde must be fresh, because paraformaldehyde is known to degrade to formic acid easily. To prevent the chemical reaction, the fixative can be stored in a plastic tube (Fig. 2c) and kept in a freezer (−20 or −30 °C) right after making it. The paraformaldehyde is toxic for oral, skin, and respiratory contact and is a suspected carcinogen, so proper protection with a lab coat and lab gloves is essential. It is also important to work in a fume hood to prevent inhalation.

Tools for histological experiments. (a) Glass screw vials. From left, 9, 13.5 and 30 mL volume. (b) Plastic microtubes. From left, 0.5, 1, and 2 mL volume. (c) Plastic centrifuge tubes. Left, 15 mL; right, 50 mL. (d) Multiwell culture plates. Upper left, size 24 wells; upper right, size 48 wells; lower, lids. (e) Brushes, plastic a disposable Pasteur pipette, a glass disposable Pasteur pipette. The tip of the glass pipette is polished by heat to prevent mechanical damage to the slice
2.1.2 Glutaraldehyde
Glutaraldehyde is a strong fixative and is used to fix brain tissue for electron microscopic observation. Glutaraldehyde is also toxic for oral, skin, and respiratory system, so preventative measures as with paraformaldehyde are mandatory. Although tissue fixed with high glutaraldehyde (0.5 % ~) is known to show less immunoreactivity for a small number of primary antisera, most primary antisera are unaffected. This is probably because of the incubation buffer containing proteins and TX, which are believed to stabilize the IgG protein in the primary antiserum and expose the epitope in the tissue.
2.1.3 Picric Acid
Picric acid is a yellow powder and toxic for oral or skin contact, so protection with lab coat and lab gloves is required. Picric acid was used as an explosive to power cannonballs. In solid form it may explode following strong physical shock, friction, or vibration. To prevent explosion, usually water of 20 % is added to the picric acid by weight ratio, or picric acid saturated aqueous (1.2 or 1.3 %) solution is used. The fixative containing this reagent is known to be good for the ultrastructure preservation [23].
2.1.4 How to Make Fixative
100 mL fixative of 4 % paraformaldehyde, 0.2 % picric acid, 0.1 % glutaraldehyde in 0.1 M phosphate buffer (PB).
-
1.
Put 50 mL of 0.2 M PB in Erlenmeyer flask. Stir and heat up to 60 °C on a hot plate magnetic stirrer.
-
2.
Add 4 g of paraformaldehyde. Cover the mouth of the flask with plastic wrapping film to prevent evaporation. No need to add NaOH to change the pH to neutral, because the buffer keeps neutrality even after the paraformaldehyde dissolves.
-
3.
It takes about 10 min to dissolve the paraformaldehyde powder in the hot buffer.
-
4.
Cool it down in ice bath.
-
5.
Filter it with filter paper.
-
6.
Add 0.2 g of picric acid and stir on a magnetic stirrer.
-
7.
Add 0.4 mL of 25 % glutaraldehyde.
-
8.
Add Milli-Q water or distilled water up to 100 mL.
-
9.
Aliquot 2 mL of the fixative into small screw vials of 5 mL volume size and put them in freezer (−20 or −30 °C) for storage (Fig. 2a).
-
10.
Just before using it, take out from the freezer and thaw.
-
11.
Used fixative should be stored in a plastic fixative waste tank, not poured into drain. It should then be dealt with by a chemical-disposal facility.
For high-quality electron microscopic ultrastructure, use fixative with high glutaraldehyde concentration: 4 % paraformaldehyde, 0.2 % picric acid, and 0.5–2 % glutaraldehyde in 0.1 M PB.
2.1.5 Preparation of Microwave for Rapid Microwave-Enhanced Fixation
-
1.
Use a typical small kitchen microwave oven (Fig. 3a).
Fig. 3 
Microwave for rapid microwave-enhanced fixation. (a) Kitchen microwave oven. (b) Fixed position of a glass vial for the rapid microwave-enhanced fixation. (c) Measuring changes in liquid temperature in the vial. (d) Microwave with excess amount of water to exclude overheating of the sample in the glass vial
-
2.
Take out the turn table.
-
3.
Choose a few spots for trial microwave irradiation to identify the spots receiving the most microwave power (Fig. 3b) because the microwave intensity is variable dependent on the point.
-
4.
Place a glass vial with cold 2 mL buffer at one of the spots (Fig. 3b) and measure temperature (Fig. 2c). The vial must be the same type used for the slice tissue fixation.
-
5.
Switch on the microwave for 10 or 20 s, and measure the temperature of the buffer. Compare the increased temperature among the various spots. The spot that the temperature increased most is the suitable location for the microwave-enhanced fixation since it gets the most intense microwave. Note the location for the microwave-enhanced fixation.
-
6.
Put three beakers with 500 mL of water at other locations in the microwave oven, which prevents extra heating of the tissue by absorbing excess microwave radiation (Fig. 3d).
-
7.
Determine the irradiation time for which the temperature of the cold 2 mL buffer in the screw vial remains lower than 40 °C after the microwave irradiation to prevent the tissue denaturalization. Usually 10–20 s should be enough.

2.2 Resection of the Fixed Slice
In some experiments, the dendrites, soma, and axon of a biocytin-injected neuron fail to stain entirely, and/or the immunoreaction in the soma is faintly positive or false negative. This probably results from the incomplete penetration of the avidin/biotin complex: ABC complex (VECTASTAIN Elite ABC, Vector laboratories) and/or primary antiserum into the slice of 300 μm thickness. To get the better staining, resection of the 300 μm thick slices into 50 μm thick sections is one option.
2.2.1 Resection Method
-
1.
Preparation of tools (Fig. 4a):
Fig. 4 
Resection of fixed slice, step 1: Sequence of resection process for agar embedding. (a) Tools for resection of fixed slice. ➀ Glass plate a. ➁ A plastic plate for agar embedding. ➂ A large glass slide. ➃ A blade tool. ➄ Glass plate b. (b) Agar mix solution in syringe is incubated in 43 °C water chamber. (c) Fixed slice on top of the plastic plate. (d) Removing excess water with filter paper. (e) Placing the melted agar mix solution onto the slice. (f) Trimming the agar block. (g) Get the trimmed agar block onto flat portion of drug spoon. (h) Placing the agar block on the glass place b. To hold one edge of the agar block with the glass board a. (i) Cutting the surface of the agar block by sliding the blade tool. (j) Trimming extra part of the agar block (This figure is reproduced and modified from Yasuo Kawaguchi (2009) [24] with permission from Yoshioka-shoten, Kyoto, Japan)
-
➀ Glass plate a: 2.5 cm × 5 cm × 6 mm, ultramicrotome glass strips (Fig. 4a➀).
-
➁ Plastic plate for agar embedding: 1.5 cm square with about 3 mm in thickness (Fig. 4a➁).
-
➂ Large glass slide for holding the plastic plate (Fig. 4a➂).
-
➃ Blade tool: assembled three glass slides and a stainless blade with glue. It is for cutting the upper surface perfectly parallel to the bottom surface of the agar block that embeds the slice (Fig. 4a➃).
-
➄ Glass plate b: This should be larger than the blade tool (Fig. 4a➄).
-
-
2.
Preparation of solution:
Agar mix solution (2.5 % agar, 0.25 % agarose): 1.125 g agar + 0.125 g agarose + 55 mL Milli-Q water
-
1.
Add 1.125 g agar and 0.125 g agarose in 55 mL Milli-Q water. Heat them in microwave to dissolve completely taking care not to overheat that may cause boiling over.
-
2.
Take the one part of the melted agar mix solution in syringe and float it in hot water bath (about 42–47 °C) to keep its liquid state (Fig. 4b).
-
3.
Put the rest of the melted agar mix solution in a laboratory dish in about 4–5 mm depth and place it in refrigerator to be solidified. This is used for the base for the resection.
-
1.
-
3.
How to resection the slice:
-
Step 1 (Fig. 4)
-
1.
Prepare all tools for resection and agar solution (Fig. 4a, b).
-
2.
Stack the plastic board (3 mm thick and 1.5 cm square) on a flat glass board. Put the fixed slice, as flat as possible, on the plastic board (Fig. 4c). The slice can be covered with agar for stability. The plastic board may be omitted and the slice placed directly on the glass board. A plastic cylinder of about 1 cm length cut from a 5 or 10 mL plastic syringe is then placed on the glass board surrounding the slice.
-
3.
Remove excess water with filter paper (Fig. 4d).
-
4.
Drop the agar solution (42–47 °C) over the slice gently to cover it about 3–4 mm high (Fig. 4e).
-
5.
The agar becomes solid after about a minute. Then trim the agar block embedding the slice roughly to keep agar part at least 4 or 5 mm from the slice edge (Fig. 4f).
-
6.
Get the trimmed agar block onto the flat portion of drug spoon (Fig. 4g).
-
7.
Put the trimmed agar block on the flat glass plate b and hold one side of the agar block against the wall of the glass plate a (Fig. 4h).
-
8.
Cut the surface of the agar block by sliding the blade tool on the glass plate b (Fig. 4i). Then the upper and lower surface of the agar block must be nicely parallel.
-
9.
Trim the extra portion of the agar at about 2 mm from the slice edge of the agar block (Fig. 4j).
-
1.
-
Step 2 (Fig. 5)
Fig. 5 
Resection of fixed slice, step 2: sequence of resection process with slicer. (a) Section the agar base to make the surface parallel to the cutting plane. (b) Getting the trimmed agar block on drug spoon with brush. (c) Placing the agar block on spread glue on surface of the agar base with the slice side up. (d) Removing excess glue with filter paper. (e) Preparing for re-section. (f) Pouring cold buffer. (g) Re-sectioning in 50 μm thickness. (h) Collecting the sections in multiwell (This figure is reproduced and modified from Yasuo Kawaguchi (2009) [24] with permission from Yoshioka-shoten, Kyoto, Japan)
-
1.
Glue the solid agar mix base on cutting board of a slicer (Leica VT1000S, Vienna, Austria). Cut the agar mix base surface with a blade equipped with the slicer to make the surface of the agar mix base parallel to the cutting plane (Fig. 5a).
-
2.
Put a drop of glue on the surface of the agar mix base and spread it evenly using the flat portion of the drug spoon. Gently and carefully place the trimmed agar block embedding the fixed slice on the agar mix base using a small drug spoon (Fig. 5b, c). The slice should be upper side of the agar block.
-
3.
Remove excess amount of glue carefully with filter paper (Fig. 5d).
-
4.
The slice surface should be parallel to the cutting plane (Fig. 5e).
-
5.
Pour cold 0.1 M PB in the cutting tray (Fig. 5f).
-
6.
Resection the slice at 50 μm thickness (Fig. 5g).
-
7.
Collect the sections into a plastic multiwell using a small soft brush (Fig. 5h).
-
1.
-


2.3 Freeze and Stock
2.3.1 Recipe of a Cryoprotectant Solution (30 % Glycerol, 30 % Ethylene Glycol, 0.04 M PBS) [25]
-
1.
Mix: glycerol 60 mL, ethylene glycol 60 mL, 0.4 M PB 20 mL and 5 M NaCl 2.3 mL.
-
2.
Add Milli-Q water or distilled water up to 200 mL.
2.3.2 Store Sections in the Cryoprotectant Solution
-
1.
Put about 2 mL of the cryoprotectant solution in a small glass screw vial (Fig. 2a).
-
2.
Place sections in the vial with a small brush gently and cap tightly (Fig. 2e).
-
3.
Put them in a plastic container and store in −30 °C freezer. The sections can be good for the histochemical staining more than a year.
2.4 Immunohisto-chemical Staining
2.4.1 Immersion Buffer for LM Tissue: 10 % Normal Goat Serum (NGS), 2 % Bovine Serum Albumin (BSA), and 0.5 % Triton X-100 (TX) in 0.05 M Tris Buffer Saline (TBS)
10 mL NGS (S-1000, Vector Laboratories, Burlingame, U.S.A.), 2 g BSA, 2.5 mL 20 % TX are dissolved in 50 mL 0.1 M TBS and add Milli-Q water up to 100 mL.
2.4.2 Immersion Buffer for EM Tissue: 10 % NGS, 2 % BSA, 0 % or 0.04 % TX in 0.05 M TBS
10 mL NGS, 2 g BSA, and none or 0.2 mL 20 % TX are dissolved in 50 mL 0.1 M TBS and add Milli-Q water up to 100 mL.
2.4.3 Storage of the immersion buffer
Aliquot the Immersion Buffer into 1 or 2 mL in Plastic Microtubes (Fig. 2b) and Store Them in −20 or −30 °C Freezer Until Use.
2.5 Histological Staining
2.5.1 ABC Complex
ABC complex (VECTASTAIN Elite ABC, Vector laboratories) is avidin/biotinylated peroxidase complex and a highly sensitive reagent due to the large number of enzyme molecules.
How to make ABC solution with 0.04 % TX in 0.05 M TBS:
-
Add 10 μL each of A and B solutions of ABC complex into 1 mL 0.05 M TBS.
-
Incubate the mixed solution on a shaker for about 30 min.
-
Add 20 μL of 20 % Triton X solution to the mixed ABC solution.
2.5.2 Features of Nickel-Diaminobenzidine Tetrahydrochloride (DAB) Molecule
DAB is a carcinogen/mutagen for bladder cancer and so on, so protect yourself with a lab coat and lab gloves. DAB can aggregate easily around dirt or dust; therefore, a dish or vial for this reagent must be very clean. DAB is susceptible to contamination from oxidizing agents, such as kitchen bleach. However, the by-product altered by the hypochlorite also is mutagenic. Therefore, used DAB solution and the by-product of DAB molecule should be stored in a DAB waste plastic bottle, not poured into drain. It should then be dealt with by a chemical-disposal facility. Collect DAB-contaminated wastes (disposable plastic pipettes, pipette tips, papers, etc.) and keep them in a plastic bag for incineration. The DAB is light sensitive, especially direct sunlight.
2.5.3 How to Make the Nickel-DAB Solution
-
1.
Add 2 mg of DAB and 30 mg of nickel (II) ammonium sulfate hexahydrate in 10 mL of 50 mM Tris-HCl, pH 7.6 and stir to dissolve well. It must be done in a dark place or dark box, because DAB is light sensitive, especially direct sunlight.
-
2.
Use the solution on the day; otherwise aliquot the nickel-DAB solution into 1 or 2 mL in a plastic microtube (Fig. 2b) and store them in −20 or −30 °C freezer until use.
-
3.
At a time of use, warm up a little bit to melt the DAB solution completely.
2.6 Osmium Fixation, Dehydration, and Embedding
2.6.1 Osmium Tetroxide: OsO4
Osmium tetroxide is a very harmful reagent, so protect yourself with a lab coat and lab gloves and work in a fume hood to prevent inhalation. We usually keep 4 % aqueous osmium tetroxide solution in special a glass bottle with a plug and cap that is specialized for the osmium tetroxide solution (Fig. 6a, b) and keep the bottle in a can or additional bottle to shut in the harmful gas (Fig. 6d). Otherwise, the inside of the refrigerator, where the osmium tetroxide bottle is stored, will become blackish by the osmium tetroxide gas. This reagent comes usually as 1 g of solid in a glass ampule (Fig. 6c). Wear plastic gloves. Wash the surface of the ampule carefully and scratch the center pit for entire circumference with an ampule cutter (Fig. 6c). Wash it carefully with Milli-Q water and put it in the special glass bottle (Fig. 6a, b) and plug it. Shake the bottle gently to break the ampule. It should be quite easily broken inside the bottle. Add 25 mL Milli-Q water and cap completely. Leave on shaker for hours until dissolved completely. Keep the 4 % aqueous osmium tetroxide solution bottle in the other can or bottle with some light impact absorber (Fig. 6d) and put it in a refrigerator. Used osmium tetroxide should be stored in a plastic osmium tetroxide waste bottle, not poured into the drain. Entrust it to a waste-disposal vendor.

Osmium tetroxide. (a) An osmium tetroxide stock solution glass container. (b) The container has an inner stopper and outer cap, double protected. (c) Left: A glass ampule contains 1 g of osmium tetroxide. Right: an ampule cutter to scratch the center pit. (d) The container is placed in this bottle for double protection
2.6.2 Uranyl Acetate
Uranyl acetate is slightly radioactive and emits alpha rays, so protect yourself with a lab coat and lab gloves, and do not inhale. Even a thin sheet of paper can block the alpha rays. A half-life of uranium 238 is 4.468 billion years, so it is important not to drink nor inhale it. The uranyl acetate is light sensitive, especially direct sunlight. Uranyl acetate can be dissolved in water or 70 % ethanol, but it takes sometimes more than an hour. While dissolving on a magnet rotator, cover it with aluminum foil or in a paper box. Used uranyl acetate solution should be stored in a plastic uranyl waste bottle, not poured into a drain, and then properly disposed of.
2.6.3 Resin for Electron Microscopy (EM) Tissue Embedding
Resin (epon) is a skin carcinogen, so protect yourself with a lab coat and lab gloves. In case of touching resin directly, remove it with ethanol from skin. After resin polymerization, it becomes just a plastic and is not a carcinogen anymore. Resin that has absorbed water cannot be polymerized completely and will not be hard enough for ultrathin sectioning, so be sure the moisture of the room should be lower than about 50 %. The section embedded in the resin must be dehydrated completely. Used resin is collected in a disposable plastic or aluminum foil cup and place in 60 °C oven for 24–48 h for polymerization and then put in a trash box.
2.6.4 How to Make Resin
2.6.4.1 Epon 812 (TAAB, Aldermaston, UK)
Measure epon raw materials in a disposable plastic cup as follows, 28.5 g epon 812, 15.0 g DDSA, and 14.5 g MNA. Mix them thoroughly with a disposable plastic stick or a disposable plastic Pasteur pipette for about 10 min then add 0.7 g DMP-30. Mix well for 10 min. Aliquot it in the glass vials with a screw cap, and keep them in −30 °C freezer until use (Fig. 7a). At the time of use, take it from the freezer and leave for about an hour to warm up to room temperature, and then open the cap. If you open the cap of the vial that is still frozen, the glass wall inside the vial gets condensation. Consequently the epon gets water, and it cannot be polymerized enough for ultrathin section cutting.

Tissue embedding with resin. (a) Frozen resin in glass screw vials. (b) Small kenzans or frogs: needle-point holders. (c) The kenzans are used as weight to push the coverslip to ooze out excess amount of resin before polymerization. The paper strips absorb the oozing out resin from the side. (d) The specimen embedded in polymerized resin. Upper: perfused brain sections for EM preparation. Middle: re-sectioned slice for EM preparation. Bottom: re-sectioned slice for LM preparation with 0.1 % osmium tetroxide. (e) Disposable chopsticks with the sharp flat tip for taking the section out from viscid pure resin. The tip end is cut sharp with cutter knife. Paper strips of lab paper are shown in bottom right
2.6.4.2 Durcupan ACM (Sigma-Aldrich, St. Louis, USA)
Measure Durcupan ACM raw materials in a disposable plastic cup as follows: 11.4 mL (13.2 g) part A, 10 mL (10.9 g) part B, and 0.3 mL (0.31g) part C. Mix them thoroughly with a disposable plastic stick or a disposable plastic Pasteur pipette for about 10 min and add 0.05–0.1 mL (0.06 - 0.12 g) part D. Mix them well for 10 min, yielding a hard resin when polymerized. Aliquot it in the glass vials with a screw cap, and keep them in −30 °C freezer until use (Fig. 7a). At the time of use, take it from the freezer and leave it for about an hour to warm up to room temperature, and then open the cap. If you open the cap of the vial that is still frozen, the glass wall inside the vial gets condensation. Consequently, the epon gets water and it cannot be polymerized enough for ultrathin section cutting.
2.6.5 How to Wash Glass Vials Contaminated with Epon
Epon has high viscosity and is not water soluble. The glass vials and plastic caps contaminated with epon are kept in ethanol for a while to remove epon on the wall surface. Then wash them with a regular way using water and soap. The contaminated ethanol should be entrusted to a waste-disposal vendor.
2.6.6 Propylene Oxide
Propylene oxide is highly volatile and a probable carcinogen, so protect yourself with a lab coat and lab gloves and work in a fume hood to prevent inhalation. United States Environmental Protection Agency (EPA) has classified propylene oxide as a Group B2, probable human carcinogen. Used propylene oxide should be stored in a corrosion resistance plastic waste bottle, not poured into drain, because it dissolves drainage pipe made of vinyl chloride. Entrust it to a waste-disposal vendor.
2.6.7 Lead Aspartate
Lead aspartate is toxic and classified a probable carcinogenic (Category 2A) by the International Agency for Research on Cancer. The reagent brings about lead poisoning. Protect yourself with a lab coat and lab gloves. Used lead aspartate should be stored in a plastic waste bottle, not poured into a drain. Entrust it to a waste-disposal vendor.
2.6.8 How to Make Walton’s Lead Aspartate [26]
Add 0.998 g of L-aspartic acid in 250 mL of Milli-Q water. The aspartic acid may be easier to dissolve in water with the pH adjusted to 3.8 with KOH. This stock solution is stable for a few months in refrigerator. Dissolve 0.066 g of lead nitrate in 10 mL of aspartic acid stock solution and adjust the pH to 5.5 with fresh 1 N KOH. The lead aspartate solution is placed in a 60 °C oven for 30 min and must be dissolved completely. Just before use, the solution is filtered with a 0.22-μm Millipore syringe filter.
2.6.9 Microwave with Temperature Control (Fig. 8)
Microwave with temperature control (PELCO BioWave Pro, Ted Pella, inc. Redding, USA) is designed for efficient processing of dehydration and resin penetration process (Fig. 8). Microwave irradiation is controlled with a set temperature to ensure no overheating of the sample tissue. It has an exhaust pipe to place in a fume hood or connect to an exhaust pipe line directly, to avoid contamination of the laboratory air.

Temperature-controlled microwave. (a) Overview of the temperature-controlled microwave. Exhaust duct leads to the fume hood in the left. (b) Thermometer for temperature control is inserted in the liquid in the glass vial. The base is a water circulator to exclude overheating the tissue
2.7 Perfusion for In Vivo Recording
2.7.1 Preparation of Solution
2.7.1.1 Prefixative (100 mL)
-
Mix 0.5 mL 1 M MgCl2 6H2O, 8.5 g sucrose and 20 mL 0.1 M PB.
-
Add Milli-Q water up to 100 mL.
2.7.1.2 Fixative (100 mL)
Same as in Sect. 20.2.1.4 Aliquot the fixative and prefixative in plastic tubes and store them in a −20 or −30 °C freezer (Fig. 2c).
3 Methods
3.1 Slice Fixation
-
1.
After a whole cell recording using patch pippete electrode with internal solution containing 0.5% - 1% biocytin, put the slice in fixative, 4 % paraformaldehyde, 0.2 % picric acid, 0.1 % glutaraldehyde in 0.1 M PB in the screw vial, and microwave for 10–20 s (Fig. 3) [5, 6, 19, 27, 28]. Then, put the vial on ice to cool the fixative down as soon as possible. The slice in the fixative should be kept on a shaker in a refrigerator overnight at 4 °C.
-
2.
Wash the slice with 0.1 M PB the next day.
3.2 Slice Resection [24]
-
1.
Wash in 0.1 M PB
-
2.
Resection the 300 μm thickness slice into 50 μm thick sections with the agar mix using slicer (Leica VT1000S, Vienna, Austria) (Figs. 4 and 5).
-
3.
Collect them in 0.1 M PB in a 24 plastic multiwell plate on ice (Fig. 5h).
3.3 Freeze and Stock
The sections or slices can be conveniently kept in the cryoprotectant solution [25] and stored in a freezer at −20 °C or −30 °C for more than a year. The storage method can keep the sections in good condition for histological staining for more than a year.
-
1.
Put the sections in the cryoprotectant solution: 30 % glycerol, 30 % ethylene glycol, and 0.04 M PBS in a glass small screw vial (5–10 mL volume size).
-
2.
Put them in a freezer.
3.4 Neurochemical Characterization with Immunohistochemical Staining [5, 8, 27, 28]
-
All the steps are processed at 4 °C.
-
1.
Place the sections in 0.05 M TBS (or 0.05 M PBS) in a plastic multiwell plate (Fig. 2d) with a brush gently (Fig. 2e).
-
2.
Suppress intrinsic peroxidase reactions by incubating sections with 1 % H2O2 in TBS for 30 min.
-
3.
Wash sections with 0.05 M TBS for 10 min 3 times
-
4.
Incubate sections with two primary antisera in immersion buffer overnight.
For example:
-
Anti-calretinin developed in rabbit diluted 1:1000, Swant #7696
-
Anti-parvalbumin developed in mouse diluted 1:4000, Sigma-Aldrich #P-3171
-
Immersion buffer for LM: 10 % NGS, 2 % bovine serum albumin, and 0.5 % TX in TBS
-
Immersion buffer for EM: 10 % NGS, 2 % bovine serum albumin, and 0 % or 0.04 % TX in TBS
The primary antisera for the double labeling should be developed in different species. Dilution rate of the primary antiserum should be determined by your own laboratory carefully.
-
-
5.
Wash sections with TBS for 10 min 3 times.
-
6.
Incubate sections in fluorescence conjugated secondary antiserums in the immersion buffer in a dark box overnight.
-
Alexa 488 anti rabbit IgG diluted 1:200 (Life Technologies, Carlsbad, U.S.A.)
-
Alexa 594 anti rat IgG diluted 1:200 (Life Technologies)
Cross-reactivity of the secondary antiserum against IgG developed in different species must be carefully checked in preliminary experiments. It is better to use secondary antisera cross-absorbed against the other species IgG.
-
-
7.
Wash sections in TBS for 10 min 3 times.
-
8.
Incubate sections in AMCA (Alexa 350) streptavidin in TBS for 3 h in a dark box at RT.
-
AMCA streptavidin diluted 1:2000 (Life Technologies)
Alternatively, Texas red streptavidin can be used. In that case, use Alexa 350 or Alexa 633 anti rat IgG instead of the Alexa 594 anti rat IgG as a secondary antiserum.
-
-
9.
Wash sections in TBS for 10 min 3 times each.
-
10.
Mount on the glass slide and embed with FluoroGuard Antifade Reagent (Bio-Rad Laboratories, Hercules, USA). Spacer of the same thickness as the section (50 μm) should be embedded side by side to retain the section thickness (Fig. 9c). Double-sided tape of 30 μm thickness helps both retaining thickness and holding a coverslip conveniently (Fig. 9c).
Fig. 9 
Immunohistochemical staining. (a) Alexa 594 labeled biocytin-injected cortical non-pyramidal cell. (b) The recorded cell expresses somatostatin immunoreaction (arrowhead ). (c) Slides prepared for a fluorescent microscopy. Upper slide embeds two sections with 50 μm thick spacers (white ). Bottom slide embeds a section between strips of double-sided lucent tape of 30 μm thickness (arrows )
-
11.
After LM observation (Fig. 9), take the sections out from the glass slide gently with a brush and put them in TBS.
-
1.

3.5 Histological Staining [2, 7, 9, 13, 27, 29–32]
-
All the steps are processed at 4 °C.
-
1.
Wash sections with 0.05 M TBS (or 0.05 M PBS).
-
2.
Suppress intrinsic peroxidase reactions by incubating sections with 1 % H2O2 in TBS for 30 min.
-
3.
Wash sections with 0.05 M TBS for 10 min 3 times.
-
4.
Incubate sections in ABC complex (1:100, Elite ABC, Vector) in 0.04 % TX in TBS for 3 h at RT or overnight at 4 °C.
-
5.
Wash the sections in TBS for 10 min, 2 times.
-
6.
Wash the sections in 0.05 M Tris-HCl buffer (TB) for 5 min.
-
1.
-
Nickel-DAB staining or DAB staining method
-
A.
Nickel-DAB staining
-
Visualize the recorded neuron by dark blue-black color.
-
1.
Incubate the sections in nickel-DAB solution for 30 min in dark.
-
2.
Add H2O2 for final concentration 0.01 % for 0.5–2 min.
Add 10 μL of 1 % H2O2 solution in 1 mL nickel-DAB solution while agitating the well slowly. The reaction time is usually 0.5–1 min.
-
3.
Wash the sections in TB to stop the nickel-DAB reaction.
-
4.
Observe the cell under a light microscopy.
-
5.
If the cell is stained appropriately, then wash the sections in TBS for 5 min 3 times. If the cell is still very weakly stained, then repeat the nickel-DAB reaction process (2).
-
6.
Wash the sections in 0.1 M PB.
-
1.
-
-
B.
DAB staining
-
Visualize the recorded neuron by brown color.
-
1.
Incubate the sections in DAB solution (50 mg/100 mL in TB) for 30 min in dark.
-
2.
Add H2O2 for final concentration 0.01 % for 2–20 min.
Add 10 μL of 1 % H2O2 solution in 1 mL DAB solution while agitating the well slowly. The reaction time is usually 2–5 min.
-
3.
Wash the sections in TB to stop the DAB reaction.
-
4.
Observe the cell under a light microscopy.
-
5.
If the cell is stained appropriately, then wash the sections in TBS for 5 min 3 times. If the cell is still very weakly stained, then repeat the DAB reaction process (2).
-
6.
Wash the sections in 0.1 M PB
-
1.
-
-
A.
3.6 Osmium Post-fixation, Dehydration, and Embedding
3.6.1 Conventional Tissue Process for LM (Fig. 7)
Section thickness becomes less than a half, maybe only 10 % or less.
-
1.
Wash sections in 0.05 M PB.
-
2.
Place the sections on a silane-coated glass slide (Sigmacote; Sigma-Aldrich) and dry them out.
-
3.
0.1 % osmium tetroxide in 0.1 M PB for 10 min.
This process should be done in a moist box in a fume hood.
-
4.
Wash sections in Milli-Q water for 3 times.
-
5.
50 % ethanol for 5 min.
-
6.
70 % ethanol for 5 min.
-
7.
80 % ethanol for 5 min.
-
8.
90 % ethanol for 5 min.
-
9.
95 % ethanol for 5 min.
-
10.
99.5 % ethanol for 5 min.
-
11.
100 % ethanol twice for 5 min.
-
12.
Embed with resin (epon or Durcupan ACM) at 60 °C for 48 h. Use only a few small drops of 100 % resin for embedding. Put metal weight on the top of the coverslip to remove excess amount of the resin. The resin oozing from the side should be absorbed with lab paper (Fig. 7).
or
-
12.
Xylene for 5 min (two times) and embed with Entellan New (E. Merck, Darmstadt, Germany)
-
13.
LM observation.
3.6.2 Tissue Process for LM with Preserved Section Thickness (Fig. 7)
This method preserves the original section thickness up to about 90 % [33]; therefore, this is appropriate for tracing dendrites and axons.
-
1.
Place the sections in 0.1 M PB in a glass screw vial with a brush (Fig. 2).
-
2.
0.1 % osmium tetroxide in 0.1 M PB for 60 min.
-
3.
Wash the sections in 0.1 M PB for 10 min 3 times.
-
4.
Wash the sections in Milli-Q water for 5 min.
-
5.
50 % ethanol for 5 min at 4 °C on shaker.
-
6.
70 % ethanol for 5 min at 4 °C on shaker.
-
7.
Place the section between a glass slide and coverslip for 15 min in 70 % ethanol to make the section perfectly flat.
-
8.
Place the sections back to the glass screw vial with 80 % ethanol for 5 min at 4 °C on shaker.
-
9.
90 % ethanol for 5 min at 4 °C on shaker.
-
10.
95 % ethanol for 5 min at RT on shaker.
-
11.
99.5 % ethanol for 5 min at RT on shaker.
-
12.
100 % ethanol twice for 5 min at RT on shaker for 2 times.
-
13.
50 % resin (epon or Durcupan ACM) in ethanol for 1 h on shaker.
-
14.
Tissue sections are then mounted on glass slide with thin flat tip of disposable chopsticks (Fig. 7e) and embedded in pure resin and covered with a coverslip. The osmium tetroxide-fixed tissue is very fragile, so handle with care.
-
15.
Put a metal weight on the top of the coverslip to remove excess amount of the resin. The resin oozing from the side should be absorbed with lab paper (Fig. 7).
-
16.
Place the specimen in a 60 °C oven for 48 h for polymerization. Place the resin-contaminated paper in the oven for the polymerization. The resin is wiped off with paper from the resin-contaminated chopstick, which is also placed in the oven for the polymerization and reuse.
-
17.
LM observation (Fig. 10). The tissue sections embedded in polymerized resin should be in good condition for many years as were the specimens prepared by Santiago Ramon y Cajal.
Fig. 10 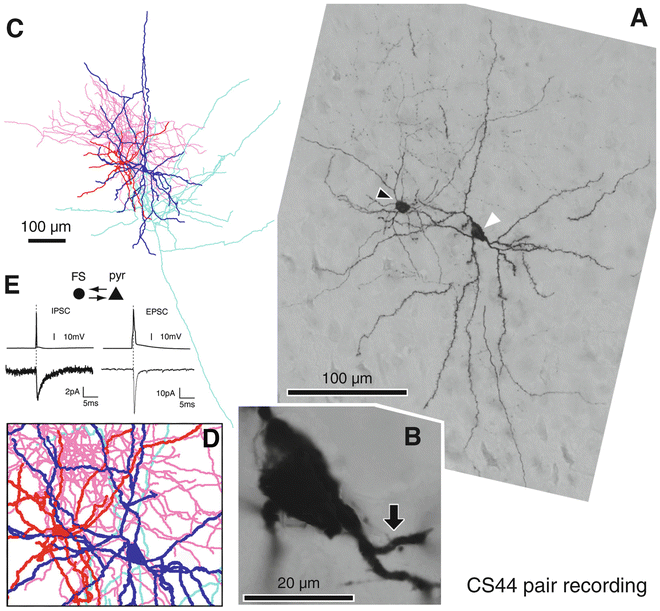
Recorded cell staining and tracing [19]. (a) Focus stack light micrograph of biocytin injected an FS basket non-pyramidal cell (arrowhead ) and a pyramidal cell (white arrowhead ) in layer V of rat cortex. (b) Enlarged pyramidal cell soma with the FS basket cell axon contact (arrow ). (c) Reconstruction of the pyramidal cell soma-dendrites (blue ) and axon (sky blue ), The FS basket cell soma-dendrites (red) and axon (pink ). (d) Close-up of the proximal area of the pair cells in the same magnification as in (a). (e) Average IPSC response in the pyramidal cell (bottom left ) to a single AP elicited in the FS basket cell (upper left ). Average EPSC response in the FS basket cell (bottom right ) to a single AP elicited in the pyramidal cell (upper right )

3.6.3 Tissue Process for EM [34, 35] (Fig. 7)
This method preserves the original section thickness at about 90 % [33]; therefore, this is the appropriate method to trace dendrites and axons.
-
1.
Place the sections in 0.1 M PB in a glass vial with a screw cap for 10 min
-
2.
1 % Osmium tetroxide, 1.5 % potassium ferrocyanide in 0.1 M PB for 60 min
-
3.
Wash the sections in 0.1 M PB for 10 min 3 times.
-
4.
1 % osmium tetroxide in 0.1 M PB for 60 min.
-
5.
Wash the sections in 0.1 M PB for 10 min 3 times.
-
6.
Wash the sections in Milli-Q water for 5 min 3 times.
-
7.
Incubate the sections in 1 % uranyl acetate in Milli-Q water in dark for 40 min.
-
8.
Wash the sections in Milli-Q water for 10 min 3 times.
-
9.
50 % ethanol for 5 min at 4 °C on shaker.
-
10.
70 % ethanol for 5 min at 4 °C on shaker.
-
11.
Place the section between a glass slide and coverslip for 15 min in 70 % ethanol to make the section perfectly flat.
-
12.
Place the sections back to the glass screw vial with 80 % ethanol for 5 min at 4 °C on shaker.
-
13.
90 % ethanol for 10 min at 4 °C on shaker.
-
14.
95 % ethanol for 15 min at RT on shaker.
-
15.
99.5 % ethanol for 15 min at RT on shaker.
-
16.
100 % ethanol twice for 10 min at RT on shaker for 2 times.
-
17.
50 % resin (epon or Durcupan ACM) ethanol for 2–3 h or overnight at RT on shaker.
-
18.
Put 100 % resin for a few hours or overnight. Tissue sections are then mounted on a Sigmacote (Sigma-Aldrich) coated or siliconized glass slide with the thin flat tip of disposable chopsticks (Fig. 7e). They are embedded in 100 % resin and covered with the coated coverslip.
-
19.
Put metal weight on top of the coverslip to remove excess amount of the resin. The resin oozing from the side should be absorbed with lab paper (Fig. 7).
-
20.
Place the specimen in a 60 °C oven for 48 h for polymerization. The resin-contaminated paper is also placed in the oven for polymerization. The resin is wiped off with paper from the resin-contaminated chopstick, which is also placed in the oven for the polymerization and reuse.
-
21.
LM observation (Fig. 10).
3.6.4 Dehydration Using Temperature Controlled Microwave (Fig. 8) [13]
-
1.
Wash the sections in Milli-Q water for 5 min.
-
2.
50 % ethanol for 5 min at 4 °C on shaker.
-
3.
70 % ethanol for 5 min at 4 °C on shaker.
-
4.
Place the section between a glass slide and coverslip for 15 min in 70 % ethanol to make the section perfectly flat.
-
5.
Place the sections back to the glass screw vial with 80 % ethanol. Place it in microwave and put the thermometer sensor in the ethanol. Adjust the temperature control under 37 °C and microwave for 40 s. Larger amount of ethanol for the microwave dehydration result in smaller temperature increase. Then place it on ice (4 °C) on shaker for 5 min. Dehydration in microwave should be without a cap and on shaker should be with a cap.
-
6.
90 % ethanol for 40 s in microwave with temperature <37 °C and then 5 min on shaker at 4 °C
-
7.
95 % ethanol for 40 s in microwave with temperature <37 °C and then 5 min on shaker at 4 °C.
-
8.
99.5 % ethanol for 40 s in microwave with temperature <37 °C and then 5 min on shaker at RT.
-
9.
100 % ethanol for 40 s in microwave with temperature <37 °C and then 5 min on shaker at RT for 2 times.
-
10.
Propylene oxide or anhydrous acetone for 40 s in microwave with temperature <45 °C without a cap and then 5 min on shaker at RT. The cap of the vial must be tightly closed to prevent evaporation. Put enough amount of propylene oxide or anydrous acetone, because it is very evaporable during heating by microwave. Repeat this step twice.
-
11.
50 % resin (epon or Durcupan ACM (Sigma-Aldrich)) acetone/propylene oxide for 15 min in microwave <45 °C. Use the other glass vial with similar amount of water to measure temperature with thermometer sensor.
-
12.
Put 100 % resin (epon or Durcupan) overnight. Tissue sections are then mounted on a Sigmacote (Sigma-Aldrich) coated or siliconized glass slide with thin flat tip of disposable chopsticks (Fig. 7e). They are embedded in pure epon or Durcupan ACM and cover with the coated coverslip.
-
13.
Put metal weight on the top of the coverslip to remove excess amount of the resin. The resin oozing from the side should be absorbed with lab paper (Fig. 7).
-
14.
Place the specimen in a 60 °C oven for 48 h for polymerization. The resin-contaminated paper is also placed in the oven for the polymerization. The resin is wiped off with paper from the resin-contaminated chopstick, which is also placed in the oven for the polymerization and reuse.
-
15.
LM observation (Fig. 10).
3.6.5 Tissue Processed for Serial Block Face Scanning Electron Microscopy (SBEM)
Coal-black color of ferrocyanide (reduced)-osmium tetroxide-thiocarbohydrazide-osmium tetroxide (rOTO) following by en block uranyl acetate-staining and lead aspartate-staining protocol [26, 36–38] (Fig. 11b). Cacodylate buffer used in the fixative and buffer instead of 0.1 M PB can enhance electron density of the tissue [26, 36]. However, it should be handled with care since it contains arsenic.

Conventional osmium tetroxide staining versus heavy metal staining using rOTO and en block lead staining. (a) 50 μm thick section of cortex processed with conventional osmium tetroxide staining. (b) 50 μm thick cortical section processed with rOTO and en block lead staining. The section is completely dark, and light penetrates through only perpendicularly oriented blood vessels
-
1.
Take light micrographs of the stained cell.
-
2.
Place the sections in 0.1 M PB in a glass screw vial and wash them for 10 min.
-
3.
1 % osmium tetroxide, 1.5 % potassium ferrocyanide in 0.1 M PB for 60 min. Sections turn to black color.
-
4.
Wash the sections in Milli-Q water for 5 min 3 times.
-
5.
Fresh 1 % thiocarbohydrazide (TCH) solution for 20 min at room temperature.
Add 0.1 g TCH to 10 mL Milli-Q water and place in a 60 °C oven for 1 h. Agitate or shake the bottle gently every 10 min for resolving. Cool down and filter this solution with a 0.22 μm Millipore syringe filter (Millipore, Billerica, USA) right before use.
-
6.
Wash the sections in Milli-Q water for 5 min 3 times.
-
7.
2 % Osmium tetroxide in Milli-Q water for 30 min.
-
8.
Wash the sections in Milli-Q water for 5 min 3 times.
-
9.
Place the sections in 1 % uranyl acetate in Milli-Q water in dark at 4 °C for overnight.
-
10.
Wash the sections in Milli-Q water for 10 min 3 times.
-
11.
Placed sections in the Walton’s lead aspartate solution, and put it in a 60 °C oven for 30 min.
-
12.
Wash the sections in Milli-Q water for 10 min 3 times.
-
13.
Dehydrate and embed sections with Durcupan ACM using the same processes in the Sects. 3.6.2 or 3.6.3.
-
14.
Place the specimen in a 70 °C oven to polymerize for 72 h for harder polymerization as SBEM requires a tissue block with hard resin.
3.6.6 Perfusion for In Vivo Recording
-
1.
After in vivo recording using juxtacellular electrode [18, 32], by which biocytin is injected into the recorded cell, the rat is perfused through heart with 5–10 mL prefixative solution of body or room temperature, following 200 mL fixative (4 % paraformaldehyde, 0.2 % picric acid, 0.1 % glutaraldehyde in 0.1 M PB) of body or room temperature for 150–250 g weight rat.
-
2.
Leave brain in the animal body for a few hours at room temperature.
-
3.
Take it out and put it in cold 0.1 M PB.
4 Notes
4.1 Rapid Microwave-Enhanced Fixation and Dehydration
Penetration of the fixative in the brain slice of 300 μm thickness is rather slow. It may not penetrate the entire tissue depth for an hour or so [39]. During the penetrating period, the neurons in the middle of the slice would get no oxygen, or glucose, which is bad for the neurons and the tissue, may degenerate. This affects ultrastructure of the tissue. Fixation with microwave promotes the fixative penetration into the tissue and provides better preservation of tissue structure [20, 21]. The reagent for the dehydration and resin penetration is also accelerated using microwave. It must be done under good temperature control to exclude the heat damage.
4.2 Tips for Good Immunohisto-chemistry
-
1.
Triton X-100 (TX)
It is necessary to dilute high viscosity liquid TX for the accurate measurement of its quantity. TX is a detergent that causes micro damage to cytoplasmic membranes and thus allows the IgG of primary antisera to penetrate into tissue. As a result, the tissue preservation may also get damaged to some extent. It is not a problem for LM observation, but the ultrastructure may not be good for EM observation. Therefore, it is highly recommended to use the immersion buffer without TX for EM tissue preparation; however, the one containing low TX, for instance, 0.04 % TX, is OK.
-
2.
Immersion buffer for primary and secondary antiserum
The immersion buffer contains high concentration of protein: 10 % NGS and 2 % BSA. Concentrations of the primary and secondary antisera are extremely low: 1:100 ~ 1:10,000. The IgG protein may be more stable in solution rich in protein than water/buffer. Therefore, the NGS and BSA probably help the IgG proteins to be stabilized in the immersion buffer solution and consequently the tissue gets a good immunoreaction. In addition the NGS and BSA may have a background blocking effect on the immunoreaction of the tissue.
-
3.
Whole cell recording
Whole cell patch pipette records dialyze intracellular contents as biocytin enters a neuron. Short recording times therefore facilitate subsequent immunohistochemical detection, especially of soluble cytoplasmic molecules such as parvalbumin, calbindin D28K, and calretinin which may be lost during a long dialysis. Five to ten minutes or even shorter recording times are recommended to detect soluble cytoplasmic molecules by immunohistochemistry. Biocytin can penetrate throughout neuronal structures including dendrites and axons during records of this duration. In contrast, immunodetection of neuropeptides is not compromised by long recordings since these molecules tend to be fixed to the Golgi apparatus or other organelles.
4.3 Comparison of Nickel-DAB and DAB Staining Methods
DAB method stains the intracellular structure of the recorded cell very dark. The electron dense DAB-osmium product covers all of the intracellular space. This makes it easy to identify the recorded cell with electron microscopy; however, this obscures the intracellular structure, such as small vesicles in a presynaptic bouton, postsynaptic density of postsynaptic structures, microtubules in a dendrite and axon, etc. Nickel-DAB staining method reduces this problem. The nickel is involved in the DAB aggregation and prevents the light transmission to make the color dark at light microscopy (LM) with a shorter reaction time than the conventional DAB method. During the followed osmium tetroxide staining process, probably the nickel is detached from the DAB aggregation somehow, but osmium tetroxide takes the place to keep the similar darkness at the LM (Fig. 12a, d). However, DAB aggregation itself is a lot lighter because of the shorter reaction time. Consequently, the tissue may contain a lot weaker electron density of DAB-osmium tetroxide aggregation than the conventional DAB method. The small vesicles in presynaptic terminals and postsynaptic density (PSD) of the nickel-DAB-stained recorded neurons are visible more clearly than the DAB-stained recorded cells (Fig. 12b, c, e, f). This feature of the nickel-DAB protocol is a useful advantage to detect synaptic contacts.

Comparison of light micrographs and electron micrographs between nickel-DAB and DAB staining method. (a) A Recorded pyramidal (white arrowhead ) and an FS basket cell (arrowhead ) in cortical layer V stained by nickel-DAB protocol. (b, c) Successive serial electron micrographs in 50 μm thickness. The intracellular structure of the nickel-DAB-stained dendrite (Den ) and spine (S) is visible. PSD (arrow ) is visible. (d) A Recorded pyramidal (white arrowhead ) and an FS basket cell (arrowhead ) in cortical layer V stained by conventional DAB protocol. (e, f) Successive serial electron micrographs in 50 μm thickness. The intracellular structure of the DAB-stained dendrite (Den ) and spine (S) is obscured by the dark dense reaction products. PSD (arrow ) is not visible
4.4 Embedding Sections with the Resin
The resin is viscous liquid. The osmium tetroxide-treated tissue sections are very hard and fragile. The section quite easily breaks into small pieces in the viscous 100 % pure resin; therefore, handling of the sections should be done very carefully with the chopstick tool (Fig. 7e). Get the fragile sections on the flat tip of the tool gently and transfer to the Sigmacote-coated glass slide. In case of very fragile sections, you may skip the 100 % resin incubation. Place a few drops/a grain of rice size of 100 % resin on the Sigmacote-coated glass slide, and place the sections in 50 % resin propylene oxide on the 100 % resin. Leave it for about 30 min for the propylene oxide to evaporate and then cover with a Sigmacote-coated coverslip.
The excess amount of resin must be removed with the method using the metal weight to ooze the resin from the side of the coverslip; otherwise the thickness of the preparation slide becomes thick, and the stained neurons may not be able to be focused well with a high magnification objective lens of short working distance. Air bubbles should not be embedded right above or below the stained cell, as this will interfere with LM observation.
4.5 Heavy Metal Staining Procedure for SBEM
SEM requires heavy metal staining which can be accomplished with the coal-black color of ferrocyanide (reduced)-osmium tetroxide-thiocarbohydrazide-osmium tetroxide (rOTO) following by en block uranyl acetate-staining and lead aspartate-staining protocol [26, 36, 37]. The heavy metal staining makes the section black, and the stained cell cannot be observed because of the dense black color of the section after the staining (Fig. 11) [40]. To identify the DAB stained cell, it is important to know the location of the cell in comparison with blood vessels that are clearly visible (Fig. 11b). The heavy metal staining procedure is also good for the other SEM-based observation systems, such as focus ion beam (FIB/SEM), automated tape-collection ultramicrotome (ATUMtome)/SEM system, because the tissue processed with this method requires less dwell time to capture scanning electron micrograph than that with the conventional EM staining method using less metal. The image quality improvement and shorter imaging time are advantages of this method [40].
4.6 Tips for Good Perfusion
-
1.
For a good perfusion, the critical issue is successful and reliable supply of the fixative solution into the cardio vascular system. To increase the success rate, penetrate the injection needle (19G, Fig. 13a) through the apex into the left ventricle and furthermore into the ascending aorta. Clip it in the aorta to stabilize it for an adult rat with a bulldog clamp (Fig. 13c). Cut the right atrium to release blood and allow the flow of the fixative after circulation through the body. File the sharp needle tip of the perfusion needle until blunted (Fig. 13); otherwise the sharp tip penetrates the wall of the aorta. For a small rat or mouse, penetrate the injection needle (24G or 21G, Fig. 13a) through apex into the left ventricle and clip the needle in the heart to stabilize with the bulldog clamp (Fig. 13b).
Fig. 13 
Appropriate needle locations for perfusion. (a) From upper, a disposable 19 G injection needle with a blunted tip, a disposable 24 G injection needle with a blunted tip, a bulldog clamp. (b) For a small rat or mouse, penetrate the injection needle (24G or 21G) through apex into the left ventricle and clip the needle in the heart to stabilize with the bulldog clamp. (c) For an adult rat, penetrate the injection needle (19G) through the apex into the left ventricle and furthermore into the ascending aorta. Clip it in the aorta to stabilize it for an adult rat with a bulldog clamp
-
2.
Prefixative solution contains Mg that is a blocker of NMDA receptor and may be effective for decreasing neuron activity. We use only a small amount of the prefixative, 5–10 mL, before the perfusion using the fixative. This may reduce time without oxygen before killing neurons. Sucrose in the prefixative adjusts osmolarity to keep good tissue structure during perfusion of the prefixative. Picric acid and glutaraldehyde are added in the fixative to fix tissue well and increase the rigidity. Those reagents almost likely do not prevent immunoreactivity. The picric acid is yellow, which helps to see the border between the transparent prefixative and yellowish fixative in the transparent plastic tube of perfusion set.
-
3.
The warm prefixative/fixative has a good effect on ultrastructure, because iced prefixative/fixative may shrink the muscle and blood vessels. The temperature also influences microtubule structure, which is neuronal cytoskeleton to maintain dendrites, axons as well as spine shape. It is known to depolymerize into stable αβ-tubuline dimers after the cooling down to 4 °C [41]. The spines are known to disappear in chilled ACSF [42]

4.7 Special features of Slice Tissue
The neuronal death is initiated upon slices cutting. Densely packed neuroglial profiles are found over several microns near their cut surfaces, presumably acting to remove neuronal debris. In contrast, neuronal profiles are sparsely distributed with many empty spaces at deeper sites in slices (Fig. 14a) [22]. Possibly neuroglia occupy these spaces in healthy brain tissue (Fig. 14b) [43]. A dense neuroglial layer at the slice surface may obstruct antiserum or ABC complex penetration, while penetration within the slice may be facilitated. Resectioning slices into thin sections is therefore needed to optimize staining.

Comparison of the ultrastructure of rat cortex from slice and perfused brain. (a) Many empty spaces are found in slice tissue (arrowhead ). The dendrite (Den ) and spine (Sp) of a recorded Martinotti cell are stained strongly with DAB after biocytin filling [35]. (b) In perfused brain tissue, neuronal and glial structures are densely packed without distinct intercellular space
References
Jones EG (1984) Laminar distribution of cortical efferent cells. In: Cerebral Cortex, vol 1. Cellular Components of the Cerebral Cortex, Plenum, New York, pp 521–553
Hirai Y, Morishima M, Karube F, Kawaguchi Y (2012) Specialized cortical subnetworks differentially connect frontal cortex to parahippocampal areas. J Neurosci 32:1898–1913
Kawaguchi Y, Kubota Y (1997) GABAergic cell subtypes and their synaptic connections in rat frontal cortex. Cereb Cortex 7:476–486
Kubota Y (2014) Untangling GABAergic wiring in the cortical microcircuit. Curr Opin Neurobiol 26:7–14
Kubota Y, Shigematsu N, Karube F, Sekigawa A, Kato S, Yamaguchi N, Hirai Y, Morishima M, Kawaguchi Y (2011) Selective coexpression of multiple chemical markers defines discrete populations of neocortical GABAergic neurons. Cereb Cortex 21:1803–1817
Morishima M, Kawaguchi Y (2006) Recurrent connection patterns of corticostriatal pyramidal cells in frontal cortex. J Neurosci 26:4394–4405
Otsuka T, Kawaguchi Y (2011) Cell diversity and connection specificity between callosal projection neurons in the frontal cortex. J Neurosci 31:3862–3870
Uematsu M, Hirai Y, Karube F, Ebihara S, Kato M, Abe K, Obata K, Yoshida S, Hirabayashi M, Yanagawa Y et al (2008) Quantitative chemical composition of cortical GABAergic neurons revealed in transgenic venus-expressing rats. Cereb Cortex 18:315–330
Ueta Y, Otsuka T, Morishima M, Ushimaru M, Kawaguchi Y (2014) Multiple layer 5 pyramidal cell subtypes relay cortical feedback from secondary to primary motor areas in rats. Cereb Cortex 24:2362–2376
Morita K, Morishima M, Sakai K, Kawaguchi Y (2012) Reinforcement learning: computing the temporal difference of values via distinct corticostriatal pathways. Trends Neurosci 35:457–467
Groh A, Meyer HS, Schmidt EF, Heintz N, Sakmann B, Krieger P (2010) Cell-type specific properties of pyramidal neurons in neocortex underlying a layout that is modifiable depending on the cortical area. Cereb Cortex 20:826–836
Otsuka T, Kawaguchi Y (2008) Firing-pattern-dependent specificity of cortical excitatory feed-forward subnetworks. J Neurosci 28:11186–11195
Morishima M, Morita K, Kubota Y, Kawaguchi Y (2011) Highly differentiated projection-specific cortical subnetworks. J Neurosci 31:10380–10391
Ueta Y, Hirai Y, Otsuka T, Kawaguchi Y (2013) Direction- and distance-dependent interareal connectivity of pyramidal cell subpopulations in the rat frontal cortex. Front Neural Circuits 7:164
Klausberger T, Somogyi P (2008) Neuronal diversity and temporal dynamics: the unity of hippocampal circuit operations. Science 321:53–57
Jiang X, Wang G, Lee AJ, Stornetta RL, Zhu JJ (2013) The organization of two new cortical interneuronal circuits. Nat Neurosci 16:210–218
Lee S, Kruglikov I, Huang ZJ, Fishell G, Rudy B (2013) A disinhibitory circuit mediates motor integration in the somatosensory cortex. Nat Neurosci 16:1662–1670
Puig MV, Ushimaru M, Kawaguchi Y (2008) Two distinct activity patterns of fast-spiking interneurons during neocortical UP states. Proc Natl Acad Sci U S A 105:8428–8433
Yoshiyuki Kubota, Satoru Kondo, Masaki Nomura, Sayuri Hatada, Noboru Yamaguchi, Alsayed A. Mohamed, Fuyuki Karube, Joachim Lubke, Yasuo Kawaguchi (2015) Functional effects of distinct innervation styles of pyramidal cells by fast spiking cortical interneurons eLife (2015) eLife.07919
Jensen FE, Harris KM (1989) Preservation of neuronal ultrastructure in hippocampal slices using rapid microwave-enhanced fixation. J Neurosci Methods 29:217–230
Login GR, Dvorak AM (1988) Microwave fixation provides excellent preservation of tissue, cells and antigens for light and electron microscopy. Histochem J 20:373–387
Kubota Y, Kawaguchi Y (2000) Dependence of GABAergic synaptic areas on the interneuron type and target size. J Neurosci 20:375–386
Somogyi P, Takagi H (1982) A note on the use of picric acid-paraformaldehyde-glutaraldehyde fixative for correlated light and electron microscopic immunocytochemistry. Neuroscience 7:1779–1783
Kawaguchi Y (2009) Anatomical and histological analysis of neurons recorded with electrophysiological method using whole cell electrode. In: Shin patch clamp jikkenn gijutsuho, 2009/10/26 edn, pp 118–131. Yoshioka Shoten in Japanese
Alcantara S, Ruiz M, D’Arcangelo G, Ezan F, de Lecea L, Curran T, Sotelo C, Soriano E (1998) Regional and cellular patterns of reelin mRNA expression in the forebrain of the developing and adult mouse. J Neurosci 18:7779–7799
Deerinck T, Bushong EA, Lev-Ram V, Shu X, Tsien RY, Ellisman MH (2010) Enhancing serial block-face scanning electron microscopy to enable high resolution 3-D nanohistology of cells and tissues. Microsc Microanal 16:1138–1139
Kawaguchi Y, Kubota Y (1993) Correlation of physiological subgroupings of nonpyramidal cells with parvalbumin- and calbindinD28k-immunoreactive neurons in layer V of rat frontal cortex. J Neurophysiol 70:387–396
Kawaguchi Y, Kubota Y (1998) Neurochemical features and synaptic connections of large physiologically-identified GABAergic cells in the rat frontal cortex. Neuroscience 85:677–701
Kawaguchi Y (1993) Groupings of nonpyramidal and pyramidal cells with specific physiological and morphological characteristics in rat frontal cortex. J Neurophysiol 69:416–431
Kawaguchi Y (1995) Physiological subgroups of nonpyramidal cells with specific morphological characteristics in layer II/III of rat frontal cortex. J Neurosci 15:2638–2655
Puig MV, Watakabe A, Ushimaru M, Yamamori T, Kawaguchi Y (2010) Serotonin modulates fast-spiking interneuron and synchronous activity in the rat prefrontal cortex through 5-HT1A and 5-HT2A receptors. J Neurosci 30:2211–2222
Ushimaru M, Ueta Y, Kawaguchi Y (2012) Differentiated participation of thalamocortical subnetworks in slow/spindle waves and desynchronization. J Neurosci 32:1730–1746
Karube F, Kubota Y, Kawaguchi Y (2004) Axon branching and synaptic bouton phenotypes in GABAergic nonpyramidal cell subtypes. J Neurosci 24:2853–2865
Kubota Y, Hatada SN, Kawaguchi Y (2009) Important factors for the three-dimensional reconstruction of neuronal structures from serial ultrathin sections. Front Neural Circuits 3:4
Kubota Y, Karube F, Nomura M, Gulledge AT, Mochizuki A, Schertel A, Kawaguchi Y (2011) Conserved properties of dendritic trees in four cortical interneuron subtypes. Sci Rep 1:89
Mikula S, Binding J, Denk W (2012) Staining and embedding the whole mouse brain for electron microscopy. Nat Methods 9:1198–1201
Willingham MC, Rutherford AV (1984) The use of osmium-thiocarbohydrazide-osmium (OTO) and ferrocyanide-reduced osmium methods to enhance membrane contrast and preservation in cultured cells. J Histochem Cytochem 32:455–460
Naoki Shigematsu, Yoshifumi Ueta, Alsayed A. Mohamed, Sayuri Hatada, Takaichi Fukuda, Yoshiyuki Kubota, Yasuo Kawaguchi (2015)Selective thalamic innervation of rat frontal cortical neuronsCerebral Cortex, (Advanced online publication) doi: 10.1093/cercor/bhv124http://cercor.oxfordjournals.org/content/early/2015/06/03/cercor.bhv124.abstract?sid=c935d413-2c23-4747-b336-aa30cc60c216
Hayat MA (2000) Electron microscopy biological applications, 4th edn. Cambridge University Press, Cambridge
Kubota Y (2015) New developments in electron microscopy for serial image acquisition of neuronal profiles. Microscopy (Oxf) 64:27–36
Fiala JC, Kirov SA, Feinberg MD, Petrak LJ, George P, Goddard CA, Harris KM (2003) Timing of neuronal and glial ultrastructure disruption during brain slice preparation and recovery in vitro. J Comp Neurol 465:90–103
Kirov SA, Petrak LJ, Fiala JC, Harris KM (2004) Dendritic spines disappear with chilling but proliferate excessively upon rewarming of mature hippocampus. Neuroscience 127:69–80
Kubota Y, Hatada S, Kondo S, Karube F, Kawaguchi Y (2007)Neocortical Inhibitory Terminals Innervate Dendritic Spines Targeted by Thalamocortical AfferentsJ. Neurosci 27: 1139-1150.
Acknowledgments
We thank Drs. Yasuo Kawaguchi, Satoru Kondo, Mieko Morishima, Fuyuki Karube, and Yasuharu Hirai for neuron drawings, photos, and micrographs in the figures and Drs. Steven R. Vincent, Richard Miles and Fuyuki Karube for valuable comments. This work was supported by Grant-in-Aid for Scientific Research (B) (25290012), Grant-in-Aid for Scientific Research on Innovative Areas “Neural creativity for communication (No. 4103)” (24120718) and “Adaptive circuit shift (No. 3603)” 26112006 from the MEXT of Japan; The Imaging Science Program of National Institutes of Natural Sciences (NINS); Toyoaki Scholarship Foundation; and The Uehara Memorial Foundation.
Author information
Authors and Affiliations
Corresponding author
Editor information
Editors and Affiliations
Rights and permissions
Copyright information
© 2016 Springer Science+Business Media New York
About this protocol
Cite this protocol
Kubota, Y. (2016). Morphological and Neurochemical Characterization of Electrophysiologically Identified Cells. In: Luján, R., Ciruela, F. (eds) Receptor and Ion Channel Detection in the Brain. Neuromethods, vol 110. Humana Press, New York, NY. https://doi.org/10.1007/978-1-4939-3064-7_20
Download citation
DOI: https://doi.org/10.1007/978-1-4939-3064-7_20
Publisher Name: Humana Press, New York, NY
Print ISBN: 978-1-4939-3063-0
Online ISBN: 978-1-4939-3064-7
eBook Packages: Springer Protocols