
Abstract
Our understanding of colitis-associated carcinoma (CAC) has benefited substantially from mouse models that faithfully recapitulate human CAC. Chemical models, in particular, have enabled fast and efficient analysis of genetic and environmental modulators of CAC without the added requirement of time-intensive genetic crossings. Here we describe the Azoxymethane (AOM)/Dextran Sodium Sulfate (DSS) mouse model of inflammatory colorectal cancer.
Access provided by CONRICYT – Journals CONACYT. Download protocol PDF
Key words
1 Introduction
Colorectal cancer (CRC) is the fourth most common cancer in the world [1]. It is well established that colitis predisposes individuals to colorectal tumorigenesis [2–4]. Patients with inflammatory bowel disease, for example, are at an elevated risk for developing colon cancer, although the magnitude of this risk has recently come under debate [5–11]. While the molecular pathogenesis of colitis-associated cancer (CAC) remains incompletely understood, significant advances have been made from studying murine models of CAC. Here we outline the application of the Azoxymethane (AOM)/Dextran sodium sulfate (DSS) model of CAC. The AOM/DSS model is a powerful, reproducible, and relatively inexpensive initiation-promotion model that utilizes chemical induction of DNA damage followed by repeated cycles of colitis [12–15].
AOM (Methyl-methylimino-oxidoazanium, CH3N = N(→O)CH3) is a procarcinogen that is metabolized by cytochrome p450, isoform CYP2E1, converting it into methylazocymethanol (MAM), a highly reactive alkylating species that induces O6 methylguanine adducts in DNA resulting in G → A transitions [16]. After excretion into the bile, it is taken up by colonic epithelium and induces mutagenesis. DSS is a heparin-like polysaccharide that is dissolved in the drinking water and inflicts colonic epithelial damage, inducing colitis mimicking some of the features of IBD [17]. Combining AOM and DSS provides a two-step tumor model of CAC.
Key features of the AOM/DSS model include its relatively short timeline and accurate modeling of CAC. Tumor development can occur in as short as 10 weeks [12]. Moreover, the histopathology of AOM/DSS-induced tumors recapitulates key facets of human CAC such as distally located tumors and invasive adenocarcinomas [13]. Application of the AOM/DSS model has been critical in unraveling the pathogenesis of CAC: from the role of signaling pathways (e.g. Toll-like receptor 4, IKKβ, and IL-6 [18–20]) and antioxidant machinery (e.g. glutathione peroxidase [21]) to the influence of the microbiota [22] and transcriptional corepressors (e.g. Myeloid translocation genes [23]). Thus, the AOM/DSS model is a powerful platform to employ when studying the pathogenesis of inflammatory colorectal cancer.
2 Materials
-
1.
Azoxyemethane solution: 1 mg/ml. Dissolve 10 mg of AOM (Sigma-Aldrich, Cat# A4586) in 10 ml of sterile Phosphate-buffered saline (PBS). Filter the solution using a 0.45 μm cellulose acetate filter and aliquot into 1 ml sterile Eppendorf tubes. Aliquots can be stored at −20 °C for up to a year.
-
2.
0.5 ml Tuberculin Syringe with 281/2 G needle.
-
3.
Dextran Sodium Sulfate solution: 3 % (w/v). Weigh 30 g of DSS (Affymetrix Cat# 14489, MW 40–50 kDa) and dissolve into 1 l of water. Once the DSS is dissolved, filter-sterilize the solution using 0.45 μm cellulose acetate filter.
-
4.
Scale for weighing mice (Model SP402, Ohaus Scout Balance).
-
5.
10 % Buffered Formalin.
-
6.
70 % Ethanol. Dilute 190 proof ethanol to 70 % ethanol with sterile, deionized water.
-
7.
Isoflurane, USP (Phoenix Pharmaceuticals, Inc.).
-
8.
Tissue Pathology Macrosette Cassettes.
-
9.
20 G Straight feeding needle.
-
10.
Dissection Scissors Sharp/Blunt Tip (VWR International, Cat# 82027-588).
-
11.
Waugh Forceps (VWR International, Cat# 82027-428).
-
12.
271/2 G Precision Glide Needle.
-
13.
Whatman Blotting Paper.
-
14.
Carbon Fiber Composites Digital Caliper.
-
15.
Nalgene Surfactant-Free Cellulose Acetate (SFCA) Filter (Cole-Palmer, Cat# EW-06731-2).
-
16.
RNAlater solution (Life Technologies).
-
17.
RIPA buffer (Thermo Scientific).
-
18.
Sterile Phosphate-Buffered Saline (PBS).
3 Methods
3.1 Treating mice with AOM/DSS (See Fig. 1 for an Example of a Typical Experimental Timeline)

Schematic timeline for AOM/DSS-induced inflammatory carcinogenesis
Day 1: Injecting Azoxymethane
-
1.
Ensure experimental groups are age- and gender-matched with control mice (see Note 1 ). Weigh 8- to 12-week old C57BL/6 (see Note 2 ) mice and record weights. Accurate weights are required in order to ensure uniform dosing of AOM (see Note 3 ). We recommend weighing each mouse three times to increase precision. Calculate the volume of AOM (1 mg/ml) to inject to achieve a dose of 12 mg/kg. For example: a 25 g mouse would receive a 300 μl injection of 1 mg/ml AOM solution. It may be necessary to reduce the dosage if substantial toxicity is observed (see Note 4 ).
-
2.
Once you have recorded weights and injection volumes, anesthetize mice using isoflurane in accordance with your institution’s IACUC protocols. Using a 281/2 G tuberculin syringe, inject each mouse intraperitoneally with the appropriate volume of AOM.
-
3.
Place the mice back in their cages. Weigh and monitor them over the next 48 h.
-
4.
If your mouse facility provides lixit drinking valves or other automatic watering systems, be sure to cap or disengage this water supply to ensure each cage only has one water supply. It is important for mice to become accustomed to drinking only from a water bottle, as this will be the source of DSS (see Note 5 ). We recommend disengaging automatic watering systems for the duration of the experiment (see Note 6 ).
Day 3: Start DSS cycle 1
-
5.
Replace drinking water in cages with 3 % DSS formula.
Day 3–8: Monitoring Animals: DSS cycle 1
-
6.
Weigh mice daily to evaluate response to DSS-induced colitis.
-
7.
During treatment with DSS, mice can lose significant body weight depending on strain and genotype (Fig. 2). If mice lose substantial body weight (between 10 and 20 % weight loss relative to the day prior to DSS administration), it is advisable to administer up to 1 ml of sterile saline via IP injection or provide wet food (see Note 7 ).
Fig. 2 
Example of weight loss during repeat cycle DSS treatment
-
8.
If mice lose greater than 20 % body weight, demonstrate hunched posture, or move in a limited fashion, then it may be necessary to euthanize the animal. Be sure to follow all appropriate IACUC protocols.

Day 8: End DSS Cycle 1
-
9.
Replace 3 % DSS with sterile drinking water.
Day 9–12: Initial Recovery
-
10.
It is important to continue to monitor the mice, especially in the 3–5 days after replacing the 3 % DSS with water. It is not unusual for mice to continue to lose weight several days after 3 % DSS administration.
Day 13–24: Recovery
-
11.
Weigh mice every 2–3 days.
Day 25: Start DSS cycle 2
-
12.
Replace water with 3 % DSS and weigh mice daily.
Day 25–30: Monitoring Animals: DSS cycle 2
-
13.
Monitor and weigh mice as exactly as detailed in Day 3–8.
Day 30: End DSS cycle 2
-
14.
Replace 3 % DSS with water.
-
15.
Tumor burden can be safely monitored via endoscopy (Fig. 3a) throughout the duration of the experiment. We recommend using endoscopy 1 week after completion of the second cycle of DSS (see Note 8 ).
Fig. 3 
Endoscopic analysis of murine colon. (a) Above: Endoscopy image of normal colon. Below: Endoscopy of colon after AOM injection followed by two cycles of DSS. White arrows indicate tumors. (b) Above: Colons harvested and oriented with the distal end toward the dissector. Below: Example of gross tumor burden. Images are reproduced from prior report [23]

Day 30–44: Recovery
-
16.
Weigh mice every 2–3 days.
Day 45: Start DSS cycle 3
-
17.
Replace drinking water in cages with 3 % DSS formula.
Day 45–50: Monitoring Animals: DSS cycle 3
-
18.
Monitor and weigh mice as exactly as detailed in Day 3–8.
Day 50: End DSS Cycle 3
-
19.
Replace 3 % DSS with sterile drinking water.
Day 51–65: Recovery
3.2 Sacrificing Mice
-
1.
Weigh mice before euthanizing. Euthanize mice by a combination of inhalational isoflurane overdose and cervical dislocation or other institutionally, IACUC-approved protocols. Expose the ventral side of the mouse by placing the mouse on a surgical dissection table with its abdomen facing up. Secure legs for unobstructed access to the abdomen. Cover the abdomen with 70 % ethanol to prevent fur from interfering with dissection.
-
2.
Using forceps pinch and pull the abdomen up at the midline (thus forming a “tent”). Using scissors incise the pinched abdominal tissue to access the peritoneum. Then extend the incision to the xyphoid process at the midline (away from the dissector) and to the costal margins bilaterally (toward the dissector). Gently push peritoneal fat and small intestine to the side and locate the cecum (see Note 9 ).
-
3.
Once the cecum is identified, cut immediately distal to isolate proximal colon. Follow the colon using forceps and gently dissect away the mesentery. Cut through the pelvis to allow removal of the distal colon including the anus (see Note 10 ). Because DSS-induced colitis damages the distal colon, it is critical to remove the entire colon to accurately assess tumor burden.
-
4.
Flush the colon with PBS using a 10 ml syringe. Place the colon lengthwise on Whatman paper (Fig. 3b) with the distal end (anus end) nearest to the dissector and the proximal (cecum end) furthest away. Cut the colon longitudinally along the proximal–distal axis so that the colon is splayed open length-wise and the distal most portion of the colon is located nearest to the dissector.
-
5.
Assess and record tumor burden grossly. Tumor size can be measured using digital calipers. If desired, isolate tumor tissue or adjacent tissue for RNA or protein analysis using a scalpel. Place tissue for RNA analysis directly into RNAlater; for protein analysis, place tissue directly in lysis buffer with protease and phosphatase inhibitors. We recommend doubling the normal concentration of protease and phosphatase inhibitors to preserve protein integrity (see Note 11 ).
-
6.
Using two fine-tipped forceps held in two hands, grasp both lateral sides of the distal edge of the colon and roll the colon. The end product should be a rolled colon resembling a Swiss roll and the distal colon will be in the center and the proximal colon will be the outermost layer (Fig. 4 and see Note 12 ). Once the colon is rolled, place a 27½ G needle through the roll to secure it. Place the Swiss-rolled colon into a labeled tissue cassette.
Fig. 4 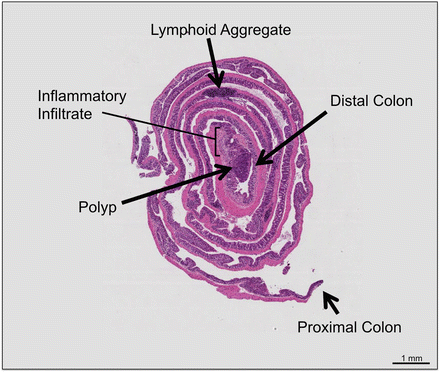
Hematoxylin and eosin stain of Swiss-rolled colon. The most distal portion of the colon is located in the innermost segment of the roll. A large polyp can be seen in the distal colon surrounded by inflammatory infiltrate
-
7.
Immerse the cassette into 10 % buffered formalin for 24 h.
-
8.
Process samples for histological analysis according to your lab’s preferred method (see Note 13 ).

4 Notes
-
1.
If possible, it is ideal to use control and experimental mice that are littermates. This will control for any environmental differences, including microbiota variability. If this is not possible, then it is strongly recommended that the control and experimental mice be housed in the same room.
-
2.
Different strains of mice will have different sensitivities to AOM/ DSS treatment. Tumor penetrance and multiplicity as well as colitis damage can all vary based on strain [15]. Thus, it is critical to adjust your AOM and DSS doses according to your genetic strain.
-
3.
As mentioned, AOM is metabolized by cytochrome p450, isoform CYP2E1 [16]. Consider the possibility that if using genetically modified mice and the gene is expressed in the liver, activation of AOM may be impaired thus confounding the results.
-
4.
AOM concentration is an important variable to adjust. Depending on the lab, mouse facilities, and mouse background, AOM can have varying effects. In preparation for your experiment, we suggest performing trial experiments using three different doses of AOM (7.5, 10, and 12.5 mg/kg) on three different cohorts (3–5 mice) of wild-type mice. Mortality from AOM is often observed between 24 and 72 h after the injection.
-
5.
Consistent DSS dosing is critical and the volume of DSS-containing water should be monitored to ensure uniform exposure across all cages. This can be done by measuring the initial volume of 3 % DSS placed into the cages on Day 1 and measuring the final volume on Day 5 before replacing with water.
-
6.
We recommend that the investigator disengage automatic watering systems or cap lixit valves for all of the mice to be used as soon as they are weaned. This allows them to become accustomed to only one water source.
-
7.
If mice lose significant body weight, they will often become too weak to access their water or food supply. If a mouse demonstrates signs of discomfort or weakness such as hunched posture, lethargy, or decreased grooming as indicated by soiled or rough hair coat, we recommend administering up to 1 ml of sterile saline by IP injection after weighing the animal. In our experience, this is an insufficient volume to affect mouse weights 24 h later. Alternatively, wet chow is a good way to provide food and hydration. A medium-sized weigh boat can be filled with standard rodent chow, soaked in water for 30 s, and then drained and placed in the cage.
-
8.
Endoscopy can be performed to visualize tumor incidence during the experiment. We recommended conducting this 1 week after completion of the second cycle of DSS (Fig. 3a). This allows sufficient time for tumor development. Moreover, allowing the mice to recover for 1 week after DSS reduces inflammation, making tumors more visible. In our experience, mice do not need to be given an oral purgative or laxative to evacuate the colonic contents. When performing endoscopy, encountered stool can be gently pushed toward the proximal regions of the colon, so as not to obscure the luminal view. If obstruction persists, 1 ml of sterile PBS can be administered as an enema to expel contents.
-
9.
The cecum is the junction at which the small intestine ends and the colon begins. The cecum can be easily identified as a large intestinal pouch containing stool and located in the right lower quadrant of the mouse.
-
10.
AOM/DSS produces tumors primarily located in the distal colon (see Fig. 3b for an example of a distal colon with a high tumor burden). Thus, it is critical to cut through the pelvis in order to remove the entire colon. This will allow you to isolate the colon with the anus intact and provide the most accurate accounting of tumor number.
-
11.
When isolating tissue from AOM/DSS-treated colons, it is important to work as quickly as possible to preserve tissue integrity. Preparation of all reagents and recording documents should be performed prior to sacrificing the mice. When harvesting tumor or colonic tissue, place the tissue directly into 350 μl of RNAlater in a pre-labeled eppendorf tube for RNA analysis. For protein analysis, we recommend preparing 500 μl of RIPA buffer with twice the amount of protease and phosphatase inhibitors as recommended. When isolating tissue for RNA or protein, it is imperative to place the tubes immediately on ice. As soon as you have completed sacrificing the mouse, recording tumor number and size, and rolled the colon, place the preserved tissue into −80 °C (for protein) or −20 °C (for RNAlater).
-
12.
While Swiss rolling can be technically challenging, especially in the presence of tumors, it is important to roll colons properly in order to obtain well-oriented samples for histological analysis. A video demonstration of proper rolling technique is available if needed [24].
-
13.
We recommend Hematoxylin and eosin (H&E) staining to assess crypt and tumor pathology (Figs. 4 and 5). H&E staining of a well-aligned colon rolls allows microscopic examination of tumors and their location within the colon. The severity of inflammatory injury can be observed with identification of inflammatory infiltrates and presence of crypt abscess. Tumor pathology such as hyperchromatic nuclei, increased nuclei/cytoplasmic ratio, and eccentric nuclei placement are all features of dysplasia and can be seen in the representative images.
Fig. 5 
Representative histology of a distal colonic tumor isolated from a mouse treated with the AOM/DSS protocol. Pathology features indicating injury include inflammatory infiltrates that are observed at low power (top panel) and intratumoral crypt abscesses (middle panel). Features of neoplasia such as hyperchromatic nuclei and increased nuclei/cytoplasmic ratios are identified at higher magnification (middle and bottom panels)

References
Siegel R, Ma J, Jemal A (2014) Cancer statistics, 2014. CA Cancer J Clin 64:9–29
Danese S, Malesci A, Vetrano S (2011) Colitis-associated cancer: the dark side of inflammatory bowel disease. Gut 60:1609–1610
Danese S, Mantovani A (2010) Inflammatory bowel disease and intestinal cancer : a paradigm of the Yin – Yang interplay between inflammation and cancer. Oncogene 29:3313–3323
Terzić J, Grivennikov S, Karin E, Karin M (2010) Inflammation and colon cancer. Gastroenterology 138:2101–2114
Eaden JA, Abrams KR, Mayberry JF (2001) The risk of colorectal cancer in ulcerative colitis : a meta analysis. Gut 48:526–535
Ekbom A, Helmick C, Zack M, Adami H (1990) Ulcerative colitis and colorectal cancer. N Engl J Med 323:1228–1233
Hovde O, Kempski-Monstad I, Småstuen MC, Solberg IC, Henriksen M, Jahnsen J et al (2013) Mortality and causes of death in Crohn’s disease: results from 20 years of follow-up in the IBSEN study. Gut 63:771–775
Beaugerie L, Svrcek M, Seksik P, Bouvier AM, Simon T, Allez M et al (2013) Risk of colorectal high-grade dysplasia and cancer in a prospective observational cohort of patients with inflammatory bowel disease. Gastroenterology 145:166–175
Gyde SN, Prior P, Allan RN, Stevens A, Jewell DP, Truelove SC et al (1988) Colorectal cancer in ulcerative colitis: a cohort study of primary referrals from three centres. Gut 29:206–217
Lakatos PL, Lakatos L (2008) Risk for colorectal cancer in ulcerative colitis: changes, causes and management strategies. World J Gastroenterol 14:3937–3947
Jess T, Rungoe C, Peyrin-Biroulet L (2012) Risk of colorectal cancer in patients with ulcerative colitis: a meta-analysis of population-based cohort studies. Clin Gastroenterol Hepatol 10:639–645
Tanaka T, Kohno H, Suzuki R, Yamada Y, Sugie S, Mori H (2003) A novel inflammation-related mouse colon carcinogenesis model induced by azoxymethane and dextran sodium sulfate. Cancer Sci 94:965–973
De Robertis M, Massi E, Poeta ML, Carotti S, Morini S, Cecchetelli L et al (2011) The AOM/DSS murine model for the study of colon carcinogenesis: from pathways to diagnosis and therapy studies. J Carcinog 10:9
Chen J, Huang XF (2009) The signal pathways in azoxymethane-induced colon cancer and preventive implications. Cancer Biol Ther 14:1313–1317
Suzuki R, Kohno H, Sugie S, Nakagama H, Tanaka T (2006) Strain differences in the susceptibility to azoxymethane and dextran sodium sulfate-induced colon carcinogenesis in mice. Carcinogenesis 1:162–169
Sohn OS, Fiala ES, Requeijo SP (2001) Differential effects of CYP2E1 status on the metabolic activation of the colon carcinogens azoxymethane. Cancer Res 61:8435–8440
Okayasu I, Hatakeyama S, Yamada M, Ohkusa T, Inagaki Y, Nakaya R (1999) A novel method in the induction of reliable experimental acute and chronic colitis in mice. Gastroenterology 98:694–702
Fukata M, Chen A, Vamadevan AS, Cohen J, Breglio K, Krishnareddy S et al (2007) Toll-like receptor-4 promotes the development of colitis-associated colorectal tumors. Gastroenterology 133:1869–1881
Greten FR, Eckmann L, Greten TF, Park JM, Li ZW, Egan LJ et al (2004) IKKβ links inflammation and tumorigenesis in a mouse model of colitis-associated cancer. Cell 118:285–296
Grivennikov S, Karin E, Terzic J, Mucida D, Yu GY, Vallabhapurapu S et al (2009) IL-6 and Stat3 are required for survival of intestinal epithelial cells and development of colitis-associated cancer. Cancer Cell 15:103–113
Barrett CW, Ning W, Chen X, Smith JJ, Washington MK, Hill KE et al (2012) Tumor suppressor function of the plasma glutathione peroxidase Gpx3 in colitis-associated carcinoma. Cancer Res 73:1245–1255
Uronis JM, Mühlbauer M, Herfarth HH, Rubinas TC, Jones GS, Jobin C (2009) Modulation of the intestinal microbiota alters colitis-associated colorectal cancer susceptibility. PLoS One 4, e6026
Barrett CW, Fingleton B, Williams A, Ning W, Fischer M, Washington MK et al (2011) MTGR1 is required for tumorigenesis in the murine AOM/DSS colitis-associated carcinoma model. Cancer Res 71:1302–1312
Whitten C, Williams A, Williams CS (2010) Murine colitis modeling using dextran sulfate sodium. J Vis Exp 35:5–8
Acknowledgments
This work was supported by the National Institutes of Health grants DK080221 (C.S.W.), 1F30DK096718-01A1 (B.P.), T32 GM07347 (NIH/NIGMS) (B.P.), Merit Review Grants from the Office of Medical Research, Department of Veterans Affairs 1I01BX001426 (C.S.W.), and ACS-RSG 116552 (C.S.W.).
Author information
Authors and Affiliations
Corresponding author
Editor information
Editors and Affiliations
Rights and permissions
Copyright information
© 2016 Springer Science+Business Media New York
About this protocol
Cite this protocol
Parang, B., Barrett, C.W., Williams, C.S. (2016). AOM/DSS Model of Colitis-Associated Cancer. In: Ivanov, A. (eds) Gastrointestinal Physiology and Diseases. Methods in Molecular Biology, vol 1422. Humana Press, New York, NY. https://doi.org/10.1007/978-1-4939-3603-8_26
Download citation
DOI: https://doi.org/10.1007/978-1-4939-3603-8_26
Published:
Publisher Name: Humana Press, New York, NY
Print ISBN: 978-1-4939-3601-4
Online ISBN: 978-1-4939-3603-8
eBook Packages: Springer Protocols