
Abstract
Since a case series on laparoscopic colectomy was firstly published in 1991 (Jacobs et al., Surg Laparosc Endosc 1:144–150, 1991), various randomized controlled trials (RCTs), non-RCTs and other types of studies had been performed, focusing on the evaluation of feasibility and safety of laparoscopic colorectal surgeries. Several meta-analyses and systematic reviews basing on RCTs and non-RCTs related to the comparison of laparoscopic and laparotomic colorectal surgeries have been established, finding out that laparoscopic surgery for colorectal cancer was non-inferior to laparotomy in terms of overall survival (Martel et al., PLoS One 7:e35292, 2012), short-term and long-term of oncological outcomes (Huang et al., Int J Colorectal Dis 26:415–421, 2011; Ma et al., Med Oncol 28:925–933, 2011), and also with shorter post-operative hospital stay (Lourenco et al., Surg Endosc 22:1146–1160, 2008). No significant differences were identified in the occurrence of major surgical complications but were associated with lower overall morbidity and minor complication rate in the management of diverticulitis (Siddiqui et al., Am J Surg 200:144–161, 2010; Cirocchi et al., Colorectal Dis 14:671–683, 2012) in the laparoscopic groups.
Substantially, laparoendoscopic single-site colorectal surgery (SILSC) is an evaluation of traditional multiport laparoscopic colorectal surgery (MLC), offering the minimally invasive advantages and cosmetic advantages over MLC with a single incision typically hidden in the umbilicus (Lu et al., Colorectal Dis 14:e171–e176, 2012). It has been applied to several colorectal procedures successfully, including right hemicolectomy, total colectomy, proctocolectomy with ileal pouch anal anastomosis, and left colectomy (Lu et al., Colorectal Dis 14:e171–e176, 2012; Chen et al., Surg Endosc 25:1887–1892, 2011; Kim et al., Ann Surg 254:933–940, 2011; Lai et al., Colorectal Dis 14:1138–1144, 2012; Papaconstantinou and Thomas, Surgery 150:820–827, 2011; Fujii et al., Surg Endosc 26:1403–1411, 2012; Poon et al., Surg Endosc 26:2729–2734, 2012; Ramos-Valadez et al., Surg Endosc 26:96–102, 2012; Rijcken et al., Dis Colon Rectum 55:140–146, 2012; Huscher et al., Am J Surg 204:115–120, 2012; Lee et al., Dis Colon Rectum 54:1355–1361, 2011; Waters et al., Dis Colon Rectum 53:1467–1472, 2010; Champagne et al., Dis Colon Rectum 54:183–186, 2011; Champagne et al., Ann Surg 255:66–69, 2012; Adair et al., Dis Colon Rectum 53:1549–1554, 2010; Gaujoux et al., J Gastrointest Surg 16:629–634, 2012; Kanakala et al., Tech Coloproctol 16:423–428, 2012; McNally et al., Surg Endosc 25:3559–3565, 2011; Wolthuis et al., Colorectal Dis 14:634–641, 2012; Papaconstantinou et al., J Am Coll Surg 213:72–80, 2011). A deceased post-operative pain score was reported, which might be due to the reduced number of lateral ports, thus decreasing post-operative discomfort (Champagne et al., Dis Colon Rectum 54:183–186, 2011; Chambers et al., Colorectal Dis 13:393–398, 2011). Additionally, the lower cost (McNally et al., Surg Endosc 25:3559–3565, 2011; Chambers et al., Colorectal Dis 13:393–398, 2011), faster recovery (Chambers et al., Colorectal Dis 13:393–398, 2011), decreased length of the largest incision (Lu et al., Colorectal Dis 14:e171–e176, 2012; Fujii et al., Surg Endosc 26:1403–1411, 2012; Lee et al., Dis Colon Rectum 54:1355–1361, 2011; Zhou et al., Dig Dis Sci 57:2103–2112, 2012), and diminished risk of incisional hernias (Ramos-Valadez et al., Surg Endosc 26:96–102, 2012) were also reviewed.
Though no criteria of contraindications for SILSC has been created, emergent condition, T4 tumors, history of abdominal surgery, morbid obesity, poor American Society of Anesthesiologists class or large size of malignant disease may act as risk factors for the performance of SILSC (Chen et al., Surg Endosc 25:1887–1892, 2011; Kim et al., Ann Surg 254:933–940, 2011; Ramos-Valadez et al., Surg Endosc 26:96–102, 2012; Huscher et al., Am J Surg 204:115–120, 2012; Waters et al., Dis Colon Rectum 53:1467–1472, 2010).
Though with potentially higher overall conversion rate, SILSC may be more feasible and safe in experienced hands if the patients are carefully selected, especially for malignancies. SILSC will benefit the patients more with its superiority over MLC.
Access provided by Autonomous University of Puebla. Download chapter PDF
Keywords
- Cecectomy
- Terminal ileum resection
- Ileocolic anastomosis
- Line of Toldt
- Right hemicolectomy
- Gerota’s fascia
- Toldt’s fascia
- Tranverse colectomy
- Sigmoidectomy
- Colorectal anastomosis
- Rectal Carcinoma
- Dixon Technique
- Miles Technique
- Artificial anus
- Pancolectomy
- Ileosigmoid anastomosis
- Appendectomy
4.1 Laparoscopic Cecectomy and Terminal Ileum Resection
4.1.1 Indications and Case Selection
Laparoscopic cecectomy and terminal ileectomy is most frequently indicated in patients with benign disease located in the ileocecal regions, including.
-
1.
Crohn’s disease.
-
2.
Cecal diverticulitis.
-
3.
Intestinal tuberculosis.
-
4.
Enteric Behcet’s disease.
-
5.
Submucosal tumors: including lipoma, gastrointestinal stromal tumor, lymphoma, carcinoid, etc.
-
6.
Giant villous adenoma.
-
7.
Polyps.
4.1.2 Contraindications
-
1.
Patients with nonlocalized intraabdominal abscesses.
-
2.
Patients underwent multiple previous bowel operations with possible dense adhesions.
-
3.
Patients having fixed mass with multiple fistulas.
-
4.
Patients with acute intestinal obstruction.
-
5.
Patients underwent perforation of cecum or terminal ileum.
4.1.3 Major Instruments or Energy Sources
-
1.
Laparoscopy System.
-
2.
Electrocautery.
-
3.
Harmonic scalpel.
-
4.
Endoscopic linear and circular stapler.
4.1.4 Team Setup, Anesthesia and Position
Under general anesthesia, the patient was placed in supine position with the arms adducted along the side. The position of surgeon, assistants and nurses is shown in Fig. 4.1.

Fig. 4.1
4.1.5 Key Steps
-
1.
Establishment of Pneumoperitoneum and Placement of Trocars.
-
2.
Mobilization of the ascending colon.
-
3.
Mobilization of the terminal ileum.
-
4.
Ileal resection and purse-string suture.
-
5.
Ileocolic end-to-side anastomosis.
-
6.
Cecectomy and Terminal Ileum Resection.
-
7.
Flushing and suturing the incision.
4.1.6 Surgical Techniques
-
1.
Establishment of Pneumoperitoneum and Placement of Trocars.
-
2.
Mobilization of the ascending colon.
A lateral to medial technique was used by the surgeon. The ascending colon was retracted medially by using an atraumatic forceps in the left hand. The terminal ileum, cecum, and ascending colon were mobilized from the line of Toldt to the midline by using the harmonic scalpel. Small bleeders encountered were cauterized. The right ureter was identified and preserved (Fig. 4.2a–h).


Fig. 4.2
-
3.
Mobilization of the terminal ileum.
The terminal ileum was lifted superiorly and laterally to expose the mesentery of the ileum. The mesentery was mobilized by using the harmonic scalpel and the ileocolic vessels were ligated and amputated until the terminal ileum, cecum and ascending colon were completely mobilized from their posterior attachment (Fig. 4.3a–f).

Fig. 4.3
-
4.
Ileal resection and purse-string suture.
Once mobilization was complete, the ports were removed and the incision was extended to 3 cm total in length to facilitate exteriorization of the specimen. The terminal ileum, cecum, and ascending colon were then brought outside the abdomen. A purse-string stapler was used to divide the terminal 10 cm ileum. The anvil of the circular stapler was put into the proximal stump of the ileum and embedded (Fig. 4.4a–h).


Fig. 4.4
-
5.
Ileocolic end-to-side anastomosis.
An incision was made on the anterior wall of the cecum and the handle lever of the circular stapler was implanted into the colic lumen through this incision and punctured out through the lateral wall of the ascending colon where the anastomosis was to be made. The handle lever and anvil of the stapler were connected, screwed and firmly locked. After careful checking the connection part, the stapler was fired to complete the ileocolic end-to-side anastomosis. Careful examination of the anastomosis was done ensure the devoid of torsion, twist or bleeding (Fig. 4.5a–f).

Fig. 4.5
-
6.
Cecectomy and Terminal Ileum Resection.
The colectomy was closed with a liner stapler 2–3 cm distal to the anastomosis. The whole specimen including the cecum and terminal ileum were removed. We closed the mesentery by using 2-0 silk figure-of-eight sutures. The stump of the ascending colon was embedded by using continuous seromuscular layer suture with absorbable thread (Fig. 4.6a, b).

Fig. 4.6
-
7.
Flushing and suturing the incision.
The anastomosis was then pushed back into the abdominal cavity. Three trocars were reinserted and routine inspection and washing were performed. After carefully checking the anastomosis to exclude torsion or twist, a closed suction drain was placed near the anastomosis through the umbilical incision (Fig. 4.7a–d).
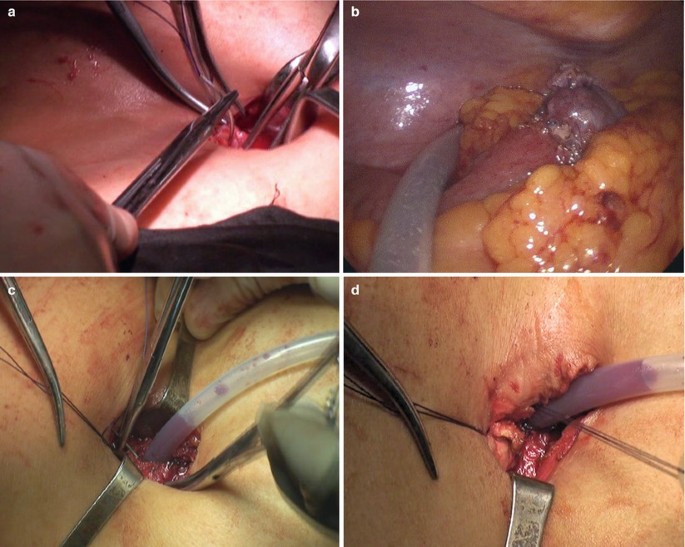
Fig. 4.7


4.1.7 Tips and Tricks
-
1.
Ileocolic resection involves mobilizing the right colon and terminal ileum with extracorporeal vessel transection and anastomosis.
-
2.
The patient should be prepared and secured to the table the same way as any laparoscopic procedure. Split-leg extenders can be beneficial for the camera driver to stay out of the field of motion of the operating surgeon in the procedures.
4.2 Laparoscopic Right Hemicolectomy
4.2.1 Indications and Case Selection
-
1.
Patients with severe damages of the cecum or ascending colon.
-
2.
Patients with malignancies in the cecum, ascending colon, or hepatic flexure of colon, but with no remote metastasis.
-
3.
Patients with ileocecal tuberculosis complicated with partial intestinal obstruction.
-
4.
Patients with ileocolic intussusception complicated with intestinal necrosis.
-
5.
Others, including cecal volvulus, inflammatory granuloma in the ileocecal junction, chronic and localized enteritis.
4.2.2 Contraindications
It’s the same as Sect. 4.1.2.
4.2.3 Major Instruments or Energy Sources
-
1.
Laparoscopy System.
-
2.
Electrocautery.
-
3.
Harmonic scalpel.
-
4.
Endoscopic linear and circular stapler.
4.2.4 Team Setup, Anesthesia and Position
Under general anesthesia, the patient was placed in supine position with the arms adducted along the side. The position of surgeon, assistants and nurses is shown in Fig. 4.8.

Fig. 4.8
4.2.5 Key Steps
-
1.
Establishment of Pneumoperitoneum and Placement of Trocars.
-
2.
Mobilization of the ascending colon.
-
3.
Mobilization of the hepatic flexure of the colon.
-
4.
Mobilization of the gastrocolic ligament.
-
5.
Mobilization of the ileocolic mesentery.
-
6.
Transection of the transverse colon.
-
7.
Right hemicolectomy.
-
8.
Ileocolic anastomosis.
-
9.
Flushing and suturing the incision.
4.2.6 Surgical Techniques
-
1.
Establishment of Pneumoperitoneum and Placement of Trocars.
-
2.
Mobilization of the ascending colon.
A lateral to medial technique was used by the surgeon. The ascending colon was retracted medially by using an atraumatic forceps in the left hand. The terminal ileum, cecum, and ascending colon were mobilized from the line of Toldt to the midline by using the harmonic scalpel. Small bleeders encountered were cauterized. The right ureter was identified and preserved (Fig. 4.9a–j).

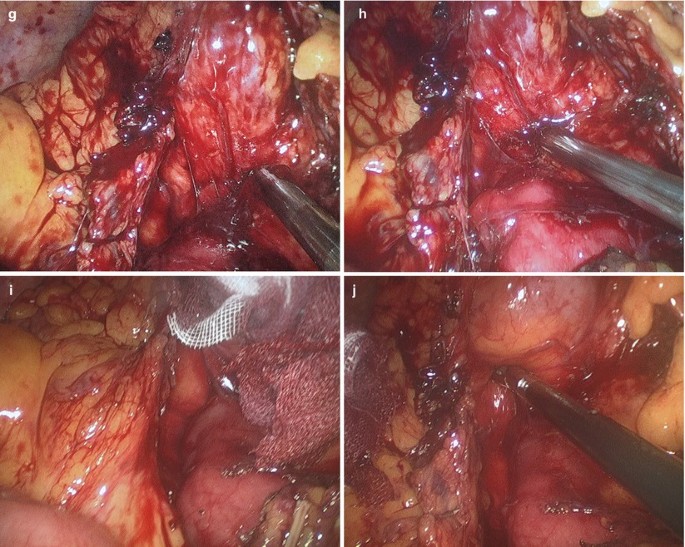
Fig. 4.9
-
3.
Mobilization of the hepatic flexure of the colon.
Continuous mobilization upward was performed until the hepatic flexure of colon was fully freed from its attachment. The right part of transverse mesocolon was mobilized by using the harmonic scalpel. The duodenum was recognized and protected (Fig. 4.10a–d).

Fig. 4.10
-
4.
Mobilization of the gastrocolic ligament.
The hepatic flexure was retracted downward. The right part of the gastrocolic ligament was mobilized by using the harmonic scalpel (Fig. 4.11a–e).

Fig. 4.11
-
5.
Mobilization of the ileocolic mesentery.
Mobilization of the ileocolic mesentery was carried out from the inferior to the superior direction in the avascular plane between Gerota’s fascia and Toldt’s fascia. During this procedure, the duodenum was used as a landmark for safe upward dissection. The ileocolic vessel was then isolated and separately ligated near the superior mesenteric vessel with Hemolock. Thereafter, using a dissection along the lateral part of the middle colic vessel, the right branch of the middle colic vessel was severed. The gastrocolic trunk from the superior mesenteric vein was then exposed (Fig. 4.12a–j).

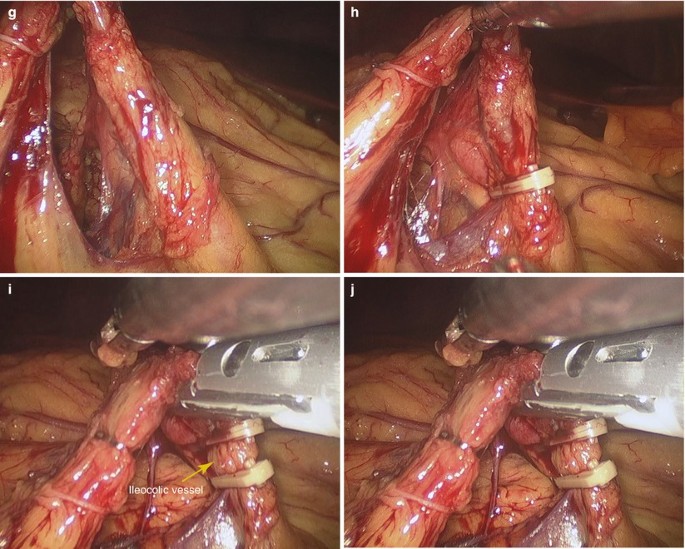
Fig. 4.12
-
6.
Transection of the transverse colon.
The transverse colon was transected on the right side of the middle colic vessel. The ports were removed and the incision was extended to 3 cm total in length to facilitate exteriorization of the specimen. The terminal ileum, cecum, ascending colon and right part of the transverse colon were then brought outside the abdomen (Fig. 4.13a–f).

Fig. 4.13
-
7.
Right hemicolectomy.
A purse-string stapler was used to divide the terminal 15 cm ileum. The anvil of the circular stapler was put into the proximal stump of the ileum and embedded. Then, the stump of the ileum was put back into the abdominal cavity (Fig. 4.14a–d).

Fig. 4.14
-
8.
Ileocolic anastomosis.
The distal stump of the transverse colon was brought outside the abdomen. The stump was opened and the handle lever of the circular stapler was implanted into the colic lumen through the stump and punctured out through the lateral wall of the transverse colon where the anastomosis was to be made. The handle lever and anvil of the stapler were connected, screwed and firmly locked. After careful checking the connection part, the stapler was fired to complete the ileocolic end-to-side anastomosis. Careful examination of the anastomosis was done to ensure the devoid of torsion, twist or bleeding. The stump of the transverse colon was then transected by using liner stapler (Fig. 4.15a–d).
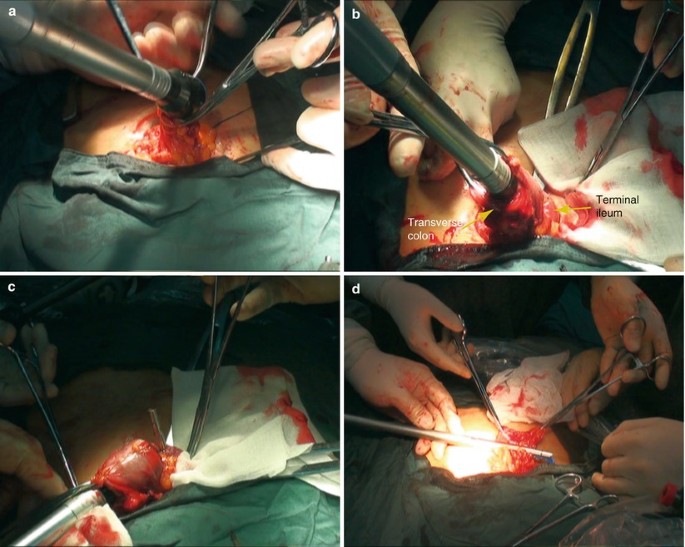
Fig. 4.15
-
9.
Flushing and suturing the incision.
The anastomosis was then pushed back into the abdominal cavity. Three trocars were reinserted and routine inspection and washing were performed. After careful checking the anastomosis to exclude torsion or twist, a closed suction drain was placed near the anastomosis through the umbilical incision (Fig. 4.16a–f).


Fig. 4.16


4.2.7 Tips and Tricks
-
1.
In the case of a right hemicolectomy, a high ligation of the ileocolic vessels can be performed using this vascular sealing device.
-
2.
Visualization of the hepatic flexure can be a challenge, requiring practice retracting with only 1 instrument. It is helpful to move the table to the reverse Trendelenburg position and, with a bowel grasper, sweep the right colon medially and anteriorly, which will display the hepatocolic attachments in reference to the duodenum. This procedure can be executed with lateral retraction on the colonic wall alone without the need to grasp the colon itself, potentially minimizing injury.
-
3.
Once the right colon is adequately mobilized and the mesentery is dissected free from the retroperitoneum, the bowel is grasped and brought out through the wound protector of umbilicus and conducted the anastomosis.
4.3 Laparoscopic Transverse Colectomy
4.3.1 Indications and Case Selection
-
1.
Patients with malignancies in the middle of transverse colon, hepatic or splenic flexure of colon, but with no remote metastasis.
-
2.
Patients with adenomatosis of the transverse colon.
-
3.
Patients with damages, or torsion with infarction of the transverse colon.
4.3.2 Contraindications
It’s the same as Sect. 4.1.2.
4.3.3 Major Instruments or Energy Sources
-
1.
Laparoscopy System.
-
2.
Electrocautery.
-
3.
Harmonic scalpel.
-
4.
Endoscopic linear and circular stapler.
4.3.4 Team Setup, Anesthesia and Position
Under general anesthesia, the patient was placed in supine position with the legs apart. The position of surgeon, assistants and nurses is shown in Fig. 4.17.

Fig. 4.17
4.3.5 Key Steps
-
1.
Establishment of Pneumoperitoneum and Placement of Trocars.
-
2.
Mobilization of the gastrocolic ligament.
-
3.
Mobilization of the transverse mesocolon.
-
4.
Mobilization of the ascending colon.
-
5.
Transection of the transverse colon.
-
6.
Flushing and suturing the incision.
4.3.6 Surgical Techniques
-
1.
Establishment of Pneumoperitoneum and Placement of Trocars.
-
2.
Mobilization of the gastrocolic ligament.
With an atraumatic grasper on the left hand and ultrasonic scalpel on the right, the gastrocolic ligament was mobilized below the vascular arch with the left side to the left flexure of colon and the right to the hepatic flexure of colon (Fig. 4.18a–f).

Fig. 4.18
-
3.
Mobilization of the transverse mesocolon.
Mobilization of the transverse mesocolon was carried out from the medial to lateral direction in the avascular plane between Gerota’s fascia and Toldt’s fascia. During this procedure, the duodenum and pancreas were used as a landmark for safe dissection. The middle colic vessels were severed (Fig. 4.19a–g).


Fig. 4.19
-
4.
Mobilization of the ascending colon.
The ascending colon was retracted medially by using an atraumatic forceps in the left hand. The cecum and ascending colon were mobilized from the line of Toldt by using the harmonic scalpel. Small bleeders encountered were cauterized (Fig. 4.20a–j).


Fig. 4.20
-
5.
Transection of the transverse colon.
The transverse colon was transected on its left side by using the liner stapler. The ports were removed and the incision was extended to 3 cm total in length to facilitate exteriorization of the specimen. Transverse colon resection and end-to-end anastomosis were performed under direct vision (Fig. 4.21a, b).

Fig. 4.21
-
6.
Flushing and suturing the incision.
The anastomosis was then pushed back into the abdominal cavity. Three trocars were reinserted and routine inspection and washing were performed. After careful checking the anastomosis to exclude torsion or twist, a closed suction drain was placed near the anastomosis through the umbilical incision (Fig. 4.22a–c).

Fig. 4.22


4.4 Laparoscopic Sigmoidectomy
4.4.1 Indications and Case Selection
Indications for laparoscopic sigmoid colectomy are identical to the indications for open colectomy. Benign disease or malignant tumors in the juncture of descending colon and sigmoid colon, or in the sigmoid colon are all indicated.
4.4.2 Contraindications
Factors that may hinder a laparoscopic approach include severe adhesions from prior abdominal or pelvic operations or inflammatory processes, cardiopulmonary insufficiency, morbid obesity, and cancer invading other structures.
4.4.3 Major Instruments or Energy Sources
-
1.
Laparoscopy System.
-
2.
Electrocautery.
-
3.
Harmonic scalpel.
-
4.
Endoscopic linear and circular stapler.
4.4.4 Team Setup, Anesthesia and Position
The patient was positioned lithotomy under general anesthesia. The position of surgeon, assistants and nurses is shown in Fig. 4.23.

Fig. 4.23
4.4.5 Key Steps
-
1.
Establishment of Pneumoperitoneum and Placement of Trocars.
-
2.
Mobilization of the sigmoid colon.
-
3.
Mobilization of the sigmoid mesocolon.
-
4.
Ligation of the inferior mesenteric vessels.
-
5.
Transection of the rectum.
-
6.
Removal of the sigmoid colon.
-
7.
Colorectal anastomosis.
-
8.
Flushing and suturing the incision.
4.4.6 Surgical Techniques
-
1.
Establishment of Pneumoperitoneum and Placement of Trocars.
-
2.
Mobilization of the sigmoid colon.
The surgeon used a lateral to medial technique. The sigmoid colon was retracted medially by using an atraumatic forceps in the left hand and was mobilized from the line of Toldt to the midline by using harmonic scalpel. Small bleeders encountered were cauterized (Fig. 4.24a–h).


Fig. 4.24
-
3.
Mobilization of the sigmoid mesocolon.
Mobilization of the sigmoid mesocolon was carried out from the inferior to superior direction in the avascular plane between Gerota’s fascia and Toldt’s fascia. The medial-to-lateral dissection was continued until the left-sided colon was separated from the retroperitoneum. the left ureter and gonadal vessels were then identified and preserved (Fig. 4.25a–f).

Fig. 4.25
-
4.
Ligation of the inferior mesenteric vessels.
Initially, the inferior mesenteric artery (IMA) was retracted with the double fenestrated forceps, and the IMA was ligated near the origin by using clip placement or linear stapler. Thereafter, division of the inferior mesenteric vein was performed close to the Treitz ligament (Fig. 4.26a–d).

Fig. 4.26
-
5.
Transection of the rectum.
The rectum was retracted upward and was transected 10 cm distal to the lesion by using a 12 mm flexible linear stapler which was introduced through the 12 mm port (Fig. 4.27a–f).

Fig. 4.27
-
6.
Removal of the sigmoid colon.
The ports were removed and the incision was extended to 3 cm total in length to facilitate exteriorization of the specimen. The sigmoid was then brought outside the abdomen. A purse-string stapler was used to divide the proximal 10 cm sigmoid colon. The anvil of the circular stapler was put into the proximal stump of the colon and embedded. Then, the stump of the colon was put back into the abdominal cavity (Fig. 4.28a–d).

Fig. 4.28
-
7.
Colorectal anastomosis.
The handle lever of the circular stapler was implanted into the rectal lumen through the anus and punctured out through the middle point of the rectal stump where the anastomosis was to be made. The handle lever and anvil of the stapler were connected, screwed and firmly locked. After careful checking the connection part, the stapler was fired to complete the colorectal end-to-end anastomosis. Careful examination of the anastomosis was done to ensure the devoid of torsion, twist or bleeding (Fig. 4.29a–j).


Fig. 4.29
-
8.
Flushing and suturing the incision.
Routine inspection and washing were performed. After careful checking the anastomosis to exclude torsion or twist, a closed suction drain was placed near the anastomosis through the umbilical incision (Fig. 4.30).


Fig. 4.30
4.4.7 Tips and Tricks
-
1.
The patient is prepared and stabilized to a split-leg extender table.
-
2.
The art of camera driving to provide adequate visualization is an acquired and essential skill that is particularly difficult with the rigid laparoscope. Time spent driving the scope is essential. Learning can occur in a laboratory setting.
-
3.
It is important to be mindful of table, surgeon, and assistant positioning throughout the procedure, as all should transition as the dissection progresses.
4.5 Laparoscopic Radical Resection of Rectal Carcinoma (Dixon Technique)
4.5.1 Indications and Case Selection
Indications for laparoscopic radical resection of rectal carcinoma are identical to the indications for open surgery. Laparoscopic radical operation should be performed as early as possible if there are no contraindications. Dixon operation should be performed for the patients with rectal carcinoma, which is more than 5 cm with the inferior border of the tumor apart from dentate line.
4.5.2 Contraindications
It’s identical to Sect. 4.4.2.
4.5.3 Major Instruments or Energy Sources
-
1.
Laparoscopy System.
-
2.
Electrocautery.
-
3.
Harmonic scalpel.
-
4.
Endoscopic linear and circular stapler.
4.5.4 Team Setup, Anesthesia and Position
The patient was positioned lithotomy under general anesthesia. The position of surgeon, assistants and nurses is shown in Fig. 4.31.

Fig. 4.31
4.5.5 Key Steps
-
1.
Establishment of Pneumoperitoneum and Placement of Trocars.
-
2.
Mobilization of the sigmoid colon.
-
3.
Ligation of the inferior mesenteric vessels.
-
4.
Mobilization of the rectum.
-
5.
Resection of the rectum (transanal technique).
-
6.
Colorectal anastomosis.
-
7.
Flushing and suturing the incision.
4.5.6 Surgical Techniques
-
1.
Establishment of Pneumoperitoneum and Placement of Trocars.
-
2.
Mobilization of the sigmoid colon.
The surgeon used a lateral to medial technique. The sigmoid colon was retracted medially by using an atraumatic forceps in the left hand and was mobilized from the line of Toldt to the midline by using harmonic scalpel until the peritoneal reflection was reached. Small bleeders encountered were cauterized. Mobilization of the sigmoid mesocolon was carried out inferior to the superior direction in the avascular plane between Gerota’s fascia and Toldt’s fascia. The medial-to-lateral dissection was continued until the left-sided colon was separated from the retroperitoneum. The left ureter and gonadal vessels were then identified and preserved (Fig. 4.32a–n).
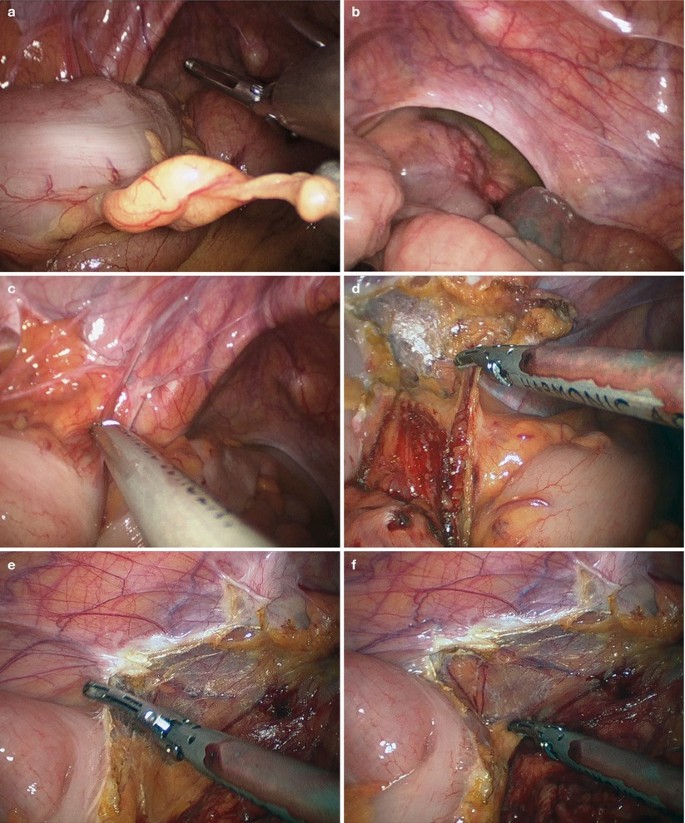


Fig. 4.32
-
3.
Ligation of the inferior mesenteric vessels.
Initially, the inferior mesenteric artery (IMA) was retracted with the double fenestrated forceps, and the IMA was ligated near the origin by using clip placement or linear stapler. Thereafter, division of the inferior mesenteric vein was performed close to the Treitz ligament (Fig. 4.33a–h).


Fig. 4.33
-
4.
Mobilization of the rectum.
A stay suture was introduced into the abdominal cavity through a small puncture on the lower abdominal wall. By seromuscular suture, the rectum was lifted upward to facilitate the mobilization of the posterior wall of the rectum. Rectal mobilization was initiated by dissecting the pelvic cavity along the avascular plane between the fascia propria of the rectum and the parietal fascia, and a total mesorectal excision or a partial mesorectal excision was then performed, depending on the tumor’s location (Fig. 4.34a–l).

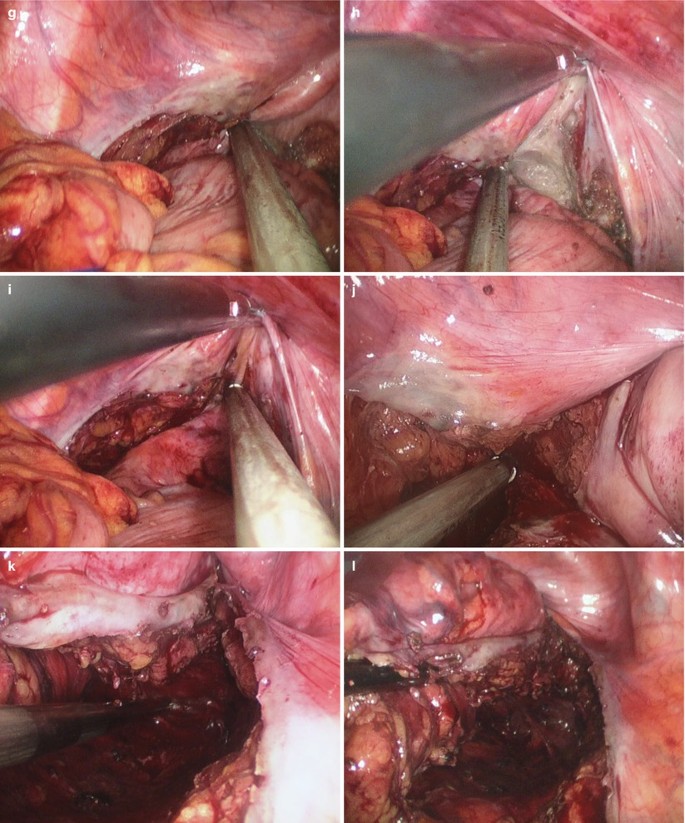
Fig. 4.34
-
5.
Resection of the rectum (transanal technique).
In the case of very low rectal mass, it was difficult to transect the rectum through the umbilical incision. We used a transanal technique here. First, the sigmoid colon was transected 10 cm proximal to the mass by using flexible linear stapler. Then, an oval clamp was introduced into the rectal cavity through the anus to clip and pull out the distal rectum stump through the anus. The distal rectum was transected by using linear stapler under direct vision (Fig. 4.35a–h).


Fig. 4.35
-
6.
Colorectal anastomosis.
The ports were removed and the incision was extended to 3 cm total in length to facilitate exteriorization of the specimen. The proximal sigmoid and rectum were then brought outside the abdomen. A purse-string stapler was used to divide the proximal 10 cm sigmoid colon. The anvil of the circular stapler was put into the proximal stump of the colon and embedded. Then, the stump of the colon was put back into the abdominal cavity. The handle lever of the circular stapler was implanted into the rectal lumen through the anus and punctured out through the middle point of the rectal stump where the anastomosis was to be made. The handle lever and anvil of the stapler were connected, screwed and firmly locked. After careful checking the connection part, the stapler was fired to complete the colorectal end-to-end anastomosis. Careful examination of the anastomosis was done to ensure the devoid of torsion, twist or bleeding (Fig. 4.36a–d).
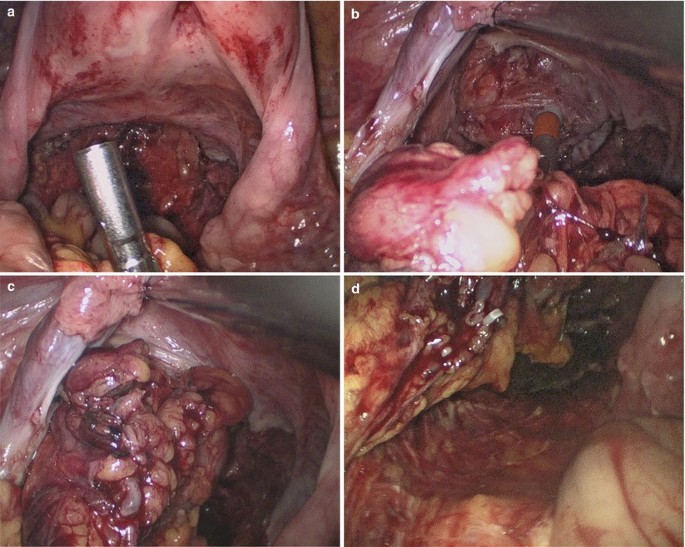
Fig. 4.36
-
7.
Flushing and suturing the incision.
Routine inspection and washing were performed. After careful checking the anastomosis to exclude torsion or twist, a closed suction drain was placed near the anastomosis through the umbilical incision (Fig. 4.37a, b).

Fig. 4.37


4.5.7 Tips and Tricks
-
1.
When below the peritoneal reflection, visualization can be difficult. A floppy uterus can be retracted anteriorly using a suture on a Keith needle passed under direct vision through the abdominal wall. Clips can also be used to tack a floppy ovary or fallopian tube above the broad ligament.
-
2.
To get further separation between the vagina and the rectum, a probe can be placed into the vagina for anterior retraction or into the rectum for posterior retraction.
-
3.
Both retraction methods can be utilized to create more operating space in the deep narrow pelvis.
-
4.
Getting an adequate flush staple line in the low pelvis can be difficult. Dissection must be low enough to avoid injury to surrounding structures. Placing the stapler in an anterior-to-posterior fashion can make it easier to fit the rectum within the stapler jaws. The staplers are not able to articulate to 90°. By placing cephalad and posterior retraction on the anterior surface of the rectum and using 70° articulation of the stapler, a staple line that is even and flush to the levators can be created.
-
5.
In the scenario of a long anal canal, dissecting within the levators can give additional mobilization so that when perineal pressure is applied, it is possible to get an extra 1–2 cm of rectum.
-
6.
The stapled rectum is grasped and the colon is extracted through the wound protector. After stapling, the small bowel can be returned to the peritoneal cavity to ensure mesenteric orientation for anastomosis or stoma creation.
4.6 Laparoscopic Radical Resection of Rectal Carcinoma (Miles Technique)
4.6.1 Indications and Case Selection
Miles operation should be performed for the patients with rectal carcinoma, which is less than 5 cm with the inferior border of the tumor apart from dentate line.
4.6.2 Contraindications
It’s identical to Sect. 4.4.2.
4.6.3 Major Instruments or Energy Sources
-
1.
Laparoscopy System.
-
2.
Electrocautery.
-
3.
Harmonic scalpel.
-
4.
Endoscopic linear stapler.
4.6.4 Team Setup, Anesthesia and Position
The patient was positioned lithotomy under general anesthesia. The position of surgeon, assistants and nurses is shown in Fig. 4.38.

Fig. 4.38
4.6.5 Key Steps
-
1.
Establishment of Pneumoperitoneum and Placement of Trocars.
-
2.
Mobilization of the sigmoid colon and upper segment of the rectum.
-
3.
Ligation of the inferior mesenteric vessels.
-
4.
Mobilization of the rectum.
-
5.
Transperineal resection of the rectum.
-
6.
Establishment of artificial anus.
4.6.6 Surgical Techniques
-
1.
Establishment of Pneumoperitoneum and Placement of Trocars.
The single 3 cm incision was made on the left lower quadrant of the abdomen wall against the McBurney point where the stoma was to be made (Fig. 4.39).
-
2.
Mobilization of the sigmoid colon and upper segment of the rectum.
The surgeon used a lateral to medial technique. The sigmoid colon was retracted medially by using an atraumatic forceps in the left hand and was mobilized from the line of Toldt to the midline by using the harmonic scalpel until the peritoneal reflection was reached. Small bleeders encountered were cauterized. Mobilization of the sigmoid mesocolon was carried out inferior to the superior direction in the avascular plane between Gerota’s fascia and Toldt’s fascia. The medial-to-lateral dissection was continued until the left-sided colon was separated from the retroperitoneum. The left ureter and gonadal vessels were then identified and preserved (Fig. 4.39a–ab).


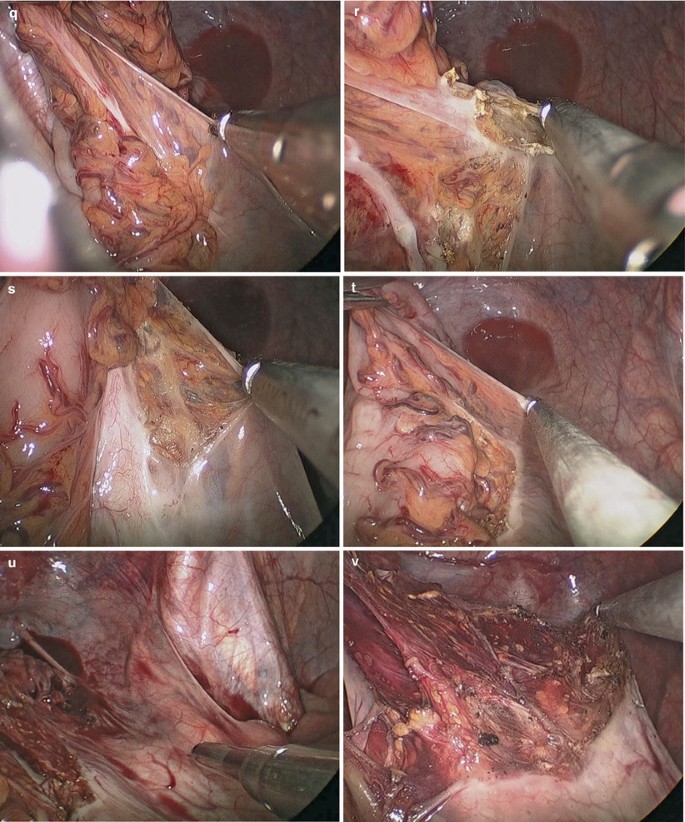

Fig. 4.39
-
3.
Ligation of the inferior mesenteric vessels.
Initially, the inferior mesenteric artery (IMA) was retracted with the double fenestrated forceps, and the IMA was ligated near the origin by using clip placement or linear stapler. Thereafter, division of the inferior mesenteric vein was performed close to the Treitz ligament (Fig. 4.40a–f).

Fig. 4.40
-
4.
Mobilization of the rectum.
Rectal mobilization was initiated by dissecting the pelvic cavity along the avascular plane between the fascia propria of the rectum and the parietal fascia, and a total mesorectal excision was then performed (Fig. 4.41a–ab).
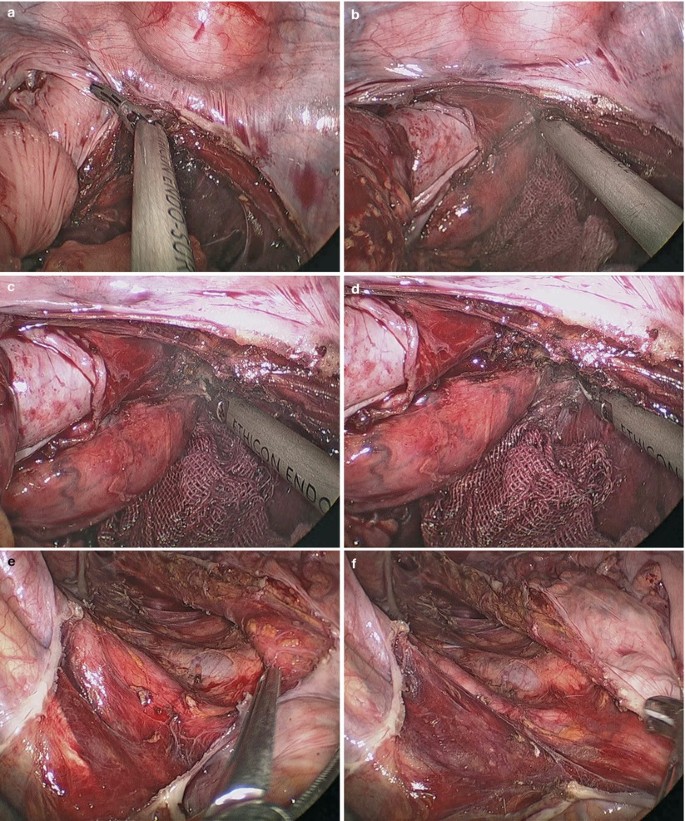


Fig. 4.41
-
5.
Transperineal resection of the rectum.
After once again disinfection of the perineum, the anus was closed by interrupted suture. An oval incision was made around the anus and the lower segment of the rectum was freed layer-by-layer until it was completely fully liberated and pulled out through the anus. The sigmoid colon was transected 15 cm proximal to the mass by using linear stapler. The whole specimen was removed and the stump of the colon returned to the abdominal cavity. The perineal incision was sutured (Fig. 4.42a–h).


Fig. 4.42
-
6.
Establishment of artificial anus.
The abdominal incision was expanded to about 3 cm and the fascial bridges among the ports were cut open. The stump of the sigmoid colon was extracted out through this single incision and an artificial anus was established (Fig. 4.43a, b).

Fig. 4.43


4.6.7 Tips and Tricks
-
1.
The right-sided dissection is difficult when operating through the stoma site as the dissection is directly below the port. Patient positioning in the maximal left-side-down position helps to maintain ergonomics while operating directly under the incision.
-
2.
A technique for providing sufficient retraction and triangulation is using an increased table angulation and gravity to tent the mesentery over the non-dominant instrument, providing a clear view both above and below the mesentery. This technique helps to ensure safety of transection and good visualization of all structures, while not causing trauma to the bowel.
-
3.
After sample removal, the small bowel can be returned to the peritoneal cavity to ensure mesenteric orientation for stoma creation.
4.7 Laparoscopic Pancolectomy
4.7.1 Indications and Case Selection
-
1.
Patients with benign disease, including familial adenomatous polyposis coli., intractable or complicated inflammatory bowel disease, bleeding arteriovenous malformations, severe, chronic constipation, ischemic colitis or any other condition suitable for resection.
-
2.
Patients with malignant disease, including synchronous colon carcinoma.
4.7.2 Contraindications
-
1.
Relative contraindications: advanced disease with frozen pelvis, multiple operations with severe adhesions, very large tumors, large abdominal aortic aneurysm, advanced cirrhosis, prior gynecologic procedures, unprepared operating room.
-
2.
Absolute contraindications: bleeding dyscrasias, severe cardiopulmonary disease, intolerance to general anesthesia, non-correctable cardiovascular disease, inadequately trained surgeon, intolerance to CO2 and dilated bowel.
4.7.3 Major Instruments or Energy Sources
-
1.
Laparoscopy System.
-
2.
Electrocautery.
-
3.
Harmonic scalpel.
-
4.
Endoscopic linear stapler.
4.7.4 Team Setup, Anesthesia and Position
Under general anesthesia, the patient was placed in supine position with the legs apart. The position of surgeon, assistants and nurses is shown in Fig. 4.44.

Fig. 4.44
4.7.5 Key Steps
-
1.
Establishment of Pneumoperitoneum and Placement of Trocars.
-
2.
Mobilization of the adhesion of the cecum.
-
3.
Mobilization of the cecum, ascending colon and terminal ileum.
-
4.
Mobilization of the hepatic flexure of the colon.
-
5.
Mobilization of the transverse colon.
-
6.
Mobilization of the splenic flexure of the colon, descending and partial sigmoid colon.
-
7.
Transection of the sigmoid.
-
8.
Removal of the specimen and ileosigmoid anastomosis.
4.7.6 Surgical Techniques
-
1.
Establishment of Pneumoperitoneum and Placement of Trocars.
-
2.
Mobilization of the adhesion of the cecum.
The cecum was retracted medially by using an atraumatic forceps and the adhesion of the cecum was mobilized by using the harmonic scalpel (Fig. 4.45a–f).
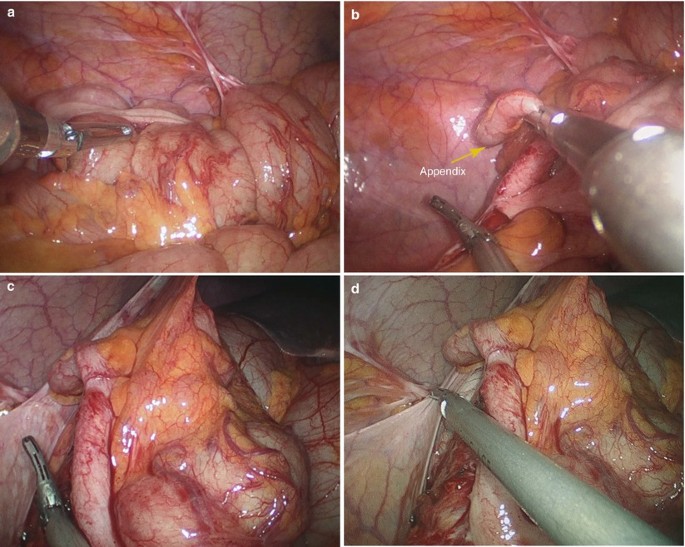

Fig. 4.45
-
3.
Mobilization of the cecum, ascending colon and terminal ileum.
The surgeon used a lateral to medial technique. The ascending colon was retracted medially by using an atraumatic forceps in the left hand. The terminal ileum, cecum, and ascending colon were mobilized from the line of Toldt to the midline by using the harmonic scalpel. Small bleeders encountered were cauterized. The right ureter was identified and preserved (Fig. 4.46a–d).
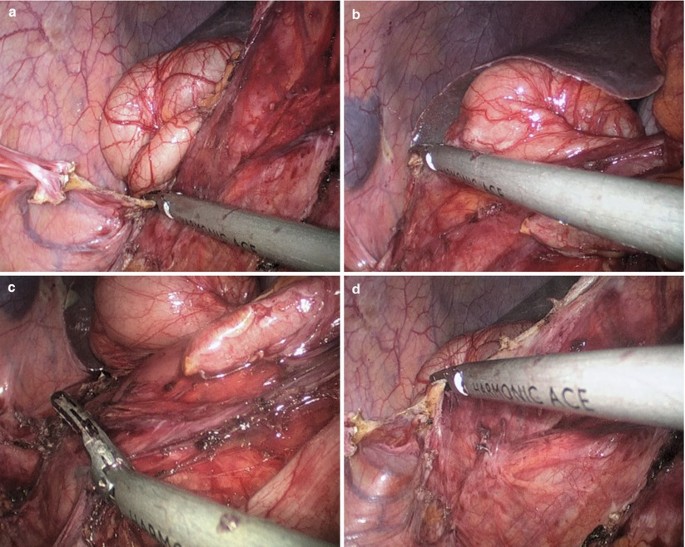
Fig. 4.46
Mobilization of the ileocolic mesentery was carried out from the inferior to superior direction in the avascular plane between Gerota’s fascia and Toldt’s fascia. During this procedure, the duodenum was used as a landmark for safe upward dissection. The ileocolic vessel was then isolated and separately ligated near the superior mesenteric vessel with Hemolock (Fig. 4.47a–h).


Fig. 4.47
-
4.
Mobilization of the hepatic flexure of the colon.
Continuous mobilization upward was performed until the hepatic flexure of colon was fully freed from its attachment (Fig. 4.48a–d).

Fig. 4.48
-
5.
Mobilization of the transverse colon.
The hepatic flexure was retracted downward. The gastrocolic ligament was mobilized by using the harmonic scalpel. Thereafter, using a dissection along the lateral part of the middle colic vessel, the middle colic vessel was severed. The gastrocolic trunk from the superior mesenteric vein was then exposed. The duodenum was carefully protected (Fig. 4.49a–j).


Fig. 4.49
-
6.
Mobilization of the splenic flexure of the colon, descending and partial sigmoid colon.
During splenic mobilization, the double fenestrated forceps was used to retract the left-sided colon to the right side of the patients, and the splenic flexure was freed from the omentum and surrounding tissues. Continuous mobilization of the descending colon and sigmoid colon was retracted medially by using an atraumatic forceps in the left hand and was mobilized from the line of Toldt to the midline by using the harmonic scalpel. Mobilization of the descending and sigmoid mesocolon was carried out from a inferior to superior direction in the avascular plane between Gerota’s fascia and Toldt’s fascia. The medial-to-lateral dissection was continued until the left-sided colon was separated from the retroperitoneum. The left ureter and gonadal vessels were then identified and preserved. The inferior mesenteric artery (IMA) was retracted with the double fenestrated forceps, and the IMA was ligated near the origin by using clip placement or linear stapler. Thereafter, division of the inferior mesenteric vein was performed close to the Treitz ligament (Fig. 4.50a–d).
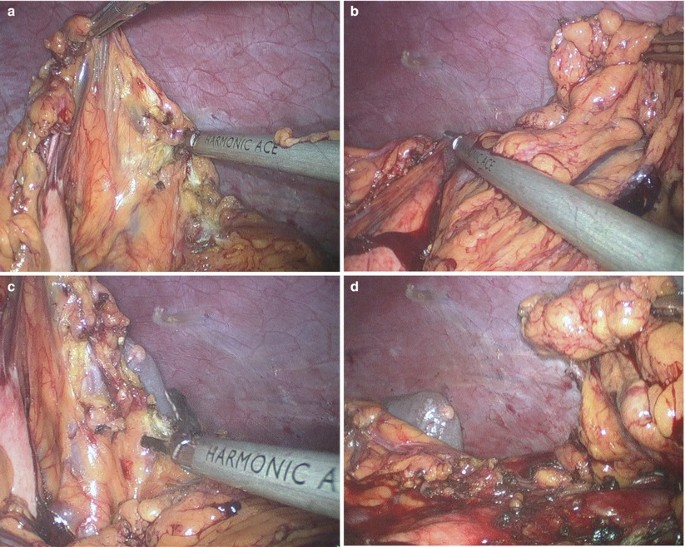
Fig. 4.50
-
7.
Transection of the sigmoid.
The sigmoid was transected by using flexible linear stapler (Fig. 4.51a–c).

Fig. 4.51
-
8.
Removal of the specimen and ileosigmoid anastomosis.
The ports were removed and the incision was extended to 3 cm total in length to facilitate exteriorization of the specimen. The terminal ileum, cecum, ascending colon, transverse colon, descending colon and the stump of the upper sigmoid colon were then brought outside the abdomen. A purse-string stapler was used to divide the terminal 15 cm ileum. The anvil of the circular stapler was put into the proximal stump of the ileum and embedded. Then, the stump of the ileum was put back into the abdominal cavity. The handle lever of the circular stapler was implanted into the sigmoid lumen through the anus and punctured out through the middle point of the stump where the anastomosis was to be made. The handle lever and anvil of the stapler were connected, screwed and firmly locked. After careful checking the connection part, the stapler was fired to complete the colorectal end-to-end ileosigmoid anastomosis. After careful checking the anastomosis to exclude torsion or twist, a closed suction drain was placed near the anastomosis through the umbilical incision (Fig. 4.52a–f).


Fig. 4.52


4.8 Laparoscopic Appendectomy
4.8.1 Indications and Case Selection
-
1.
Patients with acute, or chronic appendicitis.
-
2.
Patients with purulent or gangrenous appendicitis.
-
3.
Patients with acute episode of chronic appendicitis.
-
4.
Pregnant women with acute appendicitis who have been pregnant for less than 20 weeks.
-
5.
However, it’s more indicated for patients who are suffering from obesity or diabetes mellitus, older patients, acatalepsy, patients with much pus, or cosmetic requirements.
4.8.2 Contraindications
Appendectomy is not necessary for the patients undergoing acute appendicitis for more than 72 h, or with encapsulated mass or severe localized inflammation formed.
-
1.
Absolute contraindications:
-
(a)
severe cardiorespiratory dysfunction,
-
(b)
inability to tolerate general anesthesia or pneumoperitoneum,
-
(c)
refractory coagulopathy,
-
(a)
-
2.
Relative contraindications:
-
(a)
extensive previous surgery, or previous peritonitis leading to severe adhesion,
-
(b)
morbid obesity,
-
(c)
pregnancy (during first and third trimesters).
-
(a)
-
3.
The indication for laparoscopic appendectomy in complicated or perforated appendicitis is controversial.
4.8.3 Major Instruments or Energy Sources
-
1.
Laparoscopy System.
-
2.
Electrocautery.
-
3.
Harmonic scalpel.
-
4.
Endoscopic linear stapler.
4.8.4 Team Setup, Anesthesia and Position
Under general anesthesia, the patient was placed in supine position with the arms adducted along the side. The position of surgeon, assistants and nurses is shown in Fig. 4.53.

Fig. 4.53
4.8.5 Key Steps
-
1.
Establishment of Pneumoperitoneum and Placement of Trocars.
-
2.
Abdominal exploration and searching for the appendix.
-
3.
Mobilization of the mesoappendix.
-
4.
Amputation of the appendix.
-
5.
Removal of the appendix.
-
6.
Flushing and suturing the incision.
4.8.6 Surgical Techniques
-
1.
Establishment of Pneumoperitoneum and Placement of Trocars.
-
2.
Abdominal exploration and searching for the appendix.
The patient was placed in Trendelenburg position with his right side elevated 30°. Using an atraumatic forceps in the left hand and a harmonic scalpel in the right hand, the appendix was located and the cecum was adequately mobilized (Fig.4.54a, b).

Fig. 4.54
-
3.
Mobilization of the mesoappendix.
The appendix tip was lifted and the mesoappendix was dissected using a harmonic scalpel to the base of the appendix. The appendiceal artery in the mesoappendix could be usually cut off directly by using the harmonic scalpel. For larger arteries, absorbable clips could be used before cutting off (Fig. 4.55a–f).

Fig. 4.55
-
4.
Amputation of the appendix.
In order to ligate the root of the appendix, a 10 mm hemolock forceps was needed to go through the 10 mm trocar. The 10 mm laparoscope and 5 mm harmonic scalpel were removed and a 5 mm laparoscope was inserted through the 5 mm trocar that was used for the harmonic scalpel in previous steps. The hemolock forceps was inserted through the 10 mm trocar. Thereafter, the appendix was ligated using clips (if it was less than 10 mm in diameter) or using a silk ligature if it was very large (Fig. 4.56a–d).

Fig. 4.56
Then, the appendix was amputated distal to the clips by using the harmonic scalpel. Checking the stump of the appendix to ensure secure clipping (Fig. 4.57a, b).

Fig. 4.57
-
5.
Removal of the appendix.
The specimen was extracted through the 10-mm port by using a sample forceps. In case of severely polluted appendix, the sample was retrieved in a plastic bag and extracted through the 10-mm port (Fig. 4.58).

Fig. 4.58
-
6.
Flushing and suturing the incision.
Three trocars were reinserted and routine inspection and washing were performed before suturing the incision with absorbable stitches (Fig. 4.59a, b).

Fig. 4.59


4.8.7 Tips and Tricks
-
1.
The patient is tilted into the Trendelenburg position with their right side up.
-
2.
The appendix should be mobilized and freed from adhesions firstly.
4.9 Complications Analysis and Management
4.9.1 Haemorrhage
Haemorrhage is either primary or secondary. Primary bleeding at the time of surgery or in the immediate postoperative period is the result of poor surgical technique and failure to achieve satisfactory haemostasis.
Because of the limitation of SILS procedure, the primary reasons of haemorrhage are the lack surgical field exposure and effective retraction. Effective methods of preventing haemorrhage are an accumulation of experiences, perfect coordination between the surgeon and camera holder, and some methods that exposes the surgical field. To the definite intermediate vessels, double hemlocks clipping is still necessary. In case of haemorrhage, it is careful to avoid confusedly coagulating or blindly clipping, which can induce surrounding tissue damage. Firstly, the source of bleeding should be judged. Then, electrocoagulation, ultrasound scalpel, Ligasure or hemlock can be used to stop bleeding while sucking the surgical field. Large amount of bleeding, retraction of bleeding vessels and uncontrolled bleeding in a short time are the indications of conversion to conventional laparoscopy or open surgery.
Haemorrhage of presacral venous is the most dangerous complication of SILS rectectomy. Lacking of the assistant help, the exposure of retrorectal space is difficult in SILS rectectomy. The surgeon can’t keep the dissection plane in a suitable level. The effective methods to preventing haemorrhage are good retraction and flexible cooperation of camera holder. Some assistant method such as using a suture to ligate the distal end of rectal tumor and then appropriately retracting the suture outside the abdomen can provide help to exposure the peri-rectal space. In case of haemorrhage, compression hemostasis, using hemostatic gauze or glue can be used firstly, but if the haemorrhage is hard to control, it should be converted to conventional laparoscopy or open surgery.
Haemorrhage is uncommon in SILS appendectomy. The appendicular artery can be well coagulated by ultrasound scalpel, similar to the cystic artery. But it is necessary to carefully examine whether there is active bleeding in the surgical field before the ending of SILS appendectomy.
4.9.2 Intestinal Injury
In SILS procedure, the establishment of pneumoperitoneum can form intestinal injury. But the common reasons of intestinal injury are: (1) The bowel is injured by excessively clamping. Especially when the surgeon retracts hard on the bowel to exposure the surgical field, and the retracted bowel, which can’t be observed, is within the laparoscopic visual field. (2) Due to the lacking of necessary assistance, the bowels that are not related to operation accumulate close to the surrounding of energy devices. (3) In vitro, anastomosis via narrow umbilical incision can form crashing injury by strenuous retraction of bowel. So the surgeon should keep appropriate strength in operation to avoid rough handling. Changing the body position can keep the bowels which are not related to operation far from the energy devices. The umbilical incision can be enlarged appropriately. When the bowel is retraced outside the abdomen, the dissected mesentery should be dragged outside firstly and then the bowels.
4.9.3 Urinary Injury
The ureter injury is the most common injured urinary organ in SILS colorectal surgery. The injury of ureter is similar to conventional laparoscopy by blindly ligation of large tissue in case of unclear anatomical level. So, dissecting the bowel under direct vision plays an important role in preventing ureter injury. In rectal surgery, the most common injured parts of ureter are left lumber segment and bilateral pelvic segments. In SILS surgery, “cross hands” can induce greater interferences between operational instruments and laparoscope, which is against the exposure of left area of rectum when dissecting the left side of rectum. At this moment, extra attention should be paid to the anatomical level and if it’s necessary, the ureter should be exposed and protected. Dissecting from the inside to the outside in the procedure of dissociating rectum and sigmoid colon is more favorable to distinguish the anatomical level of ureter. In case of injury, the ureter should be repaired in time.
Membranous and bulbous parts of urethra are the possible injured parts in SILS rectal surgery. Assistant retraction in SILS can help to expose the anatomical level and prevent the injury of urethra.
4.9.4 Complications of Anastomotic Stoma
In our SILS colorectal surgery, the enteroenterostomy or embedding the head stake of stapler is in vitro via the umbilical incision. This can reduce the anastomotic difficulties of SILS colorectal surgery and the time of operation. So the anastomotic leakage and stenosis in SILS are uncommon. However, due to the smaller umbilical incision, it can’t provide a complete vision of the mesenteric direction preparing for anastomosis, so the anastomotic direction may be wrong under this condition. At the end of the procedure, the whole anastomotic bowel should be carefully examined under laparoscopy and an exact correct anastomotic direction should be confirmed. Choosing a right type of stapler can prevent the anastomotic stenosis.
4.9.5 Internal Hernia
Internal hernia is uncommon in conventional laparoscopy or open surgery, but it is possible in SILS colorectal surgery. The intraoperative suture in SILS is difficult, so closing dissected mesentery is always ignored. This is the primary reason of internal hernia formation. So, if the mesenteric gap is large in SILS right hemicolectomy and transverse colectomy, closing the mesenteric gap is recommended.
References
Jacobs M, Verdeja JC, Goldstein HS. Minimally invasive colon resection (laparoscopic colectomy). Surg Laparosc Endosc. 1991;1:144–50.
Martel G, Crawford A, Barkun JS, Barkun JS, Boushey RP, Ramsay CR, Fergusson DA. Expert opinion on laparoscopic surgery for colorectal cancer parallels evidence from a cumulative meta-analysis of randomized controlled trials. PLoS One. 2012;7:e35292.
Huang MJ, Liang JL, Wang H, Huang MJ, Liang JL, Wang H, Kang L, Deng YH, Wang JP. Laparoscopic-assisted versus open surgery for rectal cancer: a meta-analysis of randomized controlled trials on oncologic adequacy of resection and long-term oncologic outcomes. Int J Colorectal Dis. 2011;26:415–21.
Ma Y, Yang Z, Qin H, Wang Y. A meta-analysis of laparoscopy compared with open colorectal resection for colorectal cancer. Med Oncol. 2011;28:925–33.
Lourenco T, Murray A, Grant A, McKinley A, Krukowski Z, Vale L. Laparoscopic surgery for colorectal cancer: safe and effective? – A systematic review. Surg Endosc. 2008;22:1146–60.
Siddiqui MR, Sajid MS, Qureshi S, Cheek E, Baig MK. Elective laparoscopic sigmoid resection for diverticular disease has fewer complications than conventional surgery: a meta-analysis. Am J Surg. 2010;200:144–61.
Cirocchi R, Farinella E, Trastulli S, Sciannameo F, Audisio RA. Elective sigmoid colectomy for diverticular disease. Laparoscopic vs open surgery: a systematic review. Colorectal Dis. 2012;14:671–83.
Lu CC, Lin SE, Chung KC, Rau KM. Comparison of clinical outcome of single-incision laparoscopic surgery using a simplified access system with conventional laparoscopic surgery for malignant colorectal disease. Colorectal Dis. 2012;14:e171–6.
Chen WT, Chang SC, Chiang HC, Lo WY, Jeng LB, Wu C, Ke TW. Single-incision laparoscopic versus conventional laparoscopic right hemicolectomy: a comparison of short-term surgical results. Surg Endosc. 2011;25:1887–92.
Kim SJ, Ryu GO, Choi BJ, Kim JG, Lee KJ, Lee SC, Oh ST. The short-term outcomes of conventional and single-port laparoscopic surgery for colorectal cancer. Ann Surg. 2011;254:933–40.
Lai C, Edwards T, Clements D, Coleman M. Single port laparoscopic right colonic resection using a ‘vessel-first’ approach. Colorectal Dis. 2012;14:1138–44.
Papaconstantinou HT, Thomas JS. Single-incision laparoscopic colectomy for cancer: assessment of oncologic resection and short-term outcomes in a case-matched comparison with standard laparoscopy. Surgery. 2011;150:820–7.
Fujii S, Watanabe K, Ota M, Watanabe J, Ichikawa Y, Yamagishi S, Tatsumi K, Suwa H, Kunisaki C, Taguri M, Morita S, Endo I. Single-incision laparoscopic surgery using colon-lifting technique for colorectal cancer: a matched case–control comparison with standard multiport laparoscopic surgery in terms of short-term results and access instrument cost. Surg Endosc. 2012;26:1403–11.
Poon JT, Cheung CW, Fan JK, Lo OS, Law WL. Single-incision versus conventional laparoscopic colectomy for colonic neoplasm: a randomized, controlled trial. Surg Endosc. 2012;26:2729–34.
Ramos-Valadez DI, Ragupathi M, Nieto J, Patel CB, Miller S, Pickron TB, Haas EM. Single-incision versus conventional laparoscopic sigmoid colectomy: a case-matched series. Surg Endosc. 2012;26:96–102.
Rijcken E, Mennigen R, Argyris I, Senninger N, Bruewer M. Single-incision laparoscopic surgery for ileocolic resection in Crohn’s disease. Dis Colon Rectum. 2012;55:140–6.
Huscher CG, Mingoli A, Sgarzini G, Mereu A, Binda B, Brachini G, Trombetta S. Standard laparoscopic versus single-incision laparoscopic colectomy for cancer: early results of a randomized prospective study. Am J Surg. 2012;204:115–20.
Lee SW, Milsom JW, Nash GM. Single-incision versus multiport laparoscopic right and hand-assisted left colectomy: a case-matched comparison. Dis Colon Rectum. 2011;54:1355–61.
Waters JA, Guzman MJ, Fajardo AD, Selzer DJ, Wiebke EA, Robb BW, George VV. Single-port laparoscopic right hemicolectomy: a safe alternative to conventional laparoscopy. Dis Colon Rectum. 2010;53:1467–72.
Champagne BJ, Lee EC, Leblanc F, Stein SL, Delaney CP. Single-incision vs straight laparoscopic segmental colectomy: a case-controlled study. Dis Colon Rectum. 2011;54:183–6.
Champagne BJ, Papaconstantinou HT, Parmar SS, Nagle DA, Young-Fadok TM, Lee EC, Delaney CP. Single-incision versus standard multiport laparoscopic colectomy: a multicenter, case-controlled comparison. Ann Surg. 2012;255:66–9.
Adair J, Gromski MA, Lim RB, Nagle D. Single-incision laparoscopic right colectomy: experience with 17 consecutive cases and comparison with multiport laparoscopic right colectomy. Dis Colon Rectum. 2010;53:1549–54.
Gaujoux S, Maggiori L, Bretagnol F, Ferron M, Panis Y. Safety, feasibility, and short-term outcomes of single port access colorectal surgery: a single institutional case-matched study. J Gastrointest Surg. 2012;16:629–34.
Kanakala V, Borowski DW, Agarwal AK, Tabaqchali MA, Garg DK, Gill TS. Comparative study of safety and outcomes of single-port access versus conventional laparoscopic colorectal surgery. Tech Coloproctol. 2012;16:423–8.
McNally ME, Todd Moore B, Brown KM. Single-incision laparoscopic colectomy for malignant disease. Surg Endosc. 2011;25:3559–65.
Wolthuis AM, Penninckx F, Fieuws S, D’Hoore A. Outcomes for case-matched single-port colectomy are comparable with conventional laparoscopic colectomy. Colorectal Dis. 2012;14:634–41.
Papaconstantinou HT, Sharp N, Thomas JS. Single-incision laparoscopic right colectomy: a case-matched comparison with standard laparoscopic and hand-assisted laparoscopic techniques. J Am Coll Surg. 2011;213:72–80; discussion 80–2.
Chambers WM, Bicsak M, Lamparelli M, Dixon AR. Single-incision laparoscopic surgery (SILS) in complex colorectal surgery: a technique offering potential and not just cosmesis. Colorectal Dis. 2011;13:393–8.
Zhou YM, Wu LP, Zhao YF, Xu DH, Li B. Single-incision versus conventional laparoscopy for colorectal disease: a meta-analysis. Dig Dis Sci. 2012;57:2103–12.
Author information
Authors and Affiliations
Editor information
Editors and Affiliations
Rights and permissions
Copyright information
© 2013 Springer Science+Business Media Dordrecht
About this chapter
Cite this chapter
Wu, S., Fan, Y., Tian, Y. (2013). Colorectal Surgery. In: Wu, S., Fan, Y., Tian, Y. (eds) Atlas of Single-Incision Laparoscopic Operations in General Surgery. Springer, Dordrecht. https://doi.org/10.1007/978-94-007-6955-7_4
Download citation
DOI: https://doi.org/10.1007/978-94-007-6955-7_4
Published:
Publisher Name: Springer, Dordrecht
Print ISBN: 978-94-007-6954-0
Online ISBN: 978-94-007-6955-7
eBook Packages: MedicineMedicine (R0)