
Abstract
Since the introduction of laparoscopy in 1910, Nezhat et al. (J Reprod Med 34:127–134, 1989) the benefits of minimally invasive surgery have expanded its applicability to the treatment of benign and malignant gastric diseases (Liew et al., ANZ J Surg 77:787–791, 2007). But since the first publication about single incision laparoscopic sleeve gastrectomy reported by Saber (Obes Surg 18:1338–1342, 2008), only a few sporadic reports about single incision laparoscopic gastric surgery have appeared worldwide. These articles were always involved with laparoscopic sleeve gastrectomy in obese patients (Morales-Conde et al., Surg Innov [Epub ahead of print], 2011; Lakdawala et al., Obes Surg 21:1664–1670, 2011; Vilallonga et al., J Minim Access Surg 7:156–157, 2011). And in their opinion, this novel approach is feasible, but not always easily reproducible.
The first reported SILS partial resection of the stomach for the treatment of GIST was by Yasumitsu Hirano et al. in 2010 (Hirano et al., Surg Laparosc Endosc Percutan Tech 20:262–264, 2010). Then a few studies about SILS partial resection of the stomach or gastric wedge resection were reported (Na et al., J Gastric Cancer 11:225–229, 2011; Wu et al., Surg Innov [Epub ahead of print], 2012; Henckens et al., J Laparoendosc Adv Surg Tech A 20:469–471, 2010; Dapri et al., Ann Surg Oncol 18:191, 2011; Sasaki et al., Surg Today 41:133–136, 2011; Nonaka et al., Surg Laparosc Endosc Percutan Tech 22:e210–e213, 2012). In jin-UK’s report, Na et al. (J Gastric Cancer 11:225–229, 2011) seven patients diagnosed with gastric submucosal tumor underwent the intragastric wedge resection. Though flexible laparoscope and curved or double-bended graspers were used frequently and made the SILS operation easier, conventional laparoscopic instruments can achieve the similar clinical outcomes (Wu et al., Surg Innov [Epub ahead of print], 2012). Also an extra mini-port for 2 mm Mini-loop was often used to retract the liver or gastric wall surrounding the tumor to facilitate the dissection and resection (Henckens et al., J Laparoendosc Adv Surg Tech A 20:469–471, 2010; Dapri et al., Ann Surg Oncol 18:191, 2011; Sasaki et al., Surg Today 41:133–136, 2011). Except wounding bleeding in one case, Na et al. (J Gastric Cancer 11:225–229, 2011) no intraoperative or other postoperative complications were experienced in all the patients including anastomotic leakage, bleeding or anastomotic stenosis.
A patient with an intractable gastric ulcer was treated by SILS gastrectomy with intracorporeal Roux-en-Y reconstruction in 2012 (Nonaka et al., Surg Laparosc Endosc Percutan Tech 22:e210–e213, 2012). The operative time was 412 min, with blood loss 90 ml. Also in 2012, another case about SILS perforated gastric ulcer repair was reported (Dapri et al., Surg Innov 19:130–133, 2012). The operation lasted 108 min. The blood loss was 86 ml.
Ten patients underwent single-incision laparoscopic distal gastrectomy and lymph node D1α or D1β dissection in three reports (Omori et al., Surg Endosc 25:2400–2404, 2011; Park et al., Surg Laparosc Endosc Percutan Tech 22:e214–e216, 2012; Ozdemir et al., Surg Innov 18:NP1–NP4, 2011). The final pathology report showed that the tumor had invaded the submucosa or proper muscle with no seromuscular layer infiltration. A total of 172 lymph nodes were retrieved. Except one patient with 5 metastases among dissected 21 lymph nodes, Takahashi et al. (Am Surg 78:447–450, 2012) lymph nodes of other patients were identified with no tumor metastasis. In Lee JH’s [19] report, the porcine model was used to compare the perioperative outcomes of SILS and conventional laparoscopic distal gastrectomy with D1 + b lymph node dissection. The single-incision laparoscopic group was associated with a significantly longer operation time, but it had a similar mean number of resected lymph nodes and with similar inflammatory reaction and complication rates when compared with conventional laparoscopic.
Access provided by Autonomous University of Puebla. Download chapter PDF
Keywords
- Partial gastrectomy
- Subtotal gastrectomy
- Billroth-II anastomosis
- Gastroesophageal anastomosis
- Proximal gastrectomy
- Esophageal jejunum end-to-side anastomosis
- Total gastrectomy
3.1 Laparoscopic Partial Gastrectomy
3.1.1 Indications and Case Selection
-
1.
Patients with gastrointestinal stromal tumor.
-
2.
Patients with adenomyxoma.
-
3.
Patients with benign tumors.
It is mainly indicated for patients with lesions located above the anterior wall and along the greater or smaller curvature of the stomach.
3.1.2 Contraindications
-
1.
Absolute contraindications:
-
(a)
severe cardiorespiratory dysfunction,
-
(b)
inability to tolerate general anesthesia or pneumoperitoneum,
-
(c)
refractory coagulopathy.
-
(d)
complicated with gastric malignancies,
-
(e)
presence of metastatic disease.
-
(a)
-
2.
Relative contraindications:
-
(a)
extensive previous surgery, or previous peritonitis leading to severe adhesion,
-
(b)
morbid obesity,
-
(c)
pregnancy.
-
(a)
3.1.3 Major Instruments or Energy Sources
-
1.
Laparoscopy System.
-
2.
Electrocautery.
-
3.
Harmonic scalpel.
-
4.
Endoscopic linear stapler.
3.1.4 Team Setup, Anesthesia and Position
Under general anesthesia, the patient was placed in supine position with the legs apart. The position of surgeon, assistants and nurses is shown in Fig. 3.1.

Fig. 3.1
3.1.5 Key Steps
-
1.
Establishment of Pneumoperitoneum and Placement of Trocars.
-
2.
Abdominal Exploration.
-
3.
Mobilization of the body of stomach and localization of the lesion.
-
4.
Partial gastrectomy.
3.1.6 Surgical Techniques
-
1.
Establishment of Pneumoperitoneum and Placement of Trocars.
-
2.
Abdominal Exploration.
First of all, a thorough exploration of the abdominal and pelvic cavity was performed to rule out the presence of ascites or nodules in the liver. The characteristics of the lesion of the stomach including its location, morphology, and relationship with surrounding organs such as the pancreas, gallbladder, bile duct or portal vein were determined (Fig. 3.2a–c).
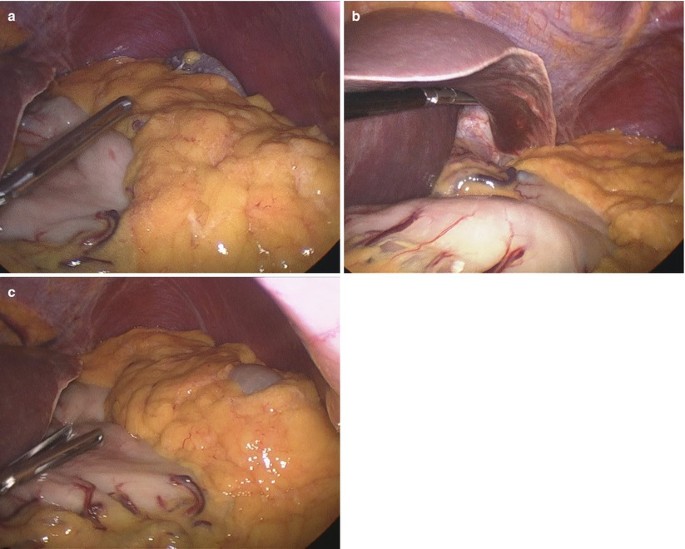
Fig. 3.2
-
3.
Mobilization of the body of stomach and localization of the lesion.
The greater curvature of stomach was elevated by using the atraumatic forcep in the left hand. Then, the gastrocolic ligament was opened outside the omental vascular arch by using the harmonic scalpel to expose the omental bursa and the posterior wall of the stomach (Fig. 3.3a–d).

Fig. 3.3
The gastrosplenic ligament was dissected to mobilize the fundus of the stomach to further expose the lesion (Fig. 3.4a, b).

Fig. 3.4
-
4.
Partial gastrectomy.
The lesion was transected on the normal gastric wall at its base by using the 60 mm endoscopic linear stapler with a single bite. In the case of incomplete excision of the lesion with a single bite, the cartridge was replaced by a new one and the lesion was completely transected by continuous bite (Fig. 3.5a–d).

Fig. 3.5


3.1.7 Tips and Tricks
-
1.
Preoperative or intraoperative endoscopic assistance was necessary when small endoluminal tumors could not be easily detected by laparoscopic exploration. During the intraoperative endoscopic procedures, proximal jejunum below the Treitz ligament was gently clamped with laparoscopic instruments to minimize the gas insufflation into the small bowel.
-
2.
The greater omentum and/or short gastric vessels were divided from the greater curvature with ultrasonic coagulating shears, as per requirement.
-
3.
The tumor was elevated by retracting the normal gastric wall near the tumor with a laparoscopic grasper or by pulling the tagging suture on the gastric wall near the tumor.
-
4.
After meticulous hemostasis was achieved along the stapled line, the specimen was placed in a laparoscopic specimen bag and extracted through the umbilicus.
3.2 Laparoscopic Subtotal Gastrectomy (Billroth-IIanastomosis)
3.2.1 Indications and Case Selection
-
1.
Patients with peptic ulcer disease who undergo failure of medical therapy, obstruction, perforation and highly suspected for malignancy.
-
2.
Patients with peptic ulcer who have over-secretion of gastric acid.
-
3.
Patients with tumors in the distal gastric lesions.
3.2.2 Contraindications
-
1.
Absolute contraindications:
-
(a)
severe cardiorespiratory dysfunction,
-
(b)
inability to tolerate general anesthesia or pneumoperitoneum,
-
(c)
refractory coagulopathy.
-
(d)
complicated with gastric malignancies,
-
(e)
presence of metastatic disease.
-
(a)
-
2.
Relative contraindications:
-
(a)
large or acutely bleeding ulcers’
-
(b)
extensive previous surgery, or previous peritonitis leading to severe adhesion,
-
(c)
morbid obesity,
-
(d)
pregnancy.
-
(a)
3.2.3 Major Instruments or Energy Sources
-
1.
Laparoscopy System.
-
2.
Electrocautery.
-
3.
Harmonic scalpel.
-
4.
Endoscopic linear stapler.
3.2.4 Team Setup, Anesthesia and Position
Under general anesthesia, the patient was placed in supine position with the legs apart. The position of surgeon, assistants and nurses is shown in Fig. 3.6.

Fig. 3.6
3.2.5 Key Steps
-
1.
Establishment of Pneumoperitoneum and Placement of Trocars.
-
2.
Mobilization of the gastrocolic ligament.
-
3.
Mobilization of the hepatogastric ligament.
-
4.
Mobilization of the hepatoduodenal ligament.
-
5.
Mobilization of the left gastric vessels.
-
6.
Transection of the duodenum.
-
7.
Gastrojejunal anastomosis.
-
8.
Subtotal gastrectomy.
3.2.6 Surgical Techniques
-
1.
Establishment of Pneumoperitoneum and Placement of Trocars.
-
2.
Mobilization of the gastrocolic ligament.
The greater curvature of the stomach was lifted by using the atraumatic forcep in the left hand. The gastrocolic ligament was dissected from its avascular zone at the center by using the harmonic scalpel (Fig. 3.7a–f).


Fig. 3.7
Continuous dissection to the left was done until the second terminal branch of the left gastroepiploic artery was reached (Fig. 3.8a, b).

Fig. 3.8
After previous mobilization, the left part of the gastrocolic ligament was freed. To expose the right gastroepiploic vein, continuous dissection to the right was performed until the antrum was reached. At the lower margin of the pancreas, the right gastroepiploic vein was first encountered, dissected, clipped and cut. In this step, much attention must be paid to avoid injury to the vein, which is prone to tear (Fig. 3.9a–d).

Fig. 3.9
Then, the right gastroepiploic artery was dissected, clipped and cut (Fig. 3.10a, b).

Fig. 3.10
-
3.
Mobilization of the hepatogastric ligament.
The hepatogastric ligament was opened at its avascular zone by using the harmonic scalpel. Continuous dissection to the right was done until the superior margin of the duodenal bulb was reached (Fig. 3.11a, b).

Fig. 3.11
-
4.
Mobilization of the hepatoduodenal ligament.
The right gastric artery in the hepatoduodenal ligament was dissected,clipped and cut (Fig. 3.12a–g).

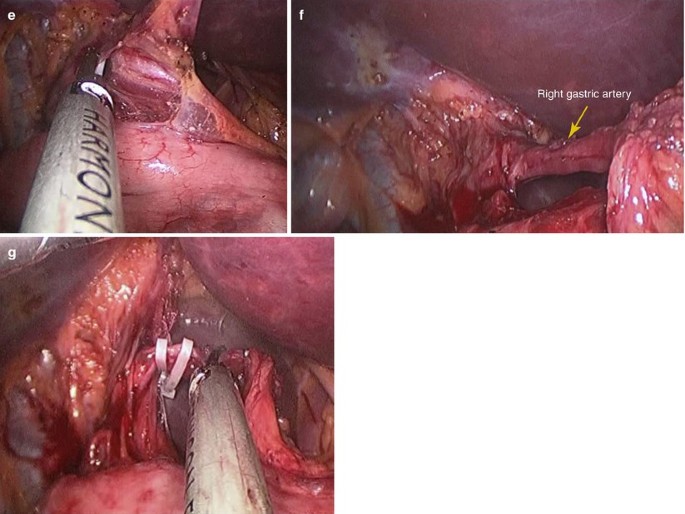
Fig. 3.12
-
5.
Mobilization of the left gastric vessels.
With the stomach lifted posterior by the atraumatic grasper on the left hand, the pancreatiogastric fold was exposed. The left gastric vein and artery were clipped and cut at their origins (Fig. 3.13a–f).

Fig. 3.13
-
6.
Transection of the duodenum.
The duodenum was transected just distal to the pyloric ring by using linear staplers (Fig. 3.14a–d).

Fig. 3.14
-
7.
Gastrojejunal anastomosis.
The gastric antrum was lifted and 1 cm incision was made on the posterior wall of the stomach where the anastomosis was to made by using the harmonic scalpel (Fig. 3.15a–d).

Fig. 3.15
A window was made on the transverse mesocolon through which the proximal jejunum was lifted to the upper transverse colon region. A small incision was made on the anti-mesenteric side of the jejunum, 10–12 cm from the duodenojejunal flexure (Fig. 3.16a, b).

Fig. 3.16
After step-by-step insertion of the linear stapler forks, the posterior wall of the stomach and the anti-mesenteric side of the jejunum were put together, and an anastomosis was made with the linear stapler (Fig. 3.17a, b).

Fig. 3.17
The gastric suction tube was found through the anastomosis and put into the afferent loop (Fig. 3.18a–d).

Fig. 3.18
The common incision was closed by running suture with 3/0 absorbable suture to complete the gastrojejunal anastomosis (Fig. 3.19a–h).

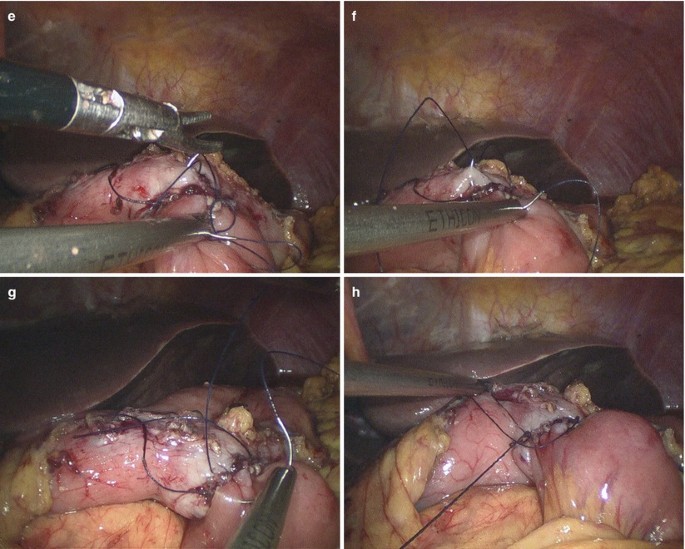
Fig. 3.19
-
8.
Subtotal gastrectomy.
The stomach was transected at least 1 cm distal from the anastomosis by using linear staplers (Fig. 3.20a–f).

Fig. 3.20
The anastomosis was put downwards below the transverse mesocolon window. The margin of the window and the seromuscular layer of the stomach wall 2 cm distal from the anastomosis were sutured by interrupted suture technique (Fig. 3.21a–f).

Fig. 3.21
The intact specimens were removed from the abdominal cavity by bag, and we often cut the connecting tissue between the 10 mm and the 12 mm-trocar to enlarge the incision for sample extracting.
After adequate flushing of the operative field and careful checking the anastomosis to exclude torsion or twist, a closed suction drain was placed into the surgical field through the umbilical incision (Fig. 3.22a–d).

Fig. 3.22


3.2.7 Tips and Tricks
-
1.
The patient was placed in the supine position with legs spread far apart. The surgeon was positioned between the patient’s legs. Two assistants stood by the patient’s side, one on the left and one on the right.
-
2.
After the omental bursa had been opened, dissection of the omentum was advanced from side to side using ultrasonic coagulating shears to enable perigastric lymph node dissection.
-
3.
The left gastroepiploic vessels were then divided, and the right gastroepiploic vein and artery were clipped and divided at the base to allow infra-pyloric lymph node dissection.
-
4.
The right gastric vessels were identified and divided for supra-pyloric lymph node dissection.
-
5.
The left gastric artery was lifted ventrally so that the supra-pancreatic lymph nodes could be dissected easily under optimal surgical exposure.
-
6.
To achieve adequate retraction of the liver, we binded the lateral left lobe of the liver to the diaphragm using Cyanoacrylate glue as mentioned above.
-
7.
For intracorporeal anastomosis, we used endoscopic flexible linear staplers (Echelon flex 60—3.5 and 4.5. Ethicon). To make a side-to-side anastomosis, two small holes were made on the posterior greater curvature wall of the stomach and the proximal part of jejunum, respectively. After step-by-step insertion of the linear stapler forks, the common opening in the stomach and jejunum was apposed and closed using the sutures.
3.3 Laparoscopic Proximal Gastrectomy
3.3.1 Indications and Case Selection
-
1.
Patients with tumor in the proximal gastric or cardiac lesion, including carcinoma of gastric cardia or large benign tumor.
-
2.
Patients with peptic ulcer in the body of stomach or cardiac lesion who undergo failure of medical therapy, obstruction, perforation.
3.3.2 Contraindications
-
1.
Absolute contraindications:
-
(a)
severe cardiorespiratory dysfunction,
-
(b)
inability to tolerate general anesthesia or pneumoperitoneum,
-
(c)
refractory coagulopathy,
-
(d)
presence of metastatic disease.
-
(a)
-
2.
Relative contraindications:
-
(a)
extensive previous surgery, or previous peritonitis leading to severe adhesion,
-
(b)
morbid obesity,
-
(c)
pregnancy.
-
(a)
3.3.3 Major Instruments or Energy Sources
-
1.
Laparoscopy System.
-
2.
Electrocautery.
-
3.
Harmonic scalpel.
-
4.
Endoscopic linear stapler.
3.3.4 Team Setup, Anesthesia and Position
Under general anesthesia, the patient was placed in supine position with the legs apart. The position of surgeon, assistants and nurses is shown in Fig. 3.23.

Fig. 3.23
3.3.5 Key Steps
-
1.
Establishment of Pneumoperitoneum and Placement of Trocars.
-
2.
Dissection of the greater omentum.
-
3.
Mobilization of the gastrosplenic ligament and fundus of stomach.
-
4.
Mobilization of the hepatogastric ligament.
-
5.
Mobilization of the left gastric artery.
-
6.
Mobilization of the lower segment of the esophagus.
-
7.
Transection of the esophagus.
-
8.
Gastroesophageal anastomosis.
-
9.
Proximal gastrectomy.
3.3.6 Surgical Techniques
-
1.
Establishment of Pneumoperitoneum and Placement of Trocars.
-
2.
Dissection of the greater omentum.
With an atraumatic grasper on the left hand and ultrasonic scalpel on the right, the omentum was dissected along the transverse colon firstly with the left side to the left flexure of colon, the left gastroepiploic vein were divided. The wall of the transverse colon should be protected from injury (Fig. 3.24a–h).


Fig. 3.24
-
3.
Mobilization of the gastrosplenic ligament and fundus of stomach.
Continuous mobilization to the left was done and the short gastric vessels in the gastrosplenic ligament were dissected. The fundus of stomach was exposed and mobilized (Fig. 3.25a–d).

Fig. 3.25
-
4.
Mobilization of the hepatogastric ligament.
The left lateral of the liver was retracted to fully expose the lesser curvature of the stomach (Fig. 3.26a–d).

Fig. 3.26
Mobilization of the hepatogastric ligament was performed by using the harmonic scalpel (Fig. 3.27a, b).

Fig. 3.27
Continuous dissection upwards was done to expose the right margin of the esophagus and the anterior peritoneum of the esophagus was cleared (Fig. 3.28a–d).

Fig. 3.28
-
5.
Mobilization of the left gastric artery.
With the stomach lifted posterior by the atraumatic grasper on the left hand, the pancreatiogastric fold was exposed. The left gastric vein and artery were clipped and cut at their origins (Fig. 3.29a–h).


Fig. 3.29
-
6.
Mobilization of the lower segment of the esophagus.
The bilateral crura were exposed and retracted laterally with a roticulated grasper, and peritoneum was incised with harmonic scalpel. The cardia and the lower esophagus 4 cm distal to the cardia were dissected and fully mobilized (Fig. 3.30a, b).

Fig. 3.30
-
7.
Transection of the esophagus.
The esophagus was transected by using flexible endoscopic linear staplers (Fig. 3.31a–c).

Fig. 3.31
-
8.
Gastroesophageal anastomosis.
A 25 mm Orvil anvil with a guiding tube was inserted into the esophagus through the oral cavity. A small incision was made on the central part of the esophageal stump, through which the guiding tube was pulled out to pull and fix the anvil to the esophageal stump. The fixed line on the guiding tube was cut off and the tube was removed (Fig. 3.32a–f).

Fig. 3.32
An incision was made on the anterior wall of the stomach and the handle lever of the Orvil stapler was implanted into the gastric cavity through this incision and punctured out through the posterior wall of the stomach where the anastomosis was to made (Fig. 3.33a–d).

Fig. 3.33
The handle lever and anvil of the Orvil stapler were connected, screwed and firmly locked. After careful checking the connection part, the stapler was fired to complete the gastroesophageal anastomosis. Careful examination of the anastomosis was done to be sure of devoid of torsion, twist or bleeding (Fig. 3.34a–j).


Fig. 3.34
-
9.
Proximal gastrectomy.
The proximal stomach was transected 2 cm distal from the anastomosis by using the linear stapler with single or multiple bites (Fig. 3.35a–f).

Fig. 3.35
The anastomosis was reinforced by seromuscular layer suture (Fig. 3.36a, b).

Fig. 3.36
The intact specimens were removed from the abdominal cavity by bag, and we often cut the connecting tissue between the 10 mm and the 12 mm-trocar to enlarge the incision for sample extracting. After adequate flushing of the operative field and careful checking the anastomosis to exclude torsion or twist, a closed suction drain was placed behind the anastomosis through the umbilical incision (Fig. 3.37a, b).

Fig. 3.37


3.3.7 Tips and Tricks
-
1.
Reconstruction of the esophagogastrostomy by double stapling method using EEA™ OrVil™
-
2.
EEA™. OrVil™ is a device that permits mechanical purse-string suture. An anvil head with a diameter of 21 or 25 mm is fastened in a tilted state at about 170° to a tube as long as about 95 mm via No. 1 polyester yarn with a white plastic connector. The tube is calibrated in 5-cm increments starting with the anvil head. The tip of the tube is called a valve tip. Purse-string suture is enabled by connecting the center rod of the anvil head and the main unit of the automated stapler, and conducting firing.
-
3.
Placement of an anvil head within the esophagus: EEA™ OrVil™ was orally inserted slowly from the valve tip until the valve tip reached the end of the esophagus. A small hole was created with harmonic ace at the tensed site while tension was confirmed. The valve tip was made to pass through. Grasping forceps were inserted via a trocar. A tube was led outside the abdominal cavity while the valve tip at a small hole at the end of the esophagus was being grasped. The cuffs of the endotracheal intubation tube tend to cause resistance during transit. To alleviate this resistance, the throat cavity was widened during transit through the larynx, and the cuffs were deflated. When the tube was pulled further, the anvil was led from the open end of the esophagus into the abdominal cavity. Then, the grasping notch of the center rod was securely grasped with grasping forceps. The anvil head and the tube were connected with two pieces of No. 1 polyester yarn, which were cut to disconnect the anvil and place the anvil head within the esophagus.
-
4.
Preparation of residual stomach: An automated stapler was led into abdominal cavity through umbilical incision and inserted from the anterior wall of the stomach. Then, the main unit of the automated stapler and the posterior wall of the stomach were fastened to prevent dropout of the stomach wall from the automated stapler.
-
5.
Connection with anvil, and anastomosis: The anvil and the main unit were connected after it was confirmed that an automated stapler and the center rod were made fully linear. Firing then completed the anastomosis.
3.4 Laparoscopic Total Gastrectomy
3.4.1 Indications and Case Selection
-
1.
Patients with peptic ulcer disease who undergo failure of medical therapy, obstruction, perforation and highly suspected for malignancy.
-
2.
Patients with peptic ulcer who have over-secretion of gastric acid.
-
3.
Patients with early gastric cancer, or palliative operation for late gastric cancer.
-
4.
Patients with gastric cancer in the body or fundus of the stomach.
3.4.2 Contraindications
-
1.
Absolute contraindications:
-
(a)
severe cardiorespiratory dysfunction,
-
(b)
inability to tolerate general anesthesia or pneumoperitoneum,
-
(c)
refractory coagulopathy,
-
(d)
presence of metastatic disease.
-
(a)
-
2.
Relative contraindications:
-
(a)
extensive previous surgery, or previous peritonitis leading to severe adhesion,
-
(b)
morbid obesity,
-
(c)
pregnancy.
-
(a)
3.4.3 Major Instruments or Energy Sources
-
1.
Laparoscopy System.
-
2.
Electrocautery.
-
3.
Harmonic scalpel.
-
4.
Endoscopic linear stapler.
3.4.4 Team Setup, Anesthesia and Position
The same as Sect. 3.3.4.
3.4.5 Key Steps
-
1.
Establishment of Pneumoperitoneum and Placement of Trocars.
-
2.
Mobilization of the gastrocolic ligament.
-
3.
Mobilization of the hepatogastric ligament.
-
4.
Transection of the duodenum.
-
5.
Transection of the esophagus.
-
6.
Esophageal jejunum end-to-side anastomosis.
-
7.
Jejunal side-to-side anastomosis.
-
8.
Operative field flushing and placement of drainage tube.
3.4.6 Surgical Techniques
-
1.
Establishment of Pneumoperitoneum and Placement of Trocars.
-
2.
Mobilization of the gastrocolic ligament.
With an atraumatic grasper on the left hand and ultrasonic scalpel on the right, the omentum was dissected along the transverse colon firstly with the left side to the left flexure of colon, the left gastroepiploic vein were divided. Continuous mobilization to the left was done and the short gastric vessels in the gastrosplenic ligament were dissected. The fundus of stomach was exposed and mobilized (Fig. 3.38a–j).


Fig. 3.38
Continuous dissection to the hepatic flexure of colon was performed until 2-3 cm distal to the pylorus. The right gastroepiploic vein and artery were clipped and divided (Fig. 3.39a–j).

Fig. 3.39
-
3.
Mobilization of the hepatogastric ligament.
The omentum of the gastric lesser curvature was lifted. With a harmonic scalpel in the right hand, the lesser omentum was opened at its avascular zone to expose the omental bursa. Mobilization to the gastric cardia and pylorus side along the lesser curvature was performed respectively. Upwards, the bilateral crura were exposed to mobilize the lower esophagus 4 cm above the cardia (Fig. 3.40a–d). Mobilizations of the hepatogastric and hepatoduodenal ligaments near the pylorus were the same as mentioned in the previous section.

Fig. 3.40
-
4.
Transection of the duodenum.
The duodenum was transected just distal to the pyloric ring by using 45 mm linear staplers (Fig. 3.41a–f).

Fig. 3.41
-
5.
Transection of the esophagus.
The esophagus was transected by using flexible endoscopic linear staplers 2 cm above the cardia. The intact specimens were removed from the abdominal cavity by bag, and we often cut the connecting tissue between the 10 mm and the 12 mm-trocar to enlarge the incision for sample extracting (Fig. 3.42a–h).


Fig. 3.42
-
6.
Esophageal jejunum end-to-side anastomosis.
A 25 mm Orvil anvil with a guiding tube was inserted into the esophagus through the oral cavity. A small incision was made on the central part of the esophageal stump, through which the guiding tube was pulled out to pull and fix the anvil to the esophageal stump. The fixed line on the guiding tube was cut off and the tube was removed (Fig. 3.43a–f).

Fig. 3.43
The transverse colon was lifted and the initial proximal jejunum was found along the Treitz ligament. The jejunum was lifted upwards to the subdiaphragmatic area. The suitable length of the jejunum for esophageal anastomosis was designed and the mobility of the mesentery was checked to avoid excessive tension (Fig. 3.44a, b).

Fig. 3.44
The mesentery of the jejunum to be anastomosed was mobilized by using the harmonic scalpel. The umbilical incision was expanded to 3 cm, through which the jejunum was pulled out of the abdominal cavity and transected under direct vision (Fig. 3.45a–d).

Fig. 3.45
The proximal jejunum was ligated with a 7# silk suture. The stay suture was retained extracorporeally for future searching of the broken end of the jejunum, while the proximal jejunum was put back into the abdominal cavity. The handle lever of the 25 mm circular stapler was implanted into the distal jejunum about 6 cm in depth (Fig. 3.46a, b).

Fig. 3.46
The broken edge of the distal jejunum was fixed on the stapler by using the silk thread ligation. The stapler was introduced into the abdominal cavity and the pneumoperitoneum was re-established (Fig. 3.47a, b).

Fig. 3.47
Under the surveillance of the laparoscope, the stapler was screwed out of the lateral wall of the jejunum about 6 cm apart from the broken end of the distal jejunum. The handle lever and anvil of the Orvil stapler were connected, screwed and firmly locked (Fig. 3.48a–n).


Fig. 3.48
After careful checking the connection part, the stapler was fired to complete the esophageal jejunum end-to-side anastomosis. Careful examination of the anastomosis was done to ensure the devoid of torsion, twist or bleeding. The ligation thread on the stapler handle was cut off and the stapler was carefully pulled out of the jejunum (Fig. 3.49a–d).

Fig. 3.49
The stump of the distal jejunum was transected by using the flexible linear stapler, then check the anastomosis to avoid leakage or bleeding (Fig. 3.50a–f).

Fig. 3.50
-
7.
Jejunal side-to-side anastomosis.
The jejunal side-to-side anastomosis was completed extracorporeally under direct vision (Fig. 3.51a, b).

Fig. 3.51
-
8.
Operative field flushing and placement of drainage tube.
The umbilical incision was sutured and the pneumoperitoneum was re-established. After adequate flushing of the operative field and careful checking of the anastomosis to exclude torsion or twist, a closed suction drain was placed behind the anastomosis through the umbilical incision (Fig. 3.52a–c).

Fig. 3.52


3.4.7 Tips and Tricks
-
1.
Reconstruction of the esophagojejunostomy by double stapling method using EEA™ OrVil™.
-
2.
Placement of an anvil head within the esophagus: As mentioned above.
-
3.
Preparation of lifted jejunum: The jejunum 20 cm away from the ligament of Treitz was led from umbilical incision to outside the abdominal cavity and also cut off with an automated stapler. An automated stapler was inserted from the open end of the lifted jejunum. Then, the main unit of the automated stapler and the lifted jejunum were fastened with silk thread to prevent dropout of the small intestines from the automated stapler. The abdomen was again inflated and the lifted jejunum was led into the abdominal cavity.
-
4.
Connection with anvil, and anastomosis: The anvil and the main unit were connected after it was confirmed that an automated stapler and the center rod were fully made linear. Firing then completed the anastomosis. The inlet of the automated stapler at the open end of the lifted jejunum was closed with an automated stapler inserted via a trocar of the umbilicus. Then, anastomosis between the esophagus and jejunum was completed.
3.5 Complications Analysis and Management
3.5.1 Haemorrhage
The exact hemostasis plays an important role in laparoscopic gastrectomy. Large amount of bleeding may lead to an obscure surgical field, which makes it difficult to identify anatomical structure and affect the surgeon’s emotion. Blood can absorb light, therefore making the image on monitor look darkened and vague. Intraoperative haemorrhage is always due to incorrect dissected layer or inadequate hemostatic techniuqe. Excessive dependence on endoscopic stapler is another important reason.
Tearing of short gastric blood vessels, incorrect ligation of left/right gastric vessels and gastroepiploic vessels, falling off clamps and unstable stapling are the primary reasons of postoperative haemorrhage.
The greater risk is the violent tearing of venous structures. Appropriate hemostatic way should be used in unambiguous distinguished artery and veins. Ultrasonic scalpel can directly cut off the vessels less than 1.5 mm in diameter. For the larger vessels, Ligasure or firing stapler is necessary for safe and effective hemostasis. Double ligation by biological clamps is appropriate for larger vessels such as left gastric artery. Though endoscopic linear stapler can staple the gastric wall well, anastomotic stoma of stapler bleeds if the gastric wall is thicker. In this case, hemostatic suture is absolutely essential.
3.5.2 Anastomotic Leak and Duodenal Stump Dehiscence
Patients with anastomotic leaks usually present with abdominal pain, tachycardia, fever, distension and leukocytosis after the fifth postoperative day. With open surgery, laparoscopic gastrectomy also faces anastomotic leak and duodenal stump dehiscence. In the majority of cases, the leak is due to a technical error and failure of the stapler. Because laparoscopic anastomosis depends on different kinds of staplers, reasonable choice and skilled application of staplers are particularly important to avoid anastomotic leak. The model of stapler is just based on the thickness of anastomotic tissue. When the stapler is fired, the surgeon should make sure that no peripheral tissue is tied to stapler. Anastomotic tension and hemodynamic disorder should be avoided. Correct gastrointestinal anastomotic angle can avoid input and output section obstruction. Laparoscopic reinforced suture is necessary to unsatisfied instrumental anastomosis. Injection of methylene blue by stomach tube is an effective method to distinguish the existence of anastomotic leak. Small leaks may be managed non-operatively if they are adequately drained, and may heal spontaneously while the patient is supported using total parenteral nutrition (TPN).
3.5.3 Anastomotic Obstruction
Anastomosis of laparoscopic surgery is always completed by stapler, so the selection criteria and principles of circular stapler are the same with open surgery. Anastomotic site decided the model of stapler. The length of linear stapler determines the length of anastomosis, so shorter stapler always makes smaller anastomosis. Twice fired stapler can form a larger anastomotic stoma. The angle of stapler should be in parallel with vertical axis of jejunum, which can guarantee a free-flowing anastomotic stoma. For additional plasma muscle layer suture, too much tissue should not be involved in the suture part and contralateral should not be sewed.
3.5.4 Intraoperative Failing Anastomosis
It may be due to unsuccessful firing of the stapler or insufficient nailing. Large leaks can be found easily, but small leaks are always observed by injecting methylene blue from stomach tube. In this case, further treatment and even switching to open surgery is always needed.
References
Nezhat C, Winer WK, Cooper JD, Nezhat F, Nezhat C. Endoscopic infertility surgery. J Reprod Med. 1989;34:127–34.
Liew V, Taylor C, Ghusn M, Jamnagerwalla M, Layani L. Laparoscopic gastric resection research for benign and malignant conditions: lessons learned from 35 consecutive caese. ANZ J Surg. 2007;77:787–91.
Saber AA, Elgamal MH, Rao AJ. Single incision laparoscopic sleeve gastrectomy: a novel technique. Obes Surg. 2008;18:1338–42.
Morales-Conde S, Dominguez G, Cañete Gomez J, Socas M, Barranco A, García Moreno J, Padillo FJ. Magnetic-assisted single-port sleeve gastrectomy. Surg Innov. 2011. [Epub ahead of print].
Lakdawala MA, Muda NH, Goel S, Bhasker A. Single-incision sleeve gastrectomy versus conventional laparoscopic sleeve gastrectomy – a randomised pilot study. Obes Surg. 2011;21:1664–70.
Vilallonga R, Rius J, Fort JM, Armengol M. Single port access sleeve gastrectomy: is it reasonable? J Minim Access Surg. 2011;7:156–7.
Hirano Y, Watanabe T, Uchida T, Yoshida S, Kato H, Hosokawa O. Laparoendoscopic single site partial resection of the stomach for gastrointestinal stromal tumor. Surg Laparosc Endosc Percutan Tech. 2010;20:262–4.
Na J-U, Lee S-IL, Noh S-M. The single incision laparoscopic intragastric wedge resection of gastric submucosal tumor. J Gastric Cancer. 2011;11:225–9.
Wu S-D, Kong J, Su Y, Fan Y. Safety and application of transumbilical single-incision laparoscopic gastrectomy for GIST: SILS in Benign Gastric Disease. Surg Innov. 2012. [Epub ahead of print].
Henckens T, Van de Putte D, Van Renterghem K, Ceelen W, Pattyn P, Van Nieuwenhove Y. Laparoendoscopic single-site gastrectomy for a gastric GIST using double-bended instruments. J Laparoendosc Adv Surg Tech A. 2010;20:469–71.
Dapri G, Ntounda R, Himpens J, Carnevali P, Scomersi S, Cadière GB. Single-incision transumbilical laparo-endoscopic gastric benign tumor resection. Ann Surg Oncol. 2011;18:191.
Sasaki A, Koeda K, Nakajima J, Obuchi T, Baba S, Wakabayashi G. Single-incision laparoscopic gastric resection for submucosal tumors: report of three cases. Surg Today. 2011;41:133–6.
Nonaka T, Hidaka S, Takafumi A, Fukuoka H, Takeshita H, Atsushi N, Sawai T, Yasutake T, Nagayasu T. Single-incision laparoscopy-assisted subtotal gastrectomy for intractable gastric ulcer: a case report. Surg Laparosc Endosc Percutan Tech. 2012;22:e210–3.
Dapri G, El Mourad H, Himpens J, Evola G, Marsili L, Cadière GB. Transumbilical single-access laparoscopic perforated gastric ulcer repair. Surg Innov. 2012;19:130–3.
Omori T, Oyama T, Akamatsu H, Tori M, Ueshima S, Nishida T. Transumbilical single-incision laparoscopic distal gastrectomy for early gastric cancer. Surg Endosc. 2011;25:2400–4.
Park do J, Lee JH, Ahn SH, Eng AK, Kim HH. Single-port laparoscopic distal gastrectomy with D1 + β lymph node dissection for gastric cancers: report of 2 cases. Surg Laparosc Endosc Percutan Tech. 2012;22:e214–6.
Ozdemir BA, Thomas RL, Soon Y. Single-port laparoscopic subtotal gastrectomy with DIα lymphadenectomy. Surg Innov. 2011;18:NP1–4.
Takahashi T, Takeuchi H, Kawakubo H, Saikawa Y, Wada N, Kitagawa Y. Single-incision laparoscopic surgery for partial gastrectomy in patients with a gastric submucosal tumor. Am Surg. 2012;78:447–50.
Lee JH, Lee MS, Kim HH, et al. Comparison of single-incision laparoscopic distal gastrectomy and laparoscopic distal gastrectomy for gastric cancer in a porcine model. J Laparoendosc Adv Surg Tech A. 2011;21:935–940.
Author information
Authors and Affiliations
Editor information
Editors and Affiliations
Rights and permissions
Copyright information
© 2013 Springer Science+Business Media Dordrecht
About this chapter
Cite this chapter
Wu, S., Fan, Y., Tian, Y. (2013). Gastrointestinal Surgery. In: Wu, S., Fan, Y., Tian, Y. (eds) Atlas of Single-Incision Laparoscopic Operations in General Surgery. Springer, Dordrecht. https://doi.org/10.1007/978-94-007-6955-7_3
Download citation
DOI: https://doi.org/10.1007/978-94-007-6955-7_3
Published:
Publisher Name: Springer, Dordrecht
Print ISBN: 978-94-007-6954-0
Online ISBN: 978-94-007-6955-7
eBook Packages: MedicineMedicine (R0)