
Abstract
Under general anesthesia, the patient was placed in supine position with the legs apart. The position of surgeon, assistants and nurses is shown in Fig. 12.1
Access provided by Autonomous University of Puebla. Download chapter PDF
Keywords
These keywords were added by machine and not by the authors. This process is experimental and the keywords may be updated as the learning algorithm improves.
12.1 Laparoscopic Sleeve Stomach Esophagoplasty
12.1.1 Major Instruments or Energy Sources
-
1.
Laparoscopy System
-
2.
Harmonic scalpel
-
3.
Ligasure
12.1.2 Team Setup, Anesthesia and Position
Under general anesthesia, the patient was placed in supine position with the legs apart. The position of surgeon, assistants and nurses is shown in Fig. 12.1.

Fig. 12.1
12.1.3 Key Steps
-
1.
Dissection of the gastrocolic ligament
-
2.
Dissection of the gastrosplenic ligament
-
3.
Division of the left gastric artery
-
4.
Dissection of the hepatogastric ligament
-
5.
Mobilization of the lower esophagus
12.1.4 Surgical Techniques
-
1.
Dissection of the gastrocolic ligament
Greater curvature was retracted and gastrocolic ligament was divided along the greater curvature (Fig.12.2a–d).

Fig. 12.2
-
2.
Dissection of the gastrosplenic ligament
Gastrosplenic ligament was divided along the greater curvature. The fundus of stomach was exposed. Then the gastrocolic ligament was divided caudally to the antrum of stomach (Fig. 12.3a–d).

Fig. 12.3
-
3.
Division of the left gastric artery
The left gastric artery was identified and clamped (Fig. 12.4a–d).
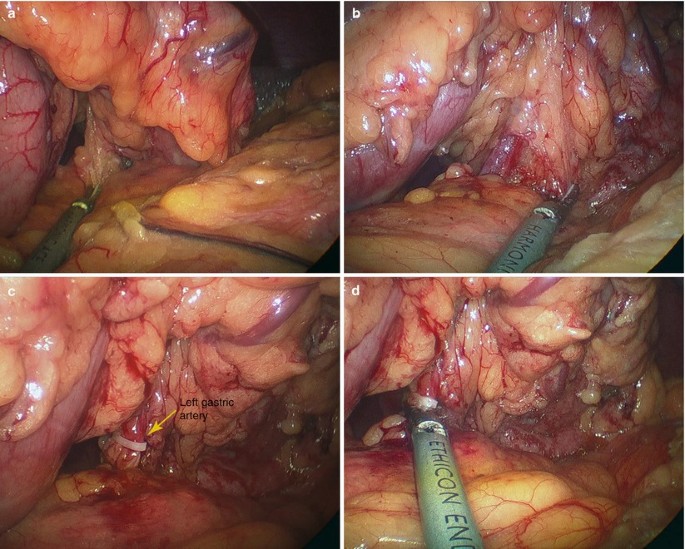
Fig. 12.4
-
4.
Dissection of the hepatogastric ligament
The left lateral lobe of liver was suspended to the diagram with glue. Then the hepatogastric ligament was divided using harmonic scalpel (Fig. 12.5a–f).

Fig. 12.5
-
5.
Mobilization of the lower esophagus
The peritoneum covering the esophagus was cut open, and then the lower part of the esophagus was mobilized along the left and right side. The diaphragmatic hiatus was extended so that the stomach could be lifted up to the thoracic cavity through it (Fig. 12.6a–i).


Fig. 12.6


12.1.5 Complications Analysis and Management
-
1.
Anastomotic leakage and anastomotic stenosis
The tension of anastomotic stoma plays an important role in the formation of leakage. The residual stomach can be prolonged 5–8 cm by the sleeve stomach, which effectively decreases the tension of anastomotic stoma. A proper sleeve stomach can prevent the formation of anastomotic leakage. Reasonable choice and skilled application of staplers are particularly important to avoid anastomotic leak. When the stapler is fired, the surgeon should make sure that no peripheral tissue is tied to stapler.
-
2.
Haemorrhage
It is similar to SILS gastric and esophageal procedure. The greater risk is the violently tearing of venous structures, such as the azygous vein. Ultrasonic scalpel can directly cut off the vessels less than 1.5 mm in diameter. For the larger vessels, Ligasure or firing stapler is necessary for safe and effective hemostasis. Before the end of surgery, haemorrhage should be examined carefully, because there is also a risk of delayed bleeding from the short branches that feed the esophagus directly from the aorta, the short gastric vessels, or from an unrecognized splenic injury.
-
3.
Reflux esophagitis and cardiopulmonary dysfunction
Cutting-off the vagus nerve may decrease tension and evacuation of the intrathoracic stomach, which induces the reflux esophagitis. Compression of intrathoracic stomach is the reason of cardiopulmonary dysfunction, and the postoperative quality of life will be obviously affected. Thus, an appropriate volume is important in making sleeve stomach. A better sleeve stomach should be close to the original esophagus in appearance which is easily placed in esophageal bed to decrease the dilation and alleviate the gastroesophageal reflux and compression to the mediastinum or lung.
12.2 Laparoscopic Jejunum Pharyngoplasty
12.2.1 Major Instruments or Energy Sources
-
1.
Laparoscopy System
-
2.
Harmonic scalpel
-
3.
Ligasure
12.2.2 Team Setup, Anesthesia and Position
Under general anesthesia, the patient was placed in supine position. The position of surgeon, assistants and nurses is shown in Fig. 12.7.

Fig. 12.7
12.2.3 Key Steps
-
1.
Identification of the Treitz ligament
-
2.
Observation of the distribution of the jejunal artery
-
3.
Isolation of the segment of jejunum
-
4.
Anastomosis of the jejunum-jejunum
-
5.
Pharyngoplasty by ENT doctor
12.2.4 Surgical Techniques
-
1.
Identification of the Treitz ligament
The transverse colon was retracted by non-invasive forceps. The Treitz ligament and proximal jejunum was identified (Fig. 12.8a–d).

Fig. 12.8
-
2.
Observation of the vessel distribution and choice of the appropriate segment of jejunum
The jejunum was grasped and the mesentery was checked carefully to observe the distribution of the vessel so that the blood supply of the segment of jejunum was good (Fig. 12.9a, b).

Fig. 12.9
-
3.
Isolation of the segment of jejunum
The peritoneum of mesentery was cut open and the vascular pedicle was made into the shape of fan. Good blood supply must be confirmed (Fig. 12.10a–d).

Fig. 12.10
The jejunum was transected using the linear cutter (Fig. 12.11a–c).

Fig. 12.11
The proximal jejunum was labeled by suturing to avoid the wrong jejunal anastomosis (Fig. 12.12a, b).

Fig. 12.12
The mesentery was further divided and the supply of blood vessel was kept completely (Fig. 12.13a–d).

Fig. 12.13
The jejunum was transected using linear stapler to make a 20 cm segment of jejunum (Fig. 12.14a–f).
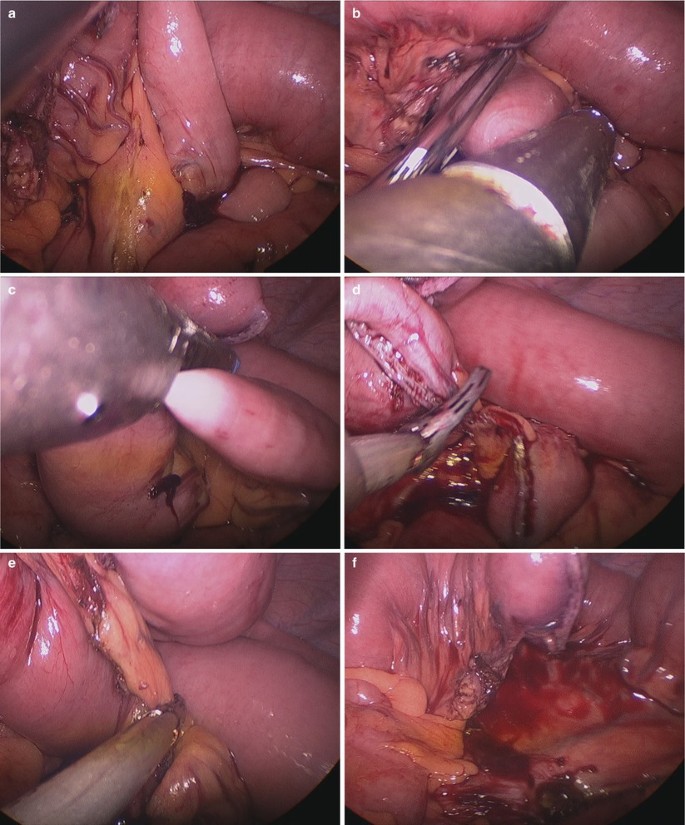
Fig. 12.14
The umbilical incision was extended and the segment of jejunum with the vascular pedicle was extracted out of the abdominal cavity for the pharyngoplasty (Fig. 12.15a–e).

Fig. 12.15
-
4.
Anastomosis of jejunum
The proximal and distal jejunum were extracted out of the abdominal cavity and the anastomosis was performed extracorporeally. Then the jejunum was returned to the abdominal cavity (Fig. 12.16a–c).

Fig. 12.16
The abdominal cavity was irrigated and the anastomosis was checked carefully. The drainage was placed (Fig. 12.17a–d).

Fig. 12.17
-
5.
Jejunum pharyngoplasty
The segment of jejunum was repaired extracorporeally and the anastomosis was performed by the ENT doctor. The blood vessel was anastomosed by microsurgeon. The color and peristalsis of the jejunum was checked (Fig. 12.18a–f).

Fig. 12.18


12.2.5 Complications Analysis and Management
In the procedure of jejunum pharyngoplasty, SILS plays the role of resection of jejunum for repair. Haemorrhage, jejunal anastomotic leakage and internal hernia are possible complications. Hemostasis should be thorough. After side-to-side anastomosis, the residual hole for stapler must be carefully sutured. Closing the mesenteric gap of removal jejunum may prevent the formation of internal hernia.
12.3 Laparoscopic Sigmoid Colon Vaginoplasty
12.3.1 Major Instruments or Energy Sources
-
1.
Laparoscopy System
-
2.
Harmonic scalpel
-
3.
Ligasure
12.3.2 Team Setup, Anesthesia and Position
The patient was positioned lithotomy under general anesthesia. The position of surgeon and assistant is shown in (Fig. 12.19).

Fig. 12.19
12.3.3 Key Steps
-
1.
Dissection of sigmoid colon
-
2.
Isolation of the segment of sigmoid colon
-
3.
Creation of the perineal incision
-
4.
Creation of the pelvic incision
-
5.
The anastomosis of the rectum and the sigmoid colon
-
6.
Security of isolated segment of sigmoid colon and fixation of the neovagina
-
7.
Irrigation and drainage
12.3.4 Surgical Techniques
-
1.
Dissection of sigmoid colon
The noninvasive forceps and Harmonic scalpel were inserted through the umbilical incision. The sigmoid colon was retracted to expose the mesocolon. Fifteen to 20 cm segment of sigmoid colon was mobilized with its vascular pedicle (Fig. 12.20a–f).

Fig. 12.20
-
2.
Isolation of the segment of sigmoid colon
The isolated segment of sigmoid colon was created by transecting the colon using the endoscopic linear cutter. The distal end of the sigmoid colon was located around 3 cm away from the peritoneal reflection. The blood supply was checked to guarantee the survival of the sigmoid colon (Fig. 12.21a–j).


Fig. 12.21
-
3.
Creation of perineal incision
The U shape incision was made under the external orifice of urethra. The tunnel was built and extended to three fingers wide so that the segment of sigmoid colon could be extracted through the incision (Fig. 12.22a, b).

Fig. 12.22
-
4.
Creation of pelvic incision
A 3 cm incision was made on the pelvic peritoneum between the anterior wall of rectum and posterior wall of bladder. Then the incision was extended to reach the perineal incision (Fig. 12.23a–h).


Fig. 12.23
-
5.
Anastomosis of proximal sigmoid colon and rectum
The proximal colon was extracted from the tunnel. The head of the stapler was inserted and secured. Then the colon was returned to the abdominal cavity. The stapler was inserted through the anus. The anastomosis between the colon and the rectum was performed (Fig. 12.24a–z).


Fig. 12.24
-
6.
Security of isolated segment of sigmoid colon
The isolated sigmoid colon was extracted out of the abdominal cavity through the man-made tunnel. The distal end of the isolated sigmoid colon was opened and the margin was sutured around the perineal incision. The segment of sigmoid colon was sutured and secured by suturing to the pelvic peritoneum to create the neovagina (Fig. 12.25a–p).


Fig. 12.25
-
7.
Irrigation and drainage
The drainage was placed around the anastomosis and put out through the umbilical incision (Fig. 12.26a, b).

Fig. 12.26


12.3.5 Complications Analysis and Management
In the procedure of laparoscopic sigmoid colon vaginoplasty, SILS plays the role of resection of sigmoid colon for repair. It is similar to SILS colorectal surgery; haemorrhage, anastomotic leakage and left ureteral injury are possible complications. Thorough hemostasis, avoiding violent operation, definite suture of residual hole for stapler and the anatomic level are effect methods to prevent these complications.
Author information
Authors and Affiliations
Editor information
Editors and Affiliations
Rights and permissions
Copyright information
© 2013 Springer Science+Business Media Dordrecht
About this chapter
Cite this chapter
Wu, S., Fan, Y., Tian, Y. (2013). Integrated Multi-subject Surgery. In: Wu, S., Fan, Y., Tian, Y. (eds) Atlas of Single-Incision Laparoscopic Operations in General Surgery. Springer, Dordrecht. https://doi.org/10.1007/978-94-007-6955-7_12
Download citation
DOI: https://doi.org/10.1007/978-94-007-6955-7_12
Published:
Publisher Name: Springer, Dordrecht
Print ISBN: 978-94-007-6954-0
Online ISBN: 978-94-007-6955-7
eBook Packages: MedicineMedicine (R0)