
Abstract
Visiting the operating theatre and the surgical environment is a fulfilling experience for any medical student, even in pre-clinical years. However, students are typically not formally taught the practical skills that are necessary to make any surgical experience worthwhile. These skills include scrubbing, gowning and gloving, and being familiar with common surgical instruments. This chapter will cover these basics, as well as outlining the more specialised electrosurgical and laparoscopic equipment you may encounter in theatre. We recommend that you give it a read-through before any hands-on surgical rotation – particularly if you are about to embark on a surgical elective.
Ankit Mishra and Michael Morgan are joint first authors.
Access provided by CONRICYT-eBooks. Download chapter PDF
Keywords
Introduction
Visiting the operating theatre and being part of the surgical environment can be an extremely fulfilling experience for a medical student, even in the pre-clinical years. However, students are typically not formally taught the basic practical skills that are necessary to make any surgical exposure worthwhile. These skills include scrubbing, gowning and gloving, and being able to identify surgical instruments and equipment. This chapter will cover these basics and more, and we recommend that you give it a read-through at the beginning of any hands-on surgical rotation – particularly if you are about to embark on a surgical elective!
Most of all, remember that theatre staff strive for safety in their work, and so it is very important for you to be honest about what you are able to do. It is always better to ask for someone to supervise you while you scrub for the first few times as it will give them (and you) peace of mind and ensure that you learn correctly.
The Surgical Scrub
Preparation for Scrubbing
Personal cleanliness is extremely important for staff in the operating theatre. Frequent hair washing, a daily shower and care of the hands and fingernails are vital. Nails should be trimmed so that they do not protrude over the tips of the fingers and should also be free from any polish or nail treatments. This will prevent them from puncturing gloves and make them easier to clean. If there is an infection, rash or open lesion on ones hands, nails or arms it should be reported to the person in charge. You should also attempt to use the restroom facilities before scrubbing to avoid having to leave the operating room once the procedure has begun.
Jewellery
Wrist watches and jewellery of any kind are a hazard in theatres and must not be worn. If possible, wedding rings should be removed before scrubbing as they harbour bacteria, although plain bands are permitted by most hospitals. There is a risk of earrings falling into the wound and they should also not be worn. Before any clinical contact with patients, staff should be bare below the elbows.
Hats
Hair must be completely covered with a clean disposable scrub that is changed daily, and on leaving the department or if it becomes visibly contaminated. The hats prevent falling hair or dandruff contaminating the sterile field. Beards must be covered with a hood.
Footwear
Closed-toe non-slip footwear is usually available for theatre staff. If there is a high risk of heavy blood or other fluid loss, boots should be worn.
Masks
The primary purpose of surgical masks is to protect the patient from the bacteria exhaled by the theatre staff. The scrub team is required to wear masks. It is at the discretion of the consultant in charge whether or not the other theatre members should wear a mask. If a prosthesis or implant is being surgically placed, all members of the theatre staff should wear a mask. The mask should be worn before the scrubbing procedure takes place and is not considered sterile. The mask should be changed between procedures as the barrier it provides can be disrupted by the mask becoming damp. This would allow droplets from the nose or mouth to penetrate the mask. A mask must fit snugly to the face to stop the passage of air around the sides and to prevent the fogging of glasses, if they are worn.
Scrubbing
The surgical scrub is part of establishing surgical hand antisepsis and is performed before donning the surgical gown and gloves. It aims to reduce the number of resident and transient microflora of the hands, wrists, and forearms, as well as inhibit their re-growth [1]. The first part of scrubbing is the hand wash with scrub solution (usually povidone-iodine or chlorhexidine) and should last for 5 min. The following steps involve a sterile nailbrush and sponge and should last for 3 min (Figs. 9.1–9.12).
Gowning and Gloving
The sterile surgical gown and gloves are donned in a rather complex manoeuvre to avoid contaminating their outer surfaces. Both procedures require the aid of a circulating person, to open the unsterile packages and tie the gown at the back. The only parts of the surgical gown that are considered sterile are the sleeves (except the axillae), and the front between the neck and waist [5].
We have included step-by-step guides on gowning and gloving, but don’t worry if you can’t remember it all precisely! If you need to scrub up, theatre staff in the scrub room will be happy to help you (Figs. 9.13–9.39).
Incisions and Closures
Surgical Incisions
The surgical incision is a cut made through the skin (typically using a scalpel) by the surgeon in order to access internal viscera. The placement and length of incisions depend on the surgical procedure taking place, and in some cases multiple incisions may be necessary. Any surgical incision is traumatic and will impinge on the post-surgical stress response, the risk of surgical site infection (SSI), and the final cosmetic outcome. As such, it is important to minimise the size of an incision by placing it appropriately while at the same time allowing sufficient access to carry out the operation. Incisions may sometimes have to be extended, for example in order to remove a larger than expected mass or organ. The rationale behind reducing incision size has played a part in the development of minimally invasive surgical techniques, such as laparoscopy.
There are a number of common incisions, particularly in the thorax and the abdomen, which it will be useful to know as a medical student. While some incisions, such as the midline, are utilised in many surgical procedures, others are commonly associated with one operation in particular. It is therefore possible to deduce a little of a patient’s medical history just by observing their surgical scars.
Horizontal Versus Vertical Incisions
Horizontal (transverse) incisions follow Langer’s lines (the general direction that collagen fibres are organised in the dermis) and typically yield better cosmetic results with less pain. Vertical incisions are faster, may afford better exposure of internal structures, and are more easily extensible, but are more likely to become infected or dehisce (fall apart) [8].
Common Thoracoabdominal Incisions (Fig. 9.40)

Common thoracoabdominal incisions
-
Midline laparotomy – A vertical incision is made along the linea alba except where it curves to avoid the umbilicus. It can be longer either above (upper) or below (lower) the umbilicus, or extend from the xyphoid process to the pubic symphysis. This latter variation is typically employed in trauma cases as it offers clear access to the majority of the abdominal cavity.
-
Paramedian – Any vertical incision placed laterally to the midline. It provides access to lateral abdominal structures, e.g. kidneys, and can be used in simple nephrectomy.
-
Transverse – Any horizontal abdominal incision. They afford better exposure to the abdominal cavity than vertical incisions in children and obese patients due to their increased transverse abdominal length.
-
Kocher – A right-sided subcostal incision used to access the gallbladder and biliary tree in open cholecystectomy.
-
Median sternotomy – A midline thoracic incision made along the sternum, with a division of the sternum itself. It is often used in open cardiac surgeries, such as coronary artery bypass.
-
Rooftop – Bilateral subcostal incisions, with improved access to upper abdominal structures (e.g. oesophagus, stomach, adrenal glands) compared to the Kocher. Also known as a chevron or gable incision.
-
Mercedes (−Benz) – A median sternotomy (without the division of sternum) combined with a rooftop incision. It is named after its resemblance to the Mercedes-Benz logo and affords better access to the upper abdominal organs and is used in hepatectomy.
-
Thoracotomy – An incision made between two ribs to access the thoracic cavity in cardiothoracic surgical procedures. It is typically placed in the sixth intercostal space.
-
Pfannenstiel – A convex 10–15 cm long incision located 2 cm above the pubic symphysis. It is typically used in abdominal hysterectomy for smaller uteruses (≤20 weeks gestation size). Also known as a bikini-line incision.
-
McBurney – An oblique incision centred at McBurney’s point (two-thirds along a line from the umbilicus to the right anterior superior iliac spine). It is used in appendectomy. Also known as a grid-iron incision.
-
Lanz – A transverse incision centred at McBurney’s point. It is also used in appendectomy, and is deemed to give a better cosmetic result than the McBurney [7].
-
Rutherford Morrison – An oblique, lower quadrant, muscle-cutting incision. It can be used to access the lower abdominal viscera in colectomies, and is also used in acute appendectomy.
Methods of Closure
After the surgical procedure, it is important to correctly approximate and close incisions. Failure to achieve proper closure leads to poor cosmesis, impaired wound healing, increased rates of infection, and dehiscence. There are several methods of incisional closure available:
-
Sutures – The most common method of surgical closure, where the incision margins are stitched together. Various suture types are available, including monofilament vs. braided and absorbable vs. non-absorbable.
-
Staples – Both absorbable and non-absorbable surgical staples are available for incisional closure. Non-absorbable staples are made from stainless steel, offering both high tensile strength and low tissue reactivity. Absorbable polymer staples may give a better cosmetic outcome.
-
Tissue adhesives – These adhesives can be biological or synthetic, and are used to glue incision margins together. Although this closure method has a lower tensile strength than both sutures and staples, it has similar rates of infection and dehiscence while being faster to use.
-
Adhesive strips – Placing adhesive strips across the incision is a non-traumatic method of closure, but the strips will not stick to moist areas or areas under tension [3].
Surgical Instruments
Instruments in Open Surgery
A wide variety of instruments are available to the surgeon, each designed to perform specific tasks during the course of an operation. While each surgical field makes use of specialised instruments particular to their own fields, there are many surgical instruments that will be found in any operating theatre. It will be useful for a medical student observing in theatre to be able to recognise these commonly used instruments (Fig. 9.41).

Selection of common open surgical instruments. Upper row (L-R): Duval tissue graspers, Crile-Wood needle holders, Robert haemostat, Metzenbaum scissors. Bottom row: Debakey dissecting forceps, scalpel, Watson-Cheyne retractor, Langenbeck retractor
Surgical instruments come in various lengths and come in curved and straight forms (apart from scalpels). Their differences in length (Fig. 9.42) and degree of curvature (Fig. 9.43) best suit them to different tasks. Many of these common instruments have their counterparts in microsurgery, which are smaller, and laparoscopic surgery, where the instrument is at the tip of a long rod in order to pass through a trocar (laparoscopic port). You are not required to know the names of these instruments whilst at medical school, but the most common ones are outlined below to help you orientate yourself.

Length range in surgical instruments

Tip angulation in surgical instruments
Common Surgical Instruments
-
Scalpels – A bladed instrument with a BP (Bard-Parker) handle and disposable blade used to make incisions and in sharp dissection. Both the handles and blades come in a variety of sizes and shapes to perform specialised tasks (Figs. 9.44, 9.45, 9.46, 9.47, 9.48, 9.49 and 9.50).
Fig. 9.44 
BP scalpel handles
Fig. 9.45 
Disposable no. 15 scalpel blade
Fig. 9.46 
Scalpel with no. 4 BP handle and no. 20 blade
Fig. 9.47 
Scalpel with no. 7 BP handle and no. 15 blade
Fig. 9.48 
Scalpel in a pencil grip
Fig. 9.49 
Scalpel in a palmar grip
Fig. 9.50 
Mayo scissors, 6″ straight
-
Scissors – Surgical scissors come in various types and are used for both cutting through tissues and also separating them in blunt dissection. For this reason, surgical scissors typically have rounded tips to avoid damaging structures. Scissors can be straight, for cutting sutures, or curved, for cutting tissue. Examples include Mayo, Metzenbaum, and Nelson (Figs. 9.50, 9.51, 9.52 and 9.53). Surgical scissors are held in the same way as surgical clamps (Fig. 9.54).
Fig. 9.51 
Mayo scissors, 6″ curved
Fig. 9.52 
Metzenbaum scissors, 9″ curved
Fig. 9.53 
Nelson scissors, 9″ curved
Fig. 9.54 
How to hold surgical scissors and clamps
-
Dissecting forceps – In a surgical context, ‘forceps’ typically refers to these non-locking dissecting instruments. Although they are essentially tweezers, don’t refer to them as such if there’s a surgeon nearby! Dissecting forceps can be toothed, for grasping skin and promoting bleeding, or non-toothed, to atraumatically grasp tissues and needles. They should be held in a pencil grip. Examples include Debakey, Gillie, Lane, and McIndoe (Figs. 9.55, 9.56, 9.57 and 9.58).
Fig. 9.55 
Debakey dissecting forceps, 7″ non-toothed
Fig. 9.56 
Gillies dissecting forceps, 6″ toothed
Fig. 9.57 
Lane dissecting forceps, 7″ toothed
Fig. 9.58 
McIndoe dissecting forceps, 6″ non-toothed
-
Haemostats – Locking clamps used to occlude vessels and control bleeding. Also called artery forceps or clips. Examples include Dunhill, Frazer, Kilner, Lahey, Roberts, and Spencer Wells (Figs. 9.59, 9.60, 9.61, 9.62, 9.63 and 9.64).
Fig. 9.59 
Dunhill haemostat, 7.5″ curved
Fig. 9.60 
Frazer haemostat, 7.5″ curved
Fig. 9.61 
Lahey haemostat, 7.75″ curved
Fig. 9.62 
Kilner haemostat, 5″ curved
Fig. 9.63 
Roberts haemostat, 8″ curved
Fig. 9.64 
Spencer Wells haemostat, 7″ straight
-
Needle holders – Locking clamps used to safely hold needles while suturing. Needle holders can be distinguished from haemostats by the crossed knurling on the gripping surface of their tips. This allows the needle holder to maintain a firm grip on the needle at all angles. Examples include Crile-Wood and Mayo (Figs. 9.65 and 9.66).
Fig. 9.65 
Crile-Wood needle holder, 9.5″ straight
Fig. 9.66 
Mayo needle holder, 6.5″ straight
-
Tissue graspers – Locking clamps used to grasp and manipulate tissue. Examples include Babcock, Duval, Judd-Aliss, and Lane (Figs. 9.67, 9.68, 9.69 and 9.70).
Fig. 9.67 
Babcock tissue graspers, 8″
Fig. 9.68 
Duval tissue graspers, 8″
Fig. 9.69 
Judd-Aliss tissue graspers
Fig. 9.70 
Lane tissue graspers, 8″
-
Sponge/Towel holders – Locking clamps used to hold surgical sponges and towels. Examples include Lane towel graspers and Rampley sponge holders (Figs. 9.71 and 9.72).
Fig. 9.71 
Mayo ball and socket towel clips
Fig. 9.72 
Rampley sponge holders, 9.5″
-
Retractors – Surgical devices used move apart tissues and organs to allow surgical access or a better view. Examples include Deaver, Morris, Langenbeck, and Ogilvie (Figs. 9.73, 9.74, 9.75, 9.76, 9.77 and 9.78).
Fig. 9.73 
Deaver retractor, 2″
Fig. 9.74 
Morris double-ended retractor
Fig. 9.75 
Langenbeck retractor, medium
Fig. 9.76 
Ogilvie retractor, 1.25″ small
Fig. 9.77 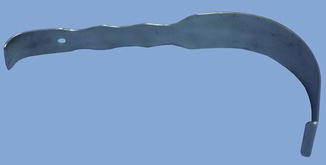
Ogilvie retractor, 1.75″ medium
Fig. 9.78 
Ogilvie retractor, 2″ large
-
Probes – Simple instruments used in dissection. Examples include the straight probe, MacDonald dissector, and Watson-Cheyne retractor (Figs. 9.79 and 9.80).
Fig. 9.79 
MacDonald dissector
Fig. 9.80 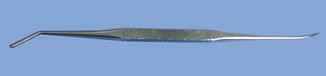
Watson-Cheyne retractor


Instruments in Laparoscopic Surgery
The primary difference between laparoscopic and open surgical instrumentation is that laparoscopic instruments must be both narrow enough to pass through a trocar (Figs. 9.81 and 9.82) and long enough to reach deep tissues in the insufflated abdomen. As such, laparoscopic instruments typically consist of specialised instrument tips at the end of a standard-length shaft. Many laparoscopic instruments are versions of open instruments, such as the Mayo and Metzenbaum scissors shown in Fig. 9.83. As with their open counterparts, there is a vast array of instrument tips used across many specialties. It is not important for a medical student to know the precise names and uses for every laparoscopic instrument; the ones shown in Figs. 9.84 and 9.85 are provided to give an indication of some common instrument tips.

Laparoscopic instrument

Laparoscopic needle holder

Laparoscopic scissors instrument tips. Upper: Mayo; Lower: Metzenbaum

Laparoscopic needle holder instrument tips. Upper: straight; Lower: curved

Laparoscopic grasper instrument tips
Using laparoscopic instruments for the first time can be difficult, particularly when combined with with 2D camera systems that confound depth perception. Another factor to keep in mind if you are called upon to assist in laparoscopic surgery is the ‘fulcrum effect’, which inverts movements and affects the perception of scaling [6]. Figs. 9.86 and 9.87 demonstrate the correct way to hold laparoscopic instruments.

How to hold a laparoscopic instrument

How to hold a laparoscopic needle holder
Sutures and Ties
Sutures
Sutures are used to hold skin, organs, blood vessels and other tissues of the body together after they have been disrupted by trauma – including surgery. The closure they create aids in wound healing. If a suture is used on a wound it can be said to be healing by ‘primary intention’.
Sutures are generally classified into two groups, absorbable and non-absorbable. Other ways to classify sutures include their construction, number of filaments and whether they are synthetic or natural. The ideal sutures is non-toxic, hypoallergenic, flexible and strong.
Absorbable Versus Non-absorbable
Absorbable sutures are broken down by the body’s tissue over time. Absorbable sutures tend to be used internally as it removes the requirement for the wound to be re-opened. Non-absorbable sutures resist being broken down by the body.
Monofilament Versus Braided
Monofilament sutures pass more easily through tissues but do not hold knots as well as braided sutures, with an increased risk of dehiscence. Braided sutures generally grip better and are coated in a range of materials such as silicon, wax or calcium stearate. However, the crevices between the filaments of the braid can harbour microorganisms, resulting in higher infection rates.
Reactivity
As with all foreign materials in the body, sutures may elicit an inflammatory tissue reaction. Natural materials (e.g. catgut, cotton, silk) will elicit a more intense inflammatory reaction than synthetic ones. Nylon and steel are among the least reactive suture materials.
Suture Size
The diameter of sutures are designated according to the United States Pharmacopeia in descending thickness from 10 to 12-0. After 0, the next thinnest suture is 1-0, then 2-0, etc. It is useful to think of the first number (1-0, 2-0, etc.) as the number of decimal places, making 12-0 much smaller than a 1-0. Sutures above 0 size tend to be used in orthopaedics.
Special Sutures
Some procedures make use of special suture types, such as wires in a median sternotomy, deep tension sutures in mass closure, and barbed sutures in urological anastomoses.
Surgical Needles
The needles used in suturing vary in size, curvature, and cross-section. Surgical needles are usually curved, and the degree of curvature is designated as a fraction of a circle. A needle may be round-bodied (circular cross-section), cutting (triangular cross-section, sharp edge inside the curve), or reverse-cutting (triangular cross-section, sharp edge on the outside of the curve) (Fig. 9.88). While some needles are eyed, most modern examples are swaged and come pre-attached with the suture. The suture pack details the properties of the suture and needle (Fig. 9.89).

Surgical needle cross-sections

Suture pack
Surgical Knots and Ties
A useful hand tie for a medical student is the reef knot (Fig. 9.90), which can be used in simple sutures e.g. to affix an arterial line. Figures 9.91–9.108 are a step-by-step guide on how to tie the reef knot. The surgeon’s knot is a modification of the reef knot, with an extra turn in the first throw to provide more grip (Fig. 9.90). As well as by hand, this knot is commonly tied with instruments as part of a stitch. Figures 9.109–9.116 are a guide on tying the surgeon’s knot and Figs. 9.117–9.133 are a guide on performing a simple interrupted stitch with instrument tie (surgeon’s knot). Other common stitches using an instrument-tied surgeon’s knot are the continuous stitch and mattress stitch.

Reef knot and surgeon’s knot
Surgical Equipment
Common Theatre Equipment
The standard operating theatre contains a lot of equipment designed to help the surgeon in the course of an operation. Most procedures make use of some general devices, such as suction systems. One ubiquitous piece of equipment is the electrosurgical diathermy device, which uses heat to cut and coagulate tissue. Other energy-based devices are used frequently in laparoscopic surgery.
Urinary Catheters
Catheterisation is necessary in all abdominal surgical procedures, both open and laparoscopic. This prevents the bladder from filling and obscuring the surgical field. In longer procedures, such as major trauma cases, measuring urine output can give an indication of the patient’s intraoperative fluid status.
The Foley catheter is commonly used as an indwelling urinary catheter, and is held in place by an expandable water-filled balloon. Insertion can be either urethral (16 French diameter for men, 12–14 French for women) or suprapubic.
Suction and Irrigation
Various methods of suction are used to remove blood and debris from the surgical field to improve visualisation. Suction tubes come in open-ended and sump designs, and may be ceiling-mounted for ease of access mid-operation. Fluid irrigation is also used in laparoscopic surgeries to improve visual clarity, generally using saline.
Electrosurgical Diathermy
Diathermy is the induction of heat in a substance by passing high-frequency electromagnetic energy through it. Surgical diathermy is used to both cut tissue and cause coagulation, and is typically achieved by passing high frequency alternating current (AC) electricity through tissues. The frequency of this current is critical:
-
50 Hz – low frequency AC (such as from mains electricity) will cause neuromuscular excitement, leading to tetanic contractions
-
>50 kHz – high frequency AC avoids neuromuscular stimulation
-
400 kHz–10 MHz – electrosurgical diathermy
Within the frequency range of electrosurgical diathermy, different AC waveforms can achieve different tissue effects [2]:
-
Coagulation – Pulsed sinusoidal waveform at 10–75 W, coagulates by desiccating tissue.
-
Cutting – Continuous sinusoidal waveform at 125–250 W, cuts by vaporising interstitial fluid and separating tissue.
-
Blend – A pulsed wave current with a lower duty cycle, used to cut and coagulate at the same time.
-
Fulguration – High-power current causing rapid heating of tissues to build up steam and violently burst cells. Used to ablate lesions.
Monopolar Versus Bipolar Diathermy Systems
The electrosurgical diathermy device consists of a 240 V AC generator and two electrodes: an active and indifferent. The placement of these two electrodes determines whether the diathermy system is monopolar or bipolar. In monopolar systems, the current passes from the generator through both limbs of the diathermy forceps, which represents the active electrode. The current then passes through the patient and back to the generator via the indifferent electrode, a metal return plate stuck to the patient (Fig. 9.134). This plate has to be a minimum of 70 cm2 to reduce contact density and prevent burns. In bipolar diathermy, the current passes through one limb of the diathermy forceps (active), between the instrument tips, and through the other limb (indifferent) back to the generator (Fig. 9.135). Bipolar systems are low power and have no cutting modes.

Monopolar electrosurgical diathermy

Bipolar electrosurgical diathermy
Electrosurgery and Safety
Electrosurgical diathermy comes with hazards to everybody in the operating theatre. All theatre staff should be trained in the safe usage of electrical diathermy systems, and the final responsibility to maintain safety in the theatre lies with the surgeon.
Monopolar diathermy systems can burn patients if the indifferent electrode is too small, wet, not firmly adhered to the patient, or even absent. With some systems an alarm will sound if the return plate has been forgotten. The plate should be attached close to the surgical site on a well vascularised area but away from any ECG electrodes. As electrical currents can ignite alcohol-based antiseptic solutions, keep any skin preparations away from the plate. Some gases, such as nitrous oxide, used in laparoscopic insufflation are flammable and therefore unsuitable to use with electrical diathermy.
Electrical currents can also interact with implanted cardiac devices, such as pacemakers and defibrillators. Older cardiac pacemakers are inappropriately stimulated, while newer models may be inhibited. To avoid lethal arrhythmias, a cardiologist should be consulted regarding the particular pacemaker model.
The use of AC diathermy in appendages such as the penis, fingers, or narrow pedicles, can result in a phenomenon known as ‘channelling’. The high current density can travel through the narrow structure and cause unwanted tissue coagulation. Diathermy should be avoided in these cases and, if unavoidable, bipolar diathermy should be employed [4].
Other Thermal Energy Sources
As well as AC electricity, a number of other energy sources are used to induce surgical diathermy. Surgical devices for cutting and coagulation can also pass ultrasound vibration or radio-frequency energy through tissue to generate heat:
-
Harmonic ACE (Ethicon Endo-Surgery, USA) – Ultrasound
-
THUNDERBEAT (Olympus, Japan) – Bipolar AC and ultrasound
-
LigaSure (Covidien, USA) – Radio-frequency energy
Laparoscopic Equipment
Laparoscopic surgery requires specialised equipment in addition to the aforementioned surgical apparatus. The most obvious piece of equipment is the laparoscope, which allows the surgeon to visualise anatomical structures without direct vision. These endoscopic devices can come with an eyepiece, as in Fig. 9.136, or be connected to a camera stack (Fig. 9.137). The laparoscopic camera stack houses the optical hardware includes a video monitor which displays the image taken by the laparoscope, as well as a video processing unit and a light source. The camera stack shown in Fig. 9.137 also includes an integrated electrosurgical unit, with pedals for cutting and coagulating diathermy.

Forward viewing (0°) laparascope

Laparoscopic camera stack
In addition to the optical equipment necessary in laparoscopic surgery, an insufflator is used to establish a pneumoperitoneum. This device pumps gas (usually CO2) into the abdominal cavity via a trocar (or less commonly a Veress needle). Trocars comes in a range of shapes and sizes, with pyramidal, conical and even blunt tips. Simpler ones, as shown in Fig. 9.138, are simply used to puncture the abdominal wall. Other, more complex, models (Fig. 9.139) act as laparoscopic ports, with gas inlet valves and sleeves to allow the passage of laparoscopes or surgical instruments.

Trocars with pyramidal tip

Trocars with blunt tip, gas inlet valve and instrument sleeve
Preparing the Surgeon: Key Messages
-
Pre-operative preparation for the surgeon includes the surgical scrub and the donning of the sterile surgical gown and gloves.
-
Surgical incisions vary in length and placement, with some that are named and associated with particular procedures.
-
Sutures are the most commonly used method of surgical closure and there are many types which vary in structure, material, and tissue reactivity.
-
Surgeons use a wide variety of instruments, each with differing designs and a specific purpose in mind.
-
Operating theatres contain an array of surgical equipment including several thermal energy sources for tissue cutting and coagulation, the most common of which is electrosurgical diathermy.
Surgeons’ Favourite Questions for Students
-
1.
How many minutes should the surgical scrub last for?
-
2.
Do horizontal or vertical incisions offer better cosmetic results?
-
3.
How is a needle holder distinguished from a haemostat?
-
4.
Which type of suture is associated with higher rates of infection, monofilament or braided?
-
5.
Which kind of electrical current is used in electrosurgical diathermy?
References
Association for Perioperative Practice (AfPP). Standards and recommendations for safe perioperative practice. 3rd ed. Harrogate: AfPP; 2011.
Culjat M, Singh R, Lee H. Medical devices: surgical and image-guided technologies. Hoboken: John Wiley & Sons; 2012.
Hochberg J, Meyer KM, Marion MD. Suture choice and other methods of skin closure. Surg Clin N Am. 2009;89:627–41.
Kingsnorth A, Majid AA. Principles of surgical practice. London: Greenwich Medical Media; 2001.
Newcastle Upon Tyne Hospitals NHS Foundation Trust (NuTH). Surgical scrub, gown, and glove procedure. Newcastle upon Tyne: Newcastle upon Tyne Hospitals NHS Foundation Trust; 2013.
Nisky I, Huang F, Milstein A, Pugh CM, Mussa-Ivaldi FA, Karniel A. Perception of stiffness in laparoscopy – the fulcrum effect. Stud Health Technol Inform. 2012;173:313–9.
Patnaik VVG, Singla RK, Bansal VK. Surgical incisions—their anatomical basis Part IV-abdomen. J Anat Soc India. 2001;50:170–8.
Raghavan R, Arya P, Arya P, China S. Abdominal incisions and sutures in obstetrics and gynaecology. Obstet Gynaecol. 2014;16:13–8.
Author information
Authors and Affiliations
Corresponding author
Editor information
Editors and Affiliations
Rights and permissions
Copyright information
© 2017 Springer International Publishing Switzerland
About this chapter
Cite this chapter
Mishra, A., Morgan, M.C.B. (2017). Preparing the Surgeon. In: Fisher, R., Ahmed, K., Dasgupta, P. (eds) Introduction to Surgery for Students. Springer, Cham. https://doi.org/10.1007/978-3-319-43210-6_9
Download citation
DOI: https://doi.org/10.1007/978-3-319-43210-6_9
Published:
Publisher Name: Springer, Cham
Print ISBN: 978-3-319-43209-0
Online ISBN: 978-3-319-43210-6
eBook Packages: MedicineMedicine (R0)