
Abstract
Semen analysis yields useful information about the fertility status of an individual and is one of the first steps in the diagnosis of male factor infertility. This test provides an assessment of fertility potential, sperm production, functioning of accessory genital tract glands, and ejaculatory capability.
Access provided by Autonomous University of Puebla. Download chapter PDF
Keywords
- Sperm
- Count
- Motility
- pH
- Volume
- Morphology
- Analysis
- Fertility status
- Progressive motility
- Quality control
- Computer assisted semen analyzer
1 Introduction
Semen analysis yields useful information about the fertility status of an individual and is one of the first steps in the evaluation of male factor infertility. This test provides an assessment of fertility potential, sperm production, functioning of accessory genital tract glands, and ejaculatory capability.
2 Specimen Collection and Delivery
-
A.
The subject should be provided with clearly written, or verbal, instructions concerning the collection and transport of semen.
-
B.
Ideally, the sample should be collected after a minimum of 48 h and not more than 1 week of sexual abstinence. The name of the individual, period of abstinence, date, time, and location of collection should be recorded on the report form for each semen analysis.
-
C.
The sample should be collected in the privacy of a collection room (or room close to the laboratory) and placed in a brown paper bag before being brought over the laboratory. The patient’s name and medical record number (or date of birth) should be written on the collection container (Fig. 5.1).
Fig. 5.1 
Collection container and brown paper bag for holding sample [Reprinted with permission, Cleveland Clinic Center for Medical Art & Photography © 2015. All Rights Reserved]
Note: If the sample is collected off-site, it should be delivered to the laboratory within 1 h of collection and kept at body temperature during transport to protect from temperature extremes (no less than 20 °C but no more than 40 °C).
-
D.
The sample should be obtained by masturbation and ejaculated into a clean, wide-mouthed plastic container (Fig. 5.1). Lubricant(s) should not be used to facilitate semen collection other than those provided by the laboratory.
-
E.
Coitus interruptus is not an acceptable means of collection because it is possible that the first portion of the ejaculate, which usually contains the highest concentration of spermatozoa, will be lost. Moreover, there will be cellular and bacteriological contamination of the sample, and sperm motility could be adversely by the acid pH of the vaginal fluid.
-
F.
Incomplete samples will be analyzed, but a comment should be noted on the report form and reported to the physician.
-
G.
Note any unusual collection or condition of the specimen on the report form.
-
H.
Please follow these instructions after each patient that uses the collection room:
While wearing gloves, scrub the surfaces of the room including the chair(s), sofa(s), sink(s), sink faucet(s), door handle, and magazine covers, using a disposable germicidal tissue.

3 Equipment and Materials
-
A.
Computer-assisted semen analyzer (Hamilton-Thorne CASA)
-
B.
Phase contrast microscope
-
C.
Disposable pasteur pipette
-
D.
Serological pipettes
-
E.
Graduated centrifuge tube
-
F.
Glass slides and coverslips
-
G.
Disposable sperm counting chamber and/or Makler chamber
-
H.
Pipettes (5 μL, 25 μL, 50 μL)
-
I.
Dilution cups × 2 mL
-
J.
Phosphate-buffered saline (PBS, 1×)
-
K.
pH paper (range 6.0–8.0)
4 Procedure
Allow the freshly collected semen specimen to undergo liquefaction for 20 min at 37 °C prior to analysis (Fig. 5.2).

Incubator set at 37 °C and a semen sample kept for liquefaction [Reprinted with permission, Cleveland Clinic Center for Medical Art & Photography © 2015. All Rights Reserved]
4.1 Initial Macroscopic Examination
Note: The standard temperature for this examination is room temperature (21 °C).
-
1.
Appearance: The semen sample is first evaluated by simple inspection at room temperature.
The sample should be mixed well in the original container and examined within 1 h of ejaculation. If the sample is more than 1 h old when motility is read, a comment indicating the time at which motility was read should be made on the report.
A normal sample has a gray-opalescent appearance, is homogeneous, and liquefies within 60 min at room temperature. In some cases, if complete liquefaction does not occur within 60 min, it should be recorded. Liquefaction should occur within 20 min at 37 °C (see Appendix 6).
The specimen may appear clear if the sperm concentration is too low. It may also appear reddish-brown when red blood cells are present in the ejaculate.
Note: If the specimen is a retrograde ejaculate, then it should be processed according to Appendix 3.
-
2.
Volume: Thevolume of the ejaculate should be measured either with a sterile graduated disposable serological pipette (Fig. 5.3) or by aspirating the entire specimen into a graduated tube.
Fig. 5.3 
Pipetting of sample from collection container into sterile 15 mL conical tube using a sterile 2 mL serological pipette and automatic pipettor [Reprinted with permission, Cleveland Clinic Center for Medical Art & Photography © 2015. All Rights Reserved]
-
Low semen volume is characteristic of obstruction of the ejaculatory duct or congenital bilateral absence of the vas deferens (CBAVD) [1–4], a condition in which the seminal vesicles are poorly developed.
-
Low semen volume can also be the result of collection problems (loss of a fraction of the ejaculate), partial retrograde ejaculation, or androgen deficiency.
-
High semen volume may reflect active exudation in cases of active inflammation of the accessory organs.
-
-
3.
pH: ApH measurement should be performed on all specimens using pH paper.
A drop of semen is spread evenly onto the pH paper (range 6.0–8.0). After 30 s, the color of the impregnated zone should be uniform and comparable with the calibration strip to read the pH (Fig. 5.4).
Fig. 5.4 
Use of pH test strip for testing sample pH [Reprinted with permission, Cleveland Clinic Center for Medical Art & Photography © 2015. All Rights Reserved]
-
If pH exceeds 7.8, then an infection may be suspected.
-
If pH is less than 7.0 in a sample with azoospermia, dysgenesis of the vas deferens or epididymis may be present [5].
Note: Whatever type of pH paper is used for this analysis, its accuracy should be checked against known standards before use in routine semen analysis.
-
-
4.
Viscosity: After liquefaction the sample’s viscosity can be determined by gently aspirating it into a container using a wide-bore plastic disposable pipette. After aspirating the semen sample, it should be allowed to drop with gravity. The length of the semen thread is observed. A thread greater than 2 cm indicates high viscosity.


4.2 Initial Microscopic Investigation
Note: Mix specimen thoroughly prior to this analysis. (Microscope setup—see Appendix 1)
-
1.
Agglutination: Spermatozoa may normally adhere to cells. The presence of agglutination is suggestive of the existence of an immunological cause of infertility. The extent of agglutination may be important and even the presence of only a few groups of small numbers of agglutinated spermatozoa should be recorded.
Agglutination May Be Categorized as Follows
-
i.
Grade 1: Isolated, <10 spermatozoa per agglutinate, many free spermatozoa
-
ii.
Grade 2: Moderate, 10–50 spermatozoa per agglutinate, several free spermatozoa
-
iii.
Grade 3: Large, >50 spermatozoa, some spermatozoa still free
-
iv.
Grade 4: Gross, all spermatozoa agglutinated and agglutinates interconnected
-
i.
-
2.
Percent motility: Themotility percentage can be determined by a 3–5 μL drop of specimen loaded onto a sperm counting chamber (Fig. 5.5) under a 40× phase objective (Fig. 5.6). Count the number of motile sperm per total number of sperm (see Appendices 2 and 5).
Fig. 5.5 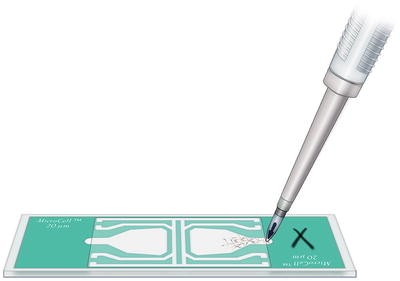
Loading a semen sample onto a sperm counting chamber [Reprinted with permission, Cleveland Clinic Center for Medical Art & Photography © 2015. All Rights Reserved]
Fig. 5.6 
View of sperm under microscope using green filter and 20× phase objective [Reprinted with permission, Cleveland Clinic Center for Medical Art & Photography © 2015. All Rights Reserved]
-
3.
Forward progressive motility:
-
A.
After complete liquefaction of the sample, mix the semen sample well on the vortex mixer.
-
B.
Aliquot 3–5 μL of a well-mixed sample onto a sperm counting chamber very gently to allow it to spread and cover the entire well. If it does not, reload another well. Wait for the sample to stop drifting.
-
C.
Examine the slide under 200× magnification.
-
D.
Examine spermatozoa that are at least 5 mm from the edge of the slide to prevent observation of effects of drying on slide motility.
-
E.
Systematically scan the slide to avoid repeatedly viewing the same area. Change fields often.
-
F.
Start scoring a given field at a random instant. Do not wait for spermatozoa to swim into the field, or grid, to begin scoring.
-
G.
Assess the motility of all spermatozoa in a defined field. This is most easily achieved by a grid. Select a portion of the field, or grid, to be scored for sperm concentration. Score the first two rows of the grid if the count is high. Score the whole grid if the count is low.
-
H.
Quickly count the spermatozoa to avoid overestimating the number of motile sperm. The goal is to count all the motile sperm in the grids instantaneously.
-
I.
Initially scan the grid being scored for the rapidly moving (progressively motile; PR) cells.
-
J.
Next, count the slow, poor progressive motile (NP) spermatozoa.
-
K.
Then, count the weakly twitching sperm with no forward progression.
-
L.
Finally, count the immotile (IM) spermatozoa.
-
M.
Evaluate at least 100 spermatozoa for different motility categories in a total of 5 fields.
-
N.
Calculate the percentage of each of the motility categories.
-
O.
Assess the predominant grade of progressively motile cells and report as follows:
-
i.
Grade 0–1 (D): Immotile, no motility
-
ii.
Grade 2 (C): Weak, twitching, no progression
-
iii.
Grade 3 (B): Poor to moderate, erratic (poor progression)
-
iv.
Grade 4 (A): Good to rapid unidirectional forward progression
Note: It may be good to use both scores as these can be verified by those provided by CASA.
-
i.
-
P.
$$ \begin{array}{l}\mathrm{Percentage}\ \mathrm{forward}=\frac{\mathrm{A} + \mathrm{B} + \mathrm{C}}{\mathrm{A} + \mathrm{B} + \mathrm{C} + \mathrm{D}}\times 100\\ {}\mathrm{progression}\ \end{array} $$
-
Q.
Report the predominant grade of forward progression (Grade 4, 3, 2, 1, or 0) on the pink sheet.
-
A.
-
4.
Undifferentiated round cells: The presence ofround cells (immature germ cells, white blood cells, etc.) should be counted in a drop of semen specimen loaded onto a sperm counting chamber, under a 20× phase objective. Round cell concentration should be counted in 100 squares multiplied by the correction factor (see Appendix 5). The results are reported as 106/mL. Epithelial cells should be noted separately if needed in the same manner.
-
5.
Bacteria: The presence of bacteria should be noted.


4.3 Morphology Smear
To examine sperm morphology, prepare at least two slides using the liquefied semen sample. The sample should be thoroughly mixed before aliquoting (~10–20 μL) on each slide. The smear should be thin and evenly distributed (done by dragging the sample at a 45° angle using a plain slide). The smear should be air-dried (~15–30 min) and then stained using the Diff-Quik staining system; this method is described in Sect. 6.
4.4 Guidelines for Sample Processing
-
1.
Field selection is always manual; Select fields to avoid clumps and excessive debris.
-
2.
Fields or cells analyzed:
-
Minimum: Five fields/sample
-
Maximum: Up to ten fields or >200 spermatozoa, whichever is less
-
-
3.
Low concentration samples (<15 × 106/mL): These samples should be analyzed manually under phase contrast 20× objective for concentration readings; the rest of the analysis should be carried out on the Hamilton-Thorne. Compare the Hamilton-Thorn count and motility with the manual count and motility. Use the manual results for either count, motility, or both in cases where the difference is ≥20 %.
Note: Please use the playback feature to check for proper identification of moving and nonmoving sperm. Adjustments may need to be done.
-
4.
High-concentration samples: Dilution can be made using phosphate-buffered saline (e.g., 20 μL PBS + 20 μL of patient semen specimen; this would be a 1:1 dilution). If a sample reads >100 M/mL, then dilute accordingly with PBS.
4.5 Specimen Handling
Semen samples present a possible biohazard risk since they may contain harmful viruses, e.g., hepatitis, herpes, and AIDS, etc. They should be handled using universal precaution (gloves, disposable jackets, face shields, etc.).
5 Computer-Assisted Semen Analysis
5.1 Setting Up the Hamilton-Thorne IVOS -Computer Assisted Semen Analyzer (CASA) for Routine Semen Analysis
The standard temperature for the CASA is 37 °C ± 1.
-
1.
Turn on the monitor, IVOS, and printer.
-
2.
The first screen to appear is the information screen. This screen is the main menu (Fig. 5.7).
Fig. 5.7 
Screenshot of CASA software upon initial loading [Reprinted with permission, Cleveland Clinic Center for Medical Art & Photography © 2015. All Rights Reserved]
-
3.
Click on the “Info” tab (Fig. 5.8).
Fig. 5.8 
Screenshot of CASA software; patient and sample information input screen [Reprinted with permission, Cleveland Clinic Center for Medical Art & Photography © 2015. All Rights Reserved]
-
4.
Click “Next” to the right of “Analysis Setup” until it reads “Analysis Setup No.1” and “Normal-Low.” Check the parameters and compare them with the previous printout. A printout of the gate settings is maintained in the Quality Control book under CASA. The parameters should be changed if they are not correct.
Note: To change parameters, click on “Setup” and then “Stage Setup.” Parameters should be defined as 20 μm slide; stage temperature, 37 °C; and field selection, manual (Fig. 5.9).
Fig. 5.9 
Screenshot of CASA software; setup information screen [Reprinted with permission, Cleveland Clinic Center for Medical Art & Photography © 2015. All Rights Reserved]
-
5.
To print the gate settings:
-
a.
Click on Print/File.
-
b.
Click on Setup Report.
Note: Check the box next to “Summary” so all user setups print (Fig. 5.10). The gate settings should be printed on a weekly basis.
Fig. 5.10 
Screenshot of CASA software; printer and report setup screen [Reprinted with permission, Cleveland Clinic Center for Medical Art & Photography © 2015. All Rights Reserved]
-
a.


5.2 Starting the Analysis
Entering Patient Information
-
1.
Click on “Info.” This screen can be accessed from the tab on the top menu in IVOS. Next, click on the “General Info” tab on the left side of the screen. The information screen contains sample information necessary for proper analysis calculations (Fig. 5.8).
-
2.
Analysis Setup No.: This parameter should be normal-low. Click on “Next” until normal-low appears on the field.
-
3.
Volume in mL: The volume is necessary to calculate the total number of sperm in the specimen. To change the volume, either click on + or until the correct volume appears or click on volume box and enter the amount using the keyboard.
-
4.
Sample Diluent—this is the ratio of sample volume to diluent volume. This is required for original sample concentration calculations. The only factor that is adjusted is the diluent volume. If 3 mL of diluent is added to 1 mL of sample, then the ratio should be set to 1:3 (this is a ×4 dilution).
-
5.
Patient name and ID: Click on the patient name box and enter the patient’s last name first followed by first name. Click on ID box and enter the patient’s medical record number.
-
6.
Enter the date, volume, days of abstinence, and location in the appropriate fields under the data fields tab.
-
7.
Assign the patient an accession number and insert it into the accession number box. New accession numbers are assigned sequentially. For instance, if the last accession # was E130266, the new accession number should be E130267. The accession number should be followed by the patient’s name, clinic number, CASA count, manual count, test run, and tech’s initials.
5.3 Analyzing the Sample
-
1.
Click on the “ Acquire” tab at the top of the screen when finished entering the necessary information in “General Info” and “Data Fields.”
-
2.
Load 3–5 μL of well-mixed semen onto the sperm counting chamber and allow the slide to rest for about 30 s to 1 min.
-
3.
Press “Load” on the front of the IVOS to access the stage (Fig. 5.11).
Fig. 5.11 
Hamilton-Thorne CASA displaying load tray location [Reprinted with permission, Cleveland Clinic Center for Medical Art & Photography © 2015. All Rights Reserved]
-
4.
Place the sperm counting chamber on the stage as indicated in Fig. 5.12 and press “Load” again. The stage will enter into the IVOS. The center of sperm counting chamber should be approximately 7.0 mm.
Fig. 5.12 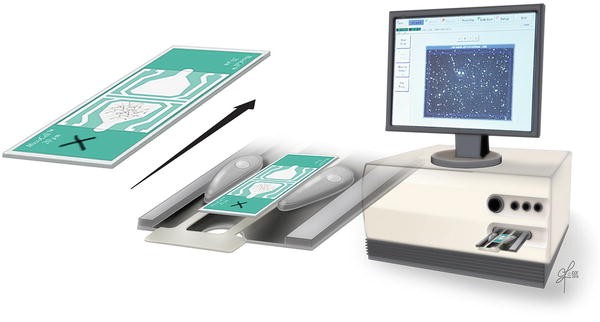
Loading the sperm counting chamber in the load tray [Reprinted with permission, Cleveland Clinic Center for Medical Art & Photography © 2015. All Rights Reserved]
-
5.
The sample image will appear on the screen. Focus the image by turning the focus knob on the IVOS.
-
6.
Manually select at least 5 fields. You may “Jog In” or “Jog Out” from the 7 mm point to obtain the desired fields. Each time “Manual Selection” is clicked, the IVOS will remember the position of the stage and will automatically move the stage to each selected field during analysis. The number under “Manual Select” denotes the number of fields chosen for analysis.
-
7.
Click on “Start Screen.” The IVOS will analyze the fields selected and automatically give the first page of analysis results on the screen.
-
8.
Click on “Results” to see further result screens. If possible, then count more than 200 cells. If you need to add more fields, then click “Add Screen.” Each new analysis and the results represent the mean (weighted by the number of cells in each field).


5.4 Printing Final Report (Fig. 5.10)
-
1.
Click on Results.
-
2.
Click on Print/File.
-
3.
Click on Print.
6 Sperm Differential
6.1 Slide-Making Technique
Make two smears per specimen using the correct slide-making technique determined by the number of sperm:
-
For a low count (<10 × 106/mL), use a wider angle.
-
For a high count (>100 × 106/mL), dilute specimen or use a smaller angle.
Allow the drop of semen to spread evenly along slide and pull with slow, even pressure. For viscous specimens with adequate counts, dilute 1:1 with saline or PBS to make a better smear. The technique described above allows for an even distribution of sperm on the slide for any type of count. Air-dry and fix with Diff-Quik fixative after smearing. Stain with Diff-Quik stain (see Sperm Morphology Stain procedure).
6.2 Sperm Differential Procedure
Two hundred sperm are to be counted on all specimens with counts ≥10 × 106 sperm/mL. If smears are made using the technique described above, there should be no difficulty counting 100 sperm on each of the two slides. For counts <10 × 106/mL, see Appendix 6.
For Counts <10 × 106/mL
-
A.
Centrifuge the semen sample prior to making two long smear slides. Be sure to complete the rest of the semen analysis prior to centrifugation.
Note: Make two long slides using the unspun specimen as well.
-
B.
Centrifuge the specimen at 1600 rpm for 7 min. Remove the supernatant (seminal plasma) and resuspend the sperm pellet in 0.3–0.5 mL of PBS (1×) solution. Mix gently. Make a set of long slides on the centrifuged specimen for morphology differentiation.
-
C.
When reading the differential, save one spun and unspun slide for the slide archives. Please make an attempt to read the differential. You may score 25 or 50 sperm as a percentage for those very low sperm count specimens. If <100 sperm are scored, make a note on the report form indicating how many spermatozoa were counted.
Note: When using spun samples, do not include the round cells as part of the differential.
6.3 No Sperm Seen
If there are no sperm seen, spin down the semen sample and load it into a sperm counting chamber. If no sperm are seen on the spun wet preparation, the following lab procedure should be used:
Cytospin Preparations
-
Using the spun semen sample, aliquot off most of the seminal plasma and remix the specimen.
-
Place one drop of the well-mixed semen into each of the cytofunnel wells (3–5 preparations).
-
Then add one drop of saline into each of the funnel wells.
-
Make 2–3 long smears.
-
One cytospin and one long smear will be stained using the Diff-Quik stain procedure.
The rest of the long and cytospin slides will use the following procedure (see the Cytospin Procedure in the Procedure Manual for more details):
Nuclear Fast Red/Picroindigocarmine Stain (or NF/PICS)
-
Interpretation: The NF/PICS stains sperm heads red and tails green. This is an aid in identifying any sperm that may have been missed on the wet preparation. In addition, all nuclear elements will stain red and cytoplasmic elements will stain green. Spermatids will have very dense red nuclei and green cytoplasm. It is also possible to see cells from the germinal epithelium that will appear as active, large mononuclear cells in the same color scheme. All slides should be scanned entirely to check for the presence of sperm and/or cells.
-
All slides should be reviewed in conjunction to make a positive identification of the cellular elements present.
-
If there are any questions concerning this procedure, please refer to the “Nuclear Fast Red and Picroindigocarmine Stain” procedure.
7 Quality Control
General: All run failures will be reported in the Quality Assurance monthly review, with interpretation and corrective action taken.
7.1 Hamilton-Thorne Computer Semen Analyzer
Printing of gate settings and comparison with original posted values should be done weekly. If the weekly printout does not match posted gate settings for the machine, then this should be corrected before proceeding with the specimen analysis. The printout should be filed in a quality control log (Red Book) marked for that purpose.
Criteria: Gate settings at the posted value.
Response: If out of range; reset gate settings.
7.2 Daily Precision
A patient specimen should be selected at random and run through the CASA. A manual count and motility reading should be performed simultaneously.
Criteria: All manual results should be within 20 % difference of CASA value.
Response: If results are not within the defined percentage difference, the manual count or motility should be used. Recalibration of the CASA may be needed if the problem persists. Inform the supervisor or director.
7.3 Manual Counts (See Appendices 2 and 5)
The manual count should be done on specimens where sperm concentration is <15 × 106/mL or those with an excessive number of extraneous cells (>20 round cells/hpf).
Criteria: CASA concentration measurement must be ≥15 × 106/mL.
Response: If <15 × 106/mL do a manual count before reporting.
7.4 Sperm Processing Interval
All semen analysis results should be tabulated in QA review to monitor if the specimens are processed within 90 min after being produced. A record of this information should be maintained.
Criteria: Greater than 90 % of the specimens received in the lab should be processed within 1 h of receipt.
Response: If >10 % of samples are delayed for more than 1 h, review staffing and the specimen flow.
7.5 Sperm Morphology
Two proficiency slides are scored by both strict criteria and the WHO methods at the end of each semiannual period. The percentages of normal sperm forms counted by each technologist from each slide are compared with the results provided by the proficiency testing agency.
Criteria: The results of individual technologists should not differ significantly compared to the AAB results.
Response: If the results are out of range (p < 0.05), review specific discordance and initiate education program to standardize criteria.
7.6 Standard Sperm Analysis Temperature
A temperature range of 37 °C (CASA) to 21 °C (manual microscope) was evaluated on 20 semen specimens with a correlation factor (r 2) of 0.970116. Therefore, our standard for CASA is 37 °C ± 1 and manual count and motility is 21 °C.
Criteria: The temperature of the CASA stage is recorded on the semen analysis worksheets.
Response: If the CASA temperature is out of range, inform the supervisor.
8 Reference Ranges
Semen volume: >1.5 mL
Semen pH: >7.2
Concentration: >15 M/mL
% Motile sperm: >40 %
Normal oval head: >4 %
Velocity: >46 μ/s
Linearity: >58 %
Undifferentiated round cells: <1.0 M/mL
References
de la Taille A, Rigot JM, Mahe P, Vankemmel O, Gervais R, Dumur V, Lemaitre L, Mazeman E. Correlation between genito-urinary anomalies, semen analysis and CFTR genotype in patients with congenital bilateral absence of the vas deferens. Br J Urol. 1998;81(4):614–9.
Daudin M, Bieth E, Bujan L, Massat G, Pontonnier F, Mieusset R. Congenital bilateral absence of the vas deferens: clinical characteristics, biological parameters, cystic fibrosis transmembrane conductance regulator gene mutations, and implications for genetic counseling. Fertil Steril. 2000;74(6):1164–74.
von Eckardstein S, Cooper TG, Rutscha K, Meschede D, Horst J, Nieschlag E. Seminal plasma characteristics as indicators of cystic fibrosis transmembrane conductance regulator (CFTR) gene mutations in men with obstructive azoospermia. Fertil Steril. 2000;73(6):1226–31.
Weiske WH, Sälzler N, Schroeder-Printzen I, Weidner W. Clinical findings in congenital absence of the vasa deferentia. Andrologia. 2000;32(1):13–8.
WHO. Laboratory manual for the examination of human semen and semen-cervical mucus interaction. Cambridge: Cambridge University Press; 2010.
Author information
Authors and Affiliations
Corresponding author
Editor information
Editors and Affiliations
Cleveland Clinic
Cleveland Clinic

Rights and permissions
Copyright information
© 2016 Springer International Publishing Switzerland
About this chapter
Cite this chapter
Agarwal, A., Gupta, S., Sharma, R. (2016). Semen Analysis Using Hamilton-Thorne Computer Assisted Semen Analyzer (CASA). In: Agarwal, A., Gupta, S., Sharma, R. (eds) Andrological Evaluation of Male Infertility. Springer, Cham. https://doi.org/10.1007/978-3-319-26797-5_5
Download citation
DOI: https://doi.org/10.1007/978-3-319-26797-5_5
Published:
Publisher Name: Springer, Cham
Print ISBN: 978-3-319-26795-1
Online ISBN: 978-3-319-26797-5
eBook Packages: MedicineMedicine (R0)