
Abstract
Gastric cancer requires 5 cm margins when a surgical resection is feasible. When a total gastrectomy is required, an esophagojejunostomy is performed and a Roux-en-Y reconstruction with the rest of the small bowel is required. The present chapter describes an open total gastrectomy with a gastrojejunostomy.
Access provided by Autonomous University of Puebla. Download chapter PDF
Keywords
Overview
-
Greater curve mobilization, greater omentectomy, left gastroepiploic vessels division
-
Infrapyloric mobilization, right gastroepiploic vessel ligation
-
Divide the short gastric arteries and bring all tissue with the specimen
-
Incise the gastrohepatic ligament and identify and ligate the right gastric vessels, continue mobilization to the GEJ at the right crus
-
Duodenal transection; include all nodal tissue with specimen
-
Identify the left crus and keep all perinodal tissue with specimen
-
D2 lymphadenectomy, dissection of PH, CHA, LGA, CA, SA, left gastric vessel ligation
-
Gastric transection
-
Esophagojejunostomy creation
-
Roux-en-Y reconstruction
-
Feeding jejunostomy tube insertion
Clinical Pearls
-
Crow’s foot courses over pylorus, so dissection distal to this includes entire stomach
-
Duodenum has Brunner’s glands which secrete HCO3; if absent on pathology, dissection is incomplete
Nodal Dissection
Must sample at least 16 nodes
Three potential purposes: (1) Staging. (2) Prevention of locoregional recurrence. (3) Improvement in overall survival. The current recommendation is that at least 16 lymph nodes are examined for correct assessment of the N.
Distal/subtotal gastrectomy D1 (1, 3, 4sb, 4d, 5, 6, 7) +8a, 9, 11p, 12a
Proximal gastrectomy N/A
Total gastrectomy: D1 (1–7) + 8a, 9, 10, 11p, 11d, 12a
Patient Preparation
Supine with arms out. Prep abdomen with chloraprep, include the chest for proximal tumors that may require a combined thoracic approach, and place a foley catheter and nasogastric tube.
Sandbag under left costal margin.
Preoperative antibiotics (second generation cephalosporin).
Consider a staging laparoscopy (25% of patients are upstaged, this procedure allows for placement of feeding jejunostomy tube prior to preoperative systemic therapy).
Anesthesia
General with or without an epidural catheter placed preoperatively.
Operative Considerations
Need a 5–6 cm margin from tumor and at least 15 lymph nodes sampled.
Lymphadenectomy
D1: Perigastric nodes (station 1–6)
D2: Lymph nodes along the common hepatic, left gastric, and splenic arteries (stations 7–11)
D3: Additional nodes within the porta hepatis and adjacent to the aorta (stations 12–16)
Operative Steps: Total Gastrectomy with D2 Lymphadenectomy
-
1.
Perform a diagnostic laparoscopy to exclude distant disease such as liver and peritoneal metastases and remote lymph node involvement, which will preclude resection. Obtain a peritoneal wash for cytology in the upper abdomen.
-
2.
Perform a midline laparotomy from the xiphoid to just below the umbilicus.
-
3.
Deepen the incision through the subcutaneous tissues and identify the linea alba, incise and enter the peritoneal cavity.
-
4.
Place retractors to aid with exposure. Dissect the greater omentum from the colon using electrocautery, entering into the anterior leaflet of the mesocolon. Bleeding should be minimal if the correct plane is entered.
-
5.
Mobilize the splenic flexure of the colon inferiorly.
-
6.
Continue the dissection to the inferior border of the pancreas and dissect the pancreatic capsule cephalad.
-
7.
Divide any branches of the right gastroepiploic vessels at the inferior border of the pancreas and carefully divide any venous tributaries. Ligate the right gastroepiploic vein just proximal to the insertion of the accessory right colic vein with 3-0 silk ligatures. Identify and ligate the right gastroepiploic artery with 3-0 silk ligatures.
-
8.
Extend the dissection laterally along the superior portion of the pancreas, skeletonizing the splenic artery and dividing short gastric vessels close to the spleen. Leave the pancreatic capsule in situ to prevent a pancreatic leak. Separate all subpyloric lymphatic tissue from the duodenal wall and keep with the specimen.
-
9.
Incise the peritoneum on the left side of the hepatoduodenal ligament and expose the right gastric artery. Ligate the artery using 2-0 silk ties and divide.
-
10.
Dissect the lesser omentum from the inferior portion of the liver to the right crus of the diaphragm and the right aspect of the gastroesophageal junction. Include the nodal tissue in the specimen.
-
11.
Place two straight Kocher clamps on the duodenum and divide using a GIA stapler (blue load) 1 cm distal to the pylorus. Reinforce the duodenal staple line with interrupted horizontal 3-0 monofilament absorbable mattress sutures.
-
12.
Reflect the stomach cephalad, exposing the pancreas, common hepatic artery and the celiac axis. Begin the portal dissection by isolating the hepatic artery bifurcation, sweeping nodal tissue downward. Dissect the portal vein to the left of the left hepatic artery and in the area between the common hepatic and the superior border of the pancreas. Sweep this dissection back to the celiac axis and meet the dissection of the superior border of the pancreas at the junction of the splenic artery with the celiac.
-
13.
Identify and divide the left gastric artery at its origin.
-
14.
Dissect along the right crus to identify the celiac axis and clear off the nodal tissue.
-
15.
The nodal tissue overlying the splenic artery should be dissected from the splenic hilum toward the left gastric artery. A splenectomy has no benefit unless it is performed for primary tumor clearance.
-
16.
Identify the origin of the left gastroepiploic artery from the splenic artery and ligate. Identify and ligate any short gastric vessels close to the spleen, allowing for the identification of the left crus. Identify and preserve the left adrenal gland.
-
17.
Once the entire stomach is mobilized, lift the entire stomach complex forward.
-
18.
Dissect the left paracardial nodes by dividing the phrenoesophageal ligament and reflect the paracardial lymph nodes inferiorly with the specimen.
-
19.
Mobilize the gastroesophageal junction with sharp and blunt dissection and encircle the esophagus with a Penrose drain. Identify the anterior and posterior vagus nerves, ligate and divide them.
-
20.
Place a soft Satinsky atraumatic vascular clamp on the esophagus and transect using an endoscopic linear stapler (3.5 mm staple size).
-
21.
Send the proximal margin for frozen section.
-
22.
Identify the ligament of Treitz and transect the jejunum approximately 20 cm distal using a linear cutting stapler.
-
23.
Bring the distal limb of jejunum through a window in the transverse mesocolon in a retrocolic fashion and juxtapose it to the esophagus, ensuring that it lies comfortably without excess tension or torsion.
-
24.
Perform the Roux-en-Y reconstruction with approximately 60 cm of length between the esophagojejunostomy and the jejunojejunostomy to minimize esophageal reflux.
-
25.
Multiple methods exist for creating the esophagojejunal anastomosis (Fig. 9.1):
-
(a)
A single layer running polydioxanone suture (3-0 PDS) using large, full-thickness bites is an acceptable approach. For this technique, a stabilizing suture is placed in the posterior aspect of the esophagus, with the posterior aspect of the jejunum. The running suture is begun in the midline posteriorly, two over-and-over running sutures are then tied anteriorly.
-
(b)
Alternatively, an end-to-end stapling device can be used, either with the entry point at the end of the jejunum or a more distal separate enterotomy in the jejunum.
Figure 9.1 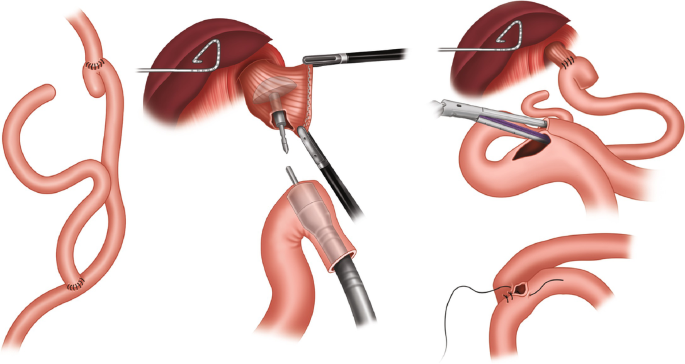
An EEA stapler can be used to create the esophagojejunostomy
-
(a)
-
26.
Place a nasogastric tube across the anastomosis and ensure no anterior suture has caught the posterior wall.
-
27.
Create the Roux-en-Y jejunojejunostomy 60 cm distal to the esophagojejunostomy (Fig. 9.1).
-
(a)
If stapled: bring the two limbs of jejunum together using 3-0 silk sutures. Create enterotomies in each limb and introduce the stapler. Ensure adequate hemostasis of the staple line and close the common enterotomy with a linear stapler or with a two-layered suture closure.
-
(b)
If sutured: perform a hand-sewn two layered end-to-side anastomosis using a running 3-0 Vicryl suture, followed by a row of interrupted silk sutures.
-
(a)
-
28.
If a feeding jejunostomy is to be constructed: Place a purse string suture in the jejunum approximately 20 cm distal to the jejunojejunostomy.
-
29.
Create an enterotomy in the center of the purse string suture and place the feeding tube through it.
-
30.
Place 3-0 silk Lembert sutures to create a Witzel tunnel, effectively burying the jejunostomy tube. Create a stab incision to the left of the midline incision and bring the tube through it.
-
31.
Suture the jejunum to the anterior abdominal wall using four-quadrant sutures with seromuscular bites through the jejunum. Tie these and ensure that the jejunum is fixed to the abdominal wall.
-
32.
Place a closed suction drain in the area of the hiatus and esophagojejunostomy and bring this out through a separate stab incision.
-
33.
Close the fascia using a running #1 PDS suture with 5 mm travel and 5 mm bites, the subcutaneous tissues using a 3-0 Vicryl suture, and close the skin using a running 4-0 Vicryl subcuticular suture

Author information
Authors and Affiliations
Corresponding author
Editor information
Editors and Affiliations
Rights and permissions
Copyright information
© 2020 Springer Nature Switzerland AG
About this chapter

Cite this chapter
Ivanics, T., Shah, R. (2020). Total Gastrectomy. In: Karamanos, E. (eds) Common Surgeries Made Easy. Springer, Cham. https://doi.org/10.1007/978-3-030-41350-7_9
Download citation
DOI: https://doi.org/10.1007/978-3-030-41350-7_9
Published:
Publisher Name: Springer, Cham
Print ISBN: 978-3-030-41349-1
Online ISBN: 978-3-030-41350-7
eBook Packages: MedicineMedicine (R0)