
Abstract
Surgical techniques for the treatment of esophageal disease have evolved and improved over the years. The advent of minimally invasive surgery has improved overall surgical outcomes and quality of life for patients with esophageal disease. This chapter discusses the surgical treatment for patients with gastroesophageal reflux disease, hiatal hernia, achalasia, and esophageal cancer.
Access provided by Autonomous University of Puebla. Download chapter PDF
Keywords
- Laparoscopic Dor fundoplication
- Laparoscopic Toupet fundoplication
- Laparoscopic hiatal hernia repair
- Laparoscopic Heller myotomy
- Laparoscopic esophagectomy (Ivor Lewis, McKeown)
- Open transhiatal esophagectomy
Laparoscopic Fundoplication
Indication
Patients with gastroesophageal reflux disease (GERD) refractory to medical therapy are evaluated for surgical treatment of reflux. Patients typically undergo esophagram, esophagogastroduodenoscopy (EGD), pH probe study, and manometry. Patients with a diagnosis of GERD on the basis of these studies are recommended to undergo fundoplication. The degree of fundoplication is based on esophageal manometric studies. We recommend a partial, 270° posterior fundoplication (Dor or Toupet) for patients with poor esophageal motility and a full, 360° fundoplication (Nissen) for patients with normal esophageal motility.
Key Steps
-
1.
Closure of crus
-
2.
Nissen or Toupet fundoplication
Position
Supine position with a foot board to prevent migration on the operating table.
Port Placement
-
1.
Use 5-mm optical trocar (e.g., Ethicon XCEL® trocar or Covidien Versaport™ bladeless optical trocar) to place first port under the left costal margin lateral to the mid clavicular line (Fig. 7.1a). Insufflate the abdomen to a maximum pressure of 15 mmHg.
Fig. 7.1 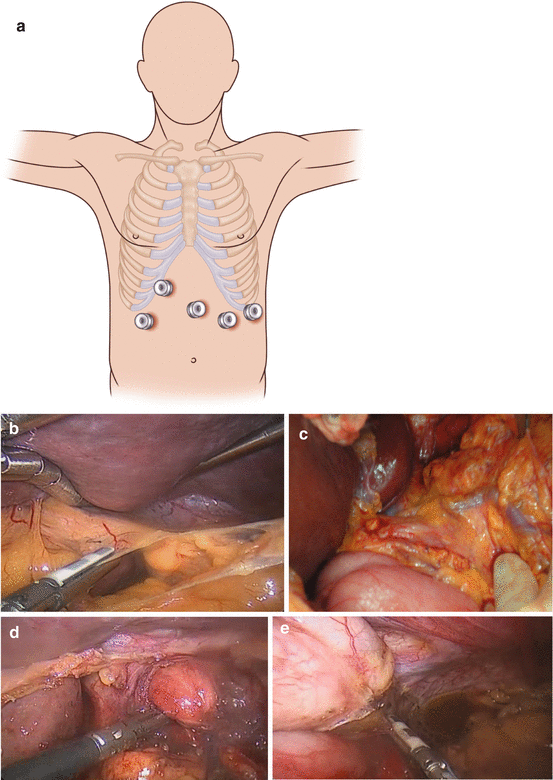

(a) Port placement for laparoscopic fundoplication and for many foregut laparoscopic procedures. (b) Division of the gastrohepatic ligament. (c) The position of an aberrant left hepatic artery (replaced or accessory). (d) Dissection of the crura to allow mobilization of the gastroesophageal junction (GEJ). (e) Division of the short gastric arteries to allow mobilization of the fundus and dissection of the left crus. (f) A suture is placed 6 cm down the greater curve. This is used as a “passer” to allow passage of the wrap behind the GEJ (dotted line), using two graspers. (g) The shoeshine maneuver allows the wrap to be placed without tension. A tension-free wrap can be seen here, with the posterior vagus excluded from the wrap. (h) Nissen fundoplication. (i) Toupet fundoplication
-
2.
Place 12-mm trocar in the midline approximately 12 cm from the xiphoid process.
-
3.
Place a further two or three 5-mm trocars to facilitate dissection per the illustration (Fig. 7.1a). If a Nathanson liver retractor is used this is placed sub-xiphoid and the liver is retracted. Alternatively a 5-mm trocar placed laterally to the umbilicus on the right allows the use of a laparoscopic liver retractor to lift the left lobe of the liver
-
Left mid quadrant trocar: 8 cm left of the 12-mm port
-
Left upper quadrant trocar: 8 cm lateral to the left mid quadrant port
-
Right mid quadrant port: 8 cm away from the 12-mm port, at approximately a 30-degree angle towards the right costal margin
-
-
4.
The surgeon stands on the right side of the patient and uses the right mid quadrant 5-mm port and the 12-mm port. The assistant stands on the left side of the patient and uses the left upper and left mid quadrant ports. The camera is placed in the left mid quadrant port. (Alternatively, if the patient is in the dorsal lithotomy position, the surgeon stands between the patient’s legs.)


Operation
-
1.
Divide the gastrohepatic ligament (Fig. 7.1b). Evaluate the hepatic branch of the vagus nerve and any aberrant hepatic arterial anatomy (Fig. 7.1c). If an accessory left hepatic artery is identified, then perform a clamp test. If the clamp test causes ischemia of the left lobe of the liver (with or without laparoscopic ultrasound to quantify the flow), do not divide this vessel. If a replaced left hepatic artery is identified, do not divide this.
-
2.
Mobilize the gastroesophageal junction (GEJ) (Fig. 7.1d ). Divide the phrenoesophageal membrane, ensuring the preservation of the left anterior vagus nerve. Bluntly separate the esophagus from the right and left crus. Place a Penrose drain around the esophagus and secure the Penrose with a tie (e.g., Ethicon ENDOLOOP® or Covidien Surgitie™).
-
3.
Close the crura. Approximate the left and right crura using suture (e.g., Covidien Endo Stitch™), leaving only the esophagus coming through the hiatus.
-
4.
Divide the short gastric arteries. Use an energy device (e.g., Covidien LigaSure™ or Ethicon HARMONIC® scalpel) to divide the short gastric arteries and mobilize the fundus of the stomach (Fig. 7.1e).
-
5.
Wrap the fundus. Place a suture 6 cm down from the GEJ and 2 cm posterior to the greater curvature (Fig. 7.1f) Bring this suture posterior to the esophagus but anterior to the posterior vagus, to create a wrap (Fig. 7.1g). Perform the “shoeshine” technique to ensure proper placement of the fundus. The fundoplication can then be completed in two ways: Nissen or Toupet.
-
Nissen fundoplication (Fig. 7.1h)
-
(i)
Place a bougie (50 Fr) in the esophagus
-
(ii)
Wrap the fundus around the esophagus, using the technique described above.
-
(iii)
Stitch three interrupted stitches from the left side of the fundus to the right side of the fundus.
-
(iv)
Suture the right side of the fundus to the right crus; then suture the left side of the fundus to left crus.
-
(i)
-
Toupet fundoplication (Fig. 7.1i)
-
(i)
Suture three interrupted stitches from the right side of the fundus to the right side of the esophagus.
-
(ii)
Suture three interrupted stitches from the left side of the fundus to the left side of the esophagus, leaving a 90-degree gap.
-
(iii)
Suture the right side of the fundus to the right crus; then suture the left side of the fundus to the left crus (cruropexy).
-
(i)
-
-
6.
Perform EGD. Withdraw the bougie and perform endoscopy to ensure proper placement of the wrap. Endoscopy can also aid in identifying the location of the EGJ, to ensure that the wrap is around the esophagus, not the stomach.
Laparoscopic Hiatal Hernia Repair
Indication
Patients with large, symptomatic hiatal hernia may benefit from surgical repair. Patients typically undergo an esophagram to classify the type of hiatal hernia and to identify a shortened esophagus.
Key Steps
-
1.
Mobilization and resection of hiatal hernia sac
-
2.
Reduction of stomach
-
3.
Toupet fundoplication
Position
Supine position.
Port Placement
The port placement is the same as for laparoscopic fundoplication (see Fig. 7.1a).
Operation
-
1.
Mobilize the hiatal hernia sac. The hernia sac is separated away from the mediastinum between the left and right crus (Fig. 7.2a). This dissection is carried out to separate the sac away from the mediastinum while keeping the peritoneum on the left and right crus and dividing the sac cephalad to the crus. The peritoneal covering provides the strength for the crural repair. This dissection allows for reduction of the stomach. Once the hernia sac is completely mobilized, resect the sac.
Fig. 7.2 
(a) The hernia sac from the hiatal hernia is dissected free from the mediastinal structures, reduced from the thorax, and excised. (b) The crural repair is performed. The GEJ can be seen dissected free, and with a 3–4-cm length of intra-abdominal esophagus. The crural repair is performed with an endosuturing device (in this case, 0 Ethibond)
-
2.
Reduce the stomach. Reduce the stomach into the abdomen and place a Penrose drain around the esophagus at the GEJ.
-
3.
Close the crus (Fig. 7.2b). Place interrupted sutures to approximate the crus inferior to the esophagus. If there is tension, place a relaxing incision in the left diaphragm, place a Gore-Tex® mesh on the diaphragm, and close the crus primarily.
-
4.
Divide the short gastric arteries and perform Toupet fundoplication as previously described.


Robotic or Laparoscopic-Assisted Modified Heller Myotomy
Indication
Patients with achalasia diagnosed on manometry and esophagram can benefit from Heller myotomy. Techniques for the endoscopic management of achalasia (Botox injection, balloon dilation, and POEM) are outlined in Chap. 6.
Key Steps
-
1.
Mobilization of left anterior vagus nerve
-
2.
Esophageal myotomy
-
3.
Dor fundoplication (Alternative: Toupet fundoplication)
Position
Supine position with foot board.
Port Placement (see Fig. 7.1a)
-
1.
Use a 5-mm optical trocar (e.g., Ethicon XCEL® trocar or Covidien Versaport™ bladeless optical trocar) to place the first port under the left costal margin, lateral to the mid-clavicular line. Insufflate the abdomen.
-
2.
Place a 12-mm trocar in the midline approximately 15 cm from the xiphoid process (camera port for robot).
-
3.
Place three 8-mm robot metal trocars in the following locations:
-
Left mid quadrant trocar: 8 cm left of the 12-mm port on the left side
-
Left upper quadrant trocar: 8 cm lateral to the left mid quadrant port
-
Right mid quadrant port: 8 cm away from the 12-mm port, at approximately a 30-degree angle towards the right costal margin
-
-
4.
Place a 12-mm trocar in the right lower quadrant as the assistant port.
-
5.
Place a liver retractor through the 5-mm optical trocar and lift the left lobe of the liver.
-
6.
Place a grasper in the right mid quadrant port and a grasper in left upper quadrant port. Place an energy device in the left mid quadrant port.
Operation: Technique #1, Dor fundoplication
-
1.
Mobilize the vagus nerve. Divide the gastrohepatic ligament and spare the hepatic branch of the vagus nerve. Divide the phrenoesophageal attachment, sparing the left vagus nerve. Dissect the esophagus away from the superior portion of the left and right crus only. Dissect the left vagus nerve away from the esophagus and place a vessel loop around it (Fig. 7.3a).
Fig. 7.3 
(a) Mobilization of the left vagus nerve. The left vagus nerve is identified during the robotic dissection and can be seen here. It is subsequently slung to protect it during completion of the myotomy. (b) Performing a robotic myotomy. The esophageal muscle is divided using the harmonic scalpel, hot blade upwards for a robotic myotomy. We also use a hook without electrocautery as an alternative method for the myotomy. (c) The myotomy is extended down the stomach over a distance of 2–3 cm using hook dissection and electrocautery, used sparingly. (d) The complete myotomy can be seen here, with mucosa pouting out from the muscular layers of the esophagus. (e) The myotomy has begun and circular muscle is demonstrated proximally prior to division. (f) The myotomy continues; circular muscle is shown distally prior to division. (g) The “sling fibers” of the proximal stomach are shown prior to division
-
2.
Mobilize the gastric fat. Separate the gastric fat pad away from the stomach in the line of the esophagus. Excise the fat pad.
-
3.
Divide the esophageal muscle. Grasp the esophageal muscle and divide the muscle using either scissors, a bipolar energy device, or a cautery hook (but no cautery attached), utilizing gentle blunt dissection until mucosa is visualized (Fig. 7.3b). Separate 6 cm of the esophageal muscle while preserving the mucosa. Use hook cautery to divide 2 cm of the stomach below the gastric fat pad (Fig. 7.3c).
-
4.
Test the myotomy by performing an EGD to ensure that the myotomy is intact and complete (Figs. 7.3d–g). Submerge the esophagus under water and insufflate it to ensure that there is no leakage of air.
-
5.
Perform the Dor fundoplication (Fig. 7.4a–c). Divide the short gastric arteries. Place three interrupted stitches from the left side of the myotomy to the anterior portion of the stomach. Place three interrupted stitches from the right side of the myotomy to the greater curvature of the stomach. Place three interrupted sutures from the posterior portion of the stomach to the right crus and diaphragm.
Fig 7.4 
Dor fundoplication. (a) The myotomy is complete and the left side of the fundus used to create the Dor wrap is sutured to the left side of the myotomy and to the left crus. (b) The right side of the fundus is sutured to the right side of the myotomy. (c) The right side of the wrap is also sutured to the crus


Operation: Technique #2, Toupet Fundoplication
-
1.
Divide the right pars flaccida (gastrohepatic ligament) and spare the hepatic branch of the vagus nerve. Identify and spare any replaced or accessory left hepatic artery coming off of the left gastric artery. Dissect the right crus and find the decussation of the right and left. Leave the lining on the right crus and do not expose the muscle. Clear the retroesophageal space by placing two graspers together and separating the fibers. Encircle the esophagus with umbilical tape or a Penrose drain.
-
2.
Divide the short gastric artery and separate the posterior attachments of the stomach. Dissect the left crus and avoid injury to the left (anterior) vagus nerve. Clear the anterior esophagus to the level of the inferior pulmonary veins.
-
3.
Divide the esophageal muscle. Grasp the esophageal muscle and divide the muscle using scissors, a bipolar energy device, or a cautery hook (but no cautery attached), utilizing gentle blunt dissection until mucosa is visualized. Separate 6 cm of the esophageal muscle while preserving the mucosa. Use hook cautery to divide 2 cm of the stomach below the gastric fat pad. Use light from the endoscope to aid in visualization of the distal 2 cm onto the stomach.
-
4.
Test the myotomy by endoscopy after the myotomy to ensure that the myotomy is complete; submerge the esophagus under water and insufflate it to ensure that there is no leakage of air.
-
5.
Perform Toupet fundoplication (Fig. 7.5a, b).
Fig 7.5 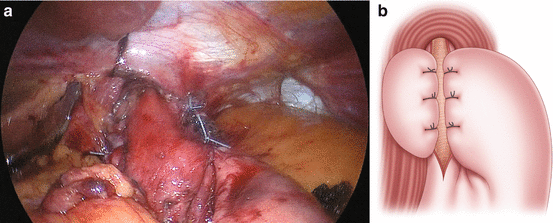
Toupet fundoplication. (a) Intraoperative appearances of a Toupet fundoplication. (b) Toupet fundoplication: the left side of the fundus is sutured to the muscle to the left of the mucosa. The right side of the fundus is sutured to the muscle to the right of the mucosa


Management of Mucosal Injury Following Surgery
In the event of a mucosal perforation, repair the mucosa with interrupted absorbable sutures. Reinforce the repair by closing the muscle over the mucosal closure. Perform a contralateral myotomy away from the repair. Repeat the leak test. Reinforce closure with a fundoplication serosal patch.
Esophagectomy
Indication
Patients with esophageal cancer undergo clinical staging with EGD, endoscopic ultrasound (EUS), and PET-CT scanning. Patients with early-stage cancer may undergo endoscopic or surgical resection. Patients with local and regional disease may receive multimodality treatment with induction chemoradiation therapy followed by surgical resection, if there is no disease progression. The type of surgery is based on the location of the tumor, the medical condition of the patient, and surgeon preference. Our preferences are:
-
Ivor Lewis esophagectomy for patients with lower esophagus and GEJ tumors
-
Three-field esophagectomy for patients with mid esophageal tumors
-
Transhiatal esophagectomy for patients with mid esophageal tumor who cannot tolerate one-lung ventilation.
Minimally Invasive Ivor Lewis Esophagectomy
Position
-
1.
Supine
-
2.
Left lateral decubitus
Abdominal Port Placement
-
1.
Use a 5-mm optical trocar (e.g., Ethicon XCEL® trocar or Covidien Versaport™ bladeless optical trocar) to place the first port under the left costal margin, lateral to the mid-clavicular line. Insufflate the abdomen once the trocar enters the peritoneal cavity (Fig. 7.6a).
Fig. 7.6 
(a) Port placement for minimally invasive Ivor Lewis esophagectomy. (b) Division of the greater omentum, preserving the right gastroepiploic artery. (c) Omental pedicle preserved during dissection of the greater omentum. This pedicle will be used to wrap around the esophagogastric anastomosis
-
2.
Place a 12-mm trocar in the midline approximately 12 cm from the xiphoid process.
-
3.
Place four 5-mm trocars in the following locations:
-
Left mid quadrant trocar: 8 cm left of the 12-mm port
-
Left upper quadrant trocar: 8 cm lateral to the left mid quadrant port
-
Right mid quadrant port: 8 cm away from the 12-mm port, at approximately a 30-degree angle towards the right costal margin
-
Supraumbilical trocar: 1 cm above the umbilicus
-
-
4.
Place a liver retractor through the 5-mm optical trocar and lift the left lobe of the liver.
-
5.
The surgeon stands on the right side of the patient and uses the right mid quadrant 5-mm port and the 12-mm port. The surgeon and assistant will need to change positions and ports throughout the procedure for optimal access. Initially, the assistant stands on the left side of the patient and uses the left upper and left mid quadrant ports. The camera is placed in the left mid quadrant port. The surgeon begins the procedure operating around the esophageal hiatus from the right side of the patient.


Operation
-
1.
Perform exploratory laparoscopy, looking for liver, peritoneal, and omental disease.
-
2.
Mobilize the esophagus at the GEJ. The camera is placed in the left mid quadrant port. Divide the gastrohepatic ligament and phrenoesophageal attachment. Mobilize the esophagus from the left and right crura. Place a Penrose drain around the esophagus. Place the Penrose in the mediastinum.
-
3.
Mobilize the stomach. Divide the short gastric artery using an energy device. Place the camera in the supraumbilical port and divide the greater omentum, preserving the right gastroepiploic artery (Fig. 7.6b). Take down the avascular adhesions between the posterior stomach and the retroperitoneum. Place the camera back in the left mid quadrant port. Divide the left gastric artery. Creation of an omental pedicle is optional for patients who have had induction chemoradiation therapy (Fig. 7.6c).
-
4.
Create a gastric conduit (Fig. 7.7a). Divide the lesser omentum between the 3rd and 4th venous plexus. Create a gastric conduit using an Endo GIA™ stapler (Covidien, Minneapolis, MN), initially 40 mm, then switching to 60 mm × 2 (Fig. 7.7b). The gastric conduit should be narrow (3–4 cm).
Fig. 7.7 
(a) Creation of the gastric conduit. (b) Creation of the gastric conduit intraoperatively. (c) Pyloroplasty is performed by placing stay sutures at superior and inferior portions of the pylorus and performing a longitudinal, full-thickness division. (d) Pyloroplasty is completed by closing the opened pylorus in transverse fashion
-
5.
Perform pyloroplasty. Place the camera in the supraumbilical port. Use the Endo Stitch™ to place stay sutures in the superior and inferior portions of the pylorus. Divide the pylorus using cautery in longitudinal fashion (Fig. 7.7c). Close the pylorus in transverse fashion, using interrupted stitches (Fig. 7.7d).
-
6.
Place a laparoscopic J-tube. Find the ligament of Treitz and travel 15 cm distally on the jejunum (Fig. 7.8, top). Place the bowel against the left lower quadrant. Place four T fasteners (Fig. 7.8, second from top). Place the needle through the incision from the abdominal wall into the small bowel. Thread a wire through the needle. Remove the needle and place an introducer with a dilator over the wire into the bowel (Fig. 7.8, second from bottom). Remove the wire and the dilator. Place the feeding tube over the wire (Fig. 7.8, bottom). See Chap. 8 for further details of J-tube placement.
Fig 7.8 
Laparoscopic J-tube placement. Top, The ligament of Treitz is identified by lifting the transverse mesocolon cephalad. A location on the jejunum that will come to the abdominal wall without tension is identified, usually about 15 cm distal to the ligament. Second from top, T fasteners are placed through the abdominal wall and fix the jejunum at this point. Second from bottom, A needle and guidewire are passed into the jejunum in the center of the T fasteners. A dilator and then an introducer are subsequently passed. Bottom, The introducer is left in place and the jejunostomy feeding tube is passed through it. The T fasteners are then secured to fix the jejunum to the abdominal wall. The jejunostomy tube is secured to the skin with 0 silk


Right Chest Port Placement
-
1.
Place three 1-cm incisions (Fig. 7.9a):
-
10 mm port: 1-cm incision in the mid-to-anterior-axillary line in the fourth to fifth intercostal space
-
10 mm port: 1-cm incision in the posterior axillary line in the fifth intercostal space
-
10 mm port: 1-cm incision in the anterior axillary line in the seventh to eighth intercostal space
Fig. 7.9 

(a) Thoracic port placement. (b) Dissection of thoracic esophagus; the azygous vein is seen divided. (c) The fundamentals of performing an EEA™-stapled esophagogastric anastomosis during minimally invasive Ivor Lewis esophagectomy. Anvil placement and purse-string suture placement in the esophagus. (d) Passage of the EEA™ stapler through the proximal end of the gastric conduit. (e) Performing the esophagogastric anastomosis using the EEA™ stapler. (f) Performing the EEA-stapled anastomosis intrathoracically
-
-
2.
Utility incision: Make a 3–4 cm incision over the eighth to ninth intercostal space, centering the incision along the scapula tip line.


Operation
-
1.
Perform diagnostic thoracoscopy.
-
2.
If suitable to proceed with esophagectomy, a silk suture can be passed through the central tendon of the right hemi-diaphragm and pulled, using a transfascial suture passer through the skin and clipped outside the chest to hold it in the retracted position using a mosquito. The retraction that this suture provides allows excellent exposure to the hiatus from the chest.
-
3.
Mobilize the esophagus. Divide the pleura overlying the esophagus at the GEJ. Find the Penrose drain and bring it out through the utility incision. Divide the pleura overlying the esophagus. Divide the azygous vein if the lesion is mid-esophagus (Fig. 7.9b). Use blunt dissection and an energy source to separate the esophagus from the pericardium, aorta, and bronchus.
-
4.
Dissect mediastinal lymph nodes. Dissect out paraesophageal lymph node and station 7 and 9 lymph nodes.
-
5.
Create anastomosis. Option 1 (using EEA™ 28-mm stapler [Covidien] with 3.5-mm staples)
-
Anvil placement. Partially transect the esophagus using LigaSure™ and place the anvil in the esophagus, using an anvil grasper. Complete the division of the esophagus. LigaSure™ allows mucosa to fuse to the esophageal muscle layers, which is essential to complete an intact anastomosis. Send the proximal esophageal margin to pathology.
-
If negative, then proceed with the anastomosis. Place two purse-string sutures using Endo Stitch™ and tie it down (Fig. 7.9c). Use ENDOLOOP® (Ethicon) to secure the esophagus around the anvil.
-
Place the EEA™ stapler in the specimen (Fig. 7.9d). Make the anastomosis (Fig. 7.9e, f) and send the gastric and esophageal “donut” to pathology.
-
-
6.
Create anastomosis. Option 2 (stapled side to side) (Fig. 7.10a). Make an incision in the gastric conduit about 5 cm from the tip. Place the gastric conduit under the esophagus. Place stay sutures between the opening in the gastric conduit and the end of the esophagus. Place the metal end of an Endo GIA™ stapler with purple load in the gastric conduit, with the stapler end in the esophagus; make the stapled anastomosis (Fig. 7.10a, b).
-
Close the opening with two-layer interrupted suture closure with 3-0 absorbable suture in the deep layer and 3-0 silk suture in the superficial layer (Fig. 7.10c).
-
-
7.
Divide the specimen using the Endo GIA™ stapler, and send the specimen to pathology
-
8.
Place a nasogastric tube (NGT) and a right chest tube after the esophageal reconstruction with gastric conduit is complete (Fig. 7.10d). It is often necessary also to place a left chest tube for pleural fluid drainage.
Fig. 7.10 
(a) Schematic demonstrating a stapled side-to-side esophagogastric anastomosis. (b) Performing the stapled anastomosis between the gastric conduit and the esophagus. (c) The closure of the enterotomy after stapled side-to-side anastomosis. (d) Completed anatomy after minimally invasive Ivor Lewis esophagectomy


Minimally Invasive McKeown (Three-Incision) Esophagectomy
Position
-
1.
Left lateral decubitus position
-
2.
Supine, with neck extended and rotated to the right
Right Chest Port Placement
-
1.
Place four 1-cm incisions:
-
10 mm port: 1-cm incision in the mid-to-anterior axillary line in the fourth to fifth intercostal space
-
10 mm port: 1-cm incision in the posterior axillary line in the fifth intercostal space
-
10 mm port: 1-cm incision in the anterior axillary line in the seventh to eighth intercostal space
-
10 mm port: 1-cm incision over the eighth to ninth intercostal space, centering the incision along the scapula tip line
-
Operation
-
1.
Perform diagnostic thoracoscopy.
-
2.
Using an endosuturing device, place a traction suture through the diaphragm. Using a transfascial suture passer, draw the suture through the skin and use a mosquito to clip it at the level of the skin, to allow good visualization of the hiatus.
-
3.
Mobilize the intrathoracic esophagus: Divide the azygous vein with an endoscopic stapler. Divide the anterior and posterior pleura overlying the esophagus on either side. Take fat and lymphatic tissue along with the esophagus if the surgery is for cancer; if the surgery is for a benign etiology, take only esophagus. Dissect around the esophagus and place a Penrose drain around it. Repeat this procedure so that two Penroses encircle the esophagus. Dissect the esophagus from the pericardium, the aorta, and the airway. Place one of the Penroses in the thoracic inlet and place the other Penrose around the esophagus at the GEJ. These drains will remain in place when the thoracic portion is completed and thoracic incisions closed.
-
4.
Dissect mediastinal lymph nodes: Remove the paraesophageal and mediastinal lymph nodes.
-
5.
Place a right (and left) chest tube.
Abdominal Port Placement
-
1.
Use a 5-mm optical trocar (e.g., Ethicon XCEL® trocar or Covidien Versaport™ bladeless optical trocar) to place the first port in the right costal margin, lateral to the mid-clavicular line. Insufflate the abdomen.
-
2.
Place a 12-mm trocar in the midline approximately 12 cm from the xiphoid process.
-
3.
Place four 5-mm trocars in the following locations:
-
Left mid quadrant trocar: 8 cm left of the 12-mm port
-
Left upper quadrant trocar: 8 cm lateral to the left mid quadrant port
-
Right mid quadrant port: 8 cm away from the 12-mm port, at approximately a 30° angle towards the right costal margin
-
Supraumbilical trocar: 1 cm above the umbilicus
-
-
4.
Place a liver retractor through the 5-mm optical trocar and lift the left lobe of the liver.
-
5.
The surgeon stands on the right side of the patient and uses the right mid quadrant 5-mm port and the 12-mm port. The surgeon and assistant will need to change positions and ports throughout the procedure for optimal access. Initially, the assistant stands on the left side of the patient and uses the left upper and left mid quadrant ports. The camera is placed in the left mid quadrant port. The surgeon begins the procedure operating around the esophageal hiatus from the right side of the patient.
Operation
-
1.
Mobilize the esophagus at the GEJ. The camera is placed in the left mid quadrant port. Divide the gastrohepatic ligament and phrenoesophageal attachment. Mobilize the esophagus from the left and right crura. Identify the Penrose that was placed around the esophagus in the chest and use it to complete the esophageal dissection.
-
2.
Mobilize the stomach. Divide the short gastric arteries using an energy device. Place the camera in the supraumbilical port and divide the greater omentum, preserving the right gastroepiploic artery. Take down the adhesions between the posterior stomach and the retroperitoneum. Place the camera back in left mid quadrant port. Divide the left gastric artery. Perform posterior antral release.
-
3.
Create a gastric conduit. Divide the lesser omentum between the 3rd and 4th venous plexus. Create a gastric conduit using Endo GIA™ stapler, initially 40 mm, then switching to 60 mm × 2. The gastric conduit should be narrow. Divide the stomach completely when making the conduit. Stitch the tip of the gastric conduit to the lesser curve side of the specimen.
-
4.
Perform pyloroplasty. Place the camera in the supraumbilical port. Use the Endo Stitch™ to place stay sutures in the superior and inferior portions of the pylorus. Divide the pylorus using cautery in longitudinal fashion. Close the pylorus in transverse fashion using interrupted stitches.
-
5.
Place a laparoscopic J-tube. Find the ligament of Treitz and travel 15 cm distally on the jejunum. Place the bowel against the left lower quadrant. Place four T fasteners. Place the needle through the incision from the abdominal wall into the small bowel. Thread a wire through the needle. Remove the needle and place an introducer with a dilator over the wire into the bowel. Remove the wire and the dilator. Place the feeding tube through the introducer and remove the introducer.
Left Neck Incision
Make an incision anterior to the left sternocleidomastoid muscle, starting about 1 cm from the sternal notch.
Operation
-
1.
Dissect cervical esophagus (Fig. 7.11a). Divide the platysma and omohyoid muscle. Retract the carotid sheath laterally and retract the trachea medially, with no traction on the recurrent laryngeal nerve. Dissect on the esophagus down to the mediastinum. Identify the Penrose drain and use it to complete the mobilization of the cervical esophagus. Take steps to avoid injury to the recurrent laryngeal nerve:
-
Monitor using neural integrity monitoring (NIM) tube.
-
Divide thoracic vagus from right chest.
-
Prevent traction on the vagus nerve.
Fig. 7.11 


(a) Cervical dissection of the esophagus. (b) Stomach before the gastric conduit is created. (c) First stapler to the lesser curve of the stomach, to create the gastric conduit. (d) Second stapler to the stomach, to create the gastric conduit. (e) Third stapler to the stomach, to create the gastric conduit. (f) Gastric conduit width is about two fingerbreadths. (g) The gastric conduit is created with a width of about 3–4 cm. (h) Fourth stapler to the stomach, to create the gastric conduit. (i) The length of the gastric conduit is tested extracorporeally to ensure that it reaches the neck without tension for anastomosis. In this case, the patient had a previous gastrostomy tube and the site is oversewn and excluded or could be incorporated if this was on the greater curve side
-
-
2.
Deliver the specimen. Pull the esophagus out through the left neck slowly, while visualizing the specimen and the gastric conduit going into the mediastinum.
-
3.
Create an anastomosis. Divide the cervical esophagus using LigaSure™. Send the proximal portion for frozen section. Once the margin is negative, create a stapled side-to-side anastomosis:
-
Place the gastric conduit behind the esophagus.
-
Make an incision on the gastric conduit 5 cm inferior to the proximal end.
-
Place a linear stapler and perform side-to-side functional end-to-end anastomosis. (See Chap. 10.)
-
Close the opening. For the first layer, use interrupted sutures with 3-0 Vicryl. For the second layer, use interrupted sutures with 3-0 silk in Lembert fashion.
-
-
4.
Place an NGT. The NGT can be placed and bridled into position or placed retrograde from the abdomen or through a pharyngostomy tube port.


Open Transhiatal Esophagectomy
Position
The patient is placed in a supine position.
Operation
-
1.
Perform midline incision. Use a Thompson retractor to provide exposure to the left upper quadrant of the abdomen.
-
2.
Mobilize the GEJ. Divide the gastrohepatic ligament and phrenoesophageal attachment. Dissect the esophagus away from the crus. Place a Penrose drain around the esophagus.
-
3.
Mobilize the stomach. Divide the short gastric arteries. Divide the greater omentum about 3–4 cm away from the right gastroepiploic artery. Divide the left gastric artery.
-
4.
Perform a left neck incision and cervical esophageal dissection. Divide the platysma and omohyoid muscle. Retract the carotid sheath laterally and retract the trachea medially, with no traction on the recurrent laryngeal nerve. Dissect on the esophagus down to the mediastinum. Place a Penrose drain around the esophagus and use it to complete the mobilization of the cervical esophagus.
-
5.
Perform mediastinal dissection. Dissect bluntly around the esophagus toward the thoracic inlet from the neck and abdomen.
-
6.
Create a gastric conduit (Fig. 7.11b–h). Create the gastric conduit using an Endo GIA™ stapler with a purple load. Suture the proximal portion of the conduit to the lesser curve of the specimen. (For details about gastric conduit preparation, please refer to Chap. 10.)
-
7.
Perform pyloroplasty.
-
8.
Deliver the specimen into the neck, along with the gastric conduit, ensuring prior to delivery that there is adequate length (Fig. 7.11i).
-
9.
Create the anastomosis. Divide the cervical esophagus using the LigaSure™. Send the proximal portion for frozen section. Once the margin is negative, create a stapled side-to-side anastomosis:
-
Place the gastric conduit behind the esophagus.
-
Make an incision on the gastric conduit 5 cm inferior to the proximal end.
-
Place a linear stapler and perform side-to-side functional end-to-end anastomosis.
-
Close the opening. For the first layer, use interrupted sutures with 3-0 Vicryl. For the second layer, use interrupted sutures with 3-0 silk in Lembert fashion.
-
-
10.
Place an NGT.
Suggested Reading
Blackmon SH, Correa AM, Skoracki R, Chevray PM, Kim MP, Mehran RJ, et al. Super-charged pedicled jejunal interposition: a 10-year experience. Ann Thorac Surg. 2012;94:1104–11; discussion 1111–3.
Blackmon SH, Hofstetter WL, Swisher SG. Thoracic approaches to esophagectomy. In: Kaiser LR, Kron IL, Spray TL, editors. Mastery of cardiothoracic surgery. 3rd ed. Philadelphia: Wolters Kluwer; 2013.
Blackmon SH, Correa AM, Wynn B, Hofstetter WL, Martin LW, Mehran RJ, et al. Propensity-matched analysis of three techniques for intrathoracic esophagogastric anastomosis. Ann Thorac Surg. 2007;83(5):1805–13; discussion 1813.
Ercan S, Rice TW, Murthy SC, Rybicki LA, Blackstone EH. Does esophagogastric anastomotic technique influence the outcome of patients with esophageal cancer? J Thorac Cardiovasc Surg. 2005;129(3):623–31.
Author information
Authors and Affiliations
Editor information
Editors and Affiliations
Rights and permissions
Copyright information
© 2015 Springer Science+Business Media New York
About this chapter
Cite this chapter
Dickinson, K.J., Kim, M.P., Gaur, P., Blackmon, S.H. (2015). Surgical Techniques. In: Blackmon, S.H., Kim, M.P., Dickinson, K.J. (eds) Atlas of Esophageal Disease and Intervention. Springer, New York, NY. https://doi.org/10.1007/978-1-4939-3088-3_7
Download citation
DOI: https://doi.org/10.1007/978-1-4939-3088-3_7
Publisher Name: Springer, New York, NY
Print ISBN: 978-1-4939-3087-6
Online ISBN: 978-1-4939-3088-3
eBook Packages: MedicineMedicine (R0)