
Abstract
In this chapter, you will learn different functionalities of the Teams app, including call quality and meeting troubleshooting. Also, you will learn about basic scenarios including Teams sign-in issues, policy-related issues, tenant configuration, network configuration, and management with a simple approach.
Access provided by Autonomous University of Puebla. Download chapter PDF
In this chapter, you will learn different functionalities of the Teams app, including call quality and meeting troubleshooting. Also, you will learn about basic scenarios including Teams sign-in issues, policy-related issues, tenant configuration, network configuration, and management with a simple approach.
Because Microsoft Teams is a cloud-only application, that puts some limitations on administrator-based troubleshooting. Unlike Office Communication, Lync, or Skype for Business, where you as an admin were doing end-to-end troubleshooting, in Microsoft Teams back-end server and services are managed by Microsoft; therefore you will be doing mainly client-side troubleshooting based on information provided by Microsoft. This chapter covers three aspect of Teams troubleshooting: user login issues, call quality (one-to-one calls and meetings) issues, and PSTN call issues. Additionally, you will learn tools that can help you in troubleshooting.
Microsoft Teams Foundation Details That Help in Troubleshooting
Teams provides chat, audio and video calls, meetings, content sharing, and application integration. These features all coming from dependent services in Teams. For example, voicemail messages within Teams require an Exchange Online mailbox. The connection point is from the Teams client to the mailbox, and playing voice messages in the client requires a player. Next-generation Calling PSTN is used for Teams PSTN using a Calling Plan and Phone System license. You cannot provision users without a Teams license. If anyone turns off the Skype for Business Online license, then that user is deprovisioned, so do not turn off Skype for Business Online, which is required for Teams.
The Teams business voice directory is where Microsoft stores user attributes. With respective to calling, reverse number lookup (RNL) happens against the business voice directory attributes.
If you have a phone number assigned and it appears in Skype for Business Online, but users get a 404 not found error for the inbound call, that is because Teams is not looking user attributes in Skype for Business Online. The phone number attribute is in a different directory, and it replicates with Skype Online, and so on. Therefore, if one feature is not in Teams, you might need to check the dependent service for that feature. As an admin, you need to allow Teams services, IP addresses, ports and protocols, URLs, and FQDNs for each feature to work correctly. As part of troubleshooting, you should identify and use the core tools for Microsoft Teams deployment, collect diagnostic information from Teams clients, troubleshoot common Teams problems, and so on.
Teams Features and URL Dependency
The following is a list of URL dependencies.
-
Teams authentication is dependent on Teams.microsoft.com and login.microsoft.com.
-
Teams chat and presence features are dependent on some URLs, so if chat or presence are not working correctly, then the first thing to check is that the following service URLs are accessible from the computer of the user who is facing an issue.
-
amer.ng.msg.teams.microsoft.com (one-to-one chat)
-
chatsvcagg.teams.microsoft.com
-
presence.teams.microsoft.com
-
nortcentralus.notifications.teams.microsoft.com
-
statics.teams.microsoft.com
-
media.giphy.com
-
us-api.asm.skype.com
-
-
Calling and live events are dependent on api.flighproxy.teams.microsoft.com, teams.registrar.prod.v2, and broadcast.skype.com service URLs.
-
Settings are dependent on config.edge.skype.com, config.teams.microsoft.com, and teams.api.mt.amer.beta service URLs.
-
Office 365 and Skype for Business are dependent on the service URLs bloguc-my.sharepoint.com, bloguc.sharepoint.com, outlook.office.com for voicemail messages, *.officeapps.live.com, and substrate.office.com. (You can replace your organization name with Bloguc.)
-
Telemetry functionality is dependent on service URLs like pipe.skype.com, mobile.pipe.aria.microsoft.com, and Watson.telemetry.microsoft.com.
Why Do I Care About Network Traces in Teams?
The Microsoft Teams app makes a direct connection to many services. That’s why you, as admin, must know the https tracing and tools to identify what is blocking the Teams connections. It might be your firewall or proxy, which you can see in https traces by looking at the response coming back from the Teams service.
You can get traces in a web browser using a browser like Microsoft Edge or Google Chrome with an F12 function key. Selecting Dev tools, then reproduce the issue and save traces to HTTP Archive (HAR) files and open in Fiddler, Charles, or Notepad++ (you can find these tools by searching in Google). These are all third-party tools, but they help you in viewing https traces. Https tracing can be helpful for connectivity issues and for getting information about the client configuring and settings, as not everything is logged to Microsoft Teams diagnostics. Depending on the client platform, you might be able to use what already exists if the client has Edge or Chrome installed. Then just connect to Teams.microsoft.com via the browser with the development tools open. These tools can also be used to view some details about the Teams client behavior and even local storage.
Microsoft Teams Sign-in Issues
Microsoft Teams Administrative Roles
Microsoft Teams provides some administrative roles to allow full access to all of the Teams service settings, such as the Global admin and the Teams admin. Other roles only provide access to certain parts of Microsoft Teams to perform recurring tasks, such as troubleshooting call quality problems and managing telephony settings. As of this writing, Microsoft Teams doesn’t support role-based access control (RBAC) to build a custom role. However, it does provide four built-in admin roles: Teams admin, Teams communication admin, Teams communication support engineer, and Teams communication support specialist. These admin roles are specific to Teams and do not grant permissions to other services, such as Exchange Online or SharePoint Online.
Microsoft Teams provides the ability to do more than just make simple PSTN phone calls, with dial plans, call routing, auto attendants, and more.
For overall Teams administration, Microsoft provides an admin tool called Microsoft Teams admin center, which allows admins to operate and create teams, to create Teams policies, manage phone devices and telephone numbers, manage locations and emergency addresses, and manage meeting settings and policies, such as live event settings and policies, messaging policies, the Teams apps settings and policies, organization-wide settings for sharing, guest access, resource accounts, and all calling settings. Refer to Chapter 2 for complete Teams admin center details. To access the Teams admin center, a user must be allocated to one of the following admin roles:
-
Global administrator
-
Teams service administrator
-
Skype for Business administrator (this is a legacy role and might be removed in the future)
-
Teams communications administrator
-
Teams communications support engineer
-
Teams communications support specialist
How Teams Authentication Works
Microsoft Teams out of the box supports modern authentication (MA) . This authentication process permits users to sign-in to a Teams application securely. MA includes single sign-on (SSO), which helps users log in on the Teams app without entering credentials (the user has to enter credentials the first time). Basically, SSO is a process that allows Teams to know that users have already entered their credentials, such as work email addresses and passwords, elsewhere, and they should not be required to enter their credentials again to log in to the Teams app.
Because Microsoft Teams supports MA, the Teams app has been provided with MA hard-coded into it, and it should be able to recognize user credentials as linked to their Office 365 account. If a user is unable to log in to Teams, there might be something wrong with that user’s Office 365 account, like an expired or incorrect password, no license assigned, and so on.
Teams Sign-in Issues and Corresponding Error Codes
If users receive an error code when logging in to Teams, you, as an admin, must take appropriate action. Table 7-1 shows a list of error codes and the actions that should be taken.
Microsoft Teams sign-in issues are generally broken into several categories.
-
Generally, authentication issues happen when users might not be entering their sign-in address (email address) or password correctly, and the Teams back-end service might not authenticate the user. This happens for different reasons.
-
The credentials (email address and password) users entered are incorrect; generally, in Teams, we use User Principal Name (UPN) and password.
-
Teams authentication is also dependent on accurate time information on the user’s computer, including the affected user’s computer, which is configured to the wrong time zone, or maybe the computer clock is incorrectly set.
-
-
Teams account provisioning issues occur if users are not be enabled for Teams, or they are enabled, but not authorized to sign in. That can check by checked by logging in to the Office 365 portal. Apart from provisioning, the user account might not be synced correctly to Office 365 (directory synchronization is not happening). To check if an account is enabled for Teams and authorized for sign-in, follow these steps.
-
a.
Log in to Office 365 portal (https://admin.microsoft.com/AdminPortal/Home#/users) and navigate to Users. Find the affected user and then open user properties.
-
b.
Validate that the Teams license is enabled, and check that the user allowed for login, as shown in Figure 7-1.
-
a.

Checking account provisioning
-
The Microsoft Teams app itself might have an issue. Perhaps the Teams app is not installed correctly on a user’s computer, causing problems with reaching the Office 365 services. Maybe the network that the user has connected to has connectivity issues. To resolve the Teams app issue, you could first update Teams and then check that Internet is working correctly.
-
The last category is Teams back-end cloud service-related issues. When there are service-related issues, all users in a tenant are affected or some users are affected at the back-end datacenter or region.
-
You can collect the Teams diagnostic log and check if there are any issues. When reading these sign-in logs, pay attention to the first few errors or warning messages, as these will indicate the issue.
Approaching Teams Issues
Every admin has an individual approach to troubleshooting any issues. Here is the fundamental but beneficial approach that I take whenever dealing with any problem. For example, often admins receive complaints via call, incident report, or email that a user is unable to log in to the Microsoft Teams client. Here is the series of steps you can perform to solve the problem. The most important thing is the approach to the issue.
-
1.
Understand the problem: What is not working? Is there any error message provided by the user? If there is not enough information, reach out to the user and make sure you understand the problem first. Once you grasp the problem, move on to Step 2.
-
2.
Check if there is any pattern: Is more than one user facing the issue? Is the whole site down, or just a single user?
-
a.
If more than one user is facing a log-in problem, then check if they are located in the same office, on the same network, and so on.
-
b.
If a single user is affected, check if that user is enabled for Microsoft Teams license. Check if the Teams sign-in ever worked or this is the first time the user is trying to sign in.
-
i.
Enabling a Teams license takes up to 12 hours. Typically a license is synced within an hour, but it sometimes takes longer.
-
ii.
Check login credentials, as user passwords might have changed, been locked out, or expired.
-
i.
-
a.
-
3.
Check if the problem is with the Teams app: Try different Teams apps.
-
a.
Try with the Teams desktop app (Windows and macOS).
-
b.
Use a mobile app (iOS or Android).
-
c.
Try with Web browser sign-in using incognito mode (kind of isolated mode).
-
d.
If a specific client shows the issue, then clear the client cache and check again.
-
a.
-
4.
Check different computers and different networks: If all Teams apps show an error, then check internal vs. external networks (using a mobile hotspot if no external network is available).
-
5.
Check if Teams login URLs are accessible: If not, check with your network team to allow Teams communication.
-
6.
If the issue still persists, then you can troubleshoot the issue with the information gathered, or you can open a support case with Microsoft.
Collecting Teams Client Logs
Microsoft Teams has three kinds of log files: debug logs, media logs, and desktop logs. Usually an admin can read debug logs to find the cause of Teams features not working; however, media and desktop logs are only needed if requested by Microsoft support when you open a support case with Microsoft.
Microsoft Teams makes log collection reasonably easy. Just press a series of keys, and the Teams debug log will be collected and stored in the Downloads folder. Teams have different apps for different platforms, and each Teams app has a different method to collect logs; in addition, their log files are stored in a different location. Here are the details for each Teams app with the process for collecting a log.
First, the Teams debug log is the most common log. It is used for debugging Teams functionality and app-related issues. When you open a case with Microsoft support, they might ask you to generate a debug log. To read this log, you can use any text-based editor.
To generate a debug log for a Teams Windows client, follow this procedure.
-
1.
Log in to the Teams client and then attempt to reproduce the issue, whether it is a call, chat, meeting join, desktop sharing, and so on.
-
2.
While keeping the Teams Windows desktop client open, press Ctrl+Alt+Shift+1 on your keyboard. The Teams debug log is automatically downloaded and saved to the %userprofile%\Downloads folder, as shown in Figure 7-2.

Downloaded Teams debug log
For a Teams macOS client, follow these steps.
-
1.
Log in to the Teams macOS client and then attempt to reproduce the issue, whether it is a call, chat, meeting join, desktop sharing, and so on.
-
2.
While keeping the Teams desktop client open, press Option+Command+Shift+1 on your keyboard. The Teams debug log will be stored under downloads.
Note
For the web browser, the Teams web app will prompt you to save the debug logs.
The Teams media log includes information about audio and video calling and desktop sharing. This log is needed when you open a Microsoft support case, as it will be inspected by Microsoft support personnel. You don’t have to do anything special to generate this log. It is automatically stored in the following paths.
-
You can find the Teams Windows client media log at the following locations.
-
%appdata%\Microsoft\Teams\media-stack\*.blog
-
%appdata%\Microsoft\Teams\skylib\*.blog
-
%appdata%\Microsoft\Teams\media-stack\*.etl
-
-
You can find the Teams macOS client media log at the following locations.
-
~/Library/Application Support/Microsoft/Teams/media-stack/*.blog
-
~/Library/Application Support/Microsoft/Teams/skylib/*.blog
-
The Teams desktop client log is identified as a bootstrapper log. It includes log data that occur between the desktop client and the browser. Similar to the media log, this log also is needed primarily when it is requested by Microsoft support personnel. This log can be viewed via text editors.
To get the desktop log on a Teams Windows client, right-click the Microsoft Teams icon in your application tray, and select Get Logs as shown in Figure 7-3.

Getting the Teams desktop log
Teams desktop logs are stored on the path %appdata%\Microsoft\Teams\logs.txt.
For the Teams macOS client, from the Help pull-down menu, select Get Logs. Logs are then automatically saved to the path ~/Library/Application Support/Microsoft/Teams/logs.txt.
Microsoft Teams Client-Side Troubleshooting
This topic covers Microsoft Teams client software installation and connectivity problems. To provide a consistent and positive experience to Teams end users, the client must be properly working without any issues. In this section, you will learn about troubleshooting Teams client installation and update issues, as well as Teams client connectivity issues.
Teams Client-Side Troubleshooting
Microsoft has provided Teams client apps for desktop (Windows and macOS), mobile (iOS and Android), Linux clients, and Web clients. Users get similar experiences using these clients.
The Teams client is part of the Office 365 suite, so when the user installs Office 365 Pro-plus as Click to Run, the Teams client is automatically installed. Admins can perform a managed microsoft installer (MSI) install as well.
If the Teams client is having issues like not starting, restarting, hanging, and so on, then follow these steps to resolve client-side issues.
-
1.
When Teams client shows the issue, the first thing to do is update the Teams client. Teams client auto-updates, but it is best practice to check for client updates. To do so, select your profile picture, and then select Check For Updates, as shown in Figure 7-4, to install any available updates.

Checking for Teams client updates (desktop client)
-
2.
If the issue persists after the Teams client updates, the next thing to do is check the client installer log. When the Teams client is installed, the Teams installer logs track the sequence of events. The installer log can be found at %LocalAppData%\SquirrelTemp\SquirrelSetup.log. Check this log to see if there is any error message or a call stack near the end of the log. Note that call stacks at the beginning of the log might not mean that an installation issue exists. It can be easier to compare the affected computer log against the log from a successful installation (even on another computer) to see what is expected.
-
3.
If an issue persists, then uninstall the Teams client entirely and then log in to the Teams web client using https://teams.microsoft.com. Perform a desktop install by clicking on the profile picture and then downloading and installing the Teams desktop app.
Microsoft Teams has various limitations and expiration periods applied for each feature: persistent chat, voice and video calls, meeting, application sharing, file sharing, and so on. In Microsoft Teams, every workload has a different maximum limit set by Teams (back-end) services. Here I elaborate on maximum limits and expirations for Teams meetings, chat, live events, PowerPoint file uploads in a meeting, file store, and so on.
As an admin, you must know when and how Teams expiration and the maximum limit applies. This information will save troubleshooting time, so carefully review these limits and specifications.
What Are the Teams Meeting Expiration Limits?
Microsoft Teams does provide different meeting scenarios, and every meeting scenario has a different expiration period defined. For example, a Teams regular meeting conference ID expires after start time plus 60 days. After the meeting expiration, if a user tries to join a Teams meeting by dialing in to the conference ID, he or she will hear a message indicating that the conference ID entered is not valid [104].
-
1.
Teams Meet Now: This type of meeting expires after the start time plus 8 hours; this meeting scenario does not extend the expiration period, as this is an ad-hoc meeting.
-
2.
Regular meeting with no end time: This type of meeting expires after the start time plus 60 days, and this meeting scenario extends the expiration period each time a user starts or updates a meeting, up to 60 days.
-
3.
Regular meeting with end time: This type of meeting expires after the meeting end time plus 60 days. This meeting scenario extends the expiration period each time a user starts or updates a meeting, up to 60 days.
-
4.
Recurring with no end time: This type of meeting expires after the start time plus 60 days. This meeting scenario extends the expiration period each time when a user starts or updates a meeting, up to 60 days.
-
5.
Recurring with end time: This type of meeting expires after the end time of the last occurrence plus 60 days. This meeting scenario extends the expiration period each time a user starts or updates a meeting, up to 60 days.
What Is the Maximum Number of Participants Who Can Join a Teams Meeting?
In any Teams meeting at any given time, the number of people in a meeting is 250 (Microsoft increased number of participant limit as 300), irrespective of whether they dial in join or through a Teams app (Windows, macOS, mobile, or web).
For larger meeting scenarios, including organization-wide meetings, use the Teams live event feature, which is scalable up to 10,000 attendees with limited interaction like Q&A, Yammer post etc. Teams live event concurrent event limit is 50 event across tenant.
Note
There is no limit set on how many Teams meeting can be hosted in one Office 365 tenant.
What Is the Maximum PowerPoint Presentation File Size Allowed in a Team Meeting?
Teams allows sharing content in Teams meetings and peer-to-peer calls. You can share and present PowerPoint presentations in a Teams meeting, for example. However, there is a specific file size limit allowed, up to 2 GB. You cannot share or upload files larger than 2 GB in Teams meetings.
What Is the Maximum Audience Limit of Teams Live Events?
Microsoft Teams live events are used for large broadcast meetings, such as all-staff meetings. The live event audience size maximum limit is 10,000 attendees and the maximum duration is 4 hours. A user can host concurrent live events in an Office 365 tenant. However, as of this writing, you can host a maximum of 15 concurrent Teams live events in your organization.
What Is the Maximum Limit in Teams and Channels?
Microsoft Teams does have a maximum limit specified for Teams and channels features. Here is the list of features with their limits.
-
The number of teams a user can create is the maximum of 250 objects, meaning a user can create a maximum of 250 teams. Remember, for the 250-object limit, any directory object in Azure AD counts toward this limit. Global admins are exempted from this limit.
-
The maximum number of teams a user can be a member of is 1,000. Individual users therefore cannot be part of more than 1,000 teams.
-
The maximum number of members in a team is 10,000. The previous limit was 5,000 members, but Microsoft has increased this limit.
-
The maximum number of owners per team is 100. It is best practice to have more than two owners of a team to handle a single-point failure situation.
-
The number of organization-wide teams allowed in any Teams tenant organization is five, so use the organization-wide teams wisely.
-
The maximum number of members in an organization-wide team is 10,000, so you cannot have more than 10,000 members in one organization-wide team (the previous limit was 5,000 members).
-
The number of teams a global admin can create is 500,000.
-
The number of teams an Office 365 tenant can have is 500,000. This limit includes archived teams.
-
The number of channels per team is limited to 200, and this includes deleted channels.
-
Another significant limitation in Teams is that each team can have a maximum of 30 private channels, so use private channels carefully and create them only when it is required.
Note
In Teams, deleted channels can be restored within 30 days. During these 30 days, a deleted channel continues to be counted toward the 200 channel per team limit. After 30 days, a deleted channel and its content are permanently deleted, and the channel no longer counts toward the limit.
Microsoft Teams Chat Limitations
In Teams, users who participate in chat conversations must have an Exchange Online (cloud-based) mailbox for an admin to search chat conversations. That’s because conversations that are part of the chat list are stored in the cloud-based mailboxes of the chat participants. If a chat participant doesn’t have an Exchange Online mailbox, the admin won’t be able to search or place a hold on chat conversations. For example, in an Exchange hybrid deployment, users with on-premises mailboxes might be able to participate in conversations that are part of the chat list in Teams. However, in this case, content from these conversations is not searchable and cannot be placed on hold because the users don’t have cloud-based mailboxes. So, keep this limitation in mind when you are using an Exchange hybrid environment.
Teams chat works on an Exchange back end, so Exchange messaging limits apply to the chat function within Teams as well. The maximum number of people in a private chat is 250.
If you have more than 20 people in a chat conversation, then the chat features such as Outlook automatic replies, Teams status messages, typing indicator, video and audio calling, sharing, and read receipts are turned off.
Another limitation is for files. The maximum number of file attachments in a chat conversation is 10. If the number of attachments exceeds this limit, then the chat participants will see an error message.
Teams Emailing a Channel Limitation
Sending an email to a team is a frequently used feature. If users want to send an email to a channel in Teams, they use the channel email address. When an email is part of a channel, anyone can reply to it to start a conversation. Here are some of the applicable limits for sending email to a channel.
-
The message size limitation is 24 KB. If the message exceeds this limit, a preview message is generated, and the user is asked to download and view the original email from the link provided.
-
The next limitation is for attachments. The number of file attachments is limited to 20. If the number of attachments or images exceeds this limit, the user will see an error message.
-
The attachment size of each file is up 10 MB. You cannot attach a file larger than 10 MB while sending to Teams.
-
The limitation for the number of inline images is 50.
Note
Message size, file attachment, and inline image limits are the same across all Office 365 licenses.
What Is the Limitation for Teams Channel Names?
Microsoft Teams channel names cannot contain characters or words such as ~ # % & * { } + / \ : < > ? | ' " and characters in ranges 0 to 1F and 80 to 9F.
Additionally, the words that are not allowed include, forms, CON, CONIN$, CONOUT$, PRN, AUX, NUL, COM1 to COM9, LPT1 to LPT9, desktop.ini, and _vti_. Also, Teams channel names cannot start with an underscore (_) or period (.), or end with a period (.).
Teams Client Connectivity Troubleshooting
A majority of Teams connectivity issues are due to the corporate firewall or proxy blocking Teams service URLs, FQDNs, IP addresses, or ports. It is worth verifying that the required URLs, FQDNs, and IP addresses are allowed through a corporate firewall or proxy. To get a list of Teams URLs, FQDN, IP addresses, and ports, visit the Microsoft document at https://support.office.com/article/Office-365-URLs-and-IP-address-ranges-8548a211-3fe7-47cb-abb1-355ea5aa88a2.
Teams Audio and Video Call Quality Issue Troubleshooting
Microsoft Teams provides real-time audio and video calls and meetings (VoIP) and many other features. When users start using Teams for making audio and video calls and organizing meetings, they might feel a caller’s audio breaking up or chopping in and out of a call or meeting. When someone shares video, it might freeze, pixelate, or disconnect. All these issues are due to the IP packets that represent audio and video traffic facing network loss, encountering congestion, and arriving out of sequence. This results in a poor user experience, and eventually users will hesitate to use Teams. To overcome these network issues, you should tackle these problems when you see the issue, or even before seeing the issue, if you implement QoS.
The majority of Teams call quality issues are related to a poor network, but sometimes they are due to resource constraints on the endpoint or the user’s device. Particularly for the network, if you see high packet loss, latency, and jitter, then you need to work with your network admin to optimize the network. These issues are described here.
-
Jitter explains the event where media arrives at different rates, which results in missing words or syllables in calls.
-
Packet loss defines the occurrence where packets in a data transfer are dropped and missing. This will result in lower voice quality and speech that is hard to understand.
-
Latency (delayed round-trip time [RTT]) means that media packets require a longer time to reach their destinations. Users will experience noticeable delays between two parties in a conversation, for example, causing people to speak at the same time.
Improving Teams call quality by solving these network quality issues boosts the overall available bandwidth for data connections, both internal and external to the network (Internet). Quality issues are caused by low bandwidth for certain real-time applications as other services, such as mass file transfers or streaming video, consume the majority of available bandwidth. To resolve these quality issues, you, as an admin, can handle the bandwidth with QoS implementations [99]. You can refer to Chapter 3 for QoS implementation, and split-tunnel VPN implementation.
Teams Audio and Video Call Quality Issues and Dependency
Network
Optimal call quality in Teams is dependent on good network conditions. The Teams apps will highlight network connectivity issues during the call, as shown in the example in Figure 7-5, which shows poor network conditions. Use a network assessment tool to investigate network conditions and switch connectivity (e.g., wireless to wired) if possible. Expect a higher quality on a managed corporate network than on an unmanaged network like public WiFi.

Bad network quality in a Teams meeting
Device
For the best audio and video quality, avoid using built-in audio devices; instead use a USB device listed at https://products.office.com/en-us/microsoft-teams/across-devices/devices/category?devicetype=36. These devices are certified for the best audio and video quality. Here are a few best practices for troubleshooting devices.
-
If a USB device is not recognized by a computer, then connect the device to a different USB port, as the port might have an issue.
-
Try connecting the device directly to the computer; avoid a USB hub for the headset or camera.
-
Installing the latest device driver might remediate some audio and video quality issues. The use of a headset on the microphone/line-in port of your computer is not a suitable replacement for a USB device, as these devices are dependent on the computer’s audio devices, as well.
-
Using a USB headset (headphones) prevents your microphone from picking up audio from your computer or background noise. Sometimes the sound is amplified and passed in and out frequently, resulting in an unpleasant, loud static or scream. Remember using a headset helps to eliminate sources of echo as well.
-
If you are unable to use a headset, try to put as much distance as possible between your speakers and microphone to minimize any background noise.
-
If you are planning to use a built-in audio device (considering the previously mentioned problems), set up your audio device correctly to manage your Windows audio device.
-
a.
First search Manage Audio Devices. Select Recording and then select the playback device (headset) that you want to set as default for Teams as well as the computer. For example, in Figure 7-6, I selected Microphone Array (Realtek High Definition Audio).
Figure 7-6 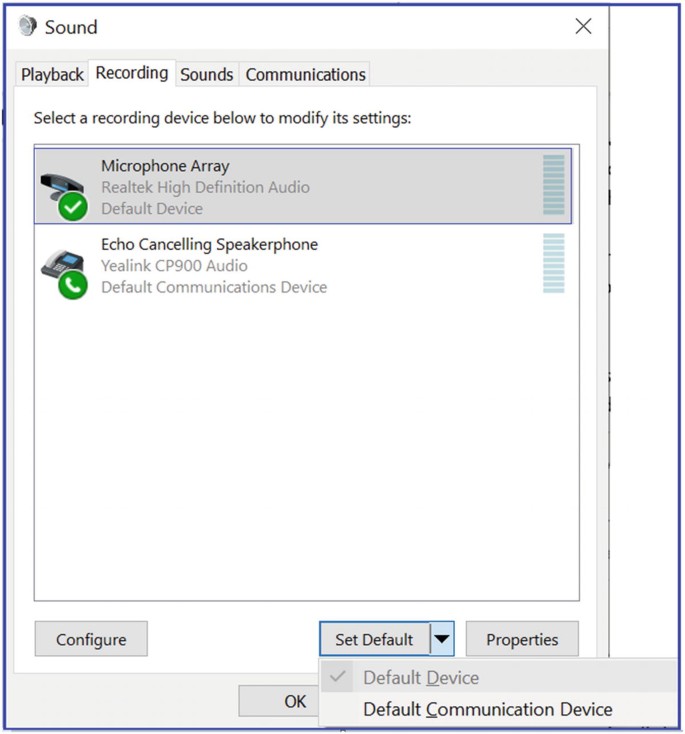
Select a device and setting it as the default
-
b.
Click Properties to set advanced options. Select the Enhancements tab and then select the Acoustic Echo Cancellation (AEC) and Far Field Pickup (FFP) check boxes, as shown in the Figure 7-7.
-
a.


Properties for a recording device
How Teams Audio and Video Calls Work
Teams allows one-to-one audio and video calls as well as multiparty meetings. First, understand how a one-to-one audio and video call works. For example, user Balu is calling user Chanda. Teams clients always send their chat service (signaling) traffic to Teams service (Office 365 cloud) over 443/TCP. Refer to https://docs.microsoft.com/en-us/office365/enterprise/urls-and-ip-address-ranges#skype-for-business-online-and-microsoft-teams for port numbers and FQDNs used by Teams.
Teams audio/video and desktop sharing media traffic will prefer a direct connection over UDP. Teams prefer the most direct connection possible. To establish a connection in Teams, leverage the Interactive Connectivity Establishment (ICE) protocol to find the most optimal path to send media. In the example shown in Figure 7-8, direct connectivity between user Balu’s computer and user Chanda's computer is possible, and both clients send media directly between them.

Teams direct audio/video call
If direct connectivity isn’t possible because of a firewall between two endpoints, chat and content still go directly to the Teams service (Office 365 cloud) via 443 (most organizations always allow 443). This way, they can then exchange private chat, files, and so on. They also contribute to the same channels; as you can see in Figure 7-9, the firewall between them is not a problem for signaling traffic.

Teams audio/video call via relay
However, when they start the audio/video real-time session, the firewall blocks their traffic because a direct connection is not possible. In this situation, Teams uses a relay. Basically, user Balu will establish a connection with Office 365, and user Chanda will also establish a connection with Office 365 for this session. Office 365 Relay will proxy any real-time traffic to another relay to another user. User Balu and user Chanda can talk to each other even though there is no direct connectivity. Office 365 functions as a relay for the media traffic, if direct connections are not possible. This media path is not optimal because all client traffic has to go to the Office 365 relay first and then to other users, so this will affect latency and network jitter, but at least Teams allows audio and video instead of no call, which is important.
Teams always preferred UDP with port 3478 to 3481. What if UDP is not available? In that case, Teams can be failed back to TCP with 443, and the call will work, but call quality will not be optimal.
There are some built-in tools in the Teams service that help you identify a call quality problem. For any issue, without identifying it you cannot resolve it. Teams provide two tools, Call Analytics and Call Quality Dashboard (CQD) to use when you encounter call quality problems.
Call Analytics
This is my favorite tool, and I frequently use this when I troubleshoot individual users’ call quality issues. Call Analytics provides detailed information about the user of the device connected, networks (internal or external, wired or wireless), and connectivity related to specific calls and meetings for each user in a Microsoft Teams or Skype for Business account. You, as an admin, can use Call Analytics to troubleshoot call quality and connection problems experienced in a specific call or meeting using Teams admin center.
To access Call Analytics that can help you to identify and eliminate problems, follow these steps.
-
1.
Log in to the Teams admin center and navigate to Users. Find the user who encountered a problem and then select that user to open the user’s account properties.
-
2.
Click Call History, which will show the detailed call history for the user, including the last seven days of call quality and activity data. Call history shows one-to-one calls and meeting audio quality. Figure 7-10 is a sample user call history.

Call Analytics
-
3.
When you select a particular meeting or call, you will see the call quality details, including device, system, connectivity, and network details. For example, in the example shown in Figure 7-11, I selected a call between Balu and Reva, which was marked as having poor audio quality. Clicking on Network, it shows the average packet loss was over 14 percent, which is very high, and the maximum packet loss rate was over 25 percent, which is why the audio quality is marked as poor. The statistics also include network quality, including RTT (latency), jitter, and packet loss.

One-to-one call network statistics
-
4.
If you are interested in doing a deeper dive, then click the Advanced tab or Debug tabs, which show more details on what IP address was used, protocol, and port used for the media session.
Microsoft Call Quality Dashboard
CQD is designed to help Teams admins and network engineers optimize their overall network. You cannot analyze and troubleshoot a single call using CQD. It allows us instead to look at combined information for an entire organization. This can also help you to identify and reduce problems that are on the whole site or network. Figure 7-12 shows the overall audio quality for Bloguc Inc. You can access CQD in two ways.
-
You can log in to the Teams admin center and then select Call Quality Dashboard. Click Sign In to access overall call quality and summary.
-
Alternatively, you can directly visit https://cqd.teams.microsoft.com/ and log in to access CQD. Figure 7-12 shows a display of monthly and daily Teams audio trends.

CQD displaying overall call quality
Teams Phone System (PSTN) Call Troubleshooting
Microsoft Teams only supports E.164 format numbers, so make sure to configure E.164 format phone numbers.
Customizing Call Features in Teams Client
In Teams client , you can configure how you want to handle incoming calls. To do so, log in to the Teams (desktop) client and then click your profile picture. Click settings and then click Calls, In to configure how you want to handle calls. You might want to ring calls to your Teams client, or you might want to forward phone calls to a different phone number. Here are the options.
-
1.
When you select the Calls Ring Me option, you can also choose the Also Ring option to simultaneously ring another phone number.
-
2.
Select If Unanswered, then select Send To Voicemail, Another Number Or Call Group, or Do Nothing, which is the default.
-
3.
If you opt to redirect to another number, then enter after how what period you want to redirect this call. The example in Figure 7-13 shows 20 seconds, which is the default.

Call answering options
All these features matter for the user experience and the settings quite self-explanatory.
Phone Dial-Pad Is Missing in Teams
In Teams, if a dial-pad is missing, users cannot make outbound calls (user can receive inbound calls). There are some prerequisites that need to be fulfilled to have a phone dial-pad in the Teams client. Ensure the following things are in place to use a phone dial-pad in Teams.
-
1.
Users must have a valid Teams Phone System (Microsoft 365 Phone System) license assigned.
-
2.
Users should have enterprise voice enabled. If not, then run this PowerShell command to enable the user for enterprise voice in Teams.
Set-CsUser -Identity "<User name>" -EnterpriseVoiceEnabled $true -HostedVoiceMail $true
-
3.
If you are using Teams Direct Routing, then make sure users have an OnpremiseLineURI number assigned or Microsoft Calling Plan and online phone number assigned to the user.
-
4.
To work with outbound calls assign a voice routing policy with proper PSTN usage and routes.
Troubleshooting Call Failures with Call Analytics
Whenever Teams client attempts a phone call, it captures some call quality and diagnostics information. That information is used by the Teams service and analyzed by Teams Call Analytics. Teams Call Analytics is the best tool to check call failures.
To access Call Analytics, you must have the appropriate permissions. To access Call Analytics, log in to Teams admin center, navigate to Users, and then find the user you want to access. Once the user page opens, click Call History and then find the PSTN call that has a problem. For example, Figure 7-14 shows a short call that has an issue.

Teams PSTN call
There are different call failures and codes you might see in Call Analytics such as Response code 486, Response code 408, Failed destination does not exist, 404 not found, and so on.
Unable to Connect to Voicemail in Teams
If you are unable to connect to voicemail using the Teams client, then the first thing you can do is download the Teams diagnostics log. For Windows, press Ctrl+Alt+Shift+1; for macOSX, use Command+Option+Shift+1. Open the downloaded log file and search for Voicemail-List, then review any ERR messages. That is your signal to troubleshoot the issue further.
If You Are Unable to Connect to Exchange, Then Teams and Outlook Connectivity Breaks
Understand that Microsoft Teams is tightly integrated with Exchange (Outlook), and if there is an issue, then Teams and Outlook connectivity will be broken. Check that Outlook is connecting, and check user credentials.
Restoring a Deleted Channel
A team owner can restore a deleted channel. To restore a deleted channel, navigate to Teams and then next to the team’s name, click More Options (…) and select Manage Channel. Click the Channels tab and then expand the Deleted section. Click Restore, as shown in Figure 7-15.

Restoring a deleted channel
Available Tools for Effective Troubleshooting
Microsoft Teams is dependent on different Office 365 services, such as SharePoint Online, Exchange Online, Skype next-gen, OneDrive for Business, and so on. Therefore, if a dependent service fails, it directly affects Teams performance. This makes checking Teams service health, network connectivity, and performance very important.
Verifying Teams Service Health Using Health Tool
Microsoft has provided Service Health, Message center, and Directory Sync status subtools to validate Teams’ overall health. Service Health for Microsoft Teams is available on the Office 365 Admin portal main page. It is highly recommended to check and validate Teams and through Service Health frequently. When you encounter a Teams service issue, before doing any further troubleshooting for that issue, you should confirm that the Teams service is healthy.
Microsoft Teams is built on top of Office 365 services, so when checking Service Health, consider checking the status of Exchange, SharePoint, and OneDrive for Business. Service Health issues for these other services do not automatically mean that Teams is affected (e.g., Address Book downloads in Exchange are unavailable), but you should review the advisories for those affected services to determine if there is an impact to Microsoft Teams [100].
Microsoft is continually adding service improvements and feature updates to Teams; therefore, as an admin, you must keep an eye on Microsoft notifications, alerts, and official documentation. You will get a notification, message, or alert when there is any service degradation. Therefore, keeping an eye on Message center is critical, and one of the tasks that admins must do daily. To access Message center, you need to visit the Office 365 admin center, navigate to Health, and then select Message Center, as shown in Figure 7-16.

Message center showing active and unread messages
Checking Teams Service Health
Frequently checking the health of Teams and dependent services is highly recommended. You can automate service health notification by setting email, so whenever service degradation happens, you will receive an email alert. To set an email for notification, log in to Teams admin center and navigate to Health. Select Service Health, and then click Preferences. In the Preferences window, add two email addresses that can receive a proactive notification via email, as shown in Figure 7-17.

Service Health email notification settings
Once you add a new email address or change the existing email address, it could take up to 8 hours for these changes to take effect. Sometimes it can take up to 12 hours to apply a policy, although in general they take an hour. Microsoft has a 24-hour SLA for any policy changes to apply because the Teams service resides in Office 365 cloud, and user objects might be on-premises.
Microsoft Teams Network Assessment Tool
When a user reports Teams call connectivity and quality issues, you can use this network assessment tool, which helps to test network quality and connectivity from users' locations to Teams media services.
The network assessment tool is very helpful to test network quality. This assessment tool analyzes the connection to Microsoft Network Edge (pairing point) by running a set of packets to the closest edge site and back for approximately 20 seconds for a configured number of iterations.
Types of Test
This tool is named Skype for Business Network assessment tool; however, it is applicable for both Skype for Business and Microsoft Teams. You can run this tool on Windows 8 or newer operating systems. It helps test network connectivity as well as network performance.
-
For network connectivity: This tool verifies the network and network elements between the test location and the Microsoft network are correctly configured to enable communication to the IP addresses and ports (using UDP and TCP) needed for Microsoft Teams calls. The addresses and ports are listed at https://support.office.com/en-us/article/Office-365-URLs-and-IP-address-ranges-8548a211-3fe7-47cb-abb1-355ea5aa88a2#bkmk_teams.
-
For network performance: To check the network, this tool tests the connection to Microsoft Network Edge by running audio packets to the nearest edge site and back for approximately 17 seconds for a configured number of iterations. The tool collects packet loss, jitter, round-trip latency, and packet reorder percentage from each call. The results from a set of test calls can be analyzed to determine if it meets the media quality and performance targets described at https://support.office.com/en-us/article/Media-Quality-and-Network-Connectivity-Performance-in-Skype-for-Business-Online-5fe3e01b-34cf-44e0-b897-b0b2a83f0917. These targets and testing applications are for both Microsoft Teams and Skype for Business Online calls.
Using the Network Assessment Tool
First, download this tool by visiting the Microsoft site at https://www.microsoft.com/en-us/download/details.aspx?id=53885, and then install the executable file. It typically installs in C:\Program Files (x86)\Microsoft Skype for Business Network Assessment Tool. Once it is installed, open a command prompt run as administrator and then go to the path where the network assessment tool installed. Run NetworkAssessmentTool.exe. Once it runs, it initializes the audio call and shows detailed results with packet loss, jitter, latency, packet reordering, and so on, as displayed in Figure 7-18. Use this sample command.
c:\Program Files\Microsoft Skype for Business Network Assessment Tool>NetworkAssessmentTool.exe

Network assessment tool
Another test you can perform is the connectivity checks test for all of the IP addresses and ports used in Microsoft Teams calls or meetings. Figure 7-19 shows the connectivity test result with HTTPS, TCP, and UDP; ports, and all IP addresses used by Microsoft Teams and Skype for Business Online. You can use the following parameter to do connectivity checks.
c:\Program Files\Microsoft Skype for Business Network Assessment Tool>NetworkAssessmentTool.exe /connectivity check /verbose

Network connectivity checks
Figure 7-19 shows Teams and Skype for Business Online IP addresses and ports are reachable.
SIP Tester
SIP tester for Direct Routing is a PowerShell script tool that allows testing of Direct Routing SBC connections in Teams. Testing Direct Routing is quite complicated, but using the SIP tester tool makes it easier. This tool allows us to test the basic functionality of a customer-paired Session Initiation Protocol (SIP) trunk with Direct Routing, such as outbound and inbound calls, simultaneous ring, media escalation, and consultative transfer.
This SIP tester tool provides the ability to test real accounts in a Teams organization’s indirect routing scenarios. Microsoft has written a web service that tests the Teams client login against one configured with SBC Direct Routing. You can automate this PowerShell script to make daily calls and checks to determine if SBC is working correctly or not.
To download the SIP tester tool, visit the Microsoft site at https://docs.microsoft.com/en-us/microsoftteams/sip-tester-powershell-script.
You can read further documents that come along with a script to understand the requirement to create test users, which will be used for basic call testing scenarios.
Refer to my blog at https://bloguc.com for more Teams client service troubleshooting information and best practice guidance.
Summary
Microsoft Teams is a unified communication and collaboration tool that works very well when your environment is prepared in advance, such as allowing Teams services, IP addresses, ports and protocols, URLs, and FQDNs from your corporate firewall so that each Teams feature works correctly. As part of troubleshooting, you should identify and use the core tools for Microsoft Teams, namely Call Analytics and CQD. You can also collect diagnostic information from Teams clients, troubleshoot common Teams problems, and more.
It is also important to use the right tool, and knowing when to use them will help to effectively make progress when identifying and troubleshooting Teams problems that users might encounter. Some of these helpful tools are Teams Call Analytics, CQD, and the network assessment tool described in this chapter.
Author information
Authors and Affiliations
Rights and permissions
Copyright information
© 2020 Balu N Ilag
About this chapter

Cite this chapter
Ilag, B.N. (2020). Microsoft Teams Troubleshooting Approaches. In: Understanding Microsoft Teams Administration. Apress, Berkeley, CA. https://doi.org/10.1007/978-1-4842-5875-0_7
Download citation
DOI: https://doi.org/10.1007/978-1-4842-5875-0_7
Published:
Publisher Name: Apress, Berkeley, CA
Print ISBN: 978-1-4842-5874-3
Online ISBN: 978-1-4842-5875-0
eBook Packages: Professional and Applied ComputingApress Access BooksProfessional and Applied Computing (R0)