
Abstract
Integration with various systems is one of the key features of SAP MII; this chapter discusses SAP MII’s possible integration areas. It also explains the steps needed to create integration with various systems from SAP MII. The steps of integration with SAP ECC, databases, other legacy systems using HTTP and web service protocols, and other standard connectors like e-mail, FTP etc., are explained in this chapter. Along with that, using SAP MII as an integrator for other SAP manufacturing products such as as SAP ME and SAP OEE is also explained.
Access provided by CONRICYT-eBooks. Download chapter PDF
Integration with various systems is one of the key features of SAP MII; this chapter discusses SAP MII’s possible integration areas. It also explains the steps needed to create integration with various systems from SAP MII. The steps of integration with SAP ECC, databases, other legacy systems using HTTP and web service protocols, and other standard connectors like e-mail, FTP etc., are explained in this chapter. Along with that, using SAP MII as an integrator for other SAP manufacturing products such as SAP ME and SAP OEE is also explained.
SAP MII:
-
Can integrate with databases like SQL and Oracle.
-
Can integrate with SAP Enterprise planning, i.e., SAP ECC.
-
Can integrate with SMTP, which enables it to send e-mails.
-
Can integrate with any other legacy systems that support HTTP POST service, web service, etc.
-
Can integrate with file transfer protocol and, using its own standard file handling business logic, can connect to local folders and shared network folders to exchange files.
-
Is used by SAP manufacturing products like SAP OEE and SAP ME as their integration platforms.
Integrating SAP MII with Databases
By using SAP MII, it is possible to connect to databases of different applications to fetch data. To achieve this, you have to first configure the data server to connect to the database. Once that is done, the database can be accessed from the SAP MII Workbench where the query templates can be created. These query templates execute MII specific query editor operations like INSERT, UPDATE, DELETE, and SELECT. First, the data server section explains the different data servers that MII supports. In the second section, the query templates are described. These query templates can be used in SAP MII transactions inside any nested logic as the data provider.
Data Servers
SAP provides connectivity to various data sources or data servers from which data can be fetched, pushed, and updated. This bi-directional flow of data can be configured in the SAP Data Servers configuration feature. Various connectors are already configured in SAP MII and other third-party vendors can be configured by providing appropriate Database Driver JARs (visit https://blogs.sap.com/2014/02/24/data-connection-details-for-data-server-configuration/ for more information about the appropriate DB drivers and download links) and connection properties. These data servers are used while configuring query templates. See Figure 6-1.

The SAP MII Data Servers screen
Query Templates
Query templates are configured from the SAP MII Workbench with a query. Queries can be used to read, write, update, or delete data from the data source. Here are the SAP MII query template types:
-
Aggregate
-
Alarm
-
OLAP
-
MDO
-
KPI Framework
-
SQL
-
Tag
-
Xacute
-
XML
-
PCo
-
Catalog
The most frequently used and important query templates are explained in the following sections.
Configuring SQL Query Templates
The SQL query is used with SQL-oriented connectors, such as the IDBC connector. It is used to retrieve and update data from connected databases.
Follow these steps to configure a SQL query template :
-
1.
From the Catalog tab, select Project, then right-click and select New. Choose a query type, such as SQL Query. See Figure 6-2.
Figure 6-2. 
Creating a SQL query template
-
2.
Select a server from the list of available servers. This list is generated from the data servers configured in the SAP MII Admin menu. See Figure 6-3.
Figure 6-3. 
Choosing a SQL data server
-
3.
Select a mode for the query from the Modes list. Different types of connectors will have different modes available. See Figure 6-4.
Figure 6-4. 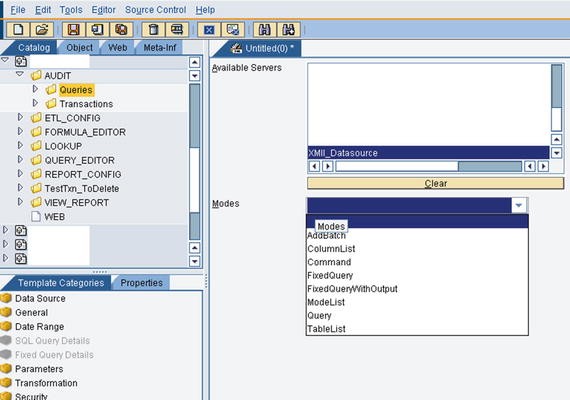
Choose a mode from the data server


SQL connectors have the following modes :
-
ColumnList: Used to retrieve a list of columns for a specific table in the selected database.
-
Command: Used when no result is expected from the query. INSERT, UPDATE, and DELETE queries can be used in this mode.
-
FixedQuery: Complex SELECT queries are written using this mode. Database specific queries and stored procedures can be invoked using this mode through query statements, parameters, and filter conditions.
-
FixedQueryWithOutput: Used to execute a Oracle stored procedure that returns a reference as output.
-
ModeList: All the modes that are available for SQL will be given as output.
-
Query: Used to create a query by configuring different parts of the query through selection.
-
TableList: Returns a list of all tables in the selected database.
From the modes defined here, the following are the most commonly used modes for SAP MII application development. Once Query mode is selected, the query needs to be defined, as shown in Figure 6-5.

Query Mode screen
If fixed query mode is selected, then the user needs to write the SELECT statement manually, as shown in Figure 6-6.

Fixed Query Mode screen
If command query mode is selected, the user needs to write the UPDATE/INSERT/DELETE statement manually, as shown in Figure 6-7.

Command Query Mode screen
The various template categories for the SQL query are shown in Figure 6-8 and explained here:

SQL Template Categories
-
Data Source: Used to choose the source of data for the query. The appropriate server and mode is then selected.
-
General: Resultset for queries can be configured using different properties:
-
RowCount: Maximum number of rows returned from the query
-
NumberFormat: Numeric format for data values
-
CacheDuration: Amount of time queries are kept in the cache
-
-
Date Range: The Date Range screen is used to assign parameters for time-sensitive queries. In tag and alarm queries, the date filter is applied to the Time column. In a SQL query, the date filter is applied to the DateColumn.
-
SQL Query Details: This is used to configure the query. The table list and column list is displayed and the query can be formulated here if Query mode is selected.
-
Fixed Query Details: This is used to configure the query if a mode other than Query mode is selected.
-
Parameters: Used to provide test parameters to query for testing purposes.
-
Transformation: Used to provide an XSL to transform the query output according to the solution’s requirements.
-
Security: You use the Security screen to assign roles with read or write permissions.
To test the query formed and its resultant dataset, execute the query shown in Figure 6-9.

Query template execution options
The display options for the Query template execution results are:
-
Internal frame: This is an internal frame in the SAP MII Workbench environment that displays the query result, as shown in Figure 6-10.
Figure 6-10. 
Internal Frame Query execution mode
-
Internal panel: This is an internal panel that appears just below but inside of the query panel and displays the query result, as shown in Figure 6-11.
Figure 6-11. 
Internal Panel Query execution mode
-
Browser: Here, you can select the type as text/html, text/xml, or text/csv, as shown in Figure 6-12.
Figure 6-12. 
Browser Query execution mode


SAP MII uses a particular XML structure to display the result. It includes rowsets, columns, and iterating rows. Row nodes contain the data from the resultant query. Figure 6-13 shows the query result in XML format.

Standard XML Query template result output
URL Format for Queries
SAP MII queries can be used as standalone services in the WEB v2.0 REST interface. The result is available as XML, which is in the standard SAP MII format:
http://<servername>/XMII/Illuminator?QueryTemplate=<Project>/<Path>/<TemplateName>
The MDO Query Template
The MDO Query template queries the data in an MDO. When configuring an MDO Query, the MDO Type Connector is used. It is associated with retrieving or updating data in an MDO. The MDO Query can also be used to join results from two different MDOs. The results of an MDO Query are shown in an XML document using the standard SAP MII structure.
Follow these steps to configure an MDO query template:
-
1.
In Catalog tab, select any project, right-click, and then select New ➤ MDOQuery, as shown in Figure 6-14.
Figure 6-14. 
Creating an MDO Query template
-
2.
Select a server from the list of available servers, as shown in Figure 6-15.
Figure 6-15. 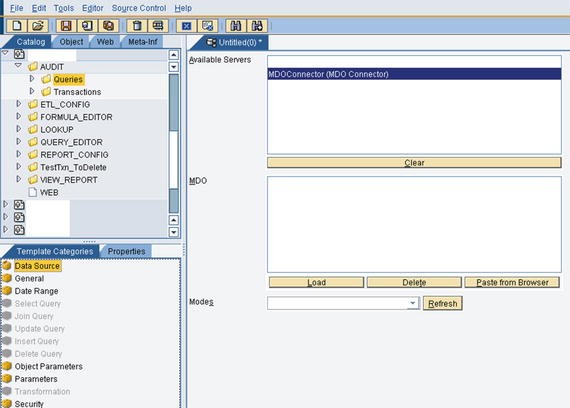
Choosing an MDO data server
-
3.
Click on Load from the MDO section and select the MDO object to work on, as shown in Figure 6-16.
Figure 6-16. 
Loading the MDO object
-
4.
Now select the mode from the Modes list in the Data Server screen, as shown in Figure 6-17.
Figure 6-17. 
Selecting the MDO Query mode
The following modes are available:
-
AttributeList: Used to retrieve MDO attributes and configurations.
-
Delete: Used to delete the data stored in MDO.
-
Info: Used to fetch MDO properties.
-
Insert: Used to insert data for MDO without a data provider.
-
ModeList: Used to retrieve list of available modes in MDO.
-
Select: Used to fetch data persisted in the MDO in case of persistence MDO and for on-demand MDO, data is fetched from the backend.
-
Update: Used to update the data in the MDO.
-
Join: Returns data as result of a JOIN on selected MDOs. Depending on the type of JOIN, the data will be returned.
-
-
5.
Depending on the mode selected, the Query can be defined. The following query options are available for selected modes:
-
Select Query: If the mode selected is the Select type, the MDO will be configured in a Select query. The attributes can be selected from the list of available attributes for the MDO . If you choose Select mode, the screen in Figure 6-18 appears.
Figure 6-18. 
The Select Query Mode screen
-
Join Query: If the mode selected is the JOIN type, the MDO will be configured in a JOIN query. It uses two or more persistent MDOs. Two types of joins can be applied—inner join and left outer join—and based on the type of join, the result will be fetched. See Figure 6-19.
Figure 6-19. 
The Join Query Mode screen
-
Update Query: If the mode selected is the UPDATE type, the MDO will be configured in an UPDATE query. This is used to update the listed attributes of the MDO . See Figure 6-20.
Figure 6-20. 
The Update Query Mode screen
-
Insert Query: If the mode selected is an INSERT type, the MDO will be configured in an INSERT query. This is used to insert the data in MDO without a data provider, as shown in Figure 6-21.
Figure 6-21. 
The Insert Query Mode screen
-
Delete Query: If the mode selected is the DELETE type, the MDO query will be configured in a DELETE query. This is used to delete data from the MDO , as shown in Figure 6-22.
Figure 6-22. 
The Delete Query mode screen
-
-
6.
Various template categories can be configured in an MDO query, as shown in Figure 6-23.
Figure 6-23. 
Template categories in an MDO query
-
Data Source: A server is selected from the list of available servers. These servers are configured with the MDO Connector type. Then, it loads the MDO(s) that are required in the query. Single or multiple MDOs can be configured since the JOIN query can be configured. Then it selects the mode of the query.
-
General: Resultset for queries can be configured using different properties:
-
RowCount: Maximum number of rows returned from the query
-
NumberFormat: Numeric format for data values
-
CacheDuration: Amount of time queries are kept in the cache
-
-
Date Range: The Date Range screen is used to assign parameters for time-sensitive queries. In tag and alarm queries, the date filter is applied to the Time column. In a SQL query, the date filter is applied to the DateColumn.
-
Parameters: Used to provide values for parameters used in a query.
-
Security: You use the Security screen to assign roles with read or write permissions on the MDO .
-
-
7.
Test and execute the query result. See Figure 6-24.
Figure 6-24. 
MDO Query execution result screen


The PCo Query Template
The PCo Query template can be used to connect to a SAP PCo server and fetch details from it using PCo tags and by writing simple SQL query statement. This query template supports the PCo connector.
Follow these steps to configure a PCo query template:
-
1.
From the Catalog tab, select a project, then right-click and select New ➤ PCoQuery, as shown in Figure 6-25.
Figure 6-25. 
Creating a PCo query template
-
2.
Select a server from the list of available servers from the data source screen, as shown in Figure 6-26.
Figure 6-26. 
Data source screen in the PCo Query template
-
3.
After TagList is selected, double-click on the Tag Selection details from the Template Categories tab, as shown in Figure 6-27.
Figure 6-27. 
Choosing Tag Selection Details from the Template Categories tab
Select the Tags required from the left side and add them to the right side to get the expected result from those tags, as shown in Figure 6-28.
Figure 6-28. 
Configuring tags in the Tag Selection Details screen
-
4.
Test and execute the query result, as shown in Figure 6-29.
Figure 6-29. 
Tag selection mode query result


The XML Query Template
This query template uses the XML connector by default. The query template can return an XML output from any URLs provided to it. For example, if an illuminator service needs to be executed using certain logic, the illuminator URL can be configured in the XML query template to return the XML output and this XML can be further used in business logic transactions. See Figure 6-30.

Providing an XML Query template URL
Note
In the XML Query template while providing the URL, it is best not to use the host and port URL because during migration or any change to the host or server, you would need to change this manually in the code. It’s better to use // instead of the host and port for the external URL. For the internal URL, where the object is being called from the Web tab in the MII Workbench, it is best to use web:// or server://.
The Xacute Query Template
This query template uses the Xacute connector to connect to any business logic transactions that are called directly from the UI. It can only execute with standard BLS XMLoutput as an input to it, as shown in Figure 6-31.

SAP MII BLS standard XML output
The Xacute Query template has following mode options available (see Figure 6-32):

The Xacute Query modes
-
ModeList: Retrieves a list of available modes in MDO.
-
Query: Provides a link to the BLS and to define the input and output parameters for the result of the query template. By default, the output parameter is * in the drop-down for multiple output type variables declared in the BLS. Further, developers can select the particular output variable from the BLS that are need to be shown from the output of the query template.
-
TargetFolderList: Lists all the folders present on the target server.
-
TransactionFolderList: Lists all the transaction folders paths present on the target server.
-
TransactionInputList: Provides input details of the business transaction.
-
TransactionList: Lists all the transaction objects and their path.
-
TransactionOutputList: Gives the output details of the business transaction.
The most common mode used is Query mode. If query mode is selected, you’ll see the screen shown in Figure 6-33.

The Xacute query’s Query Mode screen
Integrating SAP MII Using Business Logic Services
Before working on integrations with these various systems, MII developers need to have a good basic understanding of SAP MII business logic services, know how to develop the BLS, and know the most commonly used action blocks required for creating the BLS. The most commonly used integration scenarios are then explained.
What Are Business Logic Services?
SAP Manufacturing Integration and Intelligence is a platform provided by SAP mainly for integration with the Manufacturing Execution System and Enterprise System. It acts as middleware for integration. Apart from this, SAP MII can also be used as a platform for customized integration. With the help of the latest SAP UI technology (UI5), MII acts as the backend platform for placing logic to provide data to the frontend SAP UI5, which displays data in a user-friendly and presentable way.
For this environment, the logic development is very generic with drag-and-drop coding and is called MII transaction or Business Logic Services (BLS) . BLS is a diagrammatic way of writing logic, in which the logic is formed with certain blocks known as action blocks in MII. They have unique functionality and pertain to a single business requirement. The blocks follow a left-to-right execution flow.
In a SAP MII transaction, any kind of business logic can be implemented. It can either have a logic to query database for INSERT, UPDATE, and DELETE operations or can have logic for integration with SAP ECC, SAP ME, or SAP OEE systems. Even HTTP POSTs, web services, e-mail, FTP, and message queuing integration are possible, as long as you have the appropriate connector for the specific system.
Moreover, SAP MII transaction action blocks have two sections—one is for configuration and the other is the link editor, which has editor functions and operator sections for the logic to be modified. Apart from the SAP MII standard action blocks, it gives users the flexibility to add custom action blocks, which can be added from System Resources ➤ Custom Action in the SAP MII admin page. Adding custom actions requires a couple of setups, like BLSSDK and MII Jar files for the custom action need to be implemented properly. This involves a wide range of flexibility among users to develop logic based on the technical requirements of the manufacturing applications.
SAP MII Transaction can be executed manually for testing the logic manually from the SAP MII Workbench. Apart from this standard way, there are various other approaches, as follows:
-
On a scheduled basis, using SAP MII scheduler based on some logical condition or event
-
Web pages via external URN (Runner Service or Illuminator Service using Xacute Query) or Web Service (SOAP) request
-
From another SAP MII Transaction synchronously or asynchronously
Architecture-wise, SAP Transaction uses the XML and web service frameworks. Web Service/SOAP requests and XML data structure can be exposed with proper functionality. Web server has the engine installed on it and rest of the editors are dynamically loaded from the SAP MII BLS menu on independent machines with the proper JRE setup. Web server stores a SAP MII transaction as XML along with the other configurations, like the global properties, schemas, etc.
Creating a BLS
SAP MII Transaction can be created in the SAP MII Workbench, but the SAP MII Workbench must first be opened.
-
1.
Choose MII Admin ➤ Content Development ➤ Workbench ➤ File ➤ New ➤ Transaction, as shown in Figure 6-34.
Figure 6-34. 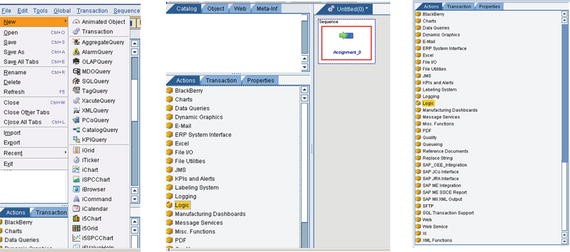
Basic components for creating a SAP MII BLS (transaction)

These show the basic SAP MII transaction creation components. The extreme right figure has all the folders under which all the possible actions are categorized. These actions are the building blocks of the logic involved in creating a transaction. Any logic requires basic input or output parameter to work with it. In a similar way, the SAP MII Transaction also has some parameters (see Figure 6-35). There are three types of parameters :
-
Global: Global for all projects.
-
Transaction: Specific to a transaction, mainly used for input and the output.
-
Local: Local to a transaction. Parameters used internally for a logic to be executed.

Available properties for creating variables in SAP MII BLS
Common Action Blocks
To elaborate on the functionalities of SAP MII Transaction, action blocks come into the picture as they are the building blocks of any SAP MII logic (BLS). There are many actions available for each category. The charts category includes the display analytics action, the data queries category includes the query action blocks, the logging category includes actions to log the data at any breakpoint, the logic category includes the basic logic to be implemented, etc.
Logic
This folder has the logical action blocks, which are required for the main logic implementation. Assignment action block is for assigning a data value from the previous output to any local or transaction variable. Switch case action block is used to switch to multiple logic as per the switching condition. It has for loop or repeater or iterator action block to loop over the XML nodes as required. It also includes action blocks that are required for handling exceptions, like exception enablers and throw and catch blocks. Figure 6-36 shows a glimpse of the action blocks available in the Logic folder.

Logic action blocks
Each action expects different inputs and provides different outputs as per its execution.
-
Assignment action: This action block is used to assign values to transaction properties. This action does not need to be configured nor need the input field to be filled up. Rather, you can assign a property in this action or include an editor operator or functions to modify them. See Figure 6-37.
Figure 6-37. 
Assignment action block
There are different Link Interaction and Link types available during configuration of an action block. Refer to Figure 6-38 for more detail.
Figure 6-38. 
Configure Link options in any action block
-
Condition action: This action is used to evaluate any number of conditions as configured and then navigate the logic toward true or false, as per the executed logic. See Figure 6-39.
Figure 6-39. 
Condition action block
-
Repeater action block: This action block is used to repeat on the XML node , the input we provide as the XPATH, which is repeating in the XML. The output fetches the value of the child nodes while repeating on the particular node. See Figure 6-40.
Figure 6-40. 
Repeater action block
-
For Next Loop action block: This is used to execute a series of action blocks a specified number of times. It is similar to the for keyword in common programming languages. See Figure 6-41.
Figure 6-41. 
For Next Loop action block
-
Switch action block: This is used to control execution flows in BLS transactions based on a variable, which can be a property of another action block, transaction properties, and local properties. See Figure 6-42.
Figure 6-42. 
Switch action block
-
Transaction Call action block: This is used to call and execute a predefined transaction that resides in the same MII server from another transaction . This action block allows you to create some reusable functionality in MII. See Figure 6-43.
Figure 6-43. 
Transaction Call action block
The transaction that needs to be executed can be browsed and selected in the configuration screen for the field called Transaction Name or the entire transaction path can also be mapped in the link editor of this action block. To reload and refresh the transaction after each execution, check the box called Reload Transaction After Execution, as shown in Figure 6-43.
By setting up the Async property to true or false, BLS can be called asynchronously or synchronously, respectively. See Figure 6-44.
Figure 6-44. 
Setting the Async property of the Transaction Call action block
-
Dynamic Transaction call action block: This is used to call another transaction from the nested transaction call. This is similar to the Transaction Call Action block. The only difference is that the transaction properties can be added, deleted, and mapped. Fields can be changed dynamically when the Dynamic Transaction call action block is used. See Figure 6-45.
Figure 6-45. 
Dynamic Transaction action block
-
Iterator action block: This is used to repeat the data of a list variable . It is like repeater but the repeater repeats in the XML node whereas this repeats on the list variable. It expects a list type variable for its input, as shown in Figure 6-46.
Figure 6-46. 
The Iterator action block
-
Exception Enabler action block: Enables logging any kind of exception during the execution of the business logic. This action is used to indicate to the developer that the exception handling model has changed during runtime.
-
Throw action block: This throws any kind of error that has occurred due to some exception that the developer wants to log . This is used to put the transaction in an exception state, which causes all actions to be skipped until a Catch action or until the end of the transaction is reached.
-
Catch action block: This catches an error at any point of execution . When a transaction is in the exception state, the transaction skips all actions until the Catch action is reached, or until the transaction finishes.


Conceptually, exception handling is similar to any other object oriented programming exception handling concept. See Figure 6-47.

Exception handling in SAP MII
The Logging Action Blocks
This category has actions that are used to log in between the logic of BLS. Refer to Figure 6-48 for the action blocks available under Logging.

Logging action blocks
There are three main actions . The first of these is the Tracer action block, which is used to debug BLS transactions by displaying any message or value in the trace window while running the BLS transaction from the Workbench. See Figure 6-49.

Tracer action block
The Message action block provides a relevant message to the MII developer during debugging. The Level action block provides the option to define the trace level during debugging, as shown in Figure 6-50.

Level types in Tracer
INFO gives the information related to the parameters used in the action block. FATAL only returns the relevant message if a fatal error is caught during execution of the BLS. WARN only returns warning information that occurred during execution of the BLS. DEBUG returns the intermediate debugging step details of the action blocks during execution of the BLS. ERROR returns any error messages that occurred during the execution of the BLS. By default, the INFO level type is selected.
Apart from this, XML Tracer is also available. It’s used to create custom log or trace files to log only XML messages from BLS transactions in files, as shown in Figure 6-51.

XML Tracer action block
The FilePath option provides the web file path where the developer wants the XML tracer to be written. The Message option provides the relevant message that needs to be written in the file.
Event Logger is available to trace message logging in the NetWeaver log, as shown in Figure 6-52.

Event Logger action block
-
Message: Provide the relevant message that needs to be written in the NetWeaver log.
-
Source: Defines the logging source information like any unique identification so that developers can search the logging information using that keyword in the log viewer of the NetWeaver. By default, the source is defined as UserEvent.
-
EventType: Defines the type of the event that you want to log in NetWeaver, as shown in Figure 6-53.
Figure 6-53. 
Event types in Event Logger

INFO gives information related to the parameters used in the action block. FAILURE returns the relevant message only if the exception type is “failure”. WARN returns the warning information that occurred during the execution of the BLS. DEBUG returns intermediate debugging step details of the action blocks during execution of the BLS. ERROR returns the relevant error message only if the exception type is “error”. By default, the INFO level type is selected.
SAP MII XML Output
SAP MII works with XML. XML has a standard format, which follows the rowsets/rowset/row format. See Figure 6-54.

SAP MII XML output action block: standard output XML
These action blocks (shown in Figure 6-55) make creating a SAP MII specific standard XML much easier:

SAP MII XML Output action blocks
-
Document action block: The main action block that defines the XML structure where the columns are assigned to its probable datatype, length of datatype, etc. See Figure 6-56.
Figure 6-56. 
Document action block
-
Rowset action block: Adds a Rowset element in a XML document defined by the Document action block.
-
Column action block: Adds a new column definition under the rowset in a XML document defined by the Document action block. See Figure 6-57.
Figure 6-57. 
Column action block
-
Row action block: Adds data rows as <Row> elements and their children in a XML document defined by the Document action block. See Figure 6-58.
Figure 6-58. 
Row action block configuration


The Data Queries Template
The Data Queries template has all the query type action blocks that you can create from the Query template feature in SAP MII. This includes SQL, MDO, and many more, as shown in Figure 6-59.

Data Queries action blocks
To add and configure this action, first of all, a blank sequence is chosen and the desired action is double-clicked or dragged over the sequence. An an example, consider SQL Query Data Queries. The SQL query would be dragged and dropped on the blank sequence. You can also select the blank sequence and double-click on the Query action block. See Figure 6-60.

Creating Data Queries
For this action to be configured, you have two options. You can choose the Configure Objects option by directly double-clicking on the specific query action block, as shown in Figure 6-61.

Option 1: Configuring Data Queries
When you right-click on the query, the Configure options appear, as shown in Figure 6-62.

Option 2: Configuring Data Queries
Next, a screen appears to configure the query (refer to Figure 6-63) and when you click on the Load button, a list of queries appears from which the required query can be selected.

Query Configuration screen
Once the query object is configured, click on Links (see Figure 6-62) or click on Configure Links (see Figure 6-61), as shown in Figure 6-64.

The Configure Links screen
Linking helps dynamically assign the query parameters as required during the runtime execution of the BLS. Apart from that, it is also possible to create a dynamic query statement and link it to “Query” and then assign a mode of the query as per the mode list available against the query template .
Users can create filter expressions (FilterExpr), join expressions (JoinExpr), and group expressions (GroupingExpr) dynamically so that the logic can reduce the hardcoded or static values and query expression. This makes the logic call a fewer number of action blocks because the same query template can be reused by passing dynamic parameters. This in turn helps the logic be optimized and efficient.
For example, say you want to query a table named User, which consists of the ID, name, country, address, contact_no, and e-mail table columns. There are two ways you can retrieve data from the table:
-
Retrieve the data for the country of India only.
-
Retrieve the data with an ID from 12 to 99; the name is blank.
To handle both scenarios, instead of writing two SQL query templates , you can use a single query template while passing the expressions dynamically.
The query template is created in Fixed Query mode and saved. Then the query statement mentioned next needs to be linked to the Query parameter dynamically from the Configure Links screen.
Statement : Scenario 1 : SELECT * FROM User WHERE User.country = 'India' Scenario 2 :SELECT* FROM User WHERE User.ID BETWEEN 12 AND 99 AND User.name IS NULL
When the query template is created with Query mode and saved, the following configurations need to be maintained from the Configure Links screen:
-
1.
The User table needs to be linked to the Tables parameter.
-
2.
The respective column names (comma-separated column names) need to be linked to the Columns parameter, like ID, name, country, address, contact_no, and e-mail.
-
3.
The filter criteria needs to be linked to FilterExpr. In scenario 1, it will be User.country = ‘India’ and in scenario 2, it will be User.ID BETWEEN 12 AND 99 AND User.name IS NULL.
Like with SQL queries, a similar approach is possible and beneficial for code optimization.
Integrating SAP MII with ERP (SAP ECC)
As explained in the beginning, ECC integration is one of the major requirements of the manufacturing shopfloor and middleware. The following section explains why this integration is needed and how to create seamless integration using SAP MII.
Why Do We Need ERP (SAP ECC) in the Manufacturing Industry ?
As explained earlier, ERP is the Enterprise Planning System , meaning the business planning from higher authorities are done in ERP. As with other industries, manufacturing follows a few standard steps to work. These steps are planning, orders as per demand, BOM (Bill of Materials ) creation based on the order created and, in parallel, the master data management is also required to maintain material classification, routing, workcenter etc. After this, the order details are passed along with the BOM and master data to the shopfloor production and to the warehouse. This ensures that the transfer of material from the warehouse and the production execution process on the shopfloor happens correctly.
The operations, components, and steps need to be followed as defined in the BOM and the master data. Once the manufacturing process is complete, the produced quantity, including good quantity and waste, are updated in the ERP. The cost analysis and the shipment handling information needs to be passed to the shopfloor from the ERP. Once the shipping is complete, this same information needs to be updated in the ERP.
To complete this manufacturing cycle, collaboration is required among the various modules, including PP (Production Planning), MM (Material Management), Finance and accounting (FICO), Supply Chain, Shipping, Sales, Warehouse Management, and more, in ERP. SAP ECC is a product by SAP that integrates all these modules internally as a package of ERP.
Integrating SAP ECC with the Shopfloor
Another integration requirement is to fill the gap between ECC and shopfloor manufacturing so as to pass the planning information in real-time. SAP MII can integrate both of these and pass the data bi-directionally in real-time. SAP MII provides a few extra layers of security in terms of access restrictions, encryptions, etc. and intelligence like reporting, real-time status monitoring, acknowledgment handling, and more.
Integrating SAP MII with SAP ECC
SAP MII can integrate with SAP ECC in two ways (see Figure 6-65):
-
Using IDOC: IDOC is an intermediary document of SAP that’s used to transfer data between two SAP systems or from one SAP system to another non-SAP system. IDOC generates an enhanced XML structure based on the IDOC type to be consumed by the system. SAP MII has a standard feature available to consume IDOC XML and process it as required.
-
Using RFC ( BAPI): BAPI includes the standard or customized function modules in SAP ECC. Function modules are procedures defined in the SAP system. They are used to expose the SAP data to a non-SAP system. Whenever a function module is enabled as a remotely accessible function module, it’s called BAPI (Business API).

Information flow between ECC and MII
Integrating SAP ECC and MII Using IDoc
SAP ECC can push the message through IDoc to MII but, before receiving the message in SAP MII, a few configurations need to be done at the MII end. Follow these steps:
-
1.
Configure the message listener in NetWeaver. The listener holds the configuration of the ECC ends, such as unique program ID, client, host, etc. SAP MII has 10 dedicated IDoc listeners. To configure it, go to http://<host>:<port>/nwa.
-
2.
Navigate to Configuration Management ➤ Infrastructure ➤ Application Resources, as shown in Figure 6-66.
Figure 6-66. 
Configuration management
-
3.
Click on the Application Resources link to get the screen shown in Figure 6-67.
Figure 6-67. 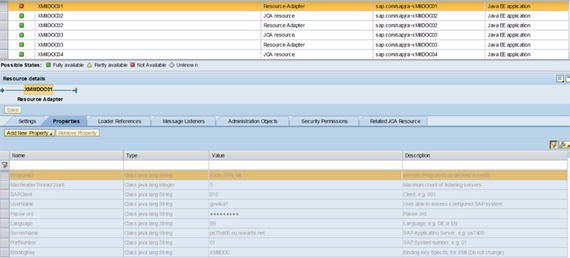
Application Resources screen
-
4.
In the resource name, put the listener’s name, such as XMIIIDOC01 and press Enter. Select the Resource Adapter for the configuration from the list.
-
5.
The bottom section of the screen will show the details of the listener. Click on the Properties tab to configure it. You need to fill in the ProgramID, User, Password, Language, SAPClient, ServerName, and portNo fields.
-
6.
Navigate to the SAP MII menu page. Go to Message Service ➤ Message Listener. Select the desired listener and click on the Update button, as shown in Figure 6-68.
Figure 6-68. 
Message listeners


Using these steps, IDoc messages can be received and further stored in the internal table of SAP MII. Now you need to know how to process the IDoc message. To do so, another configuration is required, called processing rules (see Figure 6-69).

Message processing rules
In SAP MII, two types of processing rules can be defined:
-
Category based processing rule : Defines a unique category for a message type . The benefit of using this rule is that each message from ECC being pushed to MII is tagged with a unique identification ID, which helps to recall the message from MII logic anytime. There is no need to store the message separately in another database. Only the message ID needs to be stored and can be used to recall the message. Another benefit of using this rule is that the status of each message can be identified and monitored uniquely, as processing of this rule is not automatic and the developer can define the logic based on the status categorized to determine when to pick the message, the frequency of picking it, and the priority of message types. The status of the message needs to be updated as follows:
RECEIVED=1 PROCESSED=2 FAILED=3 NORULEDEFINED=4 RUNNING=5 CATEGORIZED=6
where the numbers are used in the MII logic to represent the respective status.
Generally, to handle a category based processing rule, one scheduler must be scheduled with a MII transaction that can periodically check for any new message in the queue based on the written logic in the BLS.
-
Transaction based processing rule : This processing rule is directly linked to a BLS . Whenever a new message comes to a specific listener with a specific message type, the BLS is triggered automatically and the message is processed instantly. No message ID concept exists for this rule.
To handle the category-based message processing, these action blocks need to be invoked in BLS :
-
Query Messages action block: Finds a list of buffered messages by a set of selection criteria.
-
Read Message action block: Reads the content of the messages received and buffered by Message Services.
-
Update Message action block: Updates the status and status text for a buffered message, maybe after ad hoc processing by BLS transaction.
-
Delete Message action block: Deletes a buffered message from the SAP MII database. Like the Read Message and Update Message action blocks, this action block also has no object configuration and only the MessageId needs to be specified in its link configuration .
-
Post Message action block: Posts the message directly in the same MII server instance .
Integrating SAP ECC and MII Using RFCs (BAPI)
SAP MII BLS offers some powerful action blocks to connect to the SAP ECC to retrieve or write data that comes from the shopfloor. This integration with ECC is provided by SAP JCo or JRA actions to execute the BAPI to connect to SAP systems. See Figure 6-70.

SAP JCo and JRA Interface action blocks
To configure a SAP server alias, an alias editor needs to be opened using the SAP MII Data Services ➤ Connections menu option, as shown in Figure 6-71.

MII Connections screen
Click on the Create button to create a new alias. You can select JCo from the drop-down. You must specify a unique name, an optional description, and the server hostname or IP address. You must also specify connector-specific properties for the server for which the configuration is created. An existing configuration can be copied using the Copy button and deleted using the Delete button .
Next, you create credential access to the SAP connection being created, as shown in Figure 6-72.

Credential Stores
Both the JRA and JCo action blocks in SAP MII can connect to SAP ECC through BAPI, but as the SAP JCo action block is more commonly used, we only explain that one in this chapter.
SAP JCo Interface Action Block
The action block that’s most commonly used to call the BAPI is the JCo Interface action block without any session handling. The SAP JCo Interface action is used to create a connection to the SAP Java Connector (JCo) interface from the ERP server and create a Remote Function Call (RFC) request to execute the BAPI. See Figure 6-73.

JCo Interface action block
The following options must be filled in:
-
Connection Alias: From this drop-down , you can choose the SAP connection that was created in Step 1. The SAP server, client, and system number will then be auto populated.
-
Credential Alias: You can choose the specific credential being set up against the connection.
-
RFC Name: This can be searched using search pattern options and then you can select the desired BAPI from the list.

Configuring BAPI in the JCo action block
These options must be configured to execute the BAPI and further process in BLS. BAPI can also be called by using the SAP JCo Function action block, but it works with session handling logic (i.e., the SAP Start Session and SAP End Session action blocks).
Integrating SAP MII with an SMTP Server
Simple Mail Transfer Protocol (SMTP) is basically an Internet standard for electronic mail transmission. The following section provides details on how SMTP can be used with SAP MII.
SMTP server can be configured from the SAP MII menu by choosing Connections, as shown in Figure 6-75.

SMTP server connection configuration
Credentials can be maintained from the credential store similarly as explained for the JCo connection type. This is to facilitate sending e-mail to recipients as per requirements in case any notification must be sent. To fulfill this requirement, SAP MII includes action blocks under the E-mail category, as shown in Figure 6-76.

E-Mail action blocks
This sends an e-mail to recipients mentioned through the SMTP server. The configuration required to carry out this action has to be preconfigured in the connection section and the same can be selected while configuring the e-mail action block in the SAP MII transaction. To configure this action block, a couple of configurations in the SAP MII admin are mandatory. One is the connection details and the other is the credentials to log in to the mail server. Details of the SMTP mail server must also be accessed for this functionality to work properly. There are two actions—one is for sending e-mail and the other is for reading E-mail from the SAP MII Transaction.
The different properties of the Send Mail action block are shown in Figure 6-77.

The Send Mail action block
Similarly, Read Mail also has different properties that need to be set up before using the action block to read the mails. The configurations are similar to Send Mail and are shown in Figure 6-78.

Read Mail action block
Integrating SAP MII with Web Protocols
SAP MII can be integrated with other legacy systems using standard web protocols like Web Services and HTTP POST. SAP MII has built-in action blocks dedicated to call web services and can also post messages to the server instance.
Web Service Action Block
This executes a web service using its WSDL URL by sending and receiving SOAP messages. The Web Service action block needs to be configured with information like WSDL, authentication, and connection details. See Figure 6-79.

Web Service configuration wizard
Follow these steps to configure a web service action block:
-
1.
Once the WSDL is entered in the URL field of the configuration wizard, click the Next button.
-
2.
Based on the requirement, the authentication and connection details will be set.
-
3.
In the next view, the required port needs to be selected from the available ports. See Figure 6-80.
Figure 6-80. 
Port selection in Web Service
-
4.
After selecting the port in the next view, Operation needs to be selected, as shown in Figure 6-81.
Figure 6-81. 
Operation selection in Web Service
-
5.
Click the Finish button . The web service configuration is now done. The web service request and response structure will appear in the Link Editor, as shown in Figure 6-82.
Figure 6-82. 
Web Service request and response structure


HTTP Post Action Block
HTTP Stands for Hyper Text Transfer Protocol , which is used as an application protocol between collaborative, distributed information systems.
Launch the Workbench from the SAP MII portal. In the bottom-left corner, on the Action tab, there is a action menu item called Web. All the HTTP action blocks are available under it, as shown in Figure 6-83.

Web action blocks
The HTTP Post action block can perform the following functionalities (see Figure 6-84):

HTTP Post action block
-
Post a document to a specific URL and process it
-
Call a web service where valid WSDL definition is not available
-
Read information from an RSS feed
Available properties are as follows:
-
URL: URL where the document need to be send.
-
Post Data: Document to be posted
-
UserName: Credential to access the URL
-
User Password: Credential to access the URL
-
Content Type: Depends on the document and the type accepted by the URL
-
ReturnAsString: Stores return result as a string
-
ReturnAsXML: Stores the XML if resultant XML is expected
-
UseDestinationService: Forced to use the specified destination service
Integrating SAP MII with File Systems
The File I/O folder contains all the action blocks that deal with file input and output (see Figure 6-85). Using these set of action blocks, you can write and delete files and create directories in the Workbench. There are action blocks for reading files from external sources using the File Transfer Protocol. Flat file and advanced flat file parsers are actions that parse flat files, where CSV input can be parsed into XML with different structures.

File I/O action blocks
Get File List Action Block
This action block retrieves a list of files under a specified folder. The Folder path can be from the network shared drive, from a local drive folder (where the MII server is installed), or from the web tab of MII Workbench needs to be specified. If a particular file type needs to be fetched, then the mask feature is there to provide the specific file extension. SAP MII takes the following file types: .csv, .txt, and .xml (or any kind of flat file). See Figure 6-86.

Get File List Action Block
Write File Action Block
Among all the actions in this set, this is the most common action block and is used quite frequently. This action can be used to write a file that either creates a new file and writes in it or appends in an existing file. The link editor and configuration screen have the following properties. The path to be provided is the link of the text file, as shown in Figure 6-87.

Write File action block
The web folder path is provided as WEB://<ProjectName>/<FileName>. The mode has to be either CREATE or APPEND as per the file. The available text is the text to be written in the file and path has the file path.
When the write file action block is executed, the file is generally created under the Web tab of the Workbench in the specified path defined in the configuration. MES works only with file systems, in which case the write file action block is used to write the file in the MES destination folder. The Use BOM checkbox allows you to write a byte order mark for UTF-8 in front of the file and is applicable only when the file is created. BOM is required for certain programs like Microsoft Excel to recognize a UTF-8 CSV file containing Unicode characters.
The Write File action block is also used to trace the business logic value when the value is required to be traced at runtime directly. In this case, the developer can place the write action block in the respective BLS with the variable defined in configure links to trace the value as desired for debugging. Thus during execution from the frontend, when the control comes to the BLS where the write action block was placed, it executes the block. The developer then can check the exact value being passed from the frontend to the BLS. It helps to analyze the logic if you find any bugs in the code.
-
Delete File action block: It takes the fully qualified path to delete the specified file .
-
Flat File Parser action block: It takes as input a Comma Separated Values (CSV) file and converts it to the SAP MII XML format of /rowsets/rowset/row. To use this action block, you have to load a text file loader before calling the flat file parser. The string content of the text loader also needs to be mapped to the input of flat file parser. See Figure 6-88.
Figure 6-88. 
Flat File Parser action block
-
Advanced Flat File Parser action block: This is the advanced version of the flat file parser action block. Developers can define additional features while parsing a flat file. You can provide the document configuration to define column properties. The Has Columns checkbox is by default disabled if the columns are not defined. If those are not defined, you can check it. Once it’s checked, it means that while generating the output XML, the action block will use the first row or the input data to generate the columns . Otherwise, it will generate columns by string as the datatype. If auto expand is selected, then additional columns defined will be added; otherwise, they will be truncated while generating output. The end of line character lets you specify a character that will act as an end of line character; by default, a line feed or carriage return is treated as the end of line character. Comma is the default delimiter, but you can provide a particular delimiter that will split the different data values within a flat file row and put them in the XML document.
Figure 6-89. 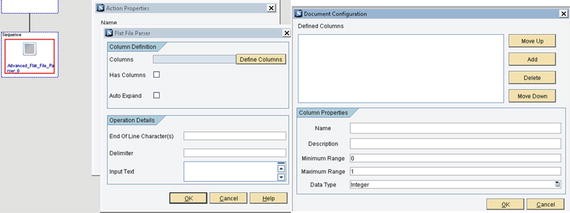
Advanced Flat File Parser Action block
-
FTP action blocks: FTP transfers file between devices on a network . To use FTP, SAP MII has some built-in action blocks dedicated to FTP integration. The FTP connection must first be created before you use the FTP action blocks in BLS .


Creating a FTP Connection
File Transfer Protocol (FTP) is a standard network protocol that’s used to transfer files from a server to a client using the client-server architecture. Although it is not used much anymore due to poor security, it is still sometimes used for internal file transfers within the same server on a closed, secured network. Follow these steps to create the FTP connection in SAP MII:
-
1.
In the SAP MII portal, navigate to Data Services ➤ Connections, as shown in Figure 6-90.
Figure 6-90. 
Data Services Connections selection
-
2.
On the Connections page, Click on Create, as shown in Figure 6-91.
Figure 6-91. 
Create SAP MII Connections
A popup to create the connection appears.
-
3.
Provide a name for the connection. Select FTP for the connection type and click on OK. See Figure 6-92.
Figure 6-92. 
Creating an FTP connection
-
4.
Now provide the server IP and port of the destination system and save, as shown in Figure 6-93.
Figure 6-93. 
FTP Connections configuration
The FTP connection is created now.
-
5.
Use the Connection alias in the configuration link of the FTP action blocks in SAP MII to connect to the FTP server.


FTP Input: This action block is used to fetch and view the content of a file available at a specified remote location. Provide the connection and credential alias as configured and the remote file and folder, as shown in Figure 6-94.

FTP Input action block
FTP Output: This action block is used to create file to a specified remote folder path. It also allows you to append content of a file available at a specific location. See Figure 6-95.

FTP Output action block
FTP Get File List: This action block fetches the list of all files available in a specified remote location . The list can be filtered depending on mask (file format) and date time format. See Figure 6-96.

FTP Get File List action block
FTP Delete File: This action block deletes all the available files from a specified remote folder path. See Figure 6-97.

FTP Delete File action block
FTP Create Directory: This action block creates a new folder at a specified remote location . See Figure 6-98.

FTP Create directory action block
Integrating SAP MII with Other Manufacturing Products
SAP has few other manufacturing products to help process executions. Two major manufacturing products of SAP are SAP ME and SAP OEE. SAP ME is mainly for discrete industries and intended users of SAP OEE product are process industries. Both products consist of two segments of the product—process handling with multiple functional screens and integration.
Process handling with multiple screens is developed by SAP on top of SAP MII and that is standard as those are products of SAP. For the integration, both products have their own components—MEINT and OEEINT. As the architecture of both products are the same, so the processing steps are the same for both products. MEINT and OEEINT are dedicated to connect to SAP ECC. To install MEINT and OEEINT, you need to execute one CTC wizard file specific to MEINT or OEEINT on NetWeaver. When you execute this file, all the standard configurations for MEINT and OEEINT are configured automatically (including the Scheduler, Message Service, Listener, etc.). The only customizable parts of MEINT and OEEINT are the workflow, supported plants, and global configuration.
SAP OEEINT and MEINT using SAP MII provides the following features:
-
It provides a standard interface to integrate with SAP ERP and SAP ME/OEE for all message types.
-
It has message enhancement and transformation capability using XSLT to change the ERP message structure into a MES level structure.
-
It provides flexibility and extensibility through the interface by allowing users to define their own specific customized logic configured in the workflows for different message types .
-
Extensibility of the interface can also be provided using ME-SDK Java based customization or by using MII BLS.
-
Bi-directional data processing is possible and plant specific or message type specific data handling is also possible.
-
Robust message monitoring functionalities is available with proper execution results for each step of the workflow.
What Is Workflow?
Workflow is the predefined dependent execution of steps where users can either use the standard available components for that step or can customize steps based on their requirements. Workflow involves multiple steps that make the integration steps more flexible so that one message can be manipulated and validated multiple times during processing and the final manipulated message can be passed to the shopfloor through MES, which can be executed directly. Workflow works bi-directionally, so workflow customization is possible for message flow from ECC to ME/OEE and vice versa.
There are three types of workflows available:
-
Standard workflow: This helps transform the inbound message and can transfer it to destination system. This is the only workflow that can send the data to other systems. This workflow can work bi-directionally from ECC to ME/OEE or vice versa.
-
Split workflow: This is based on certain conditions on which it can split the inbound messages into multiple messages with different message types. This workflow is dependent on standard workflow, i.e., split workflow provides the data on the standard workflow, which finally pushes the data into the destination system. Generally split workflow is used for ECC to ME/OEE single directional flow. For example, if MATMAS 02 comes from ECC and there is multiple plant scenario for SAP ME/OEE, split workflow will split the MATMAS02 into multiple messages based on plant IDs to send the messages to ME/OEE using the plant-specific web services.
-
Co-relational workflow: This has the opposite functionality of split workflow . This workflow merges different message types into one message and passes them to the standard workflow.
Configuring Workflow
The major customizations are handled through workflow in MEINT and OEEINT. There are seven steps involved in workflow configuration . The following are the steps needed to configure the workflow:
-
1.
Pre-XSLT transaction
-
2.
Request XSLT
-
3.
Post-XSLT transaction
-
4.
Service transaction
-
5.
Response XSLT
-
6.
Pass handler
-
7.
Fail handler
Apart from this, for each segment there are three sections as per their execution priority:
-
Customer: This is defined as part of customization as required by the client organization’s IT team.
-
Partner: This is defined by the SAP partners providing the solution to the customer client.
-
Standard: This is defined by SAP to provide a standardized solution .
At the time of customization, it is always best for the partner to check first if any standard transactions or XSLT are defined in the standard section. If there are, the partner should copy the standard content and then the customization should be done on that. Similarly, the customer should first see if the partner solution is available. If it is, it will customize on the partner solution; otherwise, it will go for the standard solution if it’s available.
In both integration components, SAP provides a standard workflow for most of the messages available in ECC, but sometimes it’s necessary to do co-customizations on the standard messages. For example, BOMMAT03 is a standard IDoc in ECC, so ECC directly sends BOMMAT03 to be transferred to ME/OEE. In MEINT and OEEINT, standard workflow for BOMMAT03 is available. But sometimes due to customer requirements, you must customize BOMMAT03 and then renamed to Z_BOMMAT03. To handle these customizations, you also must customize the standard workflow in MEINT/OEEINT.
It is up to the developer to decide into which step of the workflow the changes need to be incorporated in order to handle the customized IDoc based on the required changes. It is possible to handle this in two ways—by enhancing the standard BOMMAT03 workflow or by copying the standard workflow and creating a new workflow with the changes.
If workflow customizations are completed using MII transactions, then the following transaction properties for the BLS are always fixed:
-
Variable Name: InputXML, Datatype: XML, Variable Type: Input
-
Variable Name: OutputXML, Datatype: XML, Variable Type: Output
-
Variable Name: Error, Datatype: String, Variable Type: Output
At the time of workflow execution, the output of the first step acts as the output of the second step and so on until the execution is complete. For example, the IDoc message will be the input for Pre-XSLT Transaction step and the output of Pre-XSLT transaction will be the input for Request XSLT and so on. Figure 6-99 shows the workflow steps: how they execute and how customization is possible.

The Workflow Configuration screen
-
Pre-XSLT Transaction: Supports SAP MII Transactions and Java classes (from ME 6.0 and OEE 1.0). If validation and customization are required in the received IDoc message, this step is ideal for this scenario.
-
Request XSLT: Supports XSLT only. In this step, IDoc message structure is transformed into the shopfloor level message structure . If required, customization is also possible in this step by making changes to the XSLT file.
-
Post-XSLT Transaction: Supports MII Transactions and Java classes (from ME 6.0 and OEE 1.0). After the transformation of the XML into the shopfloor message structure, if more validations or customization are required, this is where to do them.
-
Service Transaction: It supports MII Transactions and Java classes(from ME 6.0 and OEE 1.0).In this step standard web services are by default configured to push the messages into the destination systems through web services.
-
Response XSLT: Supports XSLT only. In this step the response of the web service execution is transformed to readable XML format from the web service output.
-
Pass Handler and Fail Handler: Supports MII Transactions and Java classes (from ME 6.0 and OEE 1.0). Based on the response XSLT step, if the service transaction execution is successful, the pass handler will be called where some activities, such as notification or acknowledgement trigger etc. are possible. If the execution fails, the fail handler will be called to take further action, such as logging the exact error message.
Summary
In this chapter, you learned about the different integrations possible through SAP MII and their respective configuration steps. You also learned about the basics of SAP MII query templates, transactions, and action blocks that, as a new developer, you need to know in SAP MII. The concept of SAP MII integrations with other SAP manufacturing product integration modules, i.e., MEINT and OEEINT, was also discussed.
In the next chapter, you will learn about newly added features in SAP MII.
Author information
Authors and Affiliations
Rights and permissions
Copyright information
© 2017 Suman Mukherjee and Saptaparna Mukherjee (Das)
About this chapter
Cite this chapter
Mukherjee, S., Mukherjee (Das), S. (2017). Integration with SAP MII. In: SAP MII . Apress, Berkeley, CA. https://doi.org/10.1007/978-1-4842-2814-2_6
Download citation
DOI: https://doi.org/10.1007/978-1-4842-2814-2_6
Published:
Publisher Name: Apress, Berkeley, CA
Print ISBN: 978-1-4842-2813-5
Online ISBN: 978-1-4842-2814-2
eBook Packages: Professional and Applied ComputingProfessional and Applied Computing (R0)Apress Access Books