
Abstract
Arthroscopy has evolved from a merely diagnostic procedure to a therapeutic procedure, with most reconstructive procedures being done by arthroscopy. Suturing has been the cornerstone of all reconstructive surgeries to hold the tissues together and without excessive tension to facilitate healing and knot tying has been practiced for centuries. Arthroscopic shoulder reconstructive procedures also employ sutures and knots, and every shoulder surgeon must understand the principle and learn the technique of arthroscopic knots. Though the principles of repair are the same, arthroscopic reconstruction is different from open techniques in that suturing is much more difficult in arthroscopic procedures. The surgeon has to suture tissues at a distance, under the constraint of cannula and in a wet field. This necessitates the use of knot pusher and placement of knot with asymmetric tensioning of suture limbs. Surgeon does not have the benefit of tactile feedback as in tying open knots. Furthermore, the knot is often tightened at an acute angle to suture and not perpendicular to defect, an ideal situation described in open knotting.
Access provided by Autonomous University of Puebla. Download chapter PDF
Keywords
These keywords were added by machine and not by the authors. This process is experimental and the keywords may be updated as the learning algorithm improves.
Introduction
Arthroscopy has evolved from a merely diagnostic procedure to a therapeutic procedure, with most reconstructive procedures being done by arthroscopy. Suturing has been the cornerstone of all reconstructive surgeries to hold the tissues together and without excessive tension to facilitate healing and knot tying has been practiced for centuries. Arthroscopic shoulder reconstructive procedures also employ sutures and knots, and every shoulder surgeon must understand the principle and learn the technique of arthroscopic knots. Though the principles of repair are the same, arthroscopic reconstruction is different from open techniques in that suturing is much more difficult in arthroscopic procedures. The surgeon has to suture tissues at a distance, under the constraint of cannula and in a wet field. This necessitates the use of knot pusher and placement of knot with asymmetric tensioning of suture limbs. Surgeon does not have the benefit of tactile feedback as in tying open knots. Furthermore, the knot is often tightened at an acute angle to suture and not perpendicular to defect, an ideal situation described in open knotting. Though squaring of knots with crossing the suture limbs and applying equal tension to both limbs has been described [1], it is difficult and the knots placed in arthroscopic surgeries tend to become a series of half hitches rather than square [2]. The difficulty is compounded by the fact that the tissues that are being sutured are not always of good quality.
Since the introduction of arthroscopic shoulder surgery, surgeons have been constantly seeking better and stronger knot-tying materials and methods to overcome these problems. Hence, there are many researches and innovations in suture materials, knot configurations, and techniques. Unfortunately this has also led to a proliferation of techniques and methods, and there seems to be much variation in preference for knot-tying configurations and suture methods that surgeons use. The aim of this chapter is to clarify the issue on arthroscopic knot placement with particular reference to shoulder surgery. The principles of knot placement and recent advances in knot configurations and suture materials will be discussed. There are numerous knot configurations and techniques that have been described, and it is beyond the scope of this chapter to discuss them all. We have chosen several knots that have been commonly used or described in the literature and will focus on these knots in detail.
Arthroscopically sutured knots in shoulder surgery can fail in several circumstances. Common scenarios are cut through of suture from the tissue, pull out of anchors from bone, breakage of suture material, knot slipping, and loosely placed knot that does not approximate the tissue. Though there is no objective data, loosening of knot that allows tissue separation of more than 3 mm is described as knot failure. This chapter mainly focuses on the knot-tying principles hoping to avoid or minimize the untying of a knot (knot security) and placing the knot without proper approximation of tissues (loop security).
Several studies [3–5] have pointed out important factors when considering knot tying: material properties, material tensile strength, coating of the suture material, friction between suture limbs, internal interference of the knot, the tension applied to make a tight knot, the knot configuration, slack between throws of the knot, the tying instruments including knot-pusher design, and surgeon’s skill. Therefore, in tying an arthroscopic knot, it is essential to understand the following factors: (1) suture material factor, (2) knot pusher factor, (3) knot configuration factor, and, last but not the least, (4) the surgeon’s factor.
Terminology
Before we proceed further, we must be familiar with the relevant nomenclature that is commonly used in the knot-tying community. The following definitions will be used throughout this article:
-
Suture limbs: When a suture is passed through tissue or an anchor, it creates two ends to be tied and these are the suture limbs.
-
Turn refers to the number of twists in a given throw.
-
Throw refers to a specific step or layer of the knot. A throw can either be underhand or overhand (Fig. 14.1).
Fig. 14.1 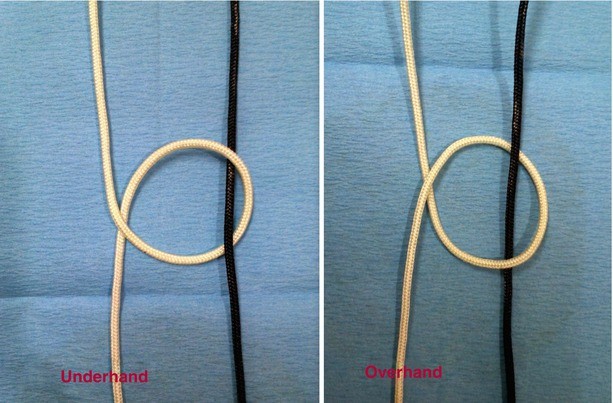
In overhand throw, the loop is passed on the top of the post and below the post in underhand throw. Note that the loop (white strand) passes either over or under the post strand (black)
-
Reversing throw refers to alternating underhand with overhand and vice versa.
-
Post (limb or strand): Of the two suture limbs, one limb is kept under tension and this limb is called the post limb. It is around this limb that the other limb will be wrapped. As discussed later in the section on knot pushers, post limb is the one under tension and not necessarily the limb on which the knot pusher is placed. The post is typically the limb that is away from the bone (or away from the center of the joint) and through the soft tissue. This allows the tissue edges to be approximated under tension; as the knot slides down the post, the tissue to be approximated will be pushed ahead of the knot (Fig. 14.2).
Fig. 14.2 
The post limb is placed on the tissue side, so the tissue is pushed to the bone on tightening the knot
-
Wrapping or loop limb (or strand) refers to a portion of the suture limb that one makes a loop around the post.
-
Post switching or reversing is alternating the post limb for each successive loop.
-
Slack refers to the loose configuration of loop or compound loop, which slides in around the post.
-
Half-hitch knot describes the simplest of all the sliding knots, consisting of a single turn around the post limb making a loop. It can be both used in sliding or non-sliding conditions.
-
The terms proximal and distal are in relation to the surgeon; portion of suture limb near to surgeon is proximal and away from him and near to tissues is distal.
-
Slipknot refers to a knot that is formed by sliding the loop strand on the post strand.
-
Square throw refers to a simple two throws, which makes square knot, with each throw having one turn. When tying a square knot, the strands are pulled down in a line, perpendicular to the axis of the knot.
-
Knot security is the ability of knot to resist slippage (Fig. 14.3), and loop security is the ability of suture to hold the tissues together (Fig. 14.4). Slippage of more than 3 mm is conventionally regarded as failure.
Fig. 14.3 
The loop security is the ability of the loop suture that is passed through the tissue to maintain its length and tension till the knot is tied. It cannot be improved after the knot is tied. This picture shows poor loop security
Fig. 14.4 
The knot security is the ability of the completed knot to resist slippage and consequent loosening. This picture shows poor knot security


Knot Configuration Symbols
Tera and Aberg [6] introduced standardized symbols for knots, and Trimbos [7] applied it to the slipknot with modification in 1984. Since then, there were slight variations among authors in use of such symbols as #, or // being same as //x. However, the most widely accepted and reasonable (codification) symbolization nomenclature seems to be the one Loutzenheiser et al. [4, 8] and Burkhart et al. [3, 9] used:
-
S refers to single sliding throw (half-hitch) knots.
-
= refers to identical throw, loop direction same around the same post.
-
x refers to nonidentical throw, loop reversed around the same post.
-
// refers to alternating post between throw, throws are identical.
-
//x refers to alternating post between throws, which are nonidentical or reversed each time.
Suture Material Factors
Numerous suture materials have been described for use in arthroscopy surgeries. Suture materials are classified by their ability to be absorbed and whether it is monofilament or polyfilament (braided). The factors that a surgeon should consider while choosing a suture material are its strength, biocompatibility, knot holding, sliding properties and the ease of tying knot, and finally its susceptibility to infection. Absorbable sutures by design lose their strength with time, while the concern with nonabsorbable sutures is that they are permanent and may cause mechanical or abrasive effects. Braided sutures are easier to handle and knot settles well, but they tend to fray with handling and may injure tissues when passed. Monofilament sutures are stiffer to work with and knot security is difficult to achieve.
While the most commonly used and studied suture material in relation to arthroscopy surgery were the No. 1 PDS monofilament (absorbable) and the No. 2 ETHIBOND (a braided polyester suture from Ethicon, Somerville, New Jersey) sutures, the previous decade has the emergence of Polyblend sutures, which promise higher tensile strength and better handling and knot characteristics compared to traditional suture materials. These new-generation sutures have an inner core made of ultrahigh molecular weight polyethylene (UHMWPE), which gives its extra strength and characteristic coating determining the handling properties. FiberWire (Arthrex, Naples, FL), ORTHOCORD, and MaxBraid can be listed among these sutures [10].
FiberWire consists of a core of many filaments of UHMWPE surrounded by braided polyester. This UHMWPE core resists elongation and is protected by the polyester jacket [10]. ORTHOCORD is another new suture that is made from a combination of 38 % UHMWPE and 62 % PDS. The ORTHOCORD suture is different from other super sutures because it consists of a PDS core with a UHMWPE sleeve and is coated with polyglactin 910 (Vicryl) for better suture handling characteristics. This material combination is designed to provide a low-profile suture once the PDS degrades while retaining some strength from the outer sleeve of UHMWPE [11]. Many studies have documented the supremacy of these newer, Polyblend braided sutures over older sutures [11–13].
Many shoulder surgeries employ suture anchors for secure fixation of suture to bone, and in this circumstance, the anchor eyelet is an additional factor to be considered. Studies comparing FiberWire with ETHIBOND have found FiberWire to have superior properties at the anchor eyelet interface [14, 15]. However, it must be noted that these newer sutures and all braided sutures may cause tissue damage when tying a sliding knot or may be at increased risk for suture damage and weakening when tying a sliding knot through a suture anchor. Coating on the newer braided sutures may reduce tissue drag but also reduce knot security.
Knot Pusher Factors
Most surgeons prefer to construct the knots extra-articularly and then push them with a knot pusher through a cannula to its intended position in the joint. Though direct intra-articular construction has been described, it is not commonly followed. Several problems can be encountered while pushing the knot with knot pushers. The knot pusher can easily slip through the loop and not advance at all. Pushing the knot may lead to fraying of the sutures. When passing half hitches it is much easier to pull the knot rather than push it. Also, the surgeon should understand the difference between the post limb, which is the limb under tension, and the limb which is threaded in the knot pusher. Though conventionally the limb that is threaded in the knot pusher is kept under tension and is identified as the post limb, it is possible that the other limb is in fact the one under tension and consequently the post limb. Such a situation occurs while past pointing the knot and can be used by the surgeon to alternate the posts without actually rethreading the knot pusher.
There are many different knot pushers available but the single-holed knot pusher has been the preferred choice of many surgeons. Most systems have knot pushers of only one size. However, a recent study [16] has pointed out the risk of knot pusher riding onto the arthroscopy knot thereby causing loosening or damage to the knot. The author has suggested the use of knot pushers of varying internal diameters for different sutures, small enough to avoid snagging of the knot yet big enough to allow passing of suture freely.
There are several “specialty” knot pushers, which represent unique designs by their respective companies [17]. The Nordt (Arthrotek), 6th Finger (Arthrex), FiberWire Tensioner (Arthrex), and the CrabClaw knot pusher (Arthrex) are some of the unique designs available. The Nordt (Arthrotek) is a mechanical spreading device. The closed spreader pushes the knot into place; activating the spreading mechanism applies equal and opposite tension to the two suture strands to tighten the knot. The 6th Finger Knot Pusher (Arthrex) consists of a small tube inside a larger tube. The surgeon can apply and maintain tension on the first throw with the inner tube while advancing subsequent throws with the sliding outer tube. The inner tube allows “past pointing” for knot tensioning. The FiberWire Tensioner (Arthrex) is a device designed specifically for the new Arthrex suture FiberWire. Once the chosen sliding knot is tied and advanced to the tissue level, the post limb is advanced up through the cannulated FiberWire Tensioner shaft and loaded into a slot and locking post on the tensioning wheel. As the wheel is turned counterclockwise, a tensiometer reads the tension obtained. When the desired tension is reached, three reverse half hitches can be thrown down the barrel of the tensioner to secure the fixation. The CrabClaw knot pusher has an opening mechanism in its ends. Hence, half-hitched can be loosely pre-tied outside the cannula. The opening jaw mechanism of the CrabClaw allows the surgeon to place the knot pusher behind each knot to advance them independently into the joint.
Knot Configuration Factors
A plethora of knot configurations and classifications have been described (Table 14.1) [35]. The simplest classification would be to classify them into sliding and non-sliding knots. Non-sliding knots are employed when the suture does not pass freely on the anchor or tissue or when the surgeon is worried about the tissue trauma from sliding sutures. Examples of non-sliding knots include square knot, Revo knot, and Snyder knot. Tissue has to be held approximated, while the knot is being placed as these knots by definition do not slide to provide further compression of the repair. Use of non-sliding knot is not recommended when the tissues are under tension.
In sliding knots, knot can slide on the post limb providing further approximation of the repair. To achieve this, knot must be placed with the post limb away from the bone, so that the knot can slide on the post and push tissues to bone and thereby provide a good approximation of repair. The initial loop limb must be at least twice the length of post limb so that loop does not slide into the cannula as the knot is being pushed. Sliding knots can slide backward after being pushed into its position and thereby compromise the loop security. Two methods have been described to avoid this occurrence, and sliding knots have been classified into two types accordingly. In some sliding knots like Duncan’s loop, French knot, Roeder knot, Tennessee slider, and Lafosse knot, friction of the suture provides a temporary restraint to back sliding, and the surgeon has to place additional half hitches to provide good loop security. Some sliding knots called ratchet knots (like Nicky’s knot, modified taut-line hitch) preferably slide in only one direction. However, there remains a risk of knot backing out as the surgeon places additional half hitches if adequate is not taken.
Locking knots were described to overcome this difficulty. In these knots, once the knot is placed in position with good tissue approximation, pulling on the loop limb causes the knot to flip and the loop strand now becomes the post. Tensioning the other limb causes the knot to lock securely. Locking knots have been classified based on the region of flipping. Some knots like the Weston knot flip distally, while some like Nicky’s knot flip proximally [36]. Theoretically, distal locking can prevent knot slippage better than proximal locking but is difficult to lock when tension in the knot loop is high. The proximal locking knot can easily be locked under the desired loop tension, but it can also easily lose tension during additional locking half hitches. The SMC knot is a middle-locking knot configuration. Due to its unique middle-locking ability, it provides the advantages of both proximal and distal locking knots. Middle-locking knots prevent easy slippage of loop security like distal locking and also can easily be locked like proximal locking knots, even with high loop tension [37].
Even though these knots are described as locking, authors describe placement of at least 3 reverse half hitches on alternate posts to secure the knot [38]. Examples of locking sliding knots include Weston knot, field knot, SMC knot, and giant knot. Though these locking sliding knots have the advantage of facilitating the desired approximation of tissues and the ability to be locked without losing loop security, they are not without shortcomings. These knots are more complicated and difficult to learn than non-sliding knots and have difficulties like premature locking as the knot is being pushed through the cannula. Untying of knot in this situation could be tiring. Furthermore, all sliding knots have an inherent risk of tissue drag and consequent tissue injury by cut through effect and consequent poor fixation. Braided sutures have much more tissue drag than monofilament sutures. Coating of braided sutures may reduce tissue drag and injury but may also decrease the knot security. The propensity to cut through tissues is compounded by the fact that tissue quality is suboptimal in most patients. This is a potential disadvantage with sliding knots, and the properties of suture material must be considered while choosing the configuration of knot.
In the recent years many studies have been conducted on the combinations of newer suture materials with various knot configurations [12, 13, 30, 39–42]. Interpretation of these studies is difficult as there is no uniformity in the knot configurations and suture materials used. No study has compared all the combinations on available suture materials with all described knot configuration in a standardized protocol. However, they seem to suggest that all the routinely used knots with these sutures are stable with respect to cyclic loading though a few studies report difference between the knot configurations and suggest some to be better than others.
Heat treatment has been suggested as a way to improve knot security. In a laboratory study, Williams et al. [43] have found that application of heat performed by use of the Mitek VAPR 3 electrosurgical unit and VAPR S90 electrode (DePuy, Mitek), ORTHOCORD, and FiberWire tolerated heat extremely well. Knot security was found to be increased.
In a study comparing the ease of tying knots with older suture materials like ETHIBOND No. 1 PDS II sutures, the Tennessee slider, Revo knot, Duncan loop, and Nicky’s knot were found to be the easiest arthroscopic knots to learn to tie. Also knots tied with ETHIBOND suture were easier to tie than those tied with PDS II suture. Hence, the authors recommended that novice surgeons should consider using ETHIBOND suture and the Revo knot when developing their arthroscopic skills [44]. We feel that due to inherit weakness of ETHIBOND compared to recent strong suture material, we recommend using stronger materials and the Revo knots for beginners.
Knot-Tying Technique: General Principles
Portal Placement
The preparation for optimal suture tying begins with portal placement. Portals must be made with care so as to reach the area to be tied as closely as possible and avoid soft tissue interposition. In many instances anatomic constraints may preclude direct access to the tissues to be repaired, but every effort must be made towards it.
Cannulas
Use of transparent cannula placed directly over the proposed knot area offers several benefits. It avoids troublesome soft tissue interposition. Transparent cannulas offer visualization of knot as it being pushed inside the joint and also show any entwining of suture limbs. Placement of cannula in line with the suture limbs avoids soft tissue chaffing at its inner tip. Use of threaded cannula prevents fluid leakage at the portal site. The diameter of cannula is determined by the instruments that are required to be passed. The cannula should not come out of the joint during the entire sequence of knot tying. Otherwise it may reenter at another location and suture loops might get entangled in soft tissues.
Anchor Orientation and Suture Passage
Anchors must be placed perpendicular to the bone surface as far as possible. Eyelet face must be perpendicular to the path of the suture through the tissue. If the eyelet is rotated by 90°, the suture can be frayed. The hole made for inserting anchor must be funnel shaped. The suture limb exiting the eyelet of the anchor closest to the tissue must be passed into the tissue. This will avoid twisting of suture in the eyelet. This suture limb must be used as the initial post so that, as the knot is being pushed in, tissue will be approximated to the bone. If a double- or triple-loaded anchor is used, surgeon must be aware of eyelet design to avoid overlapping of sutures. Most such suture anchors have different colors for each suture for easy identification. When more than one anchor is used, the author prefers use of two dissimilar anchors so that all suture strands are of different colors.
One Suture in the Cannula
Only one set of suture limbs should be inside the cannula at the time of knot tying, delivering, and tightening. If there is more than one set, the other sets must be temporarily “parked” in some other ports or even outside the cannula in the same portal.
Avoidance of Twists
Prior to placement of knots any twist in the suture must be identified and removed. Double-holed knot pusher is the best instrument to remove any twists, but most surgeons use a single-holed knot pusher to identify twists. If sliding knots are being planned, the surgeon should confirm the free sliding of suture.
Specific Knot-Tying Technique
Many different configurations have been described but it is not essential or possible to learn them all. Every surgeon should practice and perfect a few knots that she/he is comfortable with. It is beyond the scope of this chapter to describe all the knots. The description of some common and widely used knot follows. Readers are referred to original articles for the description of the rest.
Half Hitch
Half hitch is the work horse of knot tying. Half hitches may be stacked on each other to become of non-sliding knot. They are also used to secure sliding knots, both locking and non-locking. A half hitch is made by following these steps:
-
Underhand half hitch: One limb is identified as the post and other as the loop limb. The post limb is held under tension and the loop limb is initially passed under the post limb, passed distally, then above the post, and finally brought proximal under the loop.
-
Overhand half hitch: One limb is identified as the post and other as the loop limb. The post limb is held under tension and the loop limb is initially passed over the post limb, passed distally, then under the post, and finally brought proximal over the loop.
Revo Knot (Fig. 14.5)

The Revo knot configuration. This knot consists of multiple half hitches made by alternating the post and direction of half hitches
At the minimum, the arthroscopist must be able to tie a non-sliding knot, because at times when the suture limbs do not pass freely, it might be the only knot possible. Revo knot is the most common non-sliding arthroscopic knot used. All the general principles should be adhered to. In particular the arthroscopist must make sure that the suture limbs are not twisted. As described earlier, the suture limb of the tissue side is identified as the first post.
The steps involved are:
-
The post limb is kept short and the knot pusher is placed on the post limb.
-
One underhand half hitch done and pushed to the operative site.
-
Tension maintained on the post and a second underhand half hitch done and pushed to the tissues.
-
An overhand half hitch done.
-
Post switching: Loop will now be the post and knot pusher is placed on this strand and an underhand half hitch done.
-
Tension is applied.
-
Post switching: Knot pusher is placed on the original post and an overhand half hitch is thrown and tensioned.
Duncan’s Loop (Fig. 14.6)

The Duncan loop configuration. This knot must be secured with additional locking half hitches to prevent slippage
Duncan’s loop is the most common sliding knot configuration used. It is tied thus:
All the general principles should be adhered to. In particular, the arthroscopist must make sure that the suture limbs are not twisted. As described earlier, the suture limb of the tissue side is identified as the first post. The steps are:
-
Loop strand is kept twice as long as the post.
-
Loop strand is passed over the post to create the initial loop.
-
Four further loops are passed over both strands.
-
The tail of loop strand is passed through the initial loop.
-
Tension on the tail of the loop will compact the knot.
-
The loop is delivered to the operative site by tension on the post and simultaneously pushing with a knot pusher.
-
Tension is maintained on the post and additional half hitches are thrown.
-
The first half hitch is passed underhand.
-
Post-switched and the second half hitch thrown overhand.
-
A total of 4 half hitches thrown by post switching and reversing the throw between consecutive hitches.
SMC Knot (Fig. 14.7)

The SMC knot configuration. The round loop formed on the right side of the picture is the locking loop. By pulling the lock loop strand, the internal locking mechanism is applied which prevents reverse slippage
-
Post suture is kept short.
-
Loop strand is crossed over the post.
-
The loop strand is crossed under and then over both the strands to form a triangular interval with the post.
-
The loop strand is passed under and then over post strand.
-
The free is end passed from bottom to top through the triangular interval.
-
This locking loop is held with a finger to avoid premature locking.
-
The knot is pushed with a knot pusher while the post in under tension and the knot is pushed to the tissue.
-
The loop strand is pulled to lock the suture.
-
Pressure is maintained on the knot to avoid slipping.
-
The knot is further secured with half hitches.
Surgeon Factors
Consistent knot tying requires practice. Aspiring surgeons should initially practice with large chords, and once he or she is confident about configuration, knotting must be practiced with sutures. Use of cannula and knot pusher is next practiced. The final step is practicing in shoulder models using anchors and wet sutures. Practice in cadavers will facilitate learning of correct placement of cannulas and practice in surgery situations. Common problems such as suture twisting, soft-tissue entrapment, loss of tissue tension, and loose knots should be addressed and corrected before attempting shoulder surgeries. Many ingenious apparatus have been described [45] and may be used for practice.
References
Hammerman SM, Elkousy H, Edwards TB, O’Connor DP, Gartsman GM. The arthroscopic square knot: fiction or fact? Am J Orthop (Belle Mead NJ). 2009;38:14–6.
Baumgarten KM, Wright RW. Chapter 1: Suture properties. In: Arthroscopic knot tying: an instruction manual. Philadelphia: Lippincott Williams & Wilkins; 2005. p. 6.
Burkhart SS, Wirth MA, Simonich M, Salem D, Lanctot D, Athanasiou K. Knot security in simple sliding knots and its relationship to rotator cuff repair: how secure must the knot be? Arthroscopy. 2000;16:202–7.
Loutzenheiser TD, Harryman 2nd DT, Ziegler DW, Yung SW. Optimizing arthroscopic knots using braided or monofilament suture. Arthroscopy. 1998;14:57–65.
Hughes PJ, Hagan RP, Fisher AC, Holt EM, Frostick SP. The kinematics and kinetics of slipknots for arthroscopic Bankart repair. Am J Sports Med. 2001;29:738–45.
Tera H, Aberg C. Tensile strengths of twelve types of knot employed in surgery, using different suture materials. Acta Chir Scand. 1976;142:1–7.
Trimbos JB. Security of various knots commonly used in surgical practice. Obstet Gynecol. 1984;64:274–80.
Loutzenheiser TD, Harryman 2nd DT, Yung SW, France MP, Sidles JA. Optimizing arthroscopic knots. Arthroscopy. 1995;11: 199–206.
Burkhart SS, Wirth MA, Simonick M, Salem D, Lanctot D, Athanasiou K. Loop security as a determinant of tissue fixation security. Arthroscopy. 1998;14:773–6.
Alan Barber F, Boothby MH, Richards DP. New sutures and suture anchors in sports medicine. Sports Med Arthrosc. 2006;14: 177–84.
Türker M, Kılıçoğlu O, Salduz A, Bozdağ E, Sünbüloğlu E. Loop security and tensile properties of polyblend and traditional suture materials. Knee Surg Sports Traumatol Arthrosc. 2011;19: 296–302.
Mahar AT, Moezzi DM, Serra-Hsu F, Pedowitz RA. Comparison and performance characteristics of 3 different knots when tied with 2 suture materials used for shoulder arthroscopy. Arthroscopy. 2006;22:614.e1–2.
Barber FA, Herbert MA, Beavis RC. Cyclic load and failure behavior of arthroscopic knots and high strength sutures. Arthroscopy. 2009;25:192–9.
Lo IK, Burkhart SS, Athanasiou K. Abrasion resistance of two types of nonabsorbable braided suture. Arthroscopy. 2004;20: 407–13.
Acton D, Perry A, Evans R, Butler A, Stephens P, Bruce W, et al. The effect of two nonresorbable suture types on the mechanical performance over a metal suture anchor eyelet. Knee Surg Sports Traumatol Arthrosc. 2004;12:165–8.
Kerin C, Patel N, Bale RS, Fisher AC, Hughes PJ. Arthroscopic knot pushers. Does one size fit all? Int J Clin Pract. 2008;62: 747–9.
Walker JC, Baumgarten KM, Wright RW. Arthroscopic knot tying principles and instrument. Oper Tech Sports Med. 2004;12:240–4.
Chan KC, Burkhart SS, Thiagarajan P, Goh JC. Optimization of stacked half-hitch knots for arthroscopic surgery. Arthroscopy. 2001;17:752–9.
Mishra DK, Cannon Jr WD, Lucas DJ, Belzer JP. Elongation of arthroscopically tied knots. Am J Sports Med. 1997;25:113–7.
De Beer JF, van Rooyen K, Boezaart AP. Nicky’s knot–a new slipknot for arthroscopic surgery. Arthroscopy. 1998;14:109–10.
Kim SH, Ha KI, Kim SH, Kim JS. Significance of the internal locking mechanism for loop security enhancement in the arthroscopic knot. Arthroscopy. 2001;17:850–5.
Lee TQ, Matsuura PA, Fogolin RP, Lin AC, Kim D, McMahon PJ. Arthroscopic suture tying: a comparison of knot types and suture materials. Arthroscopy. 2001;17:348–52.
Weston PV. A new clinch knot. Obstet Gynecol. 1991;78:144–7.
Nottage WM, Lieurance RK. Arthroscopic knot tying techniques. Arthroscopy. 1999;15:515–21.
Soper NJ, Hunter JG. Suturing and knot tying in laparoscopy. Surg Clin North Am. 1992;72:1139–52.
Hage JJ. On the origin and evolution of the Roeder knot and loop – a geometrical review. Surg Laparosc Endosc Percutan Tech. 2008;18:1–7.
Fleega BA, Sokkar SH. The giant knot: a new one-way self-locking secured arthroscopic slipknot. Arthroscopy. 1999;15:451–2.
Field MH, Edwards TB, Savoie 3rd FH. Technical note: a “new” arthroscopic sliding knot. Orthop Clin North Am. 2001;32:525–6.
Balg F, Boileau P. The Mid-Ship knot: a new simple and secure sliding knot. Knee Surg Sports Traumatol Arthrosc. 2007;15:217–8.
Dahl KA, Patton DJ, Dai Q, Wongworawat MD. Biomechanical characteristics of 9 arthroscopic knots. Arthroscopy. 2010;26:813–8.
Conca M, Taschieri S, Del Fabbro M, Conca R. Inverse knot: a personal sliding knot for arthrosopic surgery. Knee Surg Sports Traumatol Arthrosc. 2007;15:620–3.
Mochizuki Y, Hachisuka H, Natsu K, Kashiwagi K, Yasunaga Y, Ochi M. The HU knot: a new sliding knot for arthroscopic surgery. Arthroscopy. 2005;21:1014.
Yiannakopoulos CK, Hiotis I, Antonogiannakis E. The triad knot: a new sliding self-locking knot. Arthroscopy. 2005;21:899.
Wiley WB, Goradia VK. The Tuckahoe knot: a secure locking slip knot. Arthroscopy. 2004;20:556–9.
Baumgarten KM, Brodt MD, Silva MJ, Wright RW. An in vitro analysis of the mechanical properties of 16 arthroscopic knots. Knee Surg Sports Traumatol Arthrosc. 2008;16:957–66.
Lo IK, Burkhart SS, Chan KC, Athanasiou K. Arthroscopic knots: determining the optimal balance of loop security and knot security. Arthroscopy. 2004;20:489–502.
Kim SH, Yoo JC. Arthroscopic knot tying. Tech Shoulder Elbow Surg. 2003;4:35–43.
Elkousy HA, Sekiya JK, Stabile KJ, McMahon PJ. A biomechanical comparison of arthroscopic sliding and sliding-locking knots. Arthroscopy. 2005;21:204–10.
Ilahi OA, Younas SA, Ho DM, Noble PC. Security of knots tied with ethibond, fiberwire, orthocord, or ultrabraid. Am J Sports Med. 2008;36:2407–14.
Shah MR, Strauss EJ, Kaplan K, Jazrawi L, Rosen J. Initial loop and knot security of arthroscopic knots using high-strength sutures. Arthroscopy. 2007;23:884–8.
Punjabi VM, Bokor DJ, Pelletier MH, Walsh WR. The effect on loop elongation and stress relaxation during longitudinal loading of FiberWire in shoulder arthroscopic knots. Arthroscopy. 2011;27:750–4.
Livermore RW, Chong AC, Prohaska DJ, Cooke FW, Jones TL. Knot security, loop security, and elongation of braided polyblend sutures used for arthroscopic knots. Am J Orthop (Belle Mead NJ). 2010;39:569–76.
Williams DP, Hughes PJ, Fisher AC, Doherty P. Heat treatment of arthroscopic knots and its effect on knot security. Arthroscopy. 2008;24:7–13.
Baumgarten KM, Wright RW. Ease of tying arthroscopic knots. J Shoulder Elbow Surg. 2007;16:438–42.
Kitson J, Blake SM. A model for developing psychomotor skills in arthroscopic knot tying. Ann R Coll Surg Engl. 2006;88:501–2.
Author information
Authors and Affiliations
Corresponding author
Editor information
Editors and Affiliations
Rights and permissions
Copyright information
© 2014 Springer-Verlag London
About this chapter
Cite this chapter
Yoo, JC., Park, Y.E. (2014). Arthroscopic Knot Tying. In: Milano, G., Grasso, A. (eds) Shoulder Arthroscopy. Springer, London. https://doi.org/10.1007/978-1-4471-5427-3_14
Download citation
DOI: https://doi.org/10.1007/978-1-4471-5427-3_14
Published:
Publisher Name: Springer, London
Print ISBN: 978-1-4471-5426-6
Online ISBN: 978-1-4471-5427-3
eBook Packages: MedicineMedicine (R0)