
Abstract
Shoulder arthroscopy is a complex surgery, and its success depends on a wide range of seemingly minute details. The correct position of the hands and proper utilization of all available instruments is a good starting point. Suture management is fundamental because it is easy to find oneself with many sutures in a very small space without being able to distinguish between the two strands of the same suture or without knowing which of the sutures to knot first. The sutures can be passed through the tissues in different ways, depending on the type of lesion and surgical procedure to be performed, which determine the type of instrument that will be utilized. Suture passages can be performed with direct and indirect techniques. Direct suture passages are further subdivided into antegrade and retrograde. Direct passage occurs when the sutures are passed directly in the tendon whereas indirect passage requires a suture shuttle.
Access provided by Autonomous University of Puebla. Download chapter PDF
Keywords
These keywords were added by machine and not by the authors. This process is experimental and the keywords may be updated as the learning algorithm improves.
Shoulder arthroscopy is a complex surgery, and its success depends on a wide range of seemingly minute details. The correct position of the hands and proper utilization of all available instruments is a good starting point.
Suture management is fundamental because it is easy to find oneself with many sutures in a very small space without being able to distinguish between the two strands of the same suture or without knowing which of the sutures to knot first.
The sutures can be passed through the tissues in different ways, depending on the type of lesion and surgical procedure to be performed, which determine the type of instrument that will be utilized. Suture passages can be performed with direct and indirect techniques. Direct suture passages are further subdivided into antegrade and retrograde. Direct passage occurs when the sutures are passed directly in the tendon whereas indirect passage requires a suture shuttle. To correctly manage any type of suture, specific instrumentation is necessary, which consists of the following tools: operative cannula (at least 8.0 mm), retrieval cannula (5.5 mm), direct antegrade suture passer, sharp-end suture passers with various angles of curvature for direct retrograde passages, series of suture hooks with different curvatures preloaded with a shuttle suture for indirect passages, suture grasper, and grasping forceps (see Chap. 7).
Before examining the specifics, it is important to note that the tips and techniques presented in this chapter represent the personal opinion of the authors and are based on their individual experiences. It is necessary, therefore, to consider variations to the techniques outlined below; these variations might be specifically designed for certain procedures or they might reflect the preferences of the individual surgeon.
We want to further highlight that reading this chapter is far from sufficient to really understand suture management. Rather, an extensive period of study will be needed. First and foremost, one must have a clear idea of the type of lesion to be treated and the best method to approach it (first step: have an idea!). Once the objective is fully understood, the second step involves careful and repeated observation of every single maneuver for all the techniques. As soon as we understand exactly what happens inside the operating field, the third step requires practical “hands-on” experience to acquire surgical skill (“I know what I want to do but how do I do it?”). This final step involves achieving full competence in cannula and portal management, the proper order of the various steps, as well as the correct way to hold and utilize the instruments (Box 13.1). A useful exercise to solidify what we have learned, besides practicing the maneuvers on an anatomical model, is to repeat each procedure step-by-step in one’s mind or on a piece of paper. Now we are ready to begin!
Rotator Cuff Repair
Rotator cuff lesions can vary in terms of size, shape, retraction, and mobility; therefore, repair techniques also vary and depend on the characteristics of the lesion. Suture management will be described below with the difficulty level of the procedures increasing as we proceed.
One Anchor Preloaded with Two Sutures
Imagine a supraspinatus tendon tear that can be managed with only one anchor. In this case, we will use direct antegrade passages.
Position the arthroscope in the posterior portal, the operative cannula in the lateral portal, and the retrieval cannula in the anterosuperior portal. The anchor is placed, through a superolateral accessory portal near the cartilaginous superior edge of the humeral head, in the center of the lesion with a 45° angle relative to the direction of the tendon.
For correct suture management, it is fundamental to ascertain the proper direction of the sutures. Preloaded anchors generally have a laser marker that indicates the position of the eyelet through which the sutures are threaded. In this case, we will align the sutures in such a way that they are perpendicular to the edge of the lesion. The anchor is preloaded with two permanent high-strength braided sutures of different colors to easily distinguish one from the other (Fig. 13.1).

Anchor is preloaded with two permanent high-strength braided sutures of different colors. Laser marker indicates the position of the eyelet through which sutures are threaded
Once the anchor has been positioned, we will pass the sutures through the tendons following a precise order: from anterior to posterior. We introduce the suture grasper in the operative cannula to take hold of the medial limb of the most anterior suture.
The suture grasper and the suture are extracted. Because the grasper takes hold of the suture near the anchor and because of the considerable length of the suture, the free limb of the suture that we have grasped will often still be in the superolateral portal even when the grasper has already been extracted from the joint, and we will find a loop in the lateral portal. Therefore, we have to know which end of the loop to pull to completely remove the suture limb. This is a particularly delicate task because if we pull the wrong end of the loop, the suture will be completely extracted from the anchor eyelet and it will be lost (Fig. 13.2). There are two ways to avoid this problem: tag the limb which should not be extracted with a hemostat or point the arthroscope towards the anchor eyelet and watch how the suture behaves while it is being extracted from the lateral portal. If the wrong end of the loop is pulled, the suture slides towards the anchor eyelet. On the other hand, if the suture does not move towards the anchor eyelet, it is an indication that the correct end of the loop is being pulled and, hence, that the suture limb will be correctly extracted.

The medial strand of the suture is retrieved from lateral portal using a grasper. It is important not remove the suture from the anchor eyelet
Once the suture limb is removed from the lateral portal, we load the suture into a direct antegrade suture passer preloaded with a single-use needle, which will be used throughout the entire operation. We go back into the operative cannula with the passer closed and we pass the suture in the tendon. This instrument has jaws that enable an adequate and steady grasp, ensuring a constant distance between the free edge of the rotator cuff and the sutures (Fig. 13.3). To correctly pass the sutures (from anterior to posterior), the suture passer jaws have to be directed towards the anterior edge of the tear.


Direct suture passer for anterograde passages. (a) The suture is loaded on the passer’s bite. (b) The preloaded suture is passed through the tendon
After passing the suture through the tendon, we open the jaws of the suture passer and, at the same time, delicately remove it from the cannula with closed jaws. The suture strand is retrieved from the superolateral percutaneous portal, which enables all the suture limbs to be contained in the same portal rather than being dispersed in various directions in the field of view (Fig. 13.4).

Direct suture passer for anterograde passages. (a) Suture passer is delicately removed from the cannula with closed jaws. (b) Suture strand is recovered from the superolateral portal
At this point, we have to repeat the same sequence with the other strand but this time the suture passer jaws will be directed towards the posterior margin of the lesion. To achieve homogeneous tension throughout the lesion, the distance between the sutures has to be similar to the distance between each suture and the contiguous edge of the lesion.
After passing both the sutures in the lesion, we will close and knot the sutures following a specific order: from posterior to anterior!
Now we introduce the suture grasper in the operative cannula and retrieve the most posterior suture. After retrieving both limbs, it will be fundamental to ascertain which is the “post” and which is the “loop.” The post is the limb around which the knot will be tied. The loop is the limb that will be tied around the post during the execution of the knot. In order to achieve the greatest tension and proper attachment of the tendon to the bone during knot tying, the limb that passed in the tendon is used as the post (see Chap. 14).
There are two ways to clearly differentiate between the two limbs:
-
Gently slide one of the two limbs.
-
Use a knot pusher: identify the post by pulling one of the two limbs, insert the post in the knot pusher, and advance the knot pusher in the cannula until it reaches the lesion, avoiding any twisting of the sutures (Fig. 13.5).
Fig. 13.5 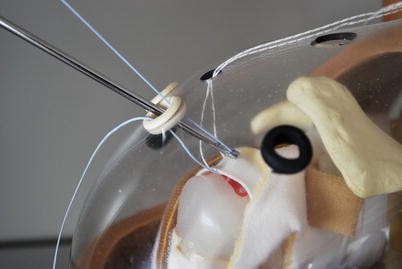
A knot pusher is used to identify the post by pulling one of the two limbs of the suture and to avoid any twisting of the sutures

The only remaining steps are to evaluate the suture’s ability to slide in the tissue and to choose the most appropriate knot (see Chap. 14). After tying the knot, a cutter is utilized to cut the suture limbs. We introduce a suture grasper in the operative cannula, retrieve the most anterior suture, and then repeat the same steps. The lesion is repaired.
Now we are ready to remove the operative cannula from the lateral portal and introduce the arthroscope in this portal. This allows us to assess the repair and the distribution of the sutures with an “en face” view. We insert the switching stick into the anterosuperior portal in order to evaluate the tension of the repair (see Chap. 23).
In the example described above, we used the lateral portal to knot both sutures. Nevertheless, there is another precise rule: the sutures have to follow the lines of force of the lesion to make the repair as anatomic as possible; therefore, based on the lines of force of the lesion (i.e., a posterosuperior lesion), it is not uncommon to knot the most posterior sutures from the anterosuperior portal and the superior sutures from the lateral portal. This case is described in the subsequent paragraph.
Two Anchors Preloaded with Two Sutures Each
Imagine a full thickness lesion of the supraspinatus and infraspinatus tendons of the left shoulder. For the most posterior sutures, it would be difficult to use a direct antegrade suture passer in the lateral portal, maintaining the arthroscope in the posterior portal, because the field of view would be too close to the operating field. This would result in a rather compromised view in terms of width, depth, and perception of real proportions. In this case, alternative solutions can be adopted, such as moving the arthroscope to the anterosuperior portal, moving the arthroscope to the lateral portal and the operative cannula to the anterosuperior portal, or moving the arthroscope to the lateral portal and using the posterior portal as the operating portal to execute either indirect sutures (with a suture hook) or direct retrograde sutures. Of all these options, we have found the last one to be the easiest, fastest, and most reliable; in our experience, it is the solution that is most commonly utilized.
We insert the arthroscope in the posterior portal, the operative cannula in the lateral portal, and the retrieval cannula in the anterosuperior portal. The anchors are placed from the superolateral portal, as previously described. In this case, however, we are repairing a larger lesion. Therefore, we will use more than one anchor. Anchor placement will follow the same order as that outlined for the sutures in the previous scenario: from anterior to posterior.
We place the first anchor near the cartilaginous edge close to the anterior edge of the tear and, like in the previous scenario, at a 45° angle relative to the direction of the tendon.
We pass the suture passer in the same order as seen previously. In this case, the most anterior suture will be passed in the most anterior portion of the lesion, and the second suture will be passed in the most posterior portion. How posterior? Like the previous case, we need to consider that the sutures (4 total, assuming 2 anchors) have to be distributed along the anteroposterior length in such a way as to be equidistant from each other. Therefore, if the perception of the size and shape of the lesion is not reliable with the view from the posterior portal, it is preferable to take a look from the lateral portal before starting to repair the lesion. This additional perspective enables us to more effectively assess the shape and size of the tear. Furthermore, using the grasper from the posterior and anterosuperior portals, we can test reducibility and the direction of the force vectors (ideal segment between the point of anchor insertion and the point in which the suture is passed in the tendon), which is most effective to achieve a complete repair with minimal and homogeneous tension along the entire lesion (see Chap. 23).
After passing the sutures of the first anchor using a direct antegrade suture passer, the four suture limbs of the two sutures come out of the superolateral portal (see previous paragraph).
Before positioning the second anchor, we utilize a hemostat to block the four suture limbs of the first anchor. This will enable us to distinguish between the sutures of the first anchor and those of the second anchor when the moment arrives to tie the knots (after the placement of the second anchor).
To place the second anchor, the arthroscope is maintained posteriorly. The anchor must be positioned near the posterior edge of the lesion. If the lesion is too far posterior, it could be difficult to identify the correct placement; therefore, the assistant will help by reducing arm elevation and internally rotating the limb to expose the exact point in which the anchor should be placed. Alternatively, a grasper can be used from the anterosuperior portal to elevate the posterior edge of the rotator cuff in order to distance it from the field of view and from the point in which we intend to insert the second anchor. Or yet another alternative would be to move the arthroscope to the lateral or anterosuperior portal.
Once the anchor has been placed, we must pass the sutures. We follow the same order: we will pass the most anterior suture through the tissue followed by the most posterior suture.
Since we must work on the posterior rotator cuff, we will utilize the direct retrograde suturing method. Hence, we position the arthroscope in the lateral portal and we use the posterior portal as the operating portal.
We are visualizing the lesion en face. We introduce a grasper in the retrieval (anterosuperior) portal that will help us to elevate the posterior rotator cuff to understand where and how to pass the sutures; a direct retrograde suture passer is inserted into the posterior portal. We use a suture passer with sharp tip, which facilitates passage of the instrument through the tissue, and with a loop at the end, which allows for atraumatic retrieval of the suture. It is important to remember that posterior rotator cuff lesions are often delaminated, so we must remember to include all the layers in the suture (see Chap. 23).
We must pass the first suture in the most central part of the lesion, maintaining a constant distance between the various sutures, as well as between the outermost sutures (anterior and posterior) and the edges of the lesion.
Before proceeding, we use the grasper to reduce the tear and check where we passed the second suture of the first anchor, and we pass the suture passer through the tendon from the bursal to the articular side. If there are additional layers, the grasping forceps will help us to distinguish between them and to pass the suture passer through all the layers. The sharp tip of the suture passer punctures the tendon; we push the suture passer delicately in the rotator cuff with small, semicircular movements of the wrist until we have reached the articular side, and we are able to open its jaws. We direct the pointed tip of the suture passer towards the second anchor. With the grasper, we select the medial limb of the most anterior suture, open the suture passer jaws, retrieve the suture, and then repeat (in inverted order) the same movements of the wrist to enable the suture to pass through the tissue by retrograde passage until it comes out the posterior portal (Fig. 13.6). As we mentioned earlier, it is important to not remove the suture from the anchor eyelet during this step!

After anchor placement, posterior suture is passed using a direct retrograde suture passer through the posterior portal. (a) The suture passer is delicately pushed through the rotator cuff from the bursal to the articular side. (b) The medial limb of the most anterior suture of the posterior anchor is recovered and passed through the tendon
We repeat the same procedure for the second suture, remembering that it has to pass through the area corresponding to the posterior edge of the tear.
As previously highlighted, we close our sutures in accordance with the lines of force of the lesion and following a precise order: from posterior to anterior.
We introduce the suture grasper in the anterosuperior portal and retrieve the two limbs (one at a time) of the most posterior suture. The lesion is posterior, and therefore, it is correct to exert traction from the anterosuperior portal (Fig. 13.7). At this point, the remaining steps include distinguishing between the sutures, evaluating how they slide in the tissue, and selecting the most appropriate knot. After tying the knot, we must cut the two suture limbs with a cutter and proceed to the second suture. Because we are still in the posterior area, we will tie the knot from the anterosuperior portal.

(a) The most posterior sutures are retrieved from the anterosuperior portal. (b) The sutures are tied from the anterosuperior portal, according to the direction of the force vectors
The sutures of the posterior anchor are now tied.
Before proceeding with the sutures of the anterior anchor, we change the position of the arthroscope again because now we must tie the knot of the most anterior sutures. Therefore, we will achieve the best view looking through the posterior portal, but even more importantly, we will be able to use the lateral portal to knot the sutures, thereby respecting the lines of force of the superior portion of the lesion while knotting, from medial to lateral.
The arthroscope is then placed in the posterior portal and the operative cannula in the lateral portal. We must remember to remove the hemostat, which was used to isolate the sutures of the first anchor; we utilize the suture grasper to retrieve the sutures, as described previously.
Once these final sutures are knotted and cut, we move the arthroscope back to the lateral portal, and with the switching stick inserted in the anterosuperior portal, we evaluate the repair.
In summary, we placed the first anchor and passed its sutures; we positioned the second anchor and passed its sutures, and finally, we knotted all the sutures at the end. This method enables us to evenly distribute the tension of the repair on the sutures and anchors.
Thus far, we have only described suture management techniques which involve single-row repair. In reality, there are various techniques, such as double-row and transosseous repair, which can be used for rotator cuff repair. A detailed description of these alternatives is nevertheless beyond the scope of this chapter (see Chap. 23).
To correctly manage the sutures regardless of the repair technique, we need to have an outline in mind, which always includes the following steps:
-
Evaluation of tear size and shape and selection of the most appropriate type of repair.
-
Positioning the anterior and posterior anchors in such a way as to enable the sutures to be properly aligned for the repair selected.
-
Passage of the sutures using the most effective method (direct or indirect) from anterior to posterior.
-
Closure of the sutures according to the tear’s lines of force, from the most posterior to the most anterior suture.
Generally speaking, the outline above can also be applied to larger lesions, which require the use of three anchors. One must consider that some surgeons prefer to utilize a sequence in which the positioning of the anchors precedes suture passage and knotting (outline for two anchors from anterior to posterior: anchors 1–2; sutures 1–4; knots 4–1). We prefer to pass the sutures of each anchor before positioning the subsequent anchor to make the procedure more orderly and to reduce the risk of confusing the sutures of the different anchors (outline for two anchors from anterior to posterior: anchor 1, sutures 1–2; anchor 2, sutures 3–4; knots 4–1).
Side-to-Side Repair
The shape of the lesion influences the type of repair. The objective is always to mobilize the lesion as much as possible and to follow its natural shape in order to execute a repair without tension.
There are various techniques to reduce the tension of a repair. For example, when repairing a tear with a longitudinal component (L or reverse L shaped), it is important to close this component with side-to-side sutures before proceeding to the positioning of the anchors. Furthermore, very large V- or U-shaped lesions can be reduced in size by positioning side-to-side sutures in the most medial area of the lesion to transform them into crescent-shaped lesions; in other words, the objective is to achieve a functional repair which reduces the area of the lesion as much as possible (margin convergence technique). We will describe suture management during a rotator cuff repair with a side-to-side technique.
Imagine repairing an L-shaped rotator cuff lesion of the left shoulder. We will use a retrograde suturing approach. We position the arthroscope in the lateral portal and the operative cannula in the anterosuperior portal. We introduce a right-curved suture hook preloaded with a shuttling monofilament or wire loop in the operative cannula with the left hand and introduce a grasper in the posterior portal with the right hand. We mobilize the anterior edge of the rotator cuff tear with the grasper and identify (with precision) the apex of the tear. The hook must pass through the anterior edge of the tear at its apex.
The hook is maneuvered with small, circular movements of the wrist that augment the curvature of the instrument, allowing it to delicately pass through the depth of the rotator cuff.
Once the tip of the hook has crossed the entire depth of the rotator cuff from the bursal to the articular side, we let the shuttling loop slide. When there is a sufficient amount of the loop in the joint, we retrieve it with the grasper and bring it out through the posterior portal (retrieval portal).
We insert a braided, non-resorbable #2 suture (i.e., FiberWire) in the suture shuttle loop that we will use for the repair.
We remove the hook with delicate rotating movements of the wrist. Once the hook is extracted, we retrieve the suture shuttle.
We introduce the suture grasper in the anterosuperior portal and retrieve the other suture limb. In this way, we have cleared the posterior portal.
Now we must pass the suture in the posterior edge of the cuff tear. The following sequence must be executed: introduce the suture grasper in the anterosuperior portal, mobilize the posterior edge, and identify the apex of the lesion and the point in which we passed the suture on the anterior edge. Next we introduce a direct retrograde suture passer in the posterior portal and pass through the entire depth of the posterior edge of the rotator cuff at a more medial point relative to the passage previously executed on the anterior edge. The stitch will, therefore, have an oblique direction from medial to lateral, from anterior to posterior. This will ensure a repair along the line of force that will be more effective in reducing the tear.
With the help of the suture grasper, we isolate the suture limb that comes out from the articular side of the anterior edge of the lesion and grasp it with the suture passer; extract the suture passer allowing the suture to slide through the posterior edge from the articular side towards the bursal side. We must remember that delamination of the rotator cuff is generally posterior; therefore, we must be careful to pass the suture through all the layers (see Chap. 23).
Before closing the suture, we must understand how to do it; we must always follow the lines of force of the lesion. When repairing an L-shaped lesion, the larger anterior edge will likely be more mobile and will be closed on the posterior edge. Therefore, we can close the suture from the posterior portal. We introduce the suture grasper from the posterior portal and retrieve the anterior suture limb. Now the only remaining steps include distinguishing between the suture strands and knotting the sutures, remembering that the post must be the limb around which the knot is tied (the limb which passes through the tissue that we want to reduce during the knotting). In this case, the post will be the limb that passed in the anterior edge (Fig. 13.8).


The indirect suture passer is used to manage an L-shaped lesion of the left shoulder. (a) A right-curved suture hook preloaded with a monofilament is introduced in the anterosuperior portal and passed through the anterior edge of the tear from the bursal to the articular side. (b) The shuttle loop is retrieved from the posterior portal using a grasper. (c) A high-strength permanent suture is loaded in the shuttle loop. (d) Sutures are retrieved and tied from the posterior portal, according to the direction of the force vectors
If necessary, we can pass other sutures, repeating the same steps until a complete reduction of the lesion is achieved, resulting in a crescent shape, in order to manage the lesion with the anchors and with the least amount of tension.
As seen previously with the anchors, it is important to have a clear objective: reduce the tension. With this goal in mind, the side-to-side sutures will be passed from medial to lateral, from the apex towards the lateral edge of the lesion, and they will be knotted one after the other, giving us the ability to visually evaluate the result obtained each time (outline for two sutures from medial to lateral: suture 1, knot 1; suture 2, knot 2).
Arthroscopic Capsuloplasty (Bankart Repair): Three Anchors Loaded with a Single Suture
Imagine repairing an anteroinferior Bankart lesion of the left shoulder. We will manage the sutures using indirect passages.
Position the arthroscope in the posterior portal, the retrieval cannula in the anterosuperior portal, and the operative cannula in the anterior midglenoid portal.
Through the anterior portal, we position the first anchor in the most distal portion of the anterior edge of the glenoid. The anchor eyelet must be parallel to the edge of the glenoid so the suture will be oriented perpendicularly to the glenoid labrum being repaired. We introduce the suture grasper in the anterosuperior portal and retrieve the anterior suture limb (the limb that is found on the capsulolabral tissue side).
We introduce a left-curved suture hook, held in the right hand, in the operative cannula and execute a reduction and a distal-proximal shift of the capsulolabral tissue using a grasper, held in the left hand, introduced through the retrieval cannula. The assistant, in the meantime, will hold the arthroscope.
We maneuver the suture hook, as explained previously, so that it passes through the capsular tissue and below the glenoid labrum to retighten the shoulder capsule and to bring the glenoid labrum back into place. For a more detailed description, refer to the chapters dedicated to this procedure (Chaps. 15 and 16).
After passing the suture hook, we allow the shuttling loop to slide ahead; we retrieve it with the suture grasper from the anterosuperior portal; we load the suture limb (that we just brought through the same portal) into the suture shuttle loop; we extract the suture hook, retrieve the suture shuttle and, hence, allow the suture to slide through the tissue in retrograde fashion (Fig. 13.9).

Arthroscopic capsulolabral repair using an indirect suture passer. (a) The anterior suture limb of the suture anchor is retrieved through the anterosuperior portal. (b) A left-curved suture hook is passed through the capsular tissue and below the glenoid labrum. (c) The anterior suture limb is loaded in the shuttle loop of the suture hook. (d) Sutures are tied from the anterior midglenoid portal. The knot is tied over the capsular tissue
We have executed a simple suture. If we intend, rather, to pass mattress sutures, we must orient the anchor eyelet so that it is perpendicular to the anterior edge of the glenoid. The suture will then be parallel to the glenoid labrum. In this case, after passing the most distal suture limb, we retrieve the other limb of the same strand from the anterosuperior portal and repeat the same steps, being careful to pass the proximal limb 3–4 mm superior to the distal limb.
After all the sutures of the first anchor have been passed, the only remaining step is to knot the sutures from the anteroinferior portal.
Once the sutures have been tied and cut, we introduce a switching stick in the anterosuperior portal to test the strength of the sutures and the result obtained.
Unlike what was seen in the rotator cuff repairs, the sutures are knotted each time before implanting thesubsequent anchor. The subsequent anchors will be placed proximal to the first and the sutures will be managed in the same way.
Suture management during a Bankart repair establishes the following sequence: (outline for three anchors from distal to proximal: anchor 1, suture 1, knot 1; anchor 2, suture 2, knot 2; anchor 3, suture 3, knot 3).
Various surgical techniques and different types of anchors are utilized for this operation. If we decide to use knotless anchors, the suture management process would not change. In this case, we would pass the suture through the tissue first, like we have seen, and then we would implant the anchor.
Author information
Authors and Affiliations
Corresponding author
Editor information
Editors and Affiliations
Rights and permissions
Copyright information
© 2014 Springer-Verlag London
About this chapter
Cite this chapter
Saccomanno, M.F., Bartoli, M., Milano, G. (2014). Arthroscopic Suture Management. In: Milano, G., Grasso, A. (eds) Shoulder Arthroscopy. Springer, London. https://doi.org/10.1007/978-1-4471-5427-3_13
Download citation
DOI: https://doi.org/10.1007/978-1-4471-5427-3_13
Published:
Publisher Name: Springer, London
Print ISBN: 978-1-4471-5426-6
Online ISBN: 978-1-4471-5427-3
eBook Packages: MedicineMedicine (R0)