
Abstract
Laparoscopic distal gastrectomy is increasingly implemented worldwide according to the positive outcomes of some randomized studies. In terms of reconstruction, several methods have been attempted such as Billroth-I, Billroth II, or Roux-en-Y. Each method has pros and cons, and probably decisions are made according to the individual patient’s conditions, surgeon’s preference, or regional trends. Advantages of Billroth-I are simplicity, save of time, and physiologicalpassage of foods. In general, localized tumors at the antrum or lower stomachStomach body seem to be suitable candidates. As an intracorporeal Billroth-I reconstruction, delta-shapedDelta-shaped anastomosisAnastomosis only using a linear staplerLinear stapler is broadly accepted, which was originated from the concept of functional end-to-end anastomosis. Moreover, in our modified method, the duodenal stump is completely resected with a planned twice stapling when closing the entry hole, which may lead to no concern about ischemic area at the duodenum.
Access provided by Autonomous University of Puebla. Download chapter PDF
Keywords
- Gastric cancer
- Gastrectomy
- Laparoscopic gastrectomy
- Anastomosis
- Lymphadenectomy
- Billroth I
- Delta-shaped anastomosis
35.1 Introduction
Laparoscopic distal gastrectomy is increasingly implemented worldwide according to the positive outcomes of some randomized studies. In terms of reconstruction, several methods have been attempted such as Billroth-I, Billroth-II, or Roux-en-Y. Each method has pros and cons, and probably decisions are made according to the individual patient’s conditions, surgeon’s preference, or regional trends. Advantages of Billroth-I are simplicity, save of time, and physiological passage of foods. In our center, we choose Billroth-I when meeting the following criteria; (i) large enough size of a remnant stomach, (ii) no duodenal invasion, and (iii) no reflux esophagitis or hiatus hernia. Therefore, in general, localized tumors at the antrum or lower stomach body seem to be suitable candidates. As an intracorporeal Billroth-I reconstruction, delta-shaped anastomosis only using a linear stapler is broadly accepted [1], which was originated from the concept of functional end-to-end anastomosis.
35.2 Description of the Surgical Technique (See Video 35.1)
The key steps to perform a Billroth I Delta-shaped anastomosis are:
-
1.
Port placement and patient’s position
The patient is positioned in supine and legs apart with head-up tilt. Five ports are used and the operator stands at the right side of the patient (Fig. 35.1). The first assistant stands at the left side of the patient and the camera assistant between the legs (Fig. 35.2). Lateral segment of the liver should be retracted in either method to attain sufficient operative space (Fig. 35.3).

Placement of ports. Close (a) and schematic view (b)

Position of patient and surgical team (a, b)

Liver retraction
Technical steps
-
2.
Transection of the duodenum
After infrapyloric lymphadenectomy, dissection of the station No. 6 according to the Japanese Classification [2], the duodenal bulb is skeletonized for consequent transection. Therefore, the duodenum should be normally divided just beneath the pyloric ring in anterior–posterior direction as much as possible using a 60-mm linear stapler advanced from a left lower port.
-
3.
Resection of the stomach
After suprapancreatic and lesser curvature site lymphadenectomy (No. 1 and No. 3), the stomach is resected. If the tumor is invisible from the serosal surface, intraoperative peroral endoscopy is employed to confirm the tumor location. Recently, indocyanine green (ICG) injection is also conducted for this purpose. Resection line should be dyed on the stomach wall (Fig. 35.4), and usually requiring twice firing of a 60-mm stapler (Fig. 35.5). The resected specimen is placed in an extraction bag.

Gastric resection line dyed. Close (a) and schematic view (b)

Stomach is divided by linear stapler. Close (a, b) and schematic view (c)
-
4.
Testing the tension
After resection of the stomach, simulation should be done to test whether the tension is adequate between the remnant stomach and the duodenum. Both the remnant stomach and the duodenum stump are moved medially to be overlapped (Fig. 35.6). If the tension seems too tight, relevant adhesion should be lysed or switch to another method should be considered.

After resection of the stomach, simulation should be done to test whether the tension is adequate between the remnant stomach and the duodenum
-
5.
Creating entry holes for stapler insertion
First, the edge at the greater curvature site of the stomach stump is hold by forceps to be cut in 1 cm in length, being adjusted for stapler’s caliber (Fig. 35.7). A suction device is put into the remnant stomach through this hole to withdraw contents. Then, the edge of the posterior side of the duodenal stump is held to be cut in a similar way (Fig. 35.8).

Opening in the gastric stump. Close (a) and schematic view (b)

Opening in the duodenal stump. Close (a) and schematic view (b)
-
6.
Gastroduodenostomy using a linear stapler
A 45-mm stapler is introduced from the left lower port and a cartridge site is inserted into the stomach (Fig. 35.9). The stapler is temporarily clamped at the posterior wall site and moved toward the duodenal stump. The duodenal stump is grasped by forceps to be lifted up and moved a little medially. Temporary clamp is released and an anvil fork of the stapler is gently inserted into the duodenum (Fig. 35.10). The remnant stomach is a slightly twisted to keep a certain distance between the stomach stump and the anastomotic line aiming no ischemic area. Regarding the duodenum, such a twisting is not required because the stump will be resected together when closing the common entry hole by stapler. After verifying that both intestinal walls are fastened in 40–45 mm in length with no gap, the stapler can be fired (Fig. 35.11). After removal of the stapler, hemostasis on the staple line should be proved using the suction device.

A 45-mm stapler is introduced from the left lower port and a cartridge site is inserted into the stomach. Close (a) and schematic view (b)

The other cartridge site is introduced into the duodenum. Close (a) and schematic view (b)

The stapler can be fired
-
7.
Closure of the common entry hole
Using a 3-0 suture material, three or four stay sutures are placed in advance. These sutures should be stitched at the stomach and duodenal walls to expand a V-shape of the anastomotic stapling line (Fig. 35.12). Closure of the entry hole is made by twice firing of linear staplers. As a first stapling, the 45-mm stapler is used. Only 30-mm length is utilized very close to the edge of the hole to avoid anastomotic stricture. Stretching the entry hole in straight line by retracting the stay sutures is mandatory. As a second stapling, the 60-mm stapler is used. In this stapling, the duodenal stump is resected at the same time so that the operator should control the position of it. The stapler must be clamped and released several times to find the best stapling position (Fig. 35.13).

Using a 3-0 suture material, three or four stay sutures are placed in advance. These sutures should be stitched at the stomach and duodenal walls to expand a V-shape of the anastomotic stapling line. Close (a, b) and schematic view (c)

Closure of the entry hole is made by twice firing of linear staplers. As the first stapling, the 45-mm stapler is used. Only 30-mm length is utilized very close to the edge of the hole to avoid anastomotic stricture. Close (a) and schematic view (b)
-
8.
After finishing the anastomosis, a nasogastric tube is introduced into the stomach and air-tight test is employed to confirm the integrity (Fig. 35.14).
Fig. 35.14 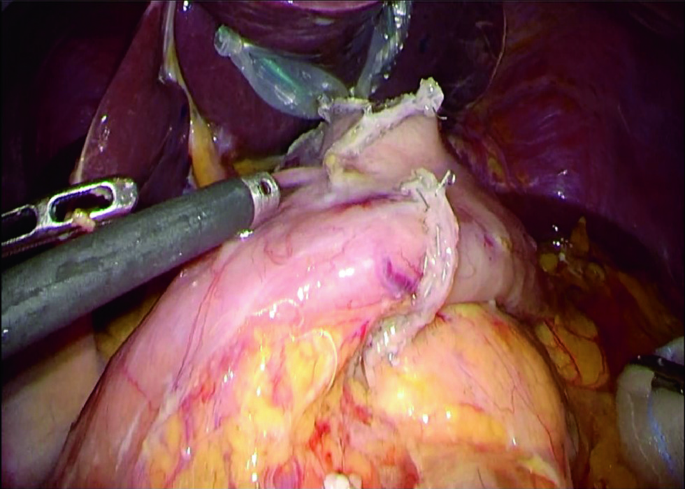
Final aspect of the anastomosis

References
Kanaya S, Gomi T, Momoi H, et al. Delta-shaped anastomosis in totally laparoscopic Billroth I gastrectomy: new technique of intraabdominal gastroduodenostomy. J Am Coll Surg. 2002;195:284–7.
Japanese Gastric Cancer Association. Japanese classification of gastric carcinoma: 3rd English edition. Gastric Cancer. 2011;14(2):101–12.
Author information
Authors and Affiliations
Corresponding author
Editor information
Editors and Affiliations
35.1 Electronic supplementary material
Below is the link to the electronic supplementary material.
Laparoscopic Billroht I with Delta anastomosis
Rights and permissions
Copyright information
© 2021 Springer Nature Switzerland AG
About this chapter

Cite this chapter
Kinoshita, T. (2021). Modified Billroth-I Delta-Shaped Anastomosis After Distal Gastrectomy. In: Asunción Acosta, M., Cuesta, M.A., Bruna, M. (eds) Atlas of Minimally Invasive Techniques in Upper Gastrointestinal Surgery. Springer, Cham. https://doi.org/10.1007/978-3-030-55176-6_35
Download citation
DOI: https://doi.org/10.1007/978-3-030-55176-6_35
Published:
Publisher Name: Springer, Cham
Print ISBN: 978-3-030-55175-9
Online ISBN: 978-3-030-55176-6
eBook Packages: MedicineMedicine (R0)