
Abstract
Xenograft mouse models have been instrumental in expanding our knowledge of hematopoiesis and can provide a functional description of stem cells that possess engrafting potential. Here we describe methodology outlining one way of analyzing human malignant cells that are able to engraft immune compromised mice. Using models such as these will allow researchers to gain valuable insight into the primitive leukemic subtypes that evade current therapy regimes and are critical to understand, in order to eradicate malignancy.
Access provided by CONRICYT – Journals CONACYT. Download protocol PDF
Key words
1 Introduction
Although in vitro techniques have been important for investigating leukemic stem cells, these approaches are limited when investigating microenvironment cellular interactions, oxygen sensitivities, and how drugs affect leukemic cell viability on a pharmacokinetic and pharmacodynamic level. Immune deficient mice, however, can provide more comprehensive environmental conditions to study both hematopoietic and leukemic stem cell biology [1–4]. Multiple strains of mice are currently available with various genetic differences and the individual researcher will need to determine what strain will be optimal as a readout for the question being investigated. NOD.Cg-Prkdcscid IL2rgtm1Wjl/SzJ (NSG) and NOD.Cg-PRKdcscid/IL2rgtmlSug/Jic (NOG) mice are commonly integrated into xenograft models to elucidate stem cell function [5].
Chronic myeloid leukemia (CML) is a clonal disorder that results in the overproduction of myeloid cells in peripheral blood [6]. This disease arises from the reciprocal translocation of chromosomes 9 and 22, resulting in the Philadelphia chromosome (Ph+). The resulting chimeric oncogene Bcr-Abl encodes a constitutively active tyrosine kinase, which is directly responsible for the malignancy that develops. Xenograft models of chronic myeloid leukemia offer valuable insight; however, also possess particular challenges, as CML patient samples contain normal as well as malignant stem cells. Importantly during the expansion of transplanted leukemic clones, CML xenograft mice lack clinical signs of disease (elevated white cell counts, splenomegaly , hepatomegaly, and weight loss) [6], as observed with other leukemic models such as AML [7]. Individual CML patient samples also possess engrafting potential unique to the sample, highlighting (1) interpatient heterogeneity and (2) interspecies barriers that still remain despite large improvements in the development of immunodeficient mice. Engraftment of patient cells does not indicate the confirmation of leukemic cells due to contaminating normal cells that reside in primary samples; it is therefore imperative to confirm the leukemic (Ph+) status (e.g., fluorescence in situ hybridization (FISH) ) of the resulting cells.
2 Materials
2.1 Solutions and Equipment
-
1.
Serum-free media: (SFM) Iscove modified Dulbecco medium (Sigma-Aldrich) supplemented with (1/5 dilution) BIT9500 (a serum substitute containing bovine serum albumin/insulin/transferrin, StemCell Technologies), 2 mM l-glutamine, 105 units/mL penicillin, 100 mg/mL streptomycin, 0.1 mM 2-mercaptoethanol, and 0.8 μg/mL low-density lipoprotein (all from Sigma-Aldrich). To culture cells, a growth factor cocktail of 0.20 ng/mL recombinant human (rh) stem cell factor, 1 ng/mL rh IL-6, 0.20 ng/mL rh granulocyte colony-stimulating factor (GM-CSF) (Chugai Pharma Europe), 0.05 ng/mL LIF, 0.2 ng/mL MIPα (all from StemCell Technologies except where indicated) is additionally added.
-
2.
Red blood (RBC) Lysis Buffer: A 1× solution can be prepared as follows; dissolve ammonium acetate (8.02 g), potassium bicarbonate (1 g), EDTA (0.02 g) in 1 L of double distilled (dd) water. This solution can be kept at 4 °C. Filter prior to use.
-
3.
2 % fetal calf serum/phosphate buffered solution (2 % FCS-PBS). Filter prior to use and always keep chilled (on ice).
-
4.
Fc block solution: Dilute rat anti-mouse CD16/32 antibody (1/500) and add 10 μL per reaction.
2.2 For FISH Analyses
-
1.
DAPI (4′,6-diamidine-2′-phenylindole dihydrochloride ): A 1000× frozen stock solution can be prepared as follows; 1 mg/mL in double-distilled (dd) water. Store as 10 μL aliquots.
-
2.
0.75 M KCl stock solution (dilute 1:10 prior to use). Store at 4 °C.
-
3.
Fixative (three parts methanol to one part acetic acid, which is to be prepared on the day of use).
-
4.
Poly-l-lysine stock (dilute 1:10) use to coat multispot slides prior to addition of cells.
-
5.
Multispot slides.
-
6.
Positive and negative control cells (can use K562/HL-60 or mononuclear cells).
-
7.
20× SSC stock buffer (UltraPure™ SSC, 20×, Catalog number: 15557-036 Invitrogen).
-
8.
Wash 1: 0.4× SSC/0.3 % Tergitol-type NP-40 (NP-40) at pH 7.
-
9.
Wash 2: 2× SSC + 1 % NP-40 buffer at pH 7.
-
10.
2× SSC at pH 7.
-
11.
FISH probe (Vysis LSI BCR/ABL Dual Color, Dual Fusion Translocation Probe—CE Marked, Part Number: 08L10-001).
-
12.
Rubber cement, slide covers, humidifier box, DAPI and mounting medium, nail polish.
-
13.
Thermo Scientific™ Hybaid OmniSlide Thermal Cycler System or similar instrument capable of heating slides within a controlled humidity chamber.
-
14.
Waterbath.
3 Methods
3.1 Determination of Engraftment Capability and Ph Status of Individual Patient Samples
Our laboratory implements female NOD.Cg-Prkdcscid IL2rgtm1Wjl/SzJ (NSG) mice with success; however, mice with similarly (or more) diminished levels of immunity can be chosen as appropriate. We and others have observed significantly different engrafting levels using males versus females [8].
Individual CML samples will possess differing levels of engraftment within NSG mice and these cells in turn will have varying levels of both Ph+ and Ph− cells at the end of the 16-week procedure. Prior to the start of the experiment, an assessment of each CML sample to be used must be individually evaluated to establish if the sample is capable of sufficient Ph+ engraftment levels post-treatment (see Note 1 ).
3.2 In Vitro or In Vivo Treatment of Human CML Primary Cells
Culture primary cells (fresh or previously frozen) that have been CD34+ selected, in SFM with appropriate growth factors, using a seeding density of ~1 million/mL. Treat cells as per desired condition (drugs, shRNA constructs, etc.) and culture <48 h, as prolonged culturing time lowers final levels of cell engraftment. Alternatively, NSG mice can be administered drug directly; maximum tolerated doses can be determined on nontransplanted irradiated mice prior to final experiment. Prior to transplant, wash cells twice (centrifuge 300 × g/5 min room temperature (RT)) in 2–3 mL 2 % FCS-PBS solution and keep on ice until transplant.
3.3 Irradiation and Transplantation of Primary Cells into NSG Mice
Typically 8-10-week-old mice are used, sublethally irradiated once at 225 cGy (this dosage will need to be empirically determined as irradiators vary from institute to institute). Within 24 h transplant mice via tail vein injection with washed CML cells in a volume of 100 μL using an insulin syringe (1 cc 27G 5/8″). Prepare cells in order to inject approximately two million cells per mouse (see Note 2 ).
After transplantation, mice should be maintained under defined sterile conditions developed for NOD/SCID mice experiments. Mice should receive drinking water containing antibiotics such as Baytril (2.5 % solution, which is subsequently diluted 1/250 in water) to inhibit infections as a result of the further dampening of immunity of the NSG mice from radiation. Daily monitoring and health checks are highly recommended during the 2 weeks after transplantation, as the mice are extremely sensitive during this period. If mice are mildly suffering with shortness of breath or appear less active, transfer mice to a heating pad and provide gel food.
3.4 Monitoring Engraftment over 16 Weeks
-
1.
In order to track engraftment over the course of the experiment, peripheral blood (PB) can be collected at 8, 12, and 16 weeks (1 day prior to final sacrifice) (see Note 3 ). Approximately 10–50 μL blood samples can be collected from mice via tail vein, collected in EDTA -containing blood tubes (see Note 4 ).
-
2.
To prepare blood samples, add 10–50 μL blood to 2 mL RBC lysis buffer (as described earlier) into flow cytometer tubes.
-
3.
Incubate on ice 10 min.
-
4.
Add 1–2 mL PBS to quench reaction.
-
5.
Centrifuge 400 × g/5 min/4 °C. Complete lysis is imperative for flow cytometry analyses; if centrifuged pellet remains bright red, add an additional 2 mL of RBC lysis buffer and repeat step 3–5.
-
6.
Remove supernatant leaving approximately 50 μL remaining and keep samples on ice. Add 10 μL of Fc block solution (see Note 5 ) and incubate for 5 min. Add prepared master mix containing human CD45 and mouse CD45 antibodies and separate samples for isotype and single color controls for flow cytometry analyses. Incubate 40 min on ice, covered under dark conditions.
-
7.
Dilute DAPI in 2 % FCS-PBS solution, taking care to minimize light exposure. Add 1–2 mL of DAPI-2 % FCS-PBS solution to all samples except controls (include a DAPI-only control, for flow cytometry compensation) (see Note 6 ). To all other controls (isotype controls, human CD45, mouse CD45) add 2 % FCS-PBS. Centrifuge 400 × g/5 min at 4 °C. Remove supernatant leaving approximately 50 μL remaining in tube. Add approximately 300 μL diluted DAPI-2 % FCS-PBS solution (4 °C) to samples and 2 % FCS-PBS solution to controls. Keep all tubes covered, in dark until analyzed (Fig. 1).
Fig. 1 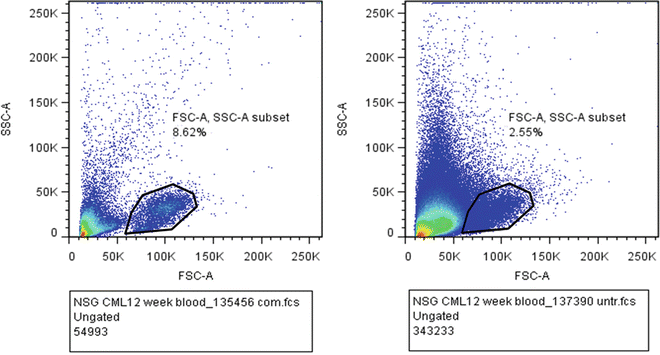
Flow cytometer dot plot of blood samples taken 12 weeks post engraftment . Gated population indicates human CML cells from a sample with complete RBC lysis (a) in contrast to a partially lysed sample (b)

3.5 Sacrificing Mice Harvesting Blood, Bone Marrow, and Spleen
-
1.
To analyze engraftment at the end of 16 weeks, mice are euthanized (with blood sample being taken the day before) and femurs, tibiae, and spleens are harvested and put into PBS until cell extraction.
-
2.
Bone marrow harvest: In a large mortar, pipette 10 mL 2 % FCS-PBS. Clean femurs and tibiae thoroughly removing all connective tissue possible, putting cleaned bones into 2 % FCS-PBS in mortar. Using pestle, crush bones with an up and down motion (avoid vigorous grinding using circular motions) to carefully break bones releasing bone marrow (see Note 7 ). Place a sterile 40 μm cell strainer in a 50 mL polypropylene conical bottom tube and pipette liquid contents from mortar through strainer. Re-add 10 mL of 2 % FCS-PBS to bone remnants and gently crush using an up and down motion again briefly. Pipette remaining contents through strainer, and keep cell suspension on ice.
-
3.
Spleen cell harvest: In a petri dish place 40 μm cell strainer with 10 mL of 2 % FCS-PBS. Gently push spleen through strainer with the rubber end of a 5 mL syringe . Homogenize gently and collect strained cell suspension into a 50 mL polypropylene conical bottom tube and place on ice.
-
4.
Depending on how many events are required to collect, pipette approximately 1–2 mL of bone marrow sample and 0.5 mL of spleen sample into separate flow cytometry tubes. Use untreated samples for all single color controls for flow cytometry compensation and fluorescence minus one (FMO) controls in order to determine gating boundaries. Centrifuge 400 × g/5 min/4 °C. Remove supernatant and place samples on ice. Add 10 μL of Fc block solution and incubate 5 min. Prepare antibody master mix with chosen antibodies, reflecting the hemopoietic subsets desired to be stained and analyzed (see Table 1* as an example) and add to each sample (amounts will depend on antibody titrations of each). Add single and FMO antibodies mixes accordingly. Incubate 40 min on ice, covered under dark conditions.
Table 1 Possible list of hemopoietic markers to use -
5.
Dilute DAPI in 2 % FCS-PBS solution taking care to minimize light exposure. Add 1–2 mL to all samples except controls (include a DAPI-only control, for flow cytometry compensation). To all other controls add 2 % FCS-PBS. Centrifuge 400 × g/5 min at 4 °C. Remove supernatant leaving approximately 50 μL remaining. Add approximately 300 μL diluted DAPI solution (4 °C) to samples and 2 % FCS-PBS solution (4 °C) to control samples. Filter samples using a cell strainer prior to reading on flow cytometer (see Note 8 ). Keep samples covered in dark, until analyzed (Fig. 2).
Fig. 2 
Representative flow cytometry dot plot of bone marrow sample taken 16 weeks post engraftment stained with human CD45 and CD19 (plot has been gated on the (mouse) CD45− population)

3.6 FACS of CD45 Cells for FISH Analysis
-
1.
Pipette approximately 2–3 mL (volume will be dependent on engraftment levels) of bone marrow sample into FACS tubes. Use untreated samples for all single color and isotype controls for flow cytometry compensation. Centrifuge 400 × g/5 min at 4 °C. Remove supernatant leaving approximately 100 μL remaining. Add 10 μL of Fc block solution and incubate for 5 min on ice. Add prepared master mix containing human CD45 and mouse CD45 antibodies and prepare controls accordingly. Incubate 40 min on ice, covered under dark conditions. After incubation, add 1–2 mL 2 % FCS-PBS solution and centrifuge 400 × g/5 min/4 °C. Remove supernatant leaving approximately 100 μL remaining. Add approximately 200–300 μL 2 % FCS-PBS solution and proceed to cell sort human CD45+ cells and ideally collect between 104 and 106 cells. Wash by adding 2 % FCS-PBS and centrifuging 400 × g/5 min/4 °C. Proceed to fixation.
3.7 FISH Fixation
-
1.
Prepare 1× hypotonic solution (dilute 0.75 M KCl stock 1:10 in dd water). Pre-warm to 37 °C.
-
2.
If there are less than 104 cells, it may better to fix cells directly to slides, as subsequent staining and washing steps lead to fewer cell numbers (see Note 9 ). Centrifuge cells 400 × g/5 min/RT, in a 1.5 mL microcentrifuge tube and discard supernatant.
-
3.
Add 1 mL prewarmed hypotonic solution and incubate for 20 min at 37 °C.
-
4.
Centrifuge 400 × g/5 min/RT.
-
5.
Remove supernatant and loosen pellet by gently flicking tube.
-
6.
Add 1 mL freshly made fixative , dropwise while continually vortexing to avoid cell clumping. Incubate at RT for 5 min.
-
7.
Centrifuge 16,000 × g/5 min/RT.
-
8.
Remove supernatant and add 1 mL fresh fixative and incubate for a further 5 min.
-
9.
Centrifuge 16,000 × g/5 min/RT, repeat steps 7–9 once more.
-
10.
Finally resuspend cell pellet with 1 mL fixative. Cells can be stored at minus 20 °C until ready to proceed to hybridize cells with FISH probes . Can stop here.
-
11.
Centrifuge cells 16,000 × g/2 min/RT. Discard supernatant and resuspend cells in a volume of fresh fixative (volume will depend on total number of cells). Aim to dispense 5 μL per sample.
-
12.
Using multispot slides, gently pipette 5 μL cell suspension onto each spot. Check cell density to ensure there are sufficient cells in field of view without overcrowding, using 10× magnification on a phase contrast microscope. Add or remove cells as required.
-
13.
Apply controls to one slide.
-
14.
Allow to air dry.
3.8 FISH Hybridization
-
1.
Place slides on Hybaid OmniSlide hot-block preset at 65 °C and leave for 10 min.
-
2.
Prepare probe using manufacturer’s instructions and hybridization buffer supplied with probe. Dilute 1 μL probe: 10 μL hybridization buffer.
-
3.
To each well, pipette 2–3 μL probe mix and cover with glass coverslip. Seal edges with rubber glue.
-
4.
Place slide on slide hot-block and heat at 72 °C for 2–5 min (to hybridize), followed by 37 °C overnight.
-
5.
Preheat waterbath to 75 °C with a Coplin jar containing Wash 1 (0.4× SSC-0.3 % NP-40). Heat solution to 72 °C and verify directly checking with thermometer.
-
6.
Remove slides from Hybaid OmniSlide and gently remove rubber seal using tweezers, without disturbing coverslip.
-
7.
Place slides in a second Coplin jar containing 2× SSC for 10–20 s and gently remove coverslip. If coverslip cannot be easily removed, repeat dipping slides in 2× SSC until coverslip is easily removable.
-
8.
Place slides without coverslip into Coplin jar with Wash 1 preheated to 72 °C and incubate for 2 min.
-
9.
Place slides in Coplin jar containing Wash 2 (2× SSC -1 % NP-40) for 2 min.
-
10.
Pipette 10–20 μL mounting media containing DAPI onto coverslip. Invert slides over the cover slip to pick it up, and allow mount to spread onto slide; works better if slides are not completely dry.
-
11.
Gently dab sides of slide to remove excess mount and visualize using a fluorescent microscope.
4 Notes
-
1.
Our laboratory has observed engraftment levels of 0–20 % and Ph+ percentages ranging from 0 to 90 %.
-
2.
Alternatively mice can be transplanted with CML cells intrafemorally; this method requires fewer CML cells.
-
3.
Engraftment levels of progenitor cells have been documented to decrease in percentages to near undetectable levels over 12 weeks, with more primitive subsets increasing or slightly decreasing. At the end of 16 weeks the human cells that remain will be a mixture of the most primitive and progenitors produced from these cells [9].
-
4.
Alternatively engraftment can be monitored by taking bone marrow aspirate samples at the indicated time points.
-
5.
The Fc block solution prevents nonspecific binding of Fc receptor expressing cells, minimizing nonspecific binding of antibodies used for subsequent flow cytometry steps.
-
6.
DAPI is used in this part of the protocol as an exclusion marker for dead cells in flow analyses. Alternative markers for dead cells can be used accordingly.
-
7.
Our laboratory crushes bone marrow as opposed to flushing bones using small needles. There are advantages and disadvantages to each method and should be decided upon based on desired output of experiment.
-
8.
It is advised to thoroughly clean flow cytometry machine before and after use; mouse cells are extremely adherent and block cytometry tubing. Engraftment percentages of human CML cells are very low and so contaminated, blocked lines may have significant effects on flow cytometry profiles of small subpopulations.
-
9.
Fixing cells directly onto multispot slides:
-
(a)
Centrifuge <104 cells in 1.5 mL microfuge tube and resuspend in 20 μL 1× hypotonic solution. Flick tube to mix.
-
(b)
Incubate cells at 37 °C/15 min.
-
(c)
To each tube add 5 μL of fresh fixative . Mix well and incubate at RT/5 min.
-
(d)
Pipette entire contents of each tube onto multispot slides. Check cell density to ensure there are sufficient cells in field of view without overcrowding, using 10× magnification on a phase contrast microscope. Add or remove cells as required.
-
(e)
Apply controls to one slide.
-
(f)
Leave cells to adhere to slide for ~20 min (can leave overnight).
-
(g)
Add 10 μL fresh fixative to each well. Allow to dry out at RT.
-
(h)
Add an additional 25 μL fixative to wells and allow to dry out at RT.
-
(i)
Incubate multispot slide in Coplin jar containing fixative for 10 min.
-
(j)
Decant off fixative and replace with fresh fixative. Repeat.
-
(k)
Remove slide and allow to air dry.
-
(l)
Wrap slide in parafilm and store at −20 °C until able to proceed to probe hybridization step.
-
(a)
References
Kamel-Reid S, Letarte M, Sirard C, Doedens M, Grunberger T, Fulop G, Freedman MH, Phillips RA, Dick JE (1989) A model of human acute lymphoblastic leukemia in immune-deficient SCID mice. Science 246:1597–1600
Lapidot T, Sirard C, Vormoor J, Murdoch B, Hoang T, Caceres-Cortes J, Minden M, Paterson B, Caligiuri MA, Dick JE (1994) A cell initiating human acute myeloid leukaemia after transplantation into SCID mice. Nature 367:645–648
Bonnet D, Dick JE (1997) Human acute myeloid leukemia is organized as a hierarchy that originates from a primitive hematopoietic cell. Nat Med 3:730–737
Doulatov S, Notta F, Laurenti E, Dick JE (2012) Hematopoiesis: a human perspective. Cell Stem Cell 10:120–136
Goyama S, Wunderlich M, Mulloy JC (2015) Xenograft models for normal and malignant stem cells. Blood 125:2630–2640
Eisterer W, Jiang X, Christ O, Glimm H, Lee KH, Pang E, Lambie K, Shaw G, Holyoake TL, Petzer AL, Auewarakul C, Barnett MJ, Eaves CJ, Eaves AC (2005) Different subsets of primary chronic myeloid leukemia stem cells engraft immunodeficient mice and produce a model of the human disease. Leukemia 19:435–441
Ailles LE, Gerhard B, Kawagoe H, Hogge DE (1999) Growth characteristics of acute myelogenous leukemia progenitors that initiate malignant hematopoiesis in nonobese diabetic/severe combined immunodeficient mice. Blood 94:1761–1772
Notta F, Doulatov S, Dick JE (2010) Engraftment of human hematopoietic stem cells is more efficient in female NOD/SCID/IL-2Rgc-null recipients. Blood 115:3704–3707
Zhang B, Strauss AC, Chu S, Li M, Ho Y, Shiang KD, Snyder DS, Huettner CS, Shultz L, Holyoake T, Bhatia R (2010) Effective targeting of quiescent chronic myelogenous leukemia stem cells by histone deacetylase inhibitors in combination with imatinib mesylate. Cancer Cell 17:427–442
Author information
Authors and Affiliations
Corresponding author
Editor information
Editors and Affiliations
Rights and permissions
Copyright information
© 2016 Springer Science+Business Media New York
About this protocol
Cite this protocol
Abraham, S.A. (2016). Biological Analysis of Human CML Stem Cells; Xenograft Model of Chronic Phase Human Chronic Myeloid Leukemia. In: Li, S., Zhang, H. (eds) Chronic Myeloid Leukemia. Methods in Molecular Biology, vol 1465. Humana Press, New York, NY. https://doi.org/10.1007/978-1-4939-4011-0_15
Download citation
DOI: https://doi.org/10.1007/978-1-4939-4011-0_15
Published:
Publisher Name: Humana Press, New York, NY
Print ISBN: 978-1-4939-4009-7
Online ISBN: 978-1-4939-4011-0
eBook Packages: Springer Protocols